
On this page
Start here
Quick answer
If an American Standard toilet keeps running, first watch whether water is leaking past the flapper into the bowl or whether the tank never stops refilling. Check that the flapper sits flat, the chain or trip lever is not holding it open, and the tank water reaches the exact model's fill mark without rising into the overflow. American Standard uses different flapper, flush-valve, and water-control designs, so use the model-specific instructions before adjusting a float or replacing a seal. If the stop valve will not shut off, the tank or valve is cracked, water is uncontrolled, or the correct mechanism cannot be identified, stop using the toilet and arrange qualified plumbing service.
Before you begin
Safety first
- Do not repeatedly flush a rising bowl, work on a pressurized valve assembly, force a seized shutoff or flapper, use sharp tools on the seal, or continue operating after a crack, leak, overflow, or uncontrolled water condition.
Work through in order
Diagnostic checks
Use only checks that match the exact appliance or system and its official guide.
-
Check 1
Remove the tank lid and observe the toilet for a complete refill cycle without touching the mechanism. Look into the bowl for a ripple or trickle, listen for water entering the tank, and note whether the water stops below the model's fill reference or rises toward the overflow tube.
Expected result: Water ripples in the bowl, the tank refills continuously, the level rises into the overflow, or the bowl is quiet and the tank reaches its normal level.
Next step: Keep the tank lid off only while observing safely. If water approaches the overflow, turn off the toilet supply and stop testing; otherwise continue with the flapper, linkage, and fill-valve checks.
Why this matters
Why: A bowl ripple suggests water is escaping past a flapper or flush-valve seal. A rising tank points toward a fill-valve or water-control problem, while a normal level with unexplained noise may involve a refill-tube or adjustment issue.
-
Check 2
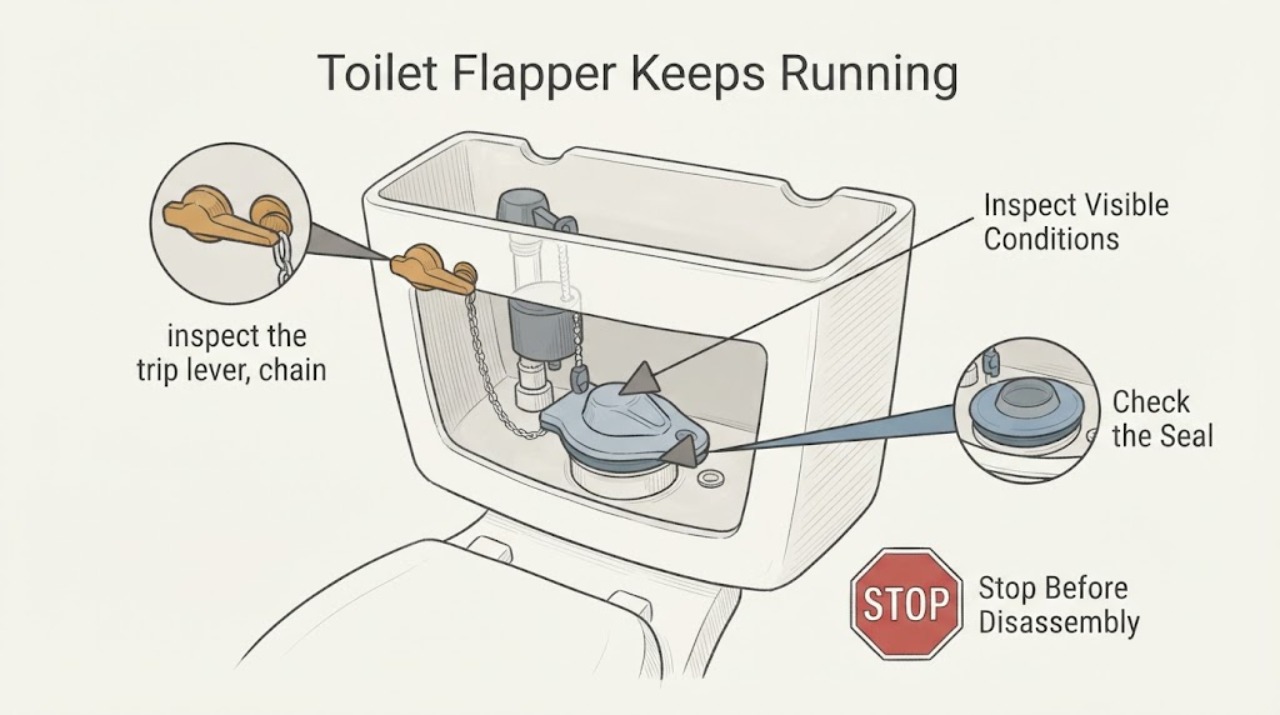
Check the flapper and flush-valve seal from above for a warped edge, crack, mineral buildup, debris on the seat, or a seal that does not sit flat. Do not scrape the sealing surface with a sharp tool or reach into a moving flush mechanism.
Expected result: The seal has visible damage or debris, it rocks or fails to seat, water continues to pass into the bowl, or it appears intact and dry between flushes.
Next step: If debris is accessible without force, follow the exact model instructions for cleaning. For a damaged, seized, or model-specific seal, shut off and drain the tank before any permitted replacement and do not install a generic part by appearance.
Why this matters
Why: A flapper or seal that cannot close allows a continuous leak into the bowl, which makes the fill valve run to replace lost tank water. A dry, well-seated seal makes linkage, water-control, overflow, or another valve issue more likely.
-
Check 3
With the water supply off, inspect the trip lever, chain, float, and flapper connection. Check whether the chain is caught, too tight, disconnected, or too slack to lift the flapper; verify that the handle returns freely and is not holding the flapper open.
Expected result: The lever binds, the chain holds the flapper open, the connection is detached, the flapper closes when the handle is released, or the linkage appears correct.
Next step: Route or reconnect the linkage only as the model manual shows, leaving enough movement for the flapper to seal. Restore water and retest once; arrange service if the lever or mounting is damaged or seized.
Why this matters
Why: A trip or chain problem can keep the seal from seating and cause running even when the rubber or silicone seal is undamaged. Linkage that works normally shifts attention to the seal, water-control valve, or overflow level.
-
Check 4
Check the tank water after it refills against the fill mark or overflow-tube reference in the exact American Standard instructions. Observe whether water is entering the overflow tube, whether the fill valve shuts off cleanly, and whether the refill tube is positioned as the model requires.
Expected result: The level is too high, the fill valve never shuts off, water flows into the overflow, or the level stops normally and the overflow stays quiet.
Next step: Use only the model's water-level adjustment. If the valve continues running, the overflow receives water, or the adjustment cannot hold, shut off the supply and arrange plumbing service rather than bending or replacing parts by guesswork.
Why this matters
Why: A high level or water-control valve that does not shut off can make the toilet run even when the flapper seals. A normal level and quiet overflow make a bowl leak through the flapper or flush valve more likely.
-
Check 5
If the tank is not overfilling and the flapper linkage is free, add a small amount of food-safe coloring to the tank only if the exact toilet instructions allow it, then wait without flushing and watch the bowl for color. Do not use this test if the bowl is already near overflow or if the tank contains an unfamiliar treatment chemical.
Expected result: Color appears in the bowl while the toilet is idle, or no color enters the bowl during the observation.
Next step: If a leak is confirmed, shut off water and use the exact model instructions to identify the correct seal or flapper. If no leak is found but the toilet still runs, stop changing the flapper and arrange a diagnosis of the water-control valve.
Why this matters
Why: Color passing into the bowl confirms a tank-to-bowl leak through the flapper or flush-valve seal. No color makes a visible seal leak less likely, so investigate the fill valve, overflow level, handle linkage, or another source of running water.
-
Check 6
Identify the exact American Standard toilet model and compare the installed flapper, flush valve, water-control valve, trip lever, and tank instructions with the manufacturer's model resources. If the toilet uses a specialized VorMax or other nonstandard valve, do not apply a conventional flapper adjustment.
Expected result: The installed parts match the model, a different seal or valve is installed, or the model cannot be identified.
Next step: Use only model-confirmed instructions and parts information. If the mechanism or model is uncertain, stop before disassembly and have qualified plumbing service identify it.
Why this matters
Why: A mismatched seal or setting can prevent proper seating or keep a model-specific valve in the wrong position. American Standard's Cadet and VorMax procedures demonstrate that component access and adjustment are not interchangeable.
-
Check 7
After an allowed linkage, level, or seal correction, turn the supply back on slowly, let the tank refill, and run one test flush. Check that the flapper closes, the tank stops filling, the bowl is quiet between flushes, and no water leaks at the tank or floor.
Expected result: The toilet stops running, it runs briefly then stops, the bowl still ripples, or a leak appears after reassembly.
Next step: Stop and arrange plumbing service for continued running, a new leak, a cracked tank or valve, or a stop valve that cannot control the water. Provide the model and the result of each check.
Why this matters
Why: A complete stop after a model-correct correction supports a linkage, seal, or water-level cause. Continued rippling or running indicates an unresolved valve or seal issue, while a new external leak means the connection should not be tightened repeatedly.
Use your observations
Decision map
Find the observation that best matches what you see, then follow the next safe action.
-
PATH 01Next step
What you see
The bowl ripples between flushes, the tank level slowly falls, and the flapper or seal does not sit flat.
Do this next
Shut off and drain the tank, then use the exact American Standard model instructions to identify the correct seal or flapper. Arrange service if the valve is damaged or seized.
Why this path and its safety boundary
Why it matters: A tank-to-bowl leak through the flapper or flush-valve seal is more likely than a fill-valve-only problem.
-
PATH 02Next step
What you see
The flapper appears sealed, but the tank water rises into the overflow and the fill valve never stops.
Do this next
Turn off the supply and use only the matching American Standard water-control procedure. Arrange service if the valve continues to overfill or the installed design cannot be identified.
Why this path and its safety boundary
Why it matters: A water-control or fill-valve adjustment or debris problem is more likely than a leaking flapper.
-
PATH 03Next step
What you see
The handle or chain holds the flapper open, the linkage is tangled, or the flapper closes only when the handle is manually released.
Do this next
Reconnect or route the chain and lever according to the exact model instructions, then run one test flush. Replace the linkage only after the model and damage are confirmed.
Why this path and its safety boundary
Why it matters: The trip-lever linkage is preventing the seal from seating; a new flapper is not yet justified.
-
PATH 04Next step
What you see
The tank level and flapper movement look normal, but the bowl drains slowly or rises during a flush.
Do this next
Stop flushing if overflow is possible, turn off the water, and make one controlled plunger attempt. Arrange plumbing service for a persistent or recurring blockage.
Why this path and its safety boundary
Why it matters: A partial bowl or trapway obstruction may be causing repeated refill and apparent running, rather than a flapper leak alone.
-
PATH 05Next step
What you see
A model-specific flapper, seal, or flush valve was recently replaced, and the toilet began running afterward or does not match the model instructions.
Do this next
Stop changing parts, shut off water if needed, and compare the installed mechanism with the exact model guide or have a plumber identify the correct assembly.
Why this path and its safety boundary
Why it matters: Incorrect fit, orientation, linkage, or setting is plausible; the brand alone does not establish compatibility.
-
PATH 06Next step
What you see
The bowl or floor is receiving uncontrolled water, the tank or valve is cracked, the stop valve will not shut off, or running continues after the model-specific checks.
Do this next
Turn off water at a safe upstream valve if possible, stop flushing, protect the floor, and arrange qualified plumbing service. Do not force a seized valve or continue operating the toilet unattended.
Why this path and its safety boundary
Why it matters: The condition exceeds a routine flapper adjustment and can cause water damage or an uncontrolled discharge.
Helpful context
Understand the symptom
Separate a flapper leak from a fill-valve problem
Look into the bowl between flushes. A steady ripple or thin stream usually means water is leaving the tank through the flapper or flush-valve seal, so the fill valve keeps adding water. If the bowl is quiet but the tank continues hissing or refilling, the water-control valve or its adjustment is more relevant. A tank that rises toward the overflow needs immediate water shutoff.
Use the exact American Standard mechanism
American Standard toilets may use a conventional flapper, a model-specific float ball, or a VorMax valve and seal arrangement. Find the model number before changing a setting or part. A flapper that looks similar may have a different float, chain, seal, or attachment, and forcing the wrong adjustment can create a leak.
Safety boundary
Stop conditions
- Do not keep flushing when the bowl rises toward an overflow. Turn off the toilet water supply and do not force the trip lever, flapper, flush valve, tank fitting, or stop valve.
- Stop and arrange qualified plumbing service for a cracked tank or valve, uncontrolled running water, a leak at the tank or floor, a corroded or seized shutoff, or a flapper or flush valve that cannot be identified.
- Do not select a generic flapper or transfer a model-specific float, chain, or flush-valve setting from another American Standard toilet. Use the exact model instructions or have the mechanism diagnosed.
Only after diagnosis
Potential parts
- American Standard toilet flapper or silicone seal
Consider only when the exact model's flapper or seal does not seat, is warped or cracked, or is confirmed to leak into the bowl after linkage checks.
Flapper shape, float setting, seal material, and flush-valve connection vary by American Standard toilet family. Confirm the exact model before selecting a replacement. - American Standard toilet water-control or fill valve
Consider only when the tank overfills or the water-control valve continues running after the flapper seals and the model-specific adjustment or debris check is complete.
Water-control designs and adjustment procedures vary by model. Confirm the exact model and use plumbing service for a corroded or inaccessible supply connection. - American Standard toilet flush valve assembly
Consider only when qualified diagnosis identifies a damaged or incorrectly operating flush valve after the flapper, linkage, water level, and bowl checks.
Flush-valve size, flapper or seal design, and tank connection vary by American Standard model. Confirm the exact model and installation requirements before replacement.
When checks do not resolve it
Need a professional?
Arrange qualified plumbing service when the toilet continues running after the tank-level, linkage, flapper-seal, water-control, and exact model checks; when the bowl ripples or the tank overflows; when the flapper or flush valve is damaged, seized, or unidentified; when the stop valve will not shut off; or when the tank, bowl, or floor connection leaks. Provide the exact American Standard model, whether water enters the bowl, tank-level and overflow observations, chain and handle behavior, seal condition, water-control behavior, and any recent part change.
Safety scope: Do not repeatedly flush a rising bowl, work on a pressurized valve assembly, force a seized shutoff or flapper, use sharp tools on the seal, or continue operating after a crack, leak, overflow, or uncontrolled water condition.
Common questions
FAQ
Why does my American Standard toilet flapper keep running?
First determine whether water is leaking into the bowl past the flapper or whether the tank is overfilling. Check the flapper seal and chain, then compare the tank level with the model's fill mark. A water-control valve that never shuts off can run even when the flapper is sealed.
How do I stop an American Standard toilet from running?
For a low-risk first check, remove obstructions from the handle and chain, confirm the flapper seats flat, and verify the tank stops at the model's reference level. Shut off water before any permitted seal or valve work, and use the exact model instructions rather than a generic adjustment.
Can a low tank water level make the American Standard toilet keep running?
A low level can occur when water leaks past the flapper, causing the fill valve to keep replacing it. Check the bowl for a ripple or use a safe model-permitted leak check; if the tank instead rises into the overflow, investigate the water-control valve and its adjustment.
Should I replace the flapper immediately?
Not necessarily. A chain or trip lever can hold an intact flapper open, a water-control valve can overfill the tank, and a partial bowl obstruction can change the flush. Identify the exact American Standard model and verify the leak or overflow pattern before selecting a replacement.
Read the exact guide
Official sources
- How To Adjust Your Vormax Toilet Flush Valve SettingsAmerican Standard · Official American Standard guide for VorMax toilets; the trip and water-level details are not universal to every flapper toilet.
- GlossaryAmerican Standard · Official American Standard glossary defining the tank components and their role in a toilet flush.
- How To Unclog A ToiletAmerican Standard · Official American Standard toilet unclogging guide used to distinguish bowl or trapway obstruction from a tank-mechanism leak.
- How to Replace the Flapper Float Ball on the Cadet ToiletAmerican Standard · Official American Standard guide for Cadet toilets; its float and linkage steps are model-specific examples and do not apply to every toilet design.
- How to Replace a Flush Valve on a VorMax ToiletAmerican Standard · Official American Standard guide for VorMax toilets; its dual-valve and silicone-seal steps are specific to that design.
- Cadet® 3 12-in. Rough-In 1.6 gpf Toilet TankAmerican Standard · Official American Standard product page for the Cadet 3 tank; its flapper or piston details apply to that model family only.
- How To Clean The Toilet Water Control Valve Of DebrisAmerican Standard · Official American Standard guide for clearing debris from a matching toilet water-control valve; the cap and arm design must match the installed valve.
Community feedback
Share a repair observation
Share a plain-text repair observation. Accepted observations are published automatically; this page may take a moment to update.