
On this page
Start here
Quick answer
An American Standard toilet that keeps running is usually allowing water to pass into the bowl or is failing to shut off the fill valve. First confirm whether water is entering the bowl through the flush valve or rising in the tank and overflow tube, then check the tank waterline, handle or chain movement, and the model-specific flapper or seal. American Standard's own guides vary by toilet family: a Champion or VorMax seal, for example, is not proof that the same part fits another model. If the tank continues to fill, the supply stop will not close, the bowl or floor leaks, or the correct repair cannot be identified from the model number, stop testing and arrange qualified plumbing service. Do not force the trip lever, use chemical tank cleaners, or order a valve by appearance alone.
Before you begin
Safety first
- This article is limited to stopping inflow, ordinary-access observation, the marked tank waterline, and model-approved visible linkage or valve checks. A professional must handle damaged porcelain, supply or base leaks, concealed plumbing, toilet removal, and unfamiliar or pressurized flush assemblies.
Work through in order
Diagnostic checks
Use only checks that match the exact appliance or system and its official guide.
-
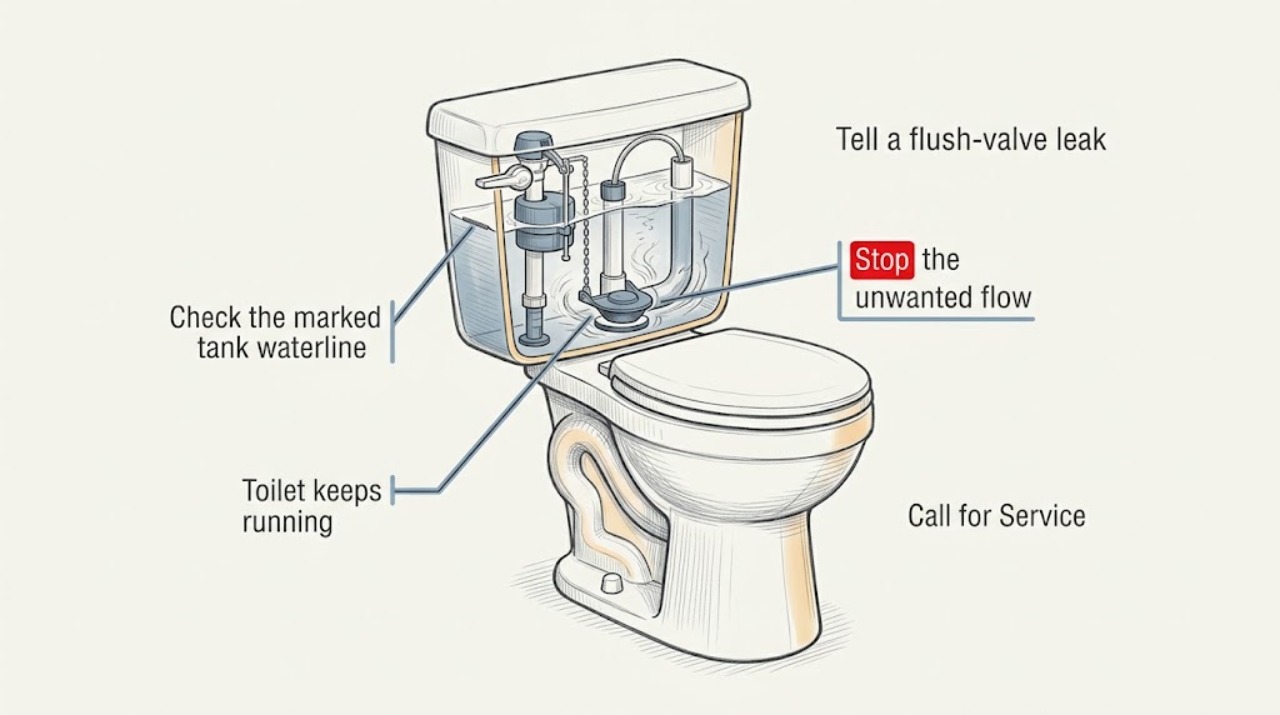
Stop the unwanted flow
Lift the tank lid only if the area is dry and safe. If the toilet is continuously refilling or the bowl is rising, turn the nearby supply stop clockwise by hand until the inflow stops; do not force a seized valve.
Expected result: The running stops when the supply is closed, the supply stop does not close, or water continues from a separate leak at the base or supply connection.
Next step: Keep the toilet out of service and arrange prompt service for a failed supply stop, base leak, contaminated water, or any overflow. Continue only when the tank and floor are stable.
Stop if: Stop immediately if water is spreading, the floor is slippery, sewage is present, or water approaches electrical equipment.
Why this matters
Why: A supply stop that works lets you isolate the toilet for diagnosis. A valve that will not close, a base leak, or water escaping onto the floor is a plumbing-service condition rather than a tank adjustment.
-
Tell a flush-valve leak from a fill-valve leak
With the supply isolated and the tank water settled, look and listen from outside the bowl and tank. Check whether water enters the bowl, whether the tank level falls, whether water reaches the overflow tube, and whether the fill valve makes a hiss even when the tank level is below the line.
Expected result: The tank level falls into the bowl, water reaches the overflow, the fill valve leaks from its outlet, or the water path cannot be seen safely.
Next step: Use the flush-seal branch for bowl leakage and the fill-valve branch for overflow or water-control leakage. Keep the supply closed while waiting if the toilet cannot hold water safely.
Stop if: Do not reach into contaminated bowl water, remove the toilet, or dismantle an unfamiliar valve while the cause is uncertain.
Why this matters
Why: A falling tank with water entering the bowl supports a flapper, flush-valve seal, or flush-valve seating problem. Water reaching the overflow points toward fill-level or fill-valve behavior. A leak path that cannot be seen without disassembly needs model-specific service.
-
Check the marked tank waterline
After the tank is safe to inspect, compare the resting water with the line marked on the flush-valve overflow tube. Observe whether the fill valve shuts off below the line, at the line, or only after water reaches the overflow; do not raise the level beyond the manufacturer's mark.
Expected result: The water is below the line, at the line with a continuing stream into the bowl, above the line, or the fill valve does not shut off.
Next step: Use only the exact model's documented fill-valve adjustment, if one is provided. If the valve will not shut off, the tank cannot hold its line, or the adjustment is unknown, arrange a compatible fill-valve assessment.
Stop if: Do not set the water level above the marked line, bypass the overflow, or keep the supply open while the valve is uncontrolled.
Why this matters
Why: An above-line tank can send water into the overflow, while a below-line tank can indicate insufficient fill or a leak. Water at the line but still entering the bowl shifts attention toward the flush-valve seal or flapper rather than the waterline.
-
Check the trip lever, chain, or button mechanism
Operate the handle or button once from a normal position and watch the flush valve. Check whether the handle returns freely, the chain has enough movement for the flapper to seat without being pulled tight, or a dual-flush or VorMax control returns to its resting position; do not bend the linkage to make it fit.
Expected result: The handle sticks, the chain holds the flapper open, a button rod remains engaged, or the flush valve opens and closes freely.
Next step: Follow the exact model instructions for a simple linkage adjustment only when the part identity is clear. If the trip lever, rod, or valve binds or is damaged, shut off the supply and request service.
Stop if: Do not force the handle, over-tighten a chain, cut a rod, or operate a partially engaged mechanism repeatedly.
Why this matters
Why: A control that does not return can hold the flush valve open and cause a running stream. Normal control movement makes a worn seal, debris, or fill-valve problem more likely.
-
Inspect the model-specific flapper or seal
Record the American Standard model before opening the tank further. If the model's official procedure supports ordinary-access inspection, look for debris, warping, a damaged silicone seal, or a flapper that is not seating; turn off the supply and drain the tank only as that procedure directs.
Expected result: The seal has debris or visible warping, the flapper is damaged or mismatched, the seating surface is damaged, or the parts appear intact.
Next step: Use the manufacturer's model-specific replacement procedure or have a plumber install the compatible seal or flush valve. If the seating surface or tank hardware is damaged, stop rather than sanding or improvising a repair.
Stop if: Do not use abrasive tools, chemical tank cleaners, unverified replacement parts, or force a flapper or seal onto a different valve design.
Why this matters
Why: A seal that cannot seat can let water leak continuously into the bowl. American Standard's Champion, VorMax, and Cadet instructions show different seal or flapper assemblies, so an intact-looking part still requires model confirmation before replacement.
-
Consider debris at the water-control valve
If the tank is not leaking down into the bowl but the water-control or fill valve continues to hiss or seep, use the American Standard water-control guide only if that valve matches the procedure. Turn off the supply before removing its top, and keep a container over the uncapped valve during the documented rinse step to limit splashing.
Expected result: The valve has visible debris and shuts off after the model-approved cleaning, or it continues to leak, will not shut off, or does not match the guide.
Next step: Restore the valve only as documented and check for leaks. If the procedure does not resolve the running, keep the supply closed and arrange service with the model number and valve photos.
Stop if: Do not remove a valve cap under pressure, use sharp tools to scrape inside the valve, or proceed when the valve type is unknown.
Why this matters
Why: American Standard says debris can cause the water-control valve to leak slowly after shutting off. A valve that remains uncontrolled after the permitted cleaning may need a compatible replacement or professional diagnosis.
Use your observations
Decision map
Find the observation that best matches what you see, then follow the next safe action.
-
PATH 01Safety boundary
What you see
The tank level falls while the supply is isolated and a visible stream enters the bowl.
Do this next
Verify the handle or chain is not holding the valve open, then use the exact American Standard model procedure for the flapper or seal. Request service if the seating surface is damaged or the model cannot be identified.
Why this path and its safety boundary
Why it matters: The running path is downstream of the tank, making a flapper, silicone seal, flush-valve seat, or trip linkage more likely than a fill-level problem.
Safety stop: Do not force the valve closed, use chemical tank cleaner, or fit a seal based only on its color or shape.
-
PATH 02Safety boundary
What you see
The water reaches or passes the marked tank line and spills into the overflow, or the fill valve keeps hissing without a falling tank level.
Do this next
Confirm the supply is open only as needed, use the documented waterline or debris check for the exact valve, and arrange service if it will not shut off or the adjustment is unknown.
Why this path and its safety boundary
Why it matters: A fill-valve setting, debris, or failed water-control valve is more likely than a leaking flush-valve seal.
Safety stop: Do not bypass the overflow, set the level higher, or leave the toilet unattended while it continues to fill.
-
PATH 03Safety boundary
What you see
The running changes when the handle, chain, trip lever, or button is moved, and the flush valve does not return to its seat freely.
Do this next
Follow the model-specific linkage adjustment or replace the compatible control through qualified service; do not keep cycling the handle to stop the leak.
Why this path and its safety boundary
Why it matters: The control linkage is likely keeping the seal open or preventing proper seating, even if the seal itself is not visibly damaged.
Safety stop: Stop for a stuck or broken handle, bent rod, binding button, or any need to force the tank hardware.
-
PATH 04Safety boundary
What you see
The linkage moves normally but the flapper or silicone seal is warped, damaged, dirty, mismatched, or unable to seat.
Do this next
Use the model number and the official repair-parts procedure to select a compatible seal or valve, or have a plumber perform the replacement.
Why this path and its safety boundary
Why it matters: The seal or flush-valve assembly is the leading local cause, but American Standard uses different assemblies across toilet families.
Safety stop: Do not order a generic seal by appearance, sand the valve seat, or force a family-specific assembly onto another model.
-
PATH 05Safety boundary
What you see
The toilet still runs after the documented visible checks, the water path cannot be distinguished, the supply stop leaks, or the bowl, tank, or floor is damaged.
Do this next
Close the supply when safe, keep the toilet out of service, and arrange a qualified plumber or American Standard support assessment with the model and observations.
Why this path and its safety boundary
Why it matters: The cause may involve concealed leakage, a damaged seat or valve body, a model-specific assembly, or plumbing outside the tank; repeated testing risks water damage.
Safety stop: Do not remove the toilet, open concealed plumbing, or continue running the fixture to collect more evidence.
Helpful context
Understand the symptom
Find where the water is going
A running toilet is not one diagnosis. If water is visibly entering the bowl from the flush-valve area, a flapper, silicone seal, flush valve, or chain may not be closing. If water rises above the marked tank line and spills into the overflow tube, the fill valve or its adjustment is involved. A toilet that runs only after the handle is touched may have a trip lever or chain that holds the valve open. Locate the path before choosing a part.
American Standard toilet families use different service procedures
American Standard publishes separate procedures for Champion accelerator seals, VorMax silicone seals, and Cadet flapper float balls. The pages share a shutoff-first boundary, but the internal assemblies are not interchangeable by brand name. Record the model from the tank or bowl and use the corresponding repair-parts guide before removing a seal or valve.
A running toilet can waste water without looking dramatic
A small, continuous stream into the bowl may be caused by a seal that is not seating or by debris at the water-control valve. If the tank level falls with the supply off, the flush valve or flapper path is leaking; if the level stays put but the fill valve leaks or fails to shut off, the water-control path is the better focus. Either pattern should be corrected rather than masked by repeated handle movement.
Safety boundary
Stop conditions
- Close the supply stop and stop testing for an overflow, sewage contamination, base or supply leak, cracked porcelain, or a valve that will not shut off.
- Do not force a trip lever, chain, button, flapper, seal, or tank fitting, and do not cycle the handle repeatedly to mask a running stream.
- Do not use chlorine or other chemical tank cleaners, abrasive tools, sharp objects, or an unverified generic replacement part.
- Do not remove the toilet, access concealed plumbing, or dismantle an unfamiliar flush, fill, dual-flush, or pressure-assisted mechanism as an ordinary-user test.
- Call a qualified plumber when the running persists after the exact model's permitted checks, the water path is uncertain, or a leak can reach the floor or surrounding structure.
Only after diagnosis
Potential parts
- American Standard flush-valve seal or flapper
Consider this category only when the tank level falls into the bowl and the exact model procedure identifies a worn, warped, dirty, or mismatched seal or flapper.
Confirm the exact toilet model and valve family; Champion, VorMax, Cadet, and other assemblies are not interchangeable by appearance. - American Standard fill or water-control valve
Consider this category only when the tank reaches the overflow, the water-control valve will not shut off, or the documented debris check fails to stop the running.
Confirm the toilet model, valve design, connection, and manufacturer's fit information before ordering. - toilet trip lever or flush control linkage
Consider this category only when the handle, chain, rod, or button remains engaged or prevents the flush valve from seating after the model-specific linkage check.
Confirm the control orientation and exact model; do not compensate for a mismatched linkage by forcing or bending it.
When checks do not resolve it
Need a professional?
Arrange qualified plumbing service when the toilet still runs after a model-specific handle, waterline, seal, and water-control check; the supply stop will not close; water reaches the floor; the bowl or tank is cracked; the correct American Standard model or valve is unknown; or the repair would require toilet removal or concealed plumbing access. Keep the supply closed when safe until the leak is corrected.
Safety scope: This article is limited to stopping inflow, ordinary-access observation, the marked tank waterline, and model-approved visible linkage or valve checks. A professional must handle damaged porcelain, supply or base leaks, concealed plumbing, toilet removal, and unfamiliar or pressurized flush assemblies.
Common questions
FAQ
Why does my American Standard toilet keep running?
The water may be leaking through a flapper or flush-valve seal, the handle or chain may hold the valve open, or the fill valve may be overfilling or leaking. Check whether the tank level falls into the bowl or rises into the overflow before selecting a part.
How do I stop an American Standard toilet from running temporarily?
Turn the nearby toilet supply stop clockwise by hand if it operates normally, especially if the bowl is rising or the tank will not shut off. Do not force a seized valve. Keep the toilet out of service for a floor leak, overflow, sewage contamination, or damaged porcelain.
Can I use any American Standard flapper or seal as a replacement?
No. American Standard publishes different procedures for Champion, VorMax, Cadet, and other toilet families. Record the exact model and use the corresponding repair-parts guide; brand name alone does not prove compatibility.
What does it mean if water is going into the overflow tube?
The tank may be overfilled or the fill valve may not be shutting off correctly. Compare the resting water with the line on the overflow tube, use only the exact model's documented adjustment, and arrange service if the valve continues to fill.
Should I use a toilet tank cleaner to fix a running toilet?
No. Chemical tank cleaners can damage seals and valves and can hide the actual leak path. Use only the model-specific inspection or debris procedure, and stop for a plumber when the water-control or flush-valve problem remains.
Read the exact guide
Official sources
- Welcome to Consumer Connections SupportAmerican Standard · Official American Standard support page used to direct model identification and the toilet parts service guide; it does not establish fit for an unspecified toilet.
- How To Clean The Toilet Water Control Valve Of DebrisAmerican Standard · Official American Standard procedure for a matching water-control valve; used for a conditional debris check, not as universal permission to disassemble any toilet valve.
- How To Replace A Champion Accelerator Flush Valve SealAmerican Standard · Official American Standard guidance for Champion toilets; used to explain a leaking seal and shutoff-first boundary, not to claim that every American Standard toilet uses an accelerator seal.
- How To Adjust Your Vormax Toilet Flush Valve SettingsAmerican Standard · Official model-family guidance used only to reinforce that VorMax settings require the exact procedure; no numeric setting is reproduced here.
- How To Replace The Flapper Float Ball On The Cadet ToiletAmerican Standard · Official American Standard guidance for Cadet toilets; used to distinguish another model-specific flapper assembly and chain connection.
- How to Replace a Flush Valve on a VorMax ToiletAmerican Standard · Official American Standard guidance for VorMax toilets; used to show model-specific seal differences and service boundaries.
Community feedback
Share a repair observation
Share a plain-text repair observation. Accepted observations are published automatically; this page may take a moment to update.