
On this page
Start here
Quick answer
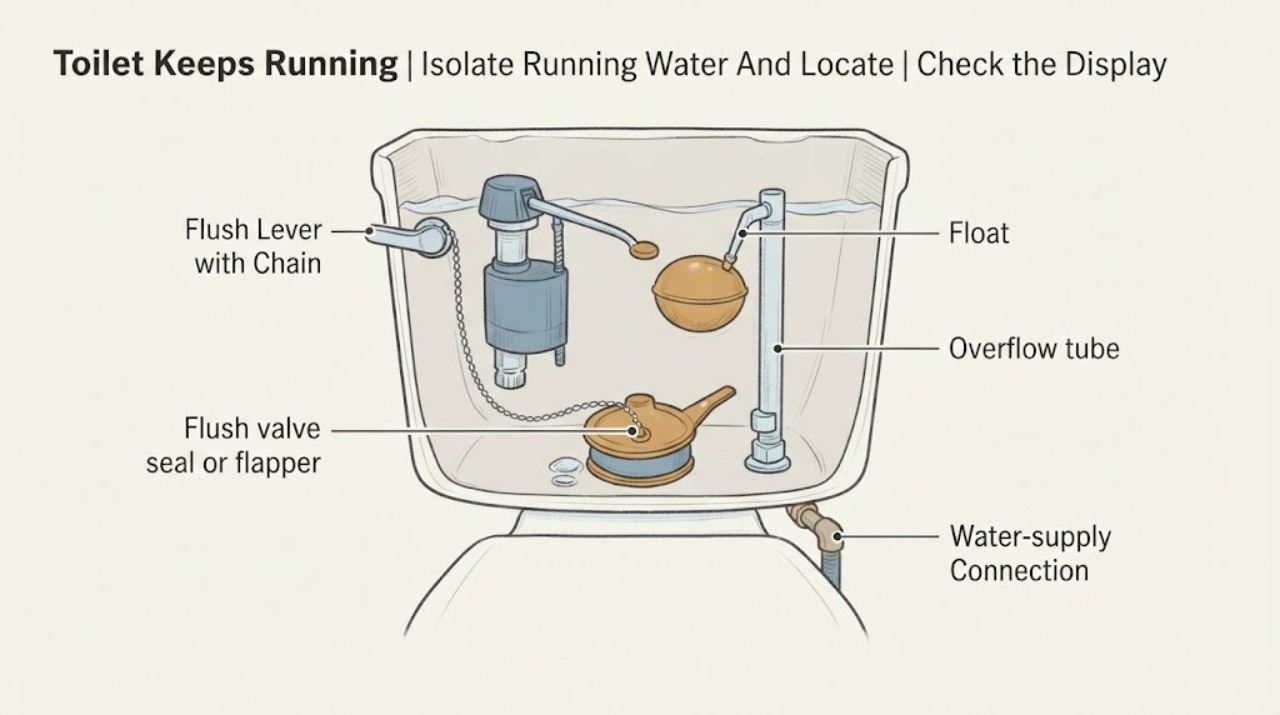
A Glacier Bay toilet that keeps running is usually losing tank water into the bowl or sending water into the overflow tube. Close the accessible angle stop gently if the flow is wasting water, then observe the tank and bowl without flushing repeatedly. A few drops of food coloring in the tank that appear in the bowl after 10 minutes points to a flush-valve seal or flapper leak; water rising into the overflow tube points more toward a fill-valve or float problem. Check that the handle, chain, or dual-flush button is not holding the flush valve open, and use the exact Glacier Bay model guide before adjusting or replacing a part. Arrange plumbing service for a cracked tank or bowl, a wet shutoff or supply connection, a valve that cannot be isolated, or a running toilet that remains after these checks.
Work through in order
Diagnostic checks
Use only checks that match the exact appliance or system and its official guide.
-
Check 1
If water is running continuously, turn the accessible angle stop near the floor clockwise only until the supply stops; do not force a wet, corroded, or stiff valve. Lift the tank lid only after the area is dry, and look into the bowl and tank without pressing the flush control.
Expected result: The bowl has a steady trickle, the tank is refilling repeatedly, water is visibly entering the overflow tube, or the running sound stops when the angle stop is closed.
Next step: Leave the angle stop closed while testing and reopen it slowly only when needed. If the valve will not stop flow, leaks at its stem, or water is outside the tank, stop and arrange plumbing service.
Stop if: Do not overtighten the angle stop, remove a supply connector under pressure, or keep operating a toilet whose tank, bowl, or floor connection is cracked or wet.
Why this matters
Why: A bowl trickle or repeated refill means the tank is losing water or the fill valve is not stopping. Water in the overflow tube makes an overfill or fill-control issue more likely. A stop at the angle valve confirms the toilet supply is isolated, not that the underlying fault is fixed.
-
Check 2
With the tank supply isolated, inspect the Glacier Bay handle, lift chain, flapper or flush-valve seal, and any dual-flush buttons or rods from above. Confirm that the handle or button returns, the chain is not tangled or pulling the seal upward, and nothing inside the tank is wedged under the seal. Do not force a button or trim a rod without the exact model instructions.
Expected result: The handle is stuck, the chain is taut or caught, a button or rod does not return, debris is visible at the seal, or the flush control and seal appear to move freely.
Next step: Clear only loose, visible debris and release an obvious chain tangle without tools, then reseat the tank lid and make one normal test. If the seal is warped, hardened, cracked, or still does not close, use the model guide for a compatible replacement or arrange service.
Stop if: Do not stretch, cut, glue, or sand a flapper; do not force dual-flush rods; and do not place hands in the tank if a cracked component or sharp edge is present.
Why this matters
Why: A control held open can keep the flush valve from seating and cause a continuous bowl trickle. Debris or a damaged seal can produce the same symptom even when the handle is free. A freely moving control makes a worn seal, fill valve, or another tank setting more likely.
-
Check 3
After the control is free and the tank has a normal water level, add a few drops of food coloring or a dye tablet to the tank water without flushing. Wait about 10 minutes, watching the bowl, then flush afterward to avoid staining if no leak is shown.
Expected result: Colored water appears in the bowl during the wait, or the bowl remains clear while the toilet still hisses or refills.
Next step: For a positive dye test, close the angle stop and follow the exact Glacier Bay model instructions for inspecting or replacing the flush seal or flapper. For a negative test with continued running, observe the fill and overflow path in the next action.
Stop if: Do not use bleach, chlorine drop-in cleaners, or unidentified chemicals as a test; do not flush repeatedly while the angle stop is open and the bowl is already high.
Why this matters
Why: Color in the bowl confirms water is bypassing the tank's flush-valve seal or flapper. A clear bowl makes that silent leak less likely and shifts attention toward the fill valve, float, overflow, refill path, or an intermittent control issue.
-
Check 4
Open the angle stop slowly with the tank lid in place or held safely, and watch one refill cycle from above without touching moving parts. Check whether the tank water stops below the overflow opening or continues into the overflow tube, and note whether the fill valve keeps hissing after the tank should be full.
Expected result: Water rises into the overflow tube, the float or fill valve does not stop at the normal level, the refill tube is displaced, or the level stops normally but the bowl still trickles.
Next step: Close the angle stop and use only model-specific, accessible adjustment instructions. If the fill valve remains uncontrolled, water enters the overflow, or the correct water level is unclear, arrange plumbing service rather than changing a critical setting by guesswork.
Stop if: Do not bypass the overflow, clamp or plug the refill tube, alter an unknown adjustment screw, or leave the water supply open while the tank is overflowing.
Why this matters
Why: Overflow or a fill valve that never shuts off makes a fill-valve, float, water-level adjustment, or refill-tube issue more likely. A normal tank level with a bowl trickle points back toward the flush seal or an internal bowl leak.
-
Check 5
With the tank and bowl dry, use a paper towel to check the accessible supply connector, angle stop, tank-to-bowl area, and floor around the base. Note whether the running is constant, occurs after every flush, or returns after the toilet has been idle; record the Glacier Bay model number and any dye-test result.
Expected result: A connector, valve, tank-to-bowl joint, or floor is wet; the running stops after a seal or control correction; or it returns despite a normal tank level and dry exterior.
Next step: Close the angle stop for an external leak and arrange plumbing service. If the exterior is dry but the running returns, provide the model and observations to a plumber rather than continuing to replace parts by appearance.
Stop if: Do not remove the tank, loosen tank bolts, disassemble a corroded valve, or keep the supply open when water is reaching the floor or a ceiling below.
Why this matters
Why: An external wet point is a separate water-leak hazard and may worsen even if the toilet also runs. A recurring internal run after controls and dye testing can indicate a damaged flush-valve seat, fill valve, tank component, water pressure issue, or model-specific mechanism.
Use your observations
Decision map
Find the observation that best matches what you see, then follow the next safe action.
-
PATH 01Next step
What you see
The dye test colors the bowl, or a clear trickle remains with the tank level stopping below the overflow and the handle or chain free.
Do this next
Close the angle stop and inspect or replace only the model-matched flush seal or flapper according to the Glacier Bay guide. Escalate if the seat is damaged, the seal will not stay seated, or the replacement does not stop the trickle.
Why this path and its safety boundary
Why it matters: Water is bypassing the flush-valve seal or flapper; the fill valve is responding by replacing that lost water.
-
PATH 02Next step
What you see
The tank water rises into the overflow tube, the fill valve hisses without stopping, or the float does not control the refill level.
Do this next
Close the angle stop and follow the exact model's adjustment and replacement instructions. Use a plumber when the valve cannot be controlled, the overflow continues, or the correct setting is uncertain.
Why this path and its safety boundary
Why it matters: A fill-valve, float, water-level, or refill-path fault is more likely than a simple flapper leak, and the toilet can waste water through the overflow.
-
PATH 03Next step
What you see
The handle, chain, lever, or dual-flush button/rod is stuck, tangled, or holding the flush seal off its seat.
Do this next
Release only an obvious tangle or obstruction without tools, then perform one controlled test. If the control does not return freely or its adjustment is unclear, use the model guide or arrange service.
Why this path and its safety boundary
Why it matters: The flush mechanism is being held open mechanically, so the bowl can receive a continuous trickle even if the seal itself is intact.
-
PATH 04Next step
What you see
The angle stop, supply connector, tank joint, bowl base, or nearby floor is wet while the toilet is running.
Do this next
Close the angle stop without forcing it, contain the water from a dry position, and arrange plumbing service. A wet or corroded shutoff should not be disassembled by guesswork.
Why this path and its safety boundary
Why it matters: There is an external leak in addition to or instead of the internal running symptom; continued supply can cause property damage.
-
PATH 05Next step
What you see
The tank level is normal, the dye test is inconclusive or negative, controls move freely, the exterior is dry, and the toilet still runs or restarts after sitting.
Do this next
Keep the angle stop closed between uses and arrange a plumber with the model number and test observations. Do not continue swapping parts without confirming the mechanism and fit.
Why this path and its safety boundary
Why it matters: An intermittent flush-valve seat, fill-valve seal, pressure-related condition, or model-specific tank mechanism remains possible; appearance alone cannot identify the failed part.
Helpful context
Understand the symptom
First tell a tank leak from an overfill
A toilet can sound as if the fill valve is the problem even when the real issue is a slow leak through the flush valve seal. The fill valve then starts again to replace the lost tank water. If the water is visibly entering the overflow tube, the tank is overfilling or its level control is not stopping; if the bowl gets color from a dye test, the tank is leaking through the flush path.
Glacier Bay mechanisms vary by model
Glacier Bay sells toilets with different tank layouts, including lever and dual-flush arrangements. Record the model or product number before ordering a seal, flapper, flush valve, or fill valve. A part that looks similar may not set the correct water level or seal the valve on your toilet.
Only after diagnosis
Potential parts
- Glacier Bay flush-valve seal or flapper
Only consider this category when a dye test or a normal tank level with a bowl trickle confirms water is bypassing the flush seal.
Glacier Bay tank layouts and flush-valve sizes vary; confirm the model and the exact seal or flapper design before ordering. - Glacier Bay fill valve or float assembly
Only consider this category when water rises into the overflow tube or the fill valve does not stop at the model's normal level after the flush seal is ruled out.
Water-level and valve arrangements differ by Glacier Bay model; use the model guide and do not bypass the overflow or critical level.
When checks do not resolve it
Need a professional?
Arrange plumbing service when the angle stop is wet, stiff, corroded, or will not stop water; the tank, bowl, or floor connection is cracked or leaking; the fill valve continues to overflow; the flush-valve seat appears damaged; the correct Glacier Bay model or replacement part cannot be confirmed; or the toilet keeps running after the control, dye, and fill-level checks. Close the angle stop when practical to limit water waste, and do not remove the tank, alter safety-critical settings, use chemical drop-in cleaners, or disassemble a pressurized or corroded connection by guesswork.
Common questions
FAQ
Why does my Glacier Bay toilet keep running after I flush?
First separate a flush-seal leak from an overfill. If water trickles into the bowl and the tank level stops normally, a flapper or flush-valve seal is more likely. If water rises into the overflow tube, the fill valve, float, water-level setting, or refill path is more likely. A tank dye test can confirm a silent seal leak.
How do I test a running Glacier Bay toilet without wasting more water?
Close the accessible angle stop, make sure the handle, chain, or buttons are free, then add a few drops of food coloring to the tank and wait about 10 minutes without flushing. Color in the bowl confirms water is leaking past the flush-valve seal or flapper. Flush afterward to avoid staining if the test is clear.
What if water is going into the overflow tube?
Close the angle stop and do not leave the supply open while the tank overflows. A fill valve, float, water-level adjustment, or refill-path issue is more likely. Use only the exact Glacier Bay model instructions for an accessible adjustment; arrange service if the valve will not stop or the correct level is uncertain.
Can I use a bleach tablet to stop a Glacier Bay toilet from running?
No. A cleaner does not correct a mechanical seal or fill-valve fault, and in-tank bleach or chlorine products can damage toilet components and contribute to leaks. Diagnose the water path and use a model-matched repair part only after the failed mechanism is identified.
Read the exact guide
Official sources
- Home MaintenanceU.S. Environmental Protection Agency WaterSense · Toilet leak detection with a tank dye test, worn flapper diagnosis, and professional help for persistent running
- Replacing a worn toilet flapperMoen Incorporated · Toilet running caused by a flapper that does not seal, safe water isolation, chain fit, and model-specific replacement caution
- QUICK Install GuideFluidmaster, Inc. · Toilet fill-valve and flush-valve troubleshooting, overflow-level observations, flapper chain fit, and replacement safety
- Universal 3" Toilet Flapper | 513A-016 Toilet FlapperFluidmaster, Inc. · Fluidmaster toilet flapper diagnosis and conditional compatibility information for Glacier Bay and other toilet brands
Community feedback
Share a repair observation
Share a plain-text repair observation. Accepted observations are published automatically; this page may take a moment to update.