
On this page
Start here
Quick answer
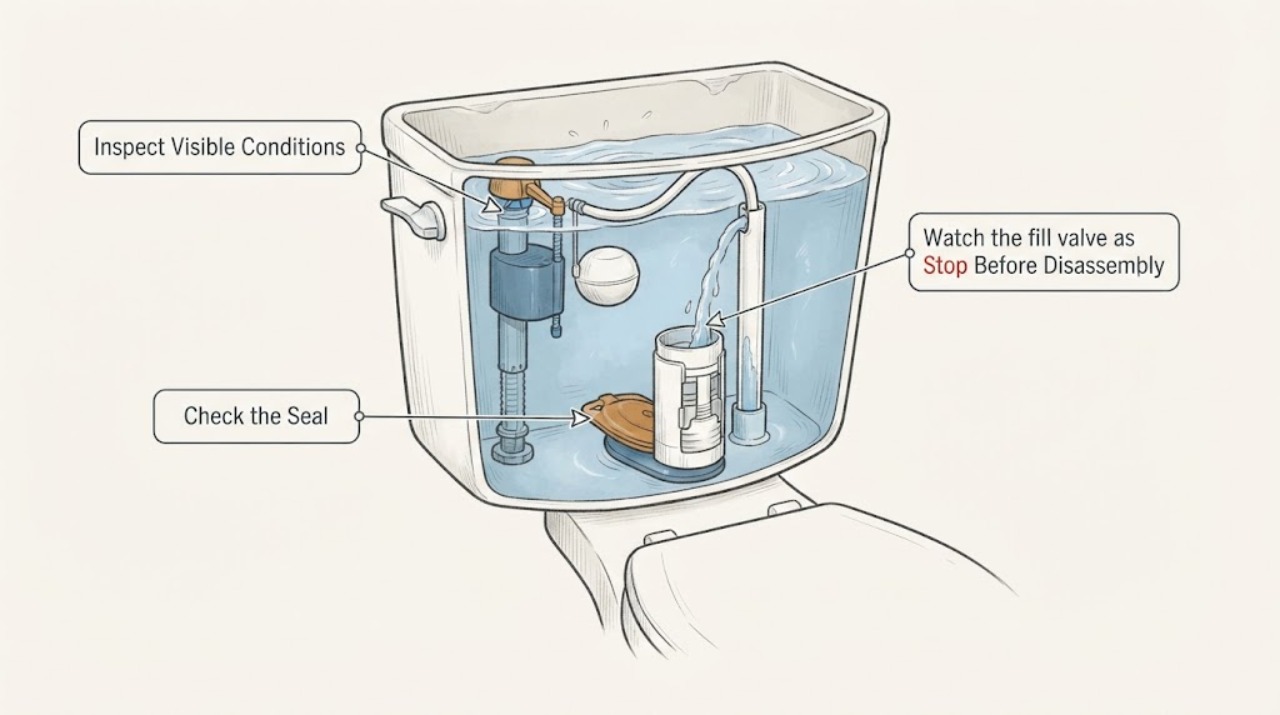
A Kohler toilet that keeps running is usually either losing tank water into the bowl or failing to shut off before water reaches the overflow. Remove the tank lid and watch the path: check whether the flapper or canister seal closes, the trip-lever chain has slight slack, the fill valve stops, the float moves freely, and the water level stays below the overflow. Also check that the refill hose is secured above the tank waterline rather than siphoning. Clean or adjust only accessible parts as the model instructions allow. If the bowl continues to ripple, the fill valve will not shut off, the tank or porcelain is cracked, the supply stop will not close, or the repair requires removing the tank, arrange qualified plumbing service.
Before you begin
Safety first
- The homeowner scope is limited to observing the tank, checking the lever, chain, seal, float, water level, and refill hose, and performing model-approved cleaning or adjustment. Do not force valves, overtighten porcelain hardware, remove the tank without the correct procedure, alter the overflow, work on concealed plumbing, or leave an uncontrolled leak running.
Work through in order
Diagnostic checks
Use only checks that match the exact appliance or system and its official guide.
-
Check 1
Remove the tank lid and observe the water path during a refill. Look at the bowl for a ripple or trickle, the tank for water entering the overflow, and the trip lever and float for movement. Keep hands clear of moving parts and do not force the lever.
Expected result: Water enters the overflow; the tank level stops but the bowl ripples; the fill valve turns on periodically; or the toilet is quiet with no visible leak after a flush.
Next step: Use the observed path to choose the seal, fill-valve, or refill-hose check rather than replacing parts at random. If the tank is close to overflowing, limit water damage with the accessible supply stop and arrange service if it will not close.
Stop if: Stop for a cracked tank or bowl, water on the floor near electrical equipment, a supply stop that leaks or will not close, or a lever, float, or valve that is stuck and would require force.
Why this matters
Why: Overflow points to water-level or fill-valve control. A bowl ripple with a normal tank level points to a flapper, canister seal, flush-valve seat, or refill-hose leak. Periodic refilling suggests a slow leak even when continuous noise is absent.
-
Check 2
Check the trip lever, rod, chain, and flapper or canister seal after the flush finishes. Confirm the lever returns, the chain is not tangled or tight, and the seal sits evenly on the flush-valve opening. If the model permits, gently reseat the seal and remove accessible debris without scratching the seat.
Expected result: The lever binds; the chain holds the seal open; the seal is dirty, cracked, warped, or misaligned; the flush-valve seat is damaged; or the seal closes evenly.
Next step: Correct only an accessible obstruction or permitted chain adjustment, then flush and recheck. Consider an exact-model flapper or canister seal only when its condition and model instructions support it; arrange service for a damaged seat or tank connection.
Stop if: Stop for cracked porcelain, a seal that cannot be reached without removing the tank or valve, a broken trip lever, or any need to overtighten or pry the flush valve.
Why this matters
Why: A binding lever or tight chain can hold the seal open. A worn, dirty, or misaligned seal can leak into the bowl. A damaged seat or a seal that closes correctly shifts attention to the fill side or a less visible tank leak.
-
Check 3
Watch the fill valve as the tank rises. Check whether the float moves freely and whether the valve shuts off before water reaches the overflow. Inspect the accessible valve cap and inlet for sediment only if the model's instructions describe safe cleaning; do not disassemble a pressurized or concealed valve.
Expected result: Water spills into the overflow; lifting the float stops the flow; the float sinks or sticks; sediment is visible; or the valve continues running with the water level below the overflow.
Next step: Adjust the water level only using the model-approved adjustment, then flush and verify shutoff. Clean or replace the fill valve only after confirming the exact Kohler model and instructions; do not infer compatibility from appearance.
Stop if: Stop for a cracked valve body, uncontrolled spray, a supply connection that leaks, a tank that cannot be isolated, or any need to work below the waterline while the supply is open.
Why this matters
Why: An overly high level, sticking float, debris, or a defective fill valve can cause overflow or continuous filling. If the valve does not stop despite a correct level and unobstructed float, replacement or professional diagnosis is more likely than further adjustment.
-
Check 4
Inspect the refill hose and its connection to the overflow or flush valve. Confirm the hose is secured as the model requires and its end is not submerged below the tank waterline. Then observe whether the toilet refills immediately or only after a delay.
Expected result: The hose end is underwater; the hose is disconnected or aimed incorrectly; the hose is correctly positioned; or the valve turns on again after many minutes without a flush.
Next step: Reconnect or secure the hose only as the exact model instructions show, then repeat the flush-and-observe test. Arrange service for a leaking valve base, cracked tank, or a hose connection that will not remain secure.
Stop if: Stop for a cracked hose port, water spraying from a connection, a tank-to-bowl leak, or any need to remove the tank or tighten concealed hardware.
Why this matters
Why: A submerged hose can siphon tank water into the bowl and cause delayed refill. A disconnected or mispositioned hose can affect refill behavior. If the hose is correct but the tank still loses water, a flapper, flush-valve seal, valve base, or fill-valve problem remains more likely.
-
Check 5
Flush the toilet several times and watch the entire refill, shutoff, and idle period. Check for a bowl ripple, overflow entry, a valve that turns on by itself, leaks around the tank base, and a lever or seal that fails to return after repeated use.
Expected result: The toilet shuts off and stays quiet; the bowl continues to ripple; water reaches the overflow; the fill valve cycles periodically; or a tank connection leaks.
Next step: If the symptom remains, close the supply stop if it operates normally, avoid repeated flushes, and arrange qualified plumbing service. Provide the toilet model, observed water path, seal and chain condition, water-level behavior, and any leak location.
Stop if: Stop for uncontrolled overflow, water on the floor, a supply stop that will not isolate flow, cracked porcelain, or any repair requiring tank removal or concealed plumbing access.
Why this matters
Why: A quiet tank and still bowl after repeated tests support a successful accessible correction. Continued bowl flow favors the flush seal or tank-to-bowl path, while overflow favors the fill valve or water-level path; periodic cycling can be a slow seal or refill-hose leak.
Use your observations
Decision map
Find the observation that best matches what you see, then follow the next safe action.
-
PATH 01Safety boundary
What you see
The tank level reaches or enters the overflow while the fill valve is running.
Do this next
Check the float and model-approved water-level adjustment, then clean or replace the fill valve only when the exact Kohler instructions support it.
Why this path and its safety boundary
Safety stop: Do not allow an uncontrolled overflow to continue or disassemble a pressurized valve; isolate the supply and call a plumber if the valve will not stop.
-
PATH 02Safety boundary
What you see
The tank reaches a normal level but the bowl has a continuous ripple or trickle.
Do this next
Inspect the flapper or canister seal, flush-valve seat, trip lever, and chain for a leak or obstruction, then retest after an approved cleaning or exact-model seal correction.
Why this path and its safety boundary
Safety stop: Do not pry the flush valve, overtighten tank hardware, or remove the tank as a first response.
-
PATH 03Safety boundary
What you see
The toilet refills periodically even though nobody flushed it, and the refill hose end is below the tank waterline.
Do this next
Secure or reconnect the refill hose exactly as the model requires, then observe whether delayed refilling stops; inspect the flapper if it does not.
Why this path and its safety boundary
Safety stop: Do not use an improvised permanent hose clip or alter the overflow connection without model guidance.
-
PATH 04Safety boundary
What you see
The lever binds, the chain holds the seal open, or the flapper/canister seal is dirty, worn, or misaligned.
Do this next
Correct the accessible obstruction or permitted chain slack and replace the seal only with an exact-model part after confirming the diagnosis.
Why this path and its safety boundary
Safety stop: Stop for a damaged flush-valve seat, broken lever, cracked tank, or any need to force the seal or valve.
-
PATH 05Safety boundary
What you see
The fill valve, float, seal, hose, and water level appear correct, but the toilet still runs after repeated flush-and-idle tests.
Do this next
Arrange qualified plumbing service to diagnose a hidden valve-base leak, flush-valve seat, model-specific valve fault, or tank connection; provide the observed water path and model number.
Why this path and its safety boundary
Safety stop: Do not keep replacing generic parts or remove the tank without the correct procedure and a way to control water and protect the floor.
-
PATH 06Safety boundary
What you see
The toilet overflows, the supply stop will not close, water reaches the floor, or porcelain or a connection is cracked.
Do this next
Stop flushing, isolate the water if it can be done safely, protect the floor, and obtain qualified plumbing service.
Why this path and its safety boundary
Safety stop: Do not force a seized stop valve, tighten cracked porcelain, or continue operating while water is uncontrolled.
Helpful context
Understand the symptom
First find where the water is going
Remove the tank lid carefully and watch one refill without putting fingers under moving parts. A ripple or trickle in the bowl means tank water is escaping, while water entering the overflow means the fill side is not stopping at the intended level. A toilet can also refill periodically from a slow leak, so a quiet tank does not prove that the seal is good.
Check the flush seal, lever, and chain
Kohler toilets may use a rubber flapper or a canister seal. The trip lever must return fully, and the chain cannot be so tight that it holds the seal open. Mineral buildup, a worn seal, a nicked flush-valve seat, or a misaligned seal can let water run from the tank to the bowl. Clean or replace the seal only when the exact model instructions support that step.
Separate fill-valve overflow from a bowl leak
If water rises into the overflow, inspect the float and tank water level and look for sediment at the fill-valve cap or seat. If the fill valve continues to admit water after a model-appropriate cleaning, it may need replacement. Keep the refill hose positioned as the model requires; a hose sitting below the waterline can siphon tank water into the bowl and make the valve turn on again later.
Test the repair before leaving the toilet unattended
After an adjustment or approved cleaning, flush several times and watch the complete fill-and-shutoff sequence. The seal should close reliably, the fill valve should stop, and the tank level should remain below the overflow without a bowl ripple. If the toilet still runs, do not keep swapping generic parts: record the toilet model and arrange a plumbing diagnosis.
Only after diagnosis
Potential parts
- flapper or canister seal
Consider this part only when the bowl continues to ripple with a normal tank level and inspection finds a worn, cracked, dirty, or misaligned seal or a damaged seat.
Confirm the exact Kohler toilet model, flush-valve style, seal shape, and installation method before selection; a generic-looking seal may not fit or seal correctly. - toilet fill valve
Consider a fill valve only when the water level reaches the overflow or the valve continues admitting water after model-approved cleaning and float adjustment.
Match the exact toilet model, valve type, inlet connection, and adjustment range; do not select a valve from appearance alone. - toilet refill hose and retaining clip
Consider this category only when the refill hose is damaged, disconnected, or cannot stay positioned above the tank waterline and the hose path is causing delayed refilling.
Use the model's specified hose routing and retaining method; do not create a permanent substitute that can siphon or obstruct the overflow.
When checks do not resolve it
Need a professional?
Escalate for persistent bowl flow, repeated refill without flushing, overflow, a damaged or misaligned flush seal, a fill valve that will not shut off, a leaking tank connection, cracked porcelain, or model-specific parts and tank removal.
Safety scope: The homeowner scope is limited to observing the tank, checking the lever, chain, seal, float, water level, and refill hose, and performing model-approved cleaning or adjustment. Do not force valves, overtighten porcelain hardware, remove the tank without the correct procedure, alter the overflow, work on concealed plumbing, or leave an uncontrolled leak running.
Have this ready
- Provide the Kohler toilet model, one- or two-piece design, whether water enters the bowl or overflow, flapper or canister style, chain and lever observations, water-level behavior, refill-hose position, leak location, and whether the supply stop isolates water.
Common questions
FAQ
Why does my Kohler toilet keep running after I flush?
Water may be leaking past the flapper or canister seal, the chain or trip lever may be holding it open, or the fill valve may be sending water into the overflow. Watch the bowl and tank with the lid removed to identify which path is active.
How can I tell whether the flapper or fill valve is the problem?
If the tank level is normal but the bowl ripples, suspect the flapper, canister seal, flush-valve seat, or refill-hose siphoning. If water rises into the overflow, check the float, water-level adjustment, and fill valve.
Can a refill hose make a Kohler toilet turn on by itself?
Yes. If the refill hose end sits below the tank waterline, it can siphon water into the bowl and make the fill valve turn on later. Route and secure it exactly as the model instructions show, then retest for delayed refilling.
Is it safe to keep using a toilet that will not stop running?
Do not leave an uncontrolled overflow or floor leak running. If the supply stop operates normally, isolate water while arranging service; stop for a cracked tank or bowl, a stop valve that will not close, or water near electrical equipment.
When should I call a plumber for a Kohler toilet that keeps running?
Call when accessible chain, seal, refill-hose, float, and water-level checks do not stop the running, or when the next step involves a flush-valve seat, tank base, concealed plumbing, tank removal, cracked porcelain, or model-specific parts.
Read the exact guide
Official sources
- Homeowners GuideKohler · Kohler owner guide for specified toilet designs; the installed product manual controls exact parts and procedures.
- How to Fix a Running ToiletKOHLER · Kohler homeowner guidance used for general running-toilet diagnosis; the installed toilet's manual controls exact adjustment and replacement steps.
- Toilet Constantly Leaking or RunningKohler Assist · Kohler support guidance for one- and two-piece toilets; exact model instructions control parts and procedures.
- Tank Leak - Fill Valve Hose PositionKohler Assist · Kohler support guidance for compatible toilet tank designs; exact model routing and clips control.
Community feedback
Share a repair observation
Share a plain-text repair observation. Accepted observations are published automatically; this page may take a moment to update.