
On this page
Start here
Quick answer
An American Standard toilet leaking at the base can be a failed floor seal, a loose or damaged flange connection, or clean water running down from the tank or supply line. Dry the floor and toilet, then flush while watching the supply connection, tank-to-bowl joint, bowl sides, and base. Water that appears at the base only during or just after a flush makes the wax ring or other floor seal more likely; water that appears before flushing points higher up. Do not rock or lift the toilet, overtighten its mounting bolts, or caulk over an active leak. Stop using it if water is reaching the subfloor or ceiling below, the bowl or tank is cracked, or the leak cannot be isolated, and arrange qualified plumbing service.
Before you begin
Safety first
- The homeowner scope is limited to drying and tracing the leak, checking accessible connections, observing a controlled flush, and isolating water with a normally operating stop. Do not rock or lift the toilet, overtighten porcelain hardware, pry or scrape the flange, handle wastewater without protection, or cover an active leak with caulk.
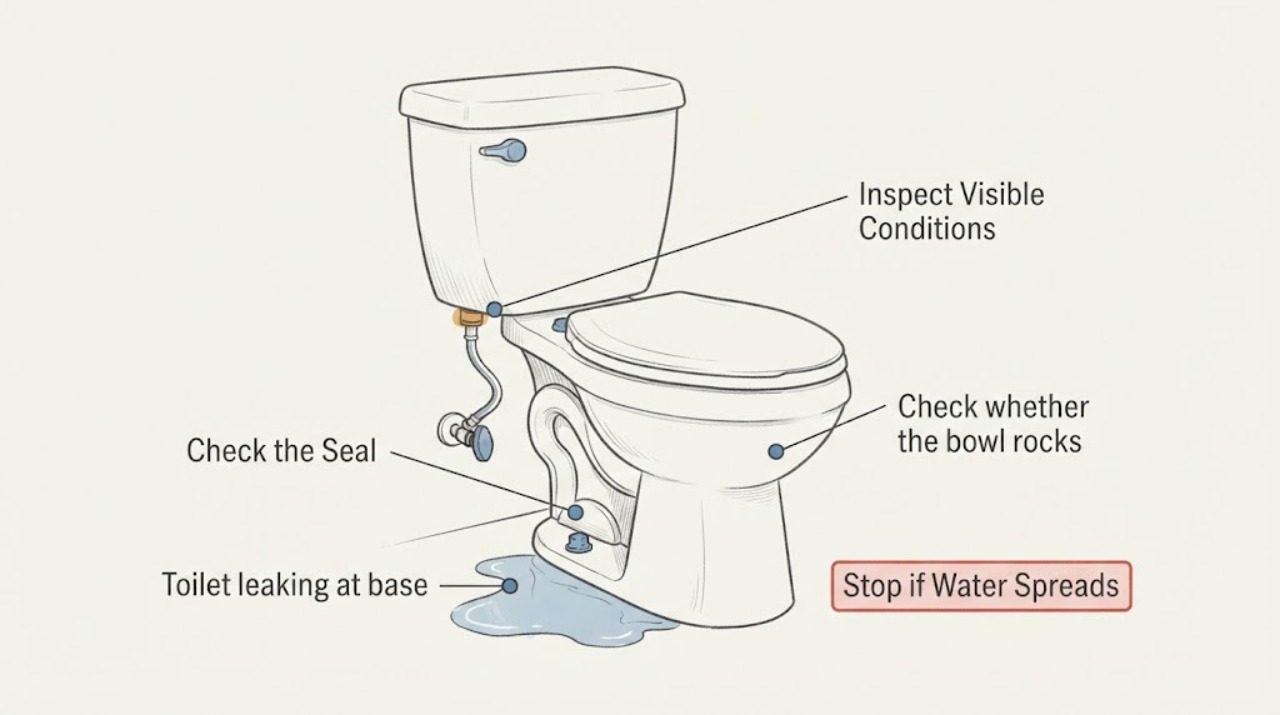
Work through in order
Diagnostic checks
Use only checks that match the exact appliance or system and its official guide.
-
Check 1
Stop flushing, dry the floor and every accessible toilet connection, then place dry tissue or towels at the supply connection, tank-to-bowl joint, bowl sides, and base. Flush once while watching from above downward; do not rock the toilet.
Expected result: Water appears at the supply connection; at the tank-to-bowl joint; on the bowl exterior; at the base only during or after the flush; or the floor is already wet before flushing.
Next step: Photograph the first wet point and isolate the water supply if the leak is active and the stop operates normally. Do not remove the bowl just to inspect under it.
Stop if: Stop use for uncontrolled water, sewage-like contamination, a cracked tank or bowl, a soft or stained floor, water reaching a ceiling below, or a supply stop that will not close.
Why this matters
Why: The highest wet point is more useful than the largest puddle. A supply or tank joint points to an upper connection, while water emerging at the floor joint during a flush makes the floor seal or flange path more likely. Pre-existing floor water may have another source.
-
Check 2
Check the supply connection and tank-to-bowl joints with the tank full but before flushing. Look for a bead forming at the supply line, shutoff, tank bolts, or tank gasket, and confirm whether the bowl itself is dry.
Expected result: The leak begins before a flush; it appears only while the tank refills; the tank joint is wet; or all upper connections remain dry.
Next step: Correct only an accessible connection according to the American Standard model instructions; do not tighten porcelain hardware aggressively. If the upper path is dry, continue with a controlled base observation and service boundary.
Stop if: Stop for a cracked tank, damaged supply tube, spraying connection, water under the tank, or any need to remove tank hardware without the exact model procedure.
Why this matters
Why: A leak before flushing favors the supply or tank assembly rather than the floor seal. A dry tank and supply path with a flush-triggered base leak leaves the bowl outlet, wax ring or gasket, flange, and drain connection as stronger possibilities.
-
Check 3
Check whether the bowl rocks or shifts when touched lightly at the rim, and inspect the visible base for a gap, broken mounting cap, or cracked porcelain. Do not sit on or deliberately move the toilet to reproduce the leak.
Expected result: The bowl is stable; it rocks; the base or mounting area is cracked; or the visible base is sound but water still appears after a flush.
Next step: Keep a rocking or cracked toilet out of service and arrange service to inspect the flange and floor. Do not compensate with random shims, extra bolt torque, or caulk over the leak.
Stop if: Stop immediately for porcelain cracks, floor softness, a broken flange, visible wastewater, or movement that worsens when the toilet is touched.
Why this matters
Why: A rocking bowl can break or disturb the floor seal and may indicate a flange or floor problem. Cracked porcelain is a product and water-damage risk. A stable bowl does not rule out a failed seal, because the seal can leak without visible movement.
-
Check 4
Use the installation history and leak timing as evidence. Note whether the toilet was recently installed, lifted, rocked, or had flooring work around it, and whether water appears only during a flush or continues while idle.
Expected result: The leak began after installation or movement; it occurs only during a flush; it continues while idle; or there is no relevant installation event.
Next step: Keep the toilet dry and limit use while arranging the appropriate repair. If removal is required, follow the exact American Standard procedure or use qualified service to avoid spreading contamination or damaging the flange.
Stop if: Do not lift, rock, or reset the toilet as a test, and stop if the floor is soft, the flange is inaccessible or damaged, or wastewater is escaping.
Why this matters
Why: A disturbed or poorly seated wax ring or gasket becomes more likely after movement or installation. A flush-only base leak supports the drain-seal path; continuous water suggests an upper connection, condensation, or another plumbing source that should be found before removing the toilet.
-
Check 5
After any permitted upper-connection correction, dry the area and repeat several controlled flushes while checking the same points. Verify that the supply, tank joints, bowl, and base remain dry through refill and flush, and check the room or ceiling below for new staining.
Expected result: The toilet stays dry; water returns at an upper connection; water returns at the base during a flush; or the floor or ceiling below shows spreading damage.
Next step: Isolate the supply if possible, stop using the toilet, and arrange qualified plumbing service for a base leak, flange inspection, floor repair, or any hidden water damage. Provide the leak timing and photos.
Stop if: Stop for sewage contamination, uncontrolled water, soft flooring, ceiling damage, cracked porcelain, or any repair requiring toilet removal without suitable water and sanitation control.
Why this matters
Why: A repeatable upper leak narrows the repair to that connection. A repeatable base leak after upper connections are dry supports a floor-seal, flange, or drain issue. Spreading floor or ceiling damage raises the urgency and the need to stop using the fixture.
Use your observations
Decision map
Find the observation that best matches what you see, then follow the next safe action.
-
PATH 01Safety boundary
What you see
Water is first visible at the supply line, shutoff, tank bolts, or tank-to-bowl connection before the bowl is flushed.
Do this next
Keep the base dry, isolate the supply if the stop works normally, and follow the exact model instructions or arrange plumbing service for the upper connection.
Why this path and its safety boundary
Safety stop: Do not tighten porcelain hardware aggressively or continue using a spraying or cracked connection.
-
PATH 02Safety boundary
What you see
Upper connections stay dry, but water emerges from the base only during or immediately after a flush.
Do this next
Treat the toilet-to-floor seal, floor flange, or drain connection as the leading path and arrange service or follow the exact removal and resealing procedure.
Why this path and its safety boundary
Safety stop: Do not rock, lift, or caulk over the base to test or conceal the leak.
-
PATH 03Safety boundary
What you see
The toilet rocks, the mounting area is damaged, or the leak began after the toilet was installed, lifted, or moved.
Do this next
Stop using the toilet and have the flange, floor, mounting, and seal inspected; movement may have broken the wax-ring or gasket seal.
Why this path and its safety boundary
Safety stop: Do not cure movement by overtightening mounting bolts or forcing the bowl against the floor.
-
PATH 04Safety boundary
What you see
The floor is wet while the toilet is idle, but the bowl, tank, and supply path have not yet been proven dry.
Do this next
Dry and trace the leak from the highest wet point, including nearby plumbing and condensation, before attributing it to the base seal.
Why this path and its safety boundary
Safety stop: Do not remove the toilet based only on a puddle at the base.
-
PATH 05Safety boundary
What you see
A suspected base leak continues after accessible upper connections are dry, or the floor or ceiling below is staining or soft.
Do this next
Isolate water, stop using the toilet, protect the floor, and arrange qualified plumbing service for toilet removal, flange inspection, seal replacement, and water-damage assessment.
Why this path and its safety boundary
Safety stop: Do not keep flushing, lift the bowl without a sanitation and water-control plan, or seal around the outside as a substitute for the failed seal.
-
PATH 06Safety boundary
What you see
The tank or bowl is cracked, wastewater is uncontrolled, the shutoff will not close, or water is near electrical equipment.
Do this next
Stop using the fixture, leave the area safe, isolate water only if it can be done without force or contact with hazards, and obtain urgent plumbing help.
Why this path and its safety boundary
Safety stop: Do not handle broken porcelain, force a seized valve, or continue operating the toilet.
Helpful context
Understand the symptom
Find the highest wet point before blaming the base seal
Water can travel down porcelain and collect at the base. Dry the floor, supply line, tank joints, and bowl, then flush once while watching with a flashlight. A supply connection or tank-to-bowl gasket can leak continuously or during refill; wastewater that appears only at the floor joint during a flush is more consistent with the toilet-to-flange seal. Do not assume the visible puddle marks the failed component.
The floor seal is not an outside caulk repair
The wax ring or approved gasket sits between the toilet outlet and floor flange. If the toilet has rocked, been lifted, or was not seated evenly, that seal may be compromised. American Standard's guidance places the ring on the bowl or flange before setting the toilet and calls for a controlled installation; a suspected failed seal normally means the toilet must be removed and the flange and floor checked.
Do not overtighten a loose-looking toilet
Mounting hardware holds the bowl in position but is not a substitute for a floor seal. Over-tightening can damage porcelain, while rocking can break the seal. If the toilet moves, the flange or floor may need correction rather than more torque. Keep the toilet out of service until the leak and movement are addressed.
Retest every connection after the cause is corrected
After a model-appropriate repair, refill slowly and flush several times while checking the supply connection, tank joints, bowl, and base. Dryness after one test is not enough if water is trapped under the bowl or a seal shifts. If the leak returns, do not cover the joint with caulk or keep flushing; document the timing and obtain a plumbing diagnosis.
Only after diagnosis
Potential parts
- toilet wax ring or approved floor gasket
Consider this seal only when the upper connections are dry and water is repeatably emerging at the base during a flush, or inspection finds that the existing floor seal was disturbed or damaged.
Confirm the exact toilet outlet, floor flange, installation type, and manufacturer instructions; do not choose a seal from the puddle location alone. - toilet floor flange and mounting hardware
Consider flange or mounting components only when the bowl rocks, the flange is cracked or displaced, or removal confirms that the seal cannot seat correctly.
Flange geometry, fasteners, floor construction, and toilet rough-in must be verified after removal; do not overtighten bolts into porcelain. - toilet supply connector or tank-to-bowl gasket
Consider these categories only when the leak starts at the supply connection or tank-to-bowl joint before or during refill and the exact connection is confirmed wet.
Match the exact American Standard model, connection type, gasket profile, and installation instructions; a base puddle does not establish an upper-connection failure.
When checks do not resolve it
Need a professional?
Escalate for a flush-triggered base leak, rocking bowl, broken or inaccessible flange, soft floor, cracked tank or bowl, persistent supply or tank-joint leak, or any repair requiring toilet removal and floor-seal replacement.
Safety scope: The homeowner scope is limited to drying and tracing the leak, checking accessible connections, observing a controlled flush, and isolating water with a normally operating stop. Do not rock or lift the toilet, overtighten porcelain hardware, pry or scrape the flange, handle wastewater without protection, or cover an active leak with caulk.
Have this ready
- Provide the American Standard model, one- or two-piece design, leak timing, highest wet point, flush and refill observations, installation or movement history, photos of the base and connections, floor or ceiling damage, and whether the supply stop isolates water.
Common questions
FAQ
Why is my American Standard toilet leaking at the base?
The water may be coming from the floor seal or flange, but a supply connection or tank-to-bowl joint can run down and collect at the base. Dry every connection and watch the first wet point during a controlled flush before deciding which part failed.
Does a base leak always mean the wax ring is bad?
No. Water can travel from a supply line, tank joint, or condensation. A flush-triggered leak with dry upper connections makes the floor seal or flange more likely, but confirming it may require toilet removal and inspection.
Can I tighten the toilet bolts to stop a leak at the base?
Do not use extra bolt torque as a repair. A rocking toilet may need flange, floor, or seal correction, and overtightening can crack porcelain or worsen the seal. Keep the fixture out of service and arrange a proper inspection.
Should I caulk around an American Standard toilet base that leaks?
Do not caulk over an active leak or use caulk to hide movement. Trace and correct the water source first; a suspected floor-seal leak normally requires inspection of the wax ring or gasket and floor flange.
When should I call a plumber for a toilet leaking at the base?
Call when the base leak repeats during flushing, the bowl rocks, the floor or flange may be damaged, water reaches the ceiling below, the porcelain is cracked, or the next step requires lifting the toilet and replacing its floor seal.
Read the exact guide
Official sources
- How to Install a ToiletKOHLER · Kohler general installation guidance used for cross-brand floor-seal and porcelain safety context; American Standard model instructions control this toilet.
- How To Install The Acticlean ToiletAmerican Standard · American Standard installation guidance for the ActiClean model; exact model instructions control other American Standard toilets.
- What Type Of Wax Ring Should I UseAmerican Standard · American Standard general wax-ring guidance; toilet and flange design determine the appropriate seal.
- GlossaryAmerican Standard · American Standard plumbing glossary used for component roles; exact product instructions control installation details.
Community feedback
Share a repair observation
Share a plain-text repair observation. Accepted observations are published automatically; this page may take a moment to update.