
On this page
Start here
Quick answer
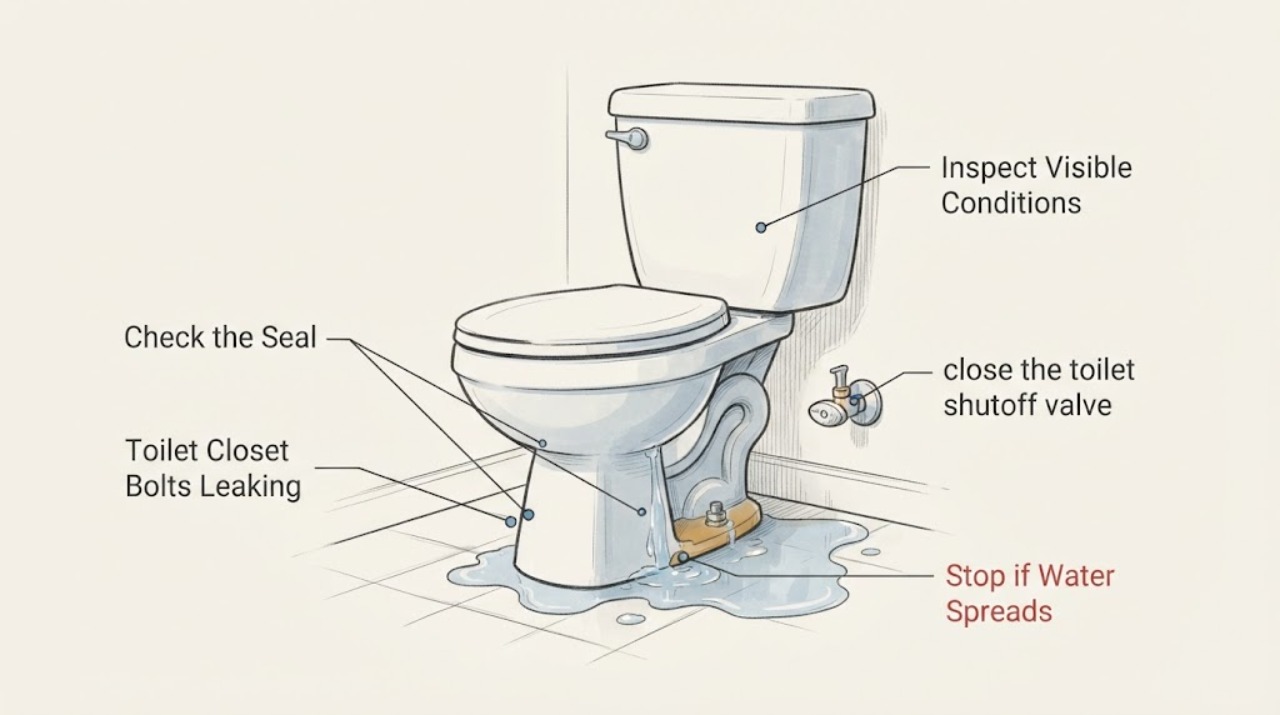
Closet bolts hold a Glacier Bay toilet to the floor, but the wax or rubber seal around the drain opening normally keeps flush water from escaping. Stop using the toilet, dry the floor, and identify whether fresh water appears only after a flush, while the tank refills, or at the supply connection. A leak after flushing together with a rocking bowl points to a disturbed seal or a flange problem; a leak before flushing is more consistent with the tank, fill valve, or supply line. Do not keep tightening the bolts because porcelain can crack. If the bowl rocks, the flange is damaged, water is steady or contaminated, the floor is soft, or the toilet must be lifted, shut off the supply and arrange plumbing service unless you are equipped to perform a complete reseal.
Work through in order
Diagnostic checks
Use only checks that match the exact appliance or system and its official guide.
-
Check 1
Stop flushing, place dry paper towels around both closet-bolt caps and the full toilet base, and watch for one new drop without moving the bowl. Check the tank bottom, tank-to-bowl joint, fill valve, shutoff valve, and supply line from a dry position.
Expected result: The towel at the base becomes wet after a flush, the towel near the supply connection becomes wet before a flush, or no towel becomes wet after the area is dried.
Next step: Follow the matching branch below. Keep the supply valve closed if water is steady, the floor is being damaged, or the source cannot be isolated.
Why this matters
Why: Water after a flush makes the bowl seal or flange more likely; water during refill makes a supply or tank connection more likely; no new water suggests a spill, cleaning water, condensation, or a slow leak that needs a longer observation.
-
Check 2
With the bowl dry and the lid closed, gently press the rim from opposite sides to check for movement; do not rock it hard and do not use the closet-bolt nuts to pull a tilted bowl down. Look for a gap under the base, a missing bolt cap, a loose nut, or a nut that spins with a corroded bolt.
Expected result: The bowl rocks or lifts slightly, the base is not evenly supported, a bolt or nut is visibly damaged, or the bowl is solid and level.
Next step: Do not overtighten. If the bowl moves or the hardware is corroded, close the supply and plan a reseal with an inspection of the flange; get help lifting the toilet or call a plumber if removal is outside your safe ability.
Why this matters
Why: Movement can interrupt the seal and can indicate a loose, broken, or poorly positioned flange. A stable bowl does not rule out a failed seal, but it makes a supply or tank leak more plausible when water appears before flushing.
-
Check 3
If the leak appears at the base after a flush, close the toilet shutoff valve clockwise, flush once to lower the tank level, and sponge out accessible water. Do not remove the bowl merely to tighten a bolt; first confirm that you can safely disconnect the supply and handle a heavy fixture.
Expected result: The leak stops when flushing stops, the bowl seal has been disturbed, the bowl rocks, or the floor below shows a stain or soft area.
Next step: For a capable DIY repair, remove the bowl, clean away the old seal, inspect the flange, install a new seal, set the bowl straight down without rocking, and tighten the mounting nuts evenly only until seated. Otherwise leave the supply off and arrange a plumber.
Why this matters
Why: A flush-dependent leak is consistent with a failed wax or rubber seal, an uneven reset, or flange damage. Water damage below the toilet raises the urgency and may involve the subfloor.
-
Check 4
If water appears before a flush, dry the base again and place separate towels around the supply-line nut, shutoff valve stem, fill-valve connection, tank bolts, and tank-to-bowl joint. Open the shutoff valve only briefly from a dry position while watching those towels.
Expected result: One towel at a supply or tank connection gets wet before flushing, while the base towel stays dry; or the base towel gets wet even with no flush.
Next step: Close the shutoff valve and correct only a clearly accessible connection according to the exact Glacier Bay model instructions; do not force a seized valve or keep using a connection that sprays. If the first wet point is hidden, the porcelain is cracked, or the leak continues with the valve closed, call a plumber.
Why this matters
Why: A refill-time leak is more likely upstream of the bowl seal. A base leak with no flush can still be a slow seal failure, a crack, or water tracking from above, so the first wet point matters.
-
Check 5
After a new seal or connection repair, refill the tank and make two supervised flushes while keeping paper towels at the base, bolt areas, and supply connection. Wait between flushes and inspect the floor below if it is accessible.
Expected result: The towels stay dry and the bowl remains level, the base leaks only when flushed, or the bowl shifts and the leak returns.
Next step: Stop testing after a failed retest. Do not hide an active leak with caulk; close the supply and have the flange, seal, and floor checked. Apply any finish caulk only after the repair is proven dry and the product instructions allow it.
Why this matters
Why: A dry, stable result supports a successful repair. A returning flush leak or renewed movement means the seal is not compressed correctly or the flange, floor, or bowl still has a defect.
Use your observations
Decision map
Find the observation that best matches what you see, then follow the next safe action.
-
PATH 01Next step
What you see
Do this next
Keep the toilet out of service, close the shutoff valve, and replace the seal while inspecting the flange; use a plumber if the flange or floor is damaged or the bowl cannot be lifted safely.
-
PATH 02Next step
What you see
Do this next
Close the shutoff valve, repair or replace only the identified connection with model-appropriate parts, and retest from a dry floor. Call a plumber if the shutoff will not close or the connection is inaccessible.
-
PATH 03Next step
What you see
Do this next
Do not rely on caulk or extra nut torque. Have the bowl removed for a flange and subfloor inspection, then install a new seal and mounting hardware as needed.
-
PATH 04Next step
What you see
Do this next
Stop flushing, close the water supply if safe, protect the floor, and arrange prompt plumbing service. Do not lift the toilet or open the drain connection without help if the fixture is heavy or the area is contaminated.
Helpful context
Understand the symptom
The bolt is usually not the water seal
The two closet bolts anchor the bowl through the floor flange. The seal around the bowl outlet is what contains flush water and sewer gas. Water under the bolt cap can therefore be a failed or unevenly compressed seal, a loose or broken flange, or water that ran down from the tank or supply connection. A Glacier Bay model number can help identify the correct installation instructions, but the leak pattern matters more than the brand name for this first diagnosis.
Protect the floor before testing
Keep the area dry enough to trace a new drop. Use gloves and paper towels around the base, the rear supply connection, and the tank-to-bowl area. Flush only when the bowl is stable and there is no active overflow. If wastewater reaches the floor, stop flushing and treat the leak as contaminated plumbing water.
Removal means a new seal
If the bowl is removed, plan on a new wax or approved rubber seal; do not reuse the old seal. The flange must be inspected while the bowl is off. A flange that is cracked, badly corroded, below the finished floor, or no longer anchored can defeat a new seal, so a mounting-bolt replacement alone will not solve that condition.
Safety boundary
Stop conditions
- Stop flushing immediately for a steady leak, wastewater on the floor, an overflow, or water reaching electrical equipment.
- Do not tighten the closet-bolt nuts further if the bowl is tilted, the porcelain is stressed, the bolt spins, or the flange moves.
- Stop and arrange plumbing service for a cracked bowl or flange, soft or stained flooring, hidden leakage, a shutoff valve that will not close, severe corrosion, or a leak that returns after a new seal.
- Do not lift the toilet alone or work with an open drain if the fixture is too heavy or the area cannot be kept hygienic.
Only after diagnosis
Potential parts
- toilet wax or rubber bowl seal
Consider this only when water is confirmed at the bowl base after a flush or when the bowl is removed for inspection; the old seal must not be reused.
Confirm the Glacier Bay model, flange height, drain configuration, and seal instructions before choosing a wax or rubber design. - toilet closet bolt set
Consider this only when the existing mounting bolts or nuts are bent, corroded, stripped, or removed during a seal repair.
Confirm the flange slot shape, bolt length, washer and nut arrangement, and Glacier Bay installation instructions; bolts do not replace the bowl seal. - toilet flange repair ring or spacer
Consider this only after the bowl is removed and the flange is confirmed cracked, corroded, loose, or below the finished floor.
Match the repair method to the flange material, floor, drain pipe, and local requirements; follow the selected product instructions. - toilet water supply line
Consider this only when a dry-floor tracing test identifies the supply line or its fittings as the first wet point.
Verify the shutoff and fill-valve connection sizes and the Glacier Bay model instructions before fitting a replacement.
When checks do not resolve it
Need a professional?
Call a plumber when the leak is flush-dependent and the bowl must be removed, when the flange or floor may be damaged, when the supply cannot be isolated, or when any water or wastewater continues after the initial shutoff.
Common questions
FAQ
Can tightening Glacier Bay closet bolts stop a leak at the toilet base?
Only if the bowl is already seated correctly and the hardware is merely loose, and even then use very small, alternating adjustments. The bolts do not form the water seal. Extra torque can crack porcelain or damage the flange, so a flush-dependent leak usually calls for a new seal and a flange inspection.
How can I tell whether the leak is from the supply line or the bowl seal?
Dry the area and use separate paper towels at the supply connection and around the bowl base. Water before a flush at the supply towel points upstream; water that appears only after flushing at the base makes the bowl seal or flange more likely.
Should I reuse the wax ring if I remove the toilet?
No. A removed toilet needs a new wax or approved rubber seal. Inspect the flange and finished floor first, because a cracked, loose, or low flange can defeat the replacement seal.
Is caulk a fix for an active leak at the toilet base?
No. Caulk may finish the joint after a dry repair, but it should not conceal an active leak or substitute for a sound seal and flange. Stop flushing and arrange service when the source is not clear or the leak returns.
Read the exact guide
Official sources
- How to Repair or Replace a Toilet FlangeOatey · Oatey guidance on cracked, corroded, low, or loose toilet flange diagnosis and repair boundaries
- Find a WaterSense® Labeled High-Efficiency ToiletU.S. Environmental Protection Agency · EPA WaterSense high-efficiency toilet listing that includes Glacier Bay models
- How to Replace, Repair & Re-attach Your ToiletOatey · Oatey residential toilet removal, flange assessment, wax seal reset, mounting bolts, and leak testing guidance
- How to Replace a Toilet Wax Ring to Fix Toilet LeaksOatey · Oatey guidance on toilet-base seals, closet bolts, flange inspection, and leak retesting
Community feedback
Share a repair observation
Share a plain-text repair observation. Accepted observations are published automatically; this page may take a moment to update.