
On this page
Start here
Quick answer
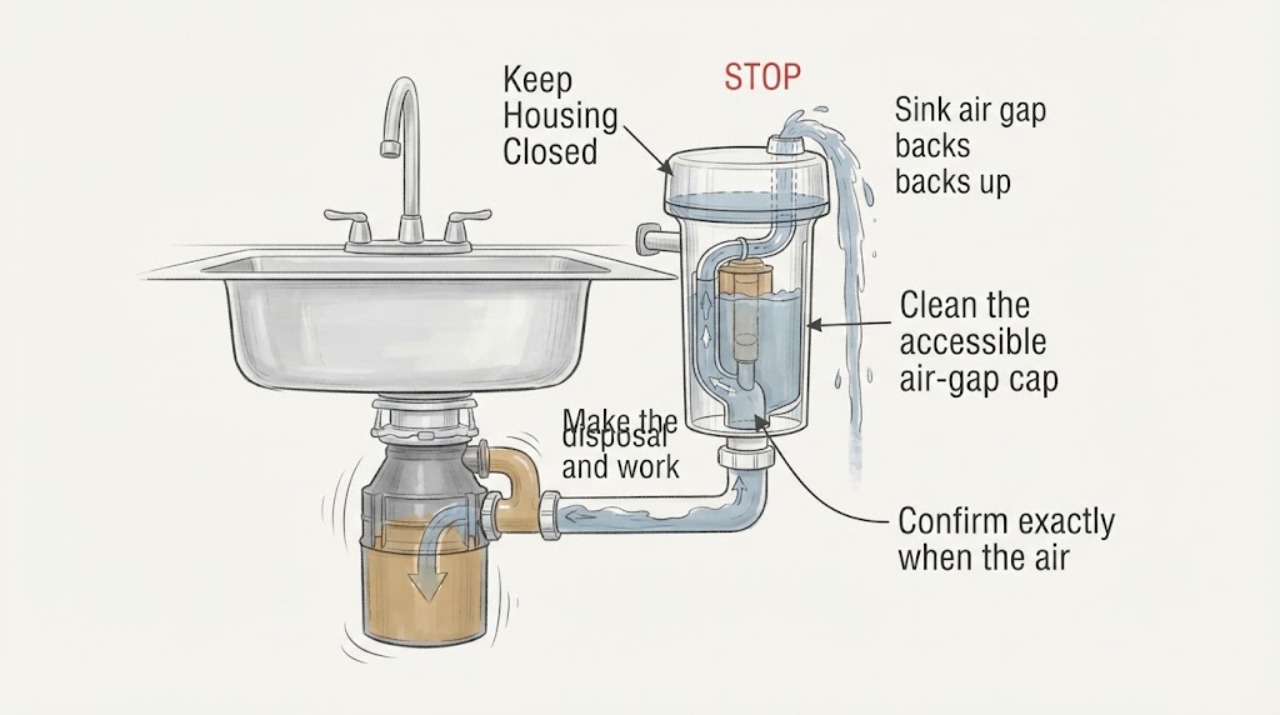
A Delta sink air gap that spills or backs up when the garbage disposal runs usually points to a restriction downstream of the air gap: the small cap or vent may be dirty, the hose to the disposal may be kinked or clogged, the disposal inlet may still have its installation knockout plug, or the sink drain or trap may be restricted. Turn off power to the disposal before removing the cap or inspecting hoses, keep hands and tools out of the disposal, and do not pour chemical drain cleaner into the system. Clean only the accessible air-gap cap and visible hose path as the manufacturer's instructions allow. If the sink also backs up with the disposal off, the disposal leaks or hums, water reaches electrical parts, or the overflow continues after the drain path is clear, stop and call a qualified plumber or appliance technician.
Work through in order
Diagnostic checks
Use only checks that match the exact appliance or system and its official guide.
-
Make the disposal and work area safe
Stop the disposal and switch off its circuit breaker or disconnect its plug before removing the air-gap cap, touching a hose, or looking into the disposal inlet. Keep the sink area dry, place a towel and shallow container under the connections, and never put a hand or tool into the disposal.
Expected result: Power is confirmed off and the water is contained; the disposal is hard-wired or cannot be safely isolated; water is near an outlet or electrical component; or there is a leak, burning smell, or damaged wiring.
Next step: Continue only with a dry, de-energized, accessible setup. Otherwise leave the disposal off and call a qualified plumber or appliance technician.
Stop if: Do not work on an energized disposal, reach into the grinding chamber, or restore power while hoses or covers are disconnected.
Why this matters
Why: The air gap and drain hoses are close to electrical equipment and can release contaminated water. An appliance that cannot be safely isolated or shows electrical or leak damage is not a routine cap-cleaning job.
-
Confirm exactly when the air gap overflows
Without putting hands near the disposal, record whether water appears at the Delta air gap only when the disposal runs, when the sink drains with the disposal off, during dishwasher draining, or all the time. Do not keep running the disposal if water rises rapidly, the motor hums, or a leak appears.
Expected result: Overflow occurs only with the disposal; the sink drains slowly even when the disposal is off; water appears during dishwasher drain; or the air gap leaks without a drain event.
Next step: Use the matching branch to choose the next safe inspection. Keep the disposal off if the symptom is rapid, persistent, noisy, or accompanied by a leak.
Stop if: Do not repeatedly cycle a disposal that hums, grinds, leaks, or pushes water toward electrical parts.
Why this matters
Why: Overflow tied to disposal operation favors a restriction at the disposal inlet or the air-gap outlet path. A sink that backs up with the disposal off favors the trap or downstream drain. Water during dishwasher drain can expose an air-gap or hose restriction, while a constant leak can indicate a loose or damaged fitting.
-
Clean the accessible air-gap cap and vent
With disposal power off, lift or unscrew the Delta air-gap cover only as its instructions permit. Rinse the cap and inspect the vent opening and visible chamber for food particles, grease, or mineral buildup; use a soft, long-handled bottle brush for accessible tubing and do not force debris deeper.
Expected result: The cap or vent is visibly blocked and clears, the air-gap body is loose or cracked, or the cap and accessible passage are already clean.
Next step: Rinse and reseat the cap securely, then inspect the outlet-side hose before any brief, supervised drain observation. Replace the air-gap assembly only if its exact model and damage are confirmed.
Stop if: Do not drill, pry, enlarge openings, use a sharp tool, or remove the entire fitting while hoses are wet or power is not isolated.
Why this matters
Why: A local air-gap blockage can restrict the dishwasher-to-drain path and force water to spill over the cap. A cracked or loose body can leak independently. A clean, intact air gap shifts attention to the hose, disposal inlet, sink drain, or trap.
-
Inspect the outlet hose and disposal connection
With power still off, look under the sink at the larger Delta air-gap outlet and its hose or pipe to the disposal or sink trap. Check for a kink, crushed section, sag that holds water, loose clamp, food debris at the connection, or a blocked disposal inlet. Use towels and a pan if a connection is opened, and do not detach a concealed or difficult connection yourself.
Expected result: The hose is kinked, crushed, sagging, loose, or blocked; the disposal was recently installed or replaced; the inlet appears to retain a knockout plug; or the visible path is clear.
Next step: Correct only an accessible hose-routing or clamp issue allowed by the installation instructions. Have the installer or qualified technician remove a retained knockout plug or address a concealed, jammed, or damaged connection.
Stop if: Do not put a hand into the disposal, hammer a plug while the unit is connected, use a chemical cleaner, or force a hose off a brittle fitting.
Why this matters
Why: The air gap can overflow when the outlet path cannot pass the disposal or dishwasher discharge. A retained knockout plug blocks the disposal inlet completely after a new disposal installation; a clear visible hose makes the sink drain or an internal disposal restriction more likely.
-
Compare sink drainage with the disposal off
After the cap and visible outlet path are restored, keep the disposal off and run a modest amount of clean water into the sink basin while watching the drain and air gap. If the sink has two basins, compare each basin without putting hands near the disposal. Stop as soon as water rises or leaks.
Expected result: The sink drains freely with the disposal off; the sink backs up or drains slowly; water rises in the air gap even though the disposal is off; or water leaks below the sink.
Next step: Do not operate the disposal until the responsible drain path is cleared. Arrange plumbing service for a trap or concealed drain obstruction, persistent air-gap rise, or any leak.
Stop if: Do not pour chemical drain opener into the sink or dishwasher path and do not continue filling a sink that is backing up.
Why this matters
Why: Free sink drainage makes a disposal inlet or air-gap outlet restriction more likely when overflow returns only with disposal operation. Slow drainage with the disposal off points toward the trap or downstream sink plumbing. Air-gap rise without disposal operation suggests the outlet path remains restricted, and a leak needs its own repair.
-
Escalate a disposal, leak, or persistent-backup pattern
If the Delta air gap still backs up after accessible cleaning and hose checks, or if the disposal hums, grinds, leaks, fails to move water, or has a suspected internal obstruction, leave the disposal off. Record the exact location and timing of the overflow and provide photographs from a dry, safe distance to the technician.
Expected result: The overflow stops after a visible blockage is cleared; the air gap continues to spill; the disposal is noisy or not moving water; a concealed connection or trap is restricted; or the disposal or hose leaks.
Next step: Use the disposal only after the drain path and any leak have been professionally cleared. Schedule qualified plumbing or appliance service for persistent, noisy, leaking, concealed, or electrical-related symptoms.
Stop if: Do not remove the disposal, trap, or concealed drain, bypass a leak, or restore power to a disposal with an obstruction or damaged wiring.
Why this matters
Why: A resolved local obstruction supports a clear air-gap or hose restriction. Continued overflow or disposal noise makes a deeper drain restriction, pump or disposal problem, damaged fitting, or concealed connection more likely than a cap issue.
Use your observations
Decision map
Find the observation that best matches what you see, then follow the next safe action.
-
PATH 01Next step
What you see
The Delta air gap overflows only when the disposal runs, while the sink drains normally with the disposal off, and the cap or outlet hose shows debris, a kink, sagging, or a blocked disposal inlet.
Do this next
With power isolated, clean the accessible cap and correct only safe hose routing. Have a qualified installer or technician address a retained knockout plug, concealed blockage, or damaged connection.
Why this path and its safety boundary
Why it matters: A restriction in the air-gap-to-disposal path or at the disposal inlet is more likely than a general sink-trap blockage.
-
PATH 02Next step
What you see
The air-gap cap or vent contains food or grease buildup, the body is intact, and overflow improves after the accessible passage is cleaned and the cap is reseated.
Do this next
Monitor the next drain event without putting hands near the disposal and clean accessible buildup periodically. If overflow returns, inspect the outlet path and sink plumbing rather than repeatedly scrubbing the cap.
Why this path and its safety boundary
Why it matters: A local air-gap restriction was likely interrupting discharge flow; the Delta fitting still needs to remain installed as backflow protection.
-
PATH 03Next step
What you see
The sink backs up or drains slowly with the disposal off, or water remains in the trap or downstream drain while the visible air-gap path is clear.
Do this next
Stop adding water and arrange qualified plumbing service for the trap or concealed drain. Do not use chemical drain opener in a system connected to a disposal or dishwasher.
Why this path and its safety boundary
Why it matters: The sink trap or downstream plumbing is more likely restricted than the Delta air-gap cap itself.
-
PATH 04Safety boundary
What you see
The problem began after the garbage disposal was installed or replaced, and the dishwasher hose enters the disposal inlet but water cannot pass through.
Do this next
Keep the disposal off and contact the installer or a qualified technician to verify the inlet and remove the plug using the correct procedure.
Why this path and its safety boundary
Why it matters: A retained disposal knockout plug is a strong installation-specific possibility; it cannot be safely confirmed by running the disposal or reaching into it.
Safety stop: Do not hammer, drill, or pry an inlet plug while the disposal is connected or while your hand could enter the grinding chamber.
-
PATH 05Safety boundary
What you see
The air gap remains backed up after accessible cleaning and hose checks, the disposal hums or grinds, a hose or fitting leaks, water reaches electrical parts, or the blockage is concealed.
Do this next
Leave the disposal off and call a qualified plumber or appliance technician. Provide the overflow timing, whether the sink backs up with the disposal off, recent installation history, and safe photographs.
Why this path and its safety boundary
Why it matters: A disposal fault, deeper drain restriction, damaged air-gap or hose connection, or electrical concern is more likely than a removable cap blockage.
Safety stop: Do not remove the disposal or trap, reach into the unit, use chemical cleaner, or restore power until the obstruction or leak has been evaluated.
Helpful context
Understand the symptom
What the air gap overflow is telling you
The counter-mounted air gap separates the dishwasher drain hose from the hose or pipe that continues to the disposal or sink trap. Delta's specification identifies the fitting as backflow protection and distinguishes its inlet and outlet connections. When the disposal runs, a restriction on the outlet side can make water rise through the air gap instead of leaving through the drain. The overflow is a warning of restricted flow, not a reason to bypass or remove the air gap.
Use the symptom timing to narrow the side of the blockage
If the air gap spills only while the disposal runs, the disposal inlet, the hose from the air gap, or the sink drain path is more suspicious than the dishwasher itself. If the sink backs up even with the disposal off, the trap or downstream drain may be restricted. Whirlpool's guidance also calls out a retained knockout plug after disposal replacement. Compare these patterns before replacing the Delta air-gap fitting.
Keep cleaning limited to accessible, safe parts
With power to the disposal off, the air-gap cap and visible hose path can be checked for food debris, kinks, sagging, or loose connections. Whirlpool recommends cleaning accessible air-gap buildup and using a soft bottle brush for tubing, while warning that persistent overflow needs professional help. Do not use chemical drain opener, reach into the disposal, or disconnect a wet connection near energized equipment.
Know when this is a plumbing or disposal repair
A clear cap does not prove the entire drain is clear. A downstream restriction, retained disposal plug, failed connection, disposal jam, trap blockage, or leak can still force water out of the air gap. Stop if there is a leak, standing water near electrical parts, repeated overflow, a disposal that hums without moving water, or any work that requires removing a disposal, trap, or concealed hose.
Safety boundary
Stop conditions
- Turn off and isolate disposal power before removing the air-gap cap or inspecting a hose; never put a hand or tool into the disposal.
- Do not use chemical drain opener in the sink, dishwasher drain path, or garbage disposal.
- Keep the disposal off for a leak, damaged wiring, water near electrical parts, humming or grinding, rapid overflow, or an obstruction that is not accessible without disassembly.
- Do not remove a disposal, trap, concealed hose, or knockout plug as a casual homeowner check; use the exact installation instructions or a qualified professional.
Only after diagnosis
Potential parts
- kitchen air-gap body and cap assembly
Consider this category only if the Delta air-gap body or cap is cracked, loose, missing, or damaged after the drain path has been evaluated; a backup alone does not prove the fitting failed.
Confirm the exact Delta model, hose sizes, mounting arrangement, and local plumbing requirements before selecting a replacement. - dishwasher-to-disposal drain hose and clamps
Consider this category only if a qualified inspection finds a kinked, crushed, leaking, or damaged hose or connection that remains restricted after safe routing checks.
Match the hose routing, connection sizes, clamp requirements, and exact installation instructions; do not choose a hose solely from the symptom. - garbage-disposal dishwasher inlet or disposal connection
Consider this category only after qualified diagnosis confirms a damaged inlet or disposal-side connection, or a retained installation plug that requires correction.
Confirm the complete disposal model and installation configuration; do not modify the inlet or disposal while it is connected to power.
When checks do not resolve it
Need a professional?
Call a qualified plumber or appliance technician when the Delta air gap continues to back up after its accessible cap and visible hose path are clear, when the sink backs up with the disposal off, when a recent disposal installation suggests a retained knockout plug, or when the disposal hums, grinds, leaks, or has an electrical concern. Professional work is required for concealed drain restrictions, disposal removal, trap work, damaged fittings, and any connection that cannot be safely isolated.
Have this ready
- Provide the Delta air-gap model if known, disposal model if safely visible, whether the disposal was recently installed, where the hose connects, whether the sink backs up with the disposal off, when water spills, any cap or hose debris, leaks, noises, and photographs taken with power isolated.
Common questions
FAQ
Why does my Delta sink air gap back up when the disposal runs?
The most likely area is downstream of the air gap: its cap or vent, the hose to the disposal, the disposal inlet, or the sink drain and trap. Turn off disposal power before inspecting, clean only the accessible cap and hose path, and call a professional if the overflow persists or the disposal is noisy or leaking.
Is water coming out of a sink air gap normal?
No. Whirlpool describes water spilling from a dishwasher air gap as a problem that typically indicates a clog or restricted drain path. Keep the disposal off while you check the accessible cap, outlet hose, disposal connection, and sink drain.
Could a new garbage disposal cause the air gap to back up?
Yes. If the disposal was recently installed or replaced, a retained knockout plug in its dishwasher inlet can block the drain connection. Do not hammer or pry the plug while the disposal is connected; have the installer or a qualified technician verify and correct it.
Can I pour drain cleaner into the sink or disposal?
Do not use chemical drain opener in a sink or drain path connected to a disposal or dishwasher. Isolate disposal power, contain standing water, and use only the accessible, manufacturer-permitted cleaning steps; call a qualified professional for a deeper restriction.
Read the exact guide
Official sources
- AIR GAP - STANDARD SPECIFICATIONSDelta Faucet Company · Delta kitchen air-gap backflow prevention, inlet and outlet routing, materials, and specification scope
- Dishwasher Not Draining - Product HelpWhirlpool · Dishwasher drain path through an air gap or disposal, hose routing, downstream restrictions, safety preparation, and air-gap overflow clues
- Not Draining - Water Remain at End of Cycle - DishwasherWhirlpool · Dishwasher air-gap blockage, disposal knockout plug, drain obstructions, and qualified service guidance
- What is a Dishwasher Air Gap?Whirlpool · Dishwasher air-gap function, backflow protection, air-gap overflow, accessible cap cleaning, and disposal knockout-plug context
Community feedback
Share a repair observation
Share a plain-text repair observation. Accepted observations are published automatically; this page may take a moment to update.