
On this page
Start here
Quick answer
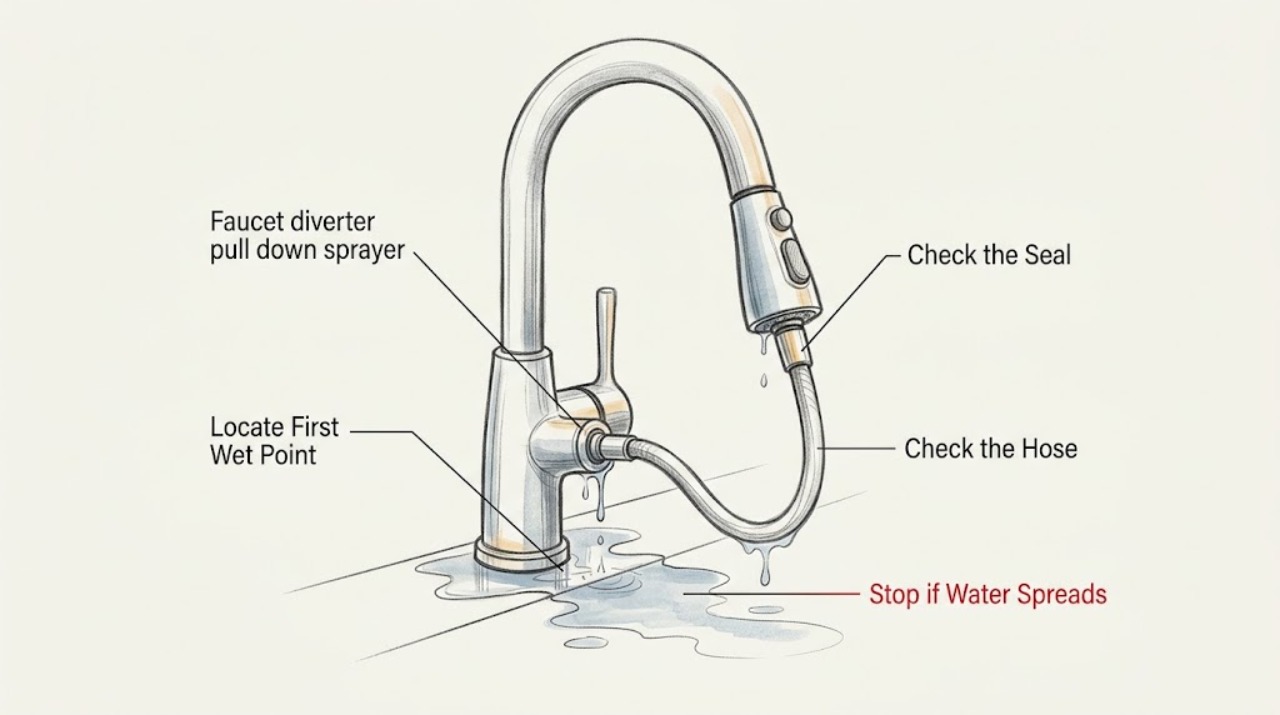
A pull-down sprayer leak is usually narrowed down by where the first drop appears: the sprayhead-to-hose joint, the flexible hose under the sink, the hose's diverter quick-connect, or the faucet body. Dry the visible parts, shut off the faucet supplies before loosening anything, and use a brief controlled test only to locate the leak. If water comes from a cracked hose, a damaged seal, or the diverter connection, stop using the faucet and match a replacement only to the faucet model. Do not force a diverter, keep using a leak that can wet the cabinet, or open the faucet body unless the model instructions support that work.
Work through in order
Diagnostic checks
Use only checks that match the exact appliance or system and its official guide.
-
Check 1
With the faucet off, wipe the sprayhead, hose-to-wand joint, exposed hose under the sink, and diverter/quick-connect area completely dry. Look for a split, loose-looking connection, displaced seal, or water track. If it is safe to do so, turn the faucet on briefly with the wand aimed into the sink while watching from a dry position; do not reach into a moving or spraying assembly.
Expected result: The first fresh drop may appear at the sprayhead-to-hose joint, along the hose wall, at the diverter connection under the sink, or at the faucet body. Water that only runs down from above is not proof that the lowest wet point is the source.
Next step: Turn the faucet off and photograph the dry-to-wet transition. Use that location to choose the next check instead of replacing the diverter by assumption.
Stop if: Stop the test and close both fixture shutoff valves if the leak becomes a spray, reaches the cabinet, or cannot be watched without placing a hand near pressurized water.
Why this matters
Why: A first wet point at the wand joint points toward the wand seal or sprayhead; moisture on the hose points toward hose damage; a drip at the diverter connection points toward its seal, clip, or seating; water from the faucet body needs model-specific service.
-
Check 2
After the supplies are off and residual pressure is relieved, inspect the sprayhead-to-hose connection. If the model's instructions allow the wand to be removed, check whether the connection is hand-loose, cross-threaded, cracked, or missing a visible screen or seal; do not pry the wand or stretch the O-ring.
Expected result: A connection that tightens correctly and has an intact seal differs from one with a cut, flattened, displaced, or missing seal, damaged threads, or a cracked wand/hose end.
Next step: Reassemble only as the faucet's model instructions show, then keep the supplies off until the connection is secure. Consider a neutral sprayhead or pull-down hose part only after the exact model and the failed interface are confirmed.
Stop if: Stop if the wand will not separate with the intended hand/tool method, the hose end twists inside the faucet, the seal is not identifiable, or the connection requires opening the faucet body.
Why this matters
Why: A damaged seal or sprayhead-to-hose interface can leak even when the diverter is working. A cracked spray assembly or hose is a replacement condition, while an intact joint sends the diagnosis back under the sink.
-
Check 3
With the faucet supplies still off, follow the flexible pull-down hose from the faucet body to the diverter or quick-connect. Check for a kink, abrasion, bulge, split braid, wet weight, or a clip/retainer that is not seated. Do not pull hard on the hose or remove a retaining clip until the model instructions identify it.
Expected result: A hose can be dry at the wand but wet along its length or at the underside connection. A kink or cabinet obstruction may change hose travel without creating a leak; a split or persistent wet spot is direct evidence of hose damage.
Next step: Leave the faucet off if the hose is damaged. Record the hose routing, connection style, and any visible clip or seal so the correct model-specific replacement can be identified.
Stop if: Stop if the hose passes through a sealed faucet body, the connection is under tension, the retainer will not release as designed, or water continues to collect after the supplies are closed.
Why this matters
Why: A damaged hose can leak regardless of spray/stream selection and should not be patched. A kink or obstruction may explain stress at a connection, but the connection still needs a leak check after safe correction.
-
Check 4
Only after the fixture water is shut off, inspect the diverter/quick-connect seating from below. Compare the visible clip or retainer with the manufacturer's installation diagram for the faucet model; check whether the hose end is fully seated and whether the retainer is present and undamaged. Do not remove an upper clip, force a connector, or substitute tape for an O-ring.
Expected result: A hose end that is not seated, a displaced retainer, or a missing/damaged seal is different from a fully seated connection that still leaks after reassembly.
Next step: If the model instructions explicitly show a user-removable connection, reseat it exactly as shown, restore water slowly, and watch the same joint. If it still leaks, close the supplies and arrange a plumber or manufacturer-supported repair.
Stop if: Stop before disassembly if the model is unknown, the diverter is inside the faucet body, the clip is broken, or reseating would require removing the faucet or cutting plumbing.
Why this matters
Why: Incorrect clip seating can create a leak at the diverter connection. If the connection is correctly seated yet leaks, the seal, hose end, diverter housing, or an internal faucet part may be damaged; a generic tightening attempt cannot identify which one.
-
Check 5
After all visible connections are dry and only if the faucet can be tested without cabinet exposure, switch once between stream and spray while the wand points into the sink. Note whether the leak occurs in both settings or only when the diverter sends water through the spray path.
Expected result: Leak in both modes differs from leak only in spray mode; a mixed stream/spray pattern or weak spray is a flow symptom, not by itself proof of a leaking diverter.
Next step: Turn the water off, preserve the observed mode, and give it to the technician. Do not repeatedly toggle a diverter that sticks, buzzes, or fails to stay in position.
Stop if: Stop immediately if the diverter binds, the leak worsens, water appears from the faucet body, or the cabinet becomes wet.
Why this matters
Why: A spray-only leak raises suspicion of the sprayer, spray-path seal, hose end, or diverter interface. A leak in both modes makes a common upstream connection or faucet-body fault more likely.
Use your observations
Decision map
Find the observation that best matches what you see, then follow the next safe action.
-
PATH 01Next step
What you see
The first fresh water appears between the sprayhead/wand and the hose.
Do this next
Shut off the supplies and inspect the visible seal and connection only as the model instructions allow. Replace the sprayhead, hose, or seal only after the exact failed interface and faucet fit are confirmed; stop and call a plumber if the joint is cracked, seized, or still leaks after correct reassembly.
-
PATH 02Next step
What you see
Water beads along the flexible hose or the hose has a split, abrasion, bulge, or damaged braid.
Do this next
Do not patch or continue using the faucet. Keep the supplies closed and identify the model-specific pull-down hose; have a plumber handle a connection that is inaccessible or under tension.
-
PATH 03Next step
What you see
The leak begins at the diverter/quick-connect, retainer, or hose end under the sink.
Do this next
Close the fixture supplies, check seating against the model instructions, and do not force the clip or use thread tape on a seal designed to be an O-ring. Persistent leakage, a damaged retainer, or an internal diverter requires professional or manufacturer-supported repair.
-
PATH 04Next step
What you see
The faucet leaks only when the diverter sends water through the spray path.
Do this next
Treat the sprayhead, hose end, and diverter path as separate candidates. Do not replace the diverter by assumption; record the spray-only behavior and arrange service if the visible joints are intact or the diverter sticks.
-
PATH 05Next step
What you see
Water appears from the faucet body or the leak occurs in both stream and spray modes.
Do this next
Close the fixture supplies and stop using the faucet. A common upstream or internal fault cannot be safely identified from the wand alone; provide the leak location and mode behavior to a plumber or the faucet manufacturer.
Helpful context
Understand the symptom
Why the leak location matters
A pull-down faucet routes water through the faucet body, a diverter or hose connection, the flexible pull-down hose, and the sprayhead. Water can run along the hose and make a leak look as though it started at a different joint. Delta's support information also separates a damaged hose, a kinked hose, mineral debris at the sprayer, and a blocked or damaged diverter as different possibilities. Start with the first wet point, not the lowest point where water collects.
Prepare for a safe check
Clear the cabinet, put an absorbent towel below the connections, and keep your hands away from a pressurized joint while water is running. Know where both fixture shutoff valves are. Turn those supplies off before disconnecting a hose, removing a sprayhead, or touching a clip. If the shutoff valves do not close, the leak is spraying, or water is reaching the cabinet floor or electrical equipment, leave the faucet off and arrange plumbing service.
Safety boundary
Stop conditions
- Close both fixture shutoff valves before disconnecting a hose, removing a sprayhead, releasing a clip, or exposing a diverter connection.
- Stop using the faucet if water reaches the cabinet floor, electrical equipment, or an area that cannot be dried and monitored.
- Do not force a diverter, pry a wand, cut plumbing, patch a pressurized hose, or use thread tape where the connection seals with an O-ring or retainer.
- Escalate when the model is unknown, the diverter is internal, a clip or hose is damaged, the leak persists after model-correct reseating, or the shutoff valves do not stop flow.
Only after diagnosis
Potential parts
- pull-down faucet hose
Consider only if the hose wall, hose end, or model-specific hose assembly is confirmed damaged after the leak is located.
Confirm the faucet brand, model, connection type, length, and retaining hardware before selection; do not assume a universal fit. - faucet sprayer head
Consider only if the sprayhead body or its hose interface is cracked or its seal is confirmed failed, rather than replacing it for a leak that starts under the sink.
Confirm the model, thread or quick-connect style, spray functions, and seal arrangement before selection. - faucet diverter valve
Consider only when the diverter connection and hose are correctly seated yet the diverter path is confirmed blocked, damaged, or leaking by model-specific diagnosis.
Diverter location and fit vary by faucet design; verify the exact model and manufacturer parts diagram before selection.
When checks do not resolve it
Need a professional?
Call a plumber or the faucet manufacturer's support when the leak is at the faucet body or diverter housing, the hose or retainer is cracked or inaccessible, the diverter sticks, the fixture shutoffs do not close, or a correct reseating does not stop the leak. Provide the faucet brand/model if readable, the first wet point, whether the leak is spray-only or occurs in both modes, the hose/clip condition, and whether the cabinet became wet.
Common questions
FAQ
How do I tell whether the diverter or the pull-down hose is leaking?
Dry the assembly and watch for the first fresh drop during a brief, controlled run. Water on the hose wall points toward hose damage; water at the hose's diverter connection points toward seating, a retainer, or a seal; a spray-only symptom can involve the spray path or diverter. Close the supplies before touching any connection.
Can I tighten the sprayer connection to stop the leak?
Only if the model instructions identify that connection as user-serviceable and the joint is simply loose. Do not force it, use thread tape on an O-ring connection, or keep tightening a cracked wand, damaged hose, or leaking diverter housing.
Should I replace the faucet diverter first?
No. First locate the leak and inspect the wand joint, hose, and visible diverter connection. A diverter replacement is conditional on a model-specific finding; a hose or seal problem will not be fixed by changing an unfailed diverter.
What should I do if the leak only happens in spray mode?
Record that behavior, then inspect the sprayhead-to-hose interface and the visible hose/diverter connection with the water off. If those joints are intact, the spray path or internal diverter may need professional or manufacturer-supported service. Do not repeatedly operate a diverter that sticks or worsens the leak.
When is a leaking pull-down faucet an emergency plumbing call?
Close the fixture shutoff valves and seek prompt help when the leak cannot be stopped, the shutoffs do not close, water is spraying or reaching electrical equipment, the hose or diverter housing is cracked, or the cabinet is being damaged.
Read the exact guide
Official sources
- Faucet Is Leaking Between the Sprayhead and Spray HoseKohler Co. · Manufacturer troubleshooting flowchart for specified Kohler K-6350, K-6352, and K-6353 faucets; used here as a model-specific example of leak isolation.
- Sprayer Hose - Service & Parts FAQDelta Faucet Company · Manufacturer troubleshooting examples for Delta pull-out/pull-down faucets; the reader's own faucet model instructions take precedence.
- Single Handle Kitchen Faucet Installation Instructions (75106 Rev. D)Delta Faucet Company · Installation example for specified Delta faucet families; it is not a universal connection instruction.
Community feedback
Share a repair observation
Share a plain-text repair observation. Accepted observations are published automatically; this page may take a moment to update.