
On this page
Start here
Quick answer
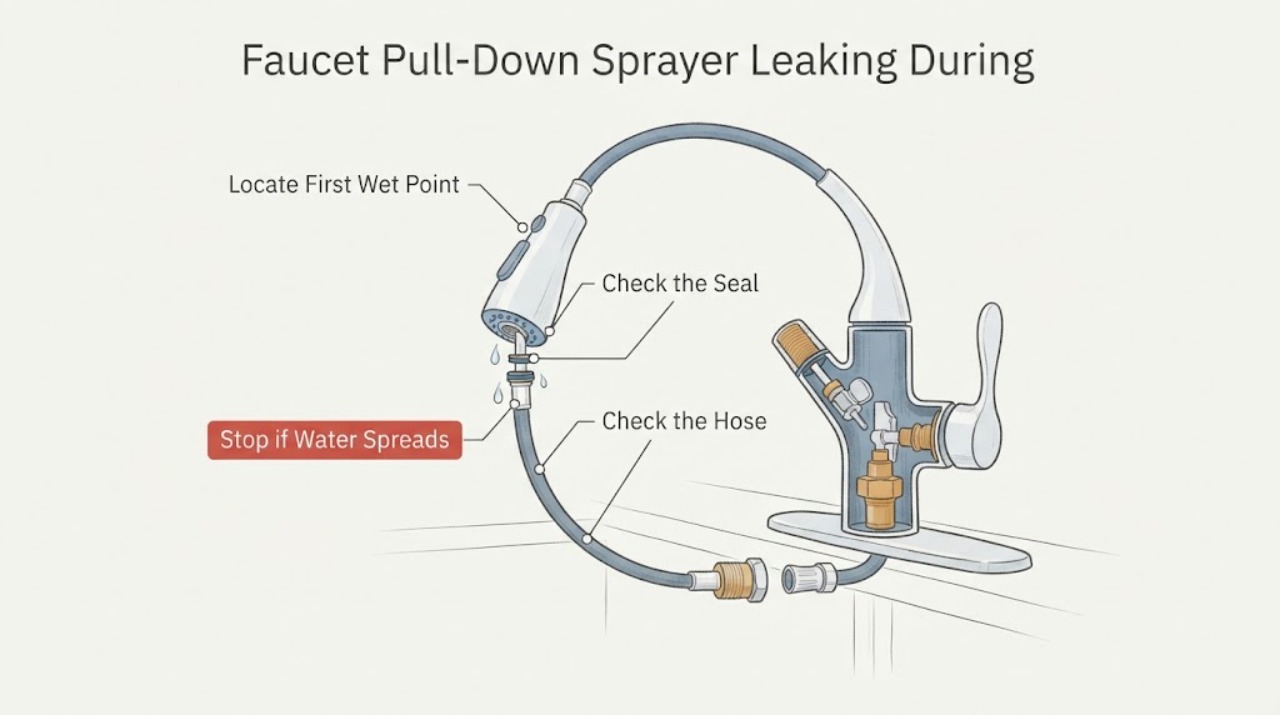
A leak that appears only when the pull-down sprayer is in use is usually somewhere in the pressurized spray path: the sprayhead-to-hose seal or connection, the wand or hose, an under-sink quick connection, or a diverter and spout path. First find the first wet point rather than tightening everything. If water starts at the sprayhead joint, stop using the sprayer and check only the visible connection when the water is off; a damaged seal or hose may be involved. If the hose or connection is wet under the sink, or water reaches the deck or cabinet, close the clearly identified fixture shutoffs if they move normally and arrange prompt plumbing service. Manufacturer parts and procedures depend on the faucet model, so do not disconnect a pressurized hose, force a retainer, or order a generic sprayhead or hose.
Before you begin
Safety first
- The plumber should identify the first failure point and confirm whether the repair involves the sprayhead seal or connection, hose assembly, quick connection, wand screen, diverter, cartridge, valve body, or related water damage before selecting parts.
Work through in order
Diagnostic checks
Use only checks that match the exact appliance or system and its official guide.
-
Check 1
Dry the visible sprayhead, hose, faucet body, deck, and reachable under-sink area, then perform at most one normal spray observation only if the area is dry and safe; watch where water first appears.
Expected result: Water first appears at the sprayhead-to-hose joint, along the hose or under-sink connection, around the faucet body or deck, or the test cannot be made safely.
Next step: Record the first wet point and stop using the sprayer. Continue only with a dry, unpressurized visual check; arrange prompt plumbing service for water at the deck, cabinet, or an unsafe area.
Stop if: Do not test near electrical equipment, standing water, a rapidly pooling cabinet, or a hot-water hazard, and do not repeat a spray test on an active leak.
Why this matters
Why: A sprayhead joint keeps the seal or connection in focus; a wet hose or under-sink connection makes hose or quick-connection damage more likely; water at the body or deck may involve the diverter or valve path. An unsafe test is a reason to stop, not to guess.
-
Check 2
With the fixture water off before handling anything, visually inspect the sprayhead-to-hose joint for a loose connection, displaced seal, mineral buildup, cracked fitting, or damaged retainer; use only normal gentle hand movement and do not force it.
Expected result: The joint is visibly loose or wet, a seal or retainer appears displaced or damaged, mineral debris is present, or the joint looks intact and dry.
Next step: Leave the faucet unused and photograph the joint. Use the exact model instructions to determine whether a seal, sprayhead, or hose is serviceable; request plumbing service if the part is damaged or the connection does not resolve with the normal procedure.
Stop if: Do not twist the sprayhead against a pressurized hose, stretch the hose, pry a retainer, or apply tools to a wet or seized connection.
Why this matters
Why: A leak at this joint supports a connection or seal problem, while a cracked or damaged fitting can require a sprayhead or hose assembly. An intact dry joint makes the hose, under-sink connection, diverter, or body path more likely.
-
Check 3
From a dry, stable position, trace the visible pull-down hose under the sink without disconnecting it; look for a split, abrasion, kink, weight or clip interference, moisture at the quick connection, or rubbing against the cabinet.
Expected result: The hose is kinked or rubbed, a split or wet quick connection is visible, the hose path is clear and dry, or the cabinet cannot be accessed safely.
Next step: Stop operating the sprayer and photograph the hose routing and connection. Arrange prompt service for a damaged or wet hose or quick connection; if the path is clear, use the model identity to guide the next diagnosis.
Stop if: Do not pull the hose hard, disconnect a quick connection, tighten a wet fitting, or work in a wet, unstable, or contaminated cabinet.
Why this matters
Why: A damaged or wet hose path makes hose or connection failure more likely and can explain a leak that occurs only while the wand is pulled down. A clear, dry hose shifts attention toward the sprayhead joint, diverter, or faucet body.
-
Check 4
If the faucet is dry and the test area is safe, compare one brief spray-mode and stream-mode observation, noting whether the leak starts only when the spray selector or diverter is engaged; stop immediately if water escapes outside the expected outlet.
Expected result: The leak occurs only in spray mode, occurs in both modes, the spray pattern is mixed or weak, or the faucet cannot be operated without spreading water.
Next step: Record the mode and pattern, then leave the faucet off. Use model-specific documentation or a plumber to distinguish a sprayhead, hose, diverter, or body repair.
Stop if: Do not keep cycling spray and stream modes, flush internal components, or open the faucet body as a troubleshooting guess.
Why this matters
Why: Spray-only leakage keeps the sprayhead, hose, quick connection, or diverter path in focus. Leakage in both modes or water at the body makes a shared faucet or valve path more plausible. A mixed or weak pattern can accompany a screen or diverter issue but does not identify a replacement part by itself.
-
Check 5
Photograph the full faucet, handle and wand, visible brand or model marking, hose path, first wet point, and fixture shutoffs; identify the shutoffs without turning them if their condition or function is uncertain.
Expected result: The exact model and normal fixture shutoffs are known, only the brand or style is known, a shutoff is seized or corroded, or no shutoff can be identified confidently.
Next step: Give the photos and leak pattern to a qualified plumber or use the manufacturer's model-specific instructions. Close a clearly identified fixture shutoff only if it moves normally and there is no leak or hazard; otherwise leave it as found and request service.
Stop if: Do not force a shutoff, disconnect a supply or spray hose, or open a pressurized cartridge, diverter, or valve body.
Why this matters
Why: An exact model allows the manufacturer to distinguish its hose, seal, sprayhead, diverter, and valve parts. Brand-only identification does not prove fit, and a questionable shutoff increases the risk of attempting disassembly.
-
Check 6
Prepare a service record with the first wet point, whether the leak occurs only during spray use, spray versus stream behavior, hose routing, model information, shutoff condition, photos, and any prior repair.
Expected result: The leak is isolated to a visible joint or hose, the water path remains unclear, water damage is present, or the leak continues after the faucet is isolated.
Next step: Keep the faucet out of service, protect the cabinet from further water, and arrange prompt plumbing service; treat uncontrolled flow, electrical exposure, or rapidly spreading water as urgent.
Stop if: Do not resume normal use to collect more evidence or order a part before the model and failed component are confirmed.
Why this matters
Why: A clear location and operating pattern help a plumber choose between a seal, sprayhead, hose, quick connection, diverter, or body diagnosis. Persistent or spreading water means containment and professional assessment are more important than additional testing.
Use your observations
Decision map
Find the observation that best matches what you see, then follow the next safe action.
-
PATH 01Next step
What you see
The sprayhead-to-hose joint is the first wet point during spray use, while the hose and faucet body remain dry.
Do this next
Leave the sprayer off, photograph the joint, and follow the exact model procedure or arrange plumbing service for a seal, sprayhead, or hose diagnosis.
Why this path and its safety boundary
Why it matters: A seal, retainer, connection, sprayhead, or hose-end fault is more likely than a property-wide plumbing problem; the visible leak location does not establish which replaceable part fits.
-
PATH 02Next step
What you see
Water appears on the pull-down hose, at its under-sink quick connection, or where the hose rubs or kinks when the wand is pulled down.
Do this next
Stop using the wand, avoid disconnecting the fitting, and request prompt plumbing service with photos and the faucet model.
Why this path and its safety boundary
Why it matters: Hose damage, a displaced retainer or seal, or a connection problem is more likely than a sprayhead-only leak; movement-dependent wetness raises the chance of further cabinet damage.
-
PATH 03Next step
What you see
The sprayhead and visible hose are dry, but water appears at the spout, faucet body, or deck only when spray mode is selected, or spray and stream behavior changes together.
Do this next
Do not open the body or flush internal parts as a guess. Shut off the clearly identified fixture supplies if safe and arrange model-specific plumbing service.
Why this path and its safety boundary
Why it matters: A diverter, shared spout path, or valve-body issue is more likely than a hose-end seal; a screen or mixed pattern may be part of the symptom but does not prove the failed component.
-
PATH 04Next step
What you see
Water is pooling rapidly, reaching electrical equipment, soaking the cabinet or deck, escaping outside the expected outlet, or the fixture shutoffs are seized, corroded, or unclear.
Do this next
Stop using the faucet, close only a clearly identified shutoff that moves normally, keep clear of electrical exposure, and obtain urgent plumbing help if flow cannot be controlled safely.
Why this path and its safety boundary
Why it matters: Containment and professional assessment take priority over locating a small component; continued operation can increase water damage or create an electrical or hot-water hazard.
-
PATH 05Next step
What you see
The leak stops when the faucet is not in spray use but the first wet point remains uncertain, the model is unknown, or a safe visual check cannot distinguish the sprayhead, hose, diverter, and body paths.
Do this next
Keep the faucet out of service, provide the photos and operating pattern to a qualified plumber, and use the exact model documentation before considering any replacement.
Why this path and its safety boundary
Why it matters: Several model-dependent components remain possible, and symptom timing alone is not enough to select a compatible repair part.
Helpful context
Understand the symptom
Locate the first wet point
Dry the visible sprayhead, hose, faucet body, deck, and the reachable area below the sink. If a normal spray test would send water toward an electrical appliance, standing water, or an already damaged cabinet, do not test it; leave the water off and call a plumber. When it is safe to observe, the first wet point is more useful than the largest puddle: the sprayhead joint suggests a seal or connection, while water under the sink shifts attention to the hose or quick connection. A leak that appears only while spray mode is flowing does not prove that the valve body is the failed part.
Separate the sprayhead, hose, and diverter paths
A sprayhead-to-hose joint can leak while the faucet body remains dry. A split, kinked, or rubbed hose can release water only when it is pulled down and pressurized. A wand screen or diverter issue can change spray behavior and send water back toward a connection or spout path. Compare only normal spray and stream operation if the faucet is dry and controlled; do not keep cycling a leaking faucet to make the symptom clearer.
Use the model before any replacement
Photograph the faucet, handle, wand, visible brand or model marking, hose routing, and first wet point. Manufacturer instructions and replacement parts vary by design and age. If a repair requires removing the wand, retainer, hose, diverter, cartridge, or valve body, shut off the clearly identified fixture supplies first and follow the exact model instructions; stop if a shutoff is seized, corroded, leaking, or not clearly identified.
Safety boundary
Stop conditions
- Stop using the sprayer for any active leak, spray outside the expected outlet, wet cabinet, standing water, rapidly pooling water, hot-water hazard, or water near electrical equipment.
- Do not disconnect a supply, hose, retainer, or quick connection while pressurized; do not open a cartridge, diverter, or valve body as an ordinary-user guess.
- Do not force a shutoff, sprayhead, stiff fitting, retainer, or hose, and do not tighten a wet connection or use improvised tools that may damage the faucet.
- Do not order a generic hose, sprayhead, seal, diverter, or valve by appearance alone; model, design, and faucet age determine the correct part family.
- Arrange prompt plumbing service for persistent or spreading leakage, an under-sink wet connection, a damaged hose or fitting, an uncertain model, or any condition that cannot be checked safely.
Only after diagnosis
Potential parts
- pull-down spray hose assembly or hose-end seal
Consider this category only when the first wet point is the sprayhead connection, hose, or under-sink quick connection and the exact faucet model confirms that the hose or seal is serviceable.
Confirm the faucet model, hose routing, connector style, retainer, and manufacturer's fit information; pull-down hose assemblies and seals are not universal. - pull-down sprayhead or diverter component
Consider this category only when the model-specific diagnosis points to a cracked sprayhead or a spray-only diverter or body-path fault after the visible hose and connection checks.
Do not select by appearance or thread size alone; confirm the exact faucet model, spray modes, internal design, and manufacturer's service information first.
When checks do not resolve it
Need a professional?
Use prompt service for a wet or damaged spray hose, quick connection, sprayhead joint, diverter, or faucet body, for any leak that returns during spray use, or when safe isolation is not possible. Treat uncontrolled water, electrical exposure, rapidly spreading water, or hot-water danger as urgent.
Safety scope: The plumber should identify the first failure point and confirm whether the repair involves the sprayhead seal or connection, hose assembly, quick connection, wand screen, diverter, cartridge, valve body, or related water damage before selecting parts.
Have this ready
- Photos of the full faucet, handle and pull-down wand, visible brand or model marking, first wet point, hose routing, and fixture shutoffs
- Whether the leak occurs only during spray use or also in stream mode, and whether the spray pattern is weak or mixed
- Whether the hose is kinked, rubbed, split, wet at a quick connection, or pulled against a weight, clip, or cabinet
- The normal visual checks performed, any safe fixture shutoff position, and whether the leak stopped when the faucet was taken out of service
- Any prior hose, sprayhead, seal, diverter, cartridge, or faucet repair and any visible cabinet or deck water damage
Common questions
FAQ
Why does my pull-down sprayer leak only when I use spray mode?
Spray use pressurizes and moves the sprayhead, hose, connection, and diverter path, so a seal, hose, quick connection, or spray-only diverter fault may appear only then. Find the first wet point and stop using the sprayer rather than assuming the faucet valve is the failed part.
Can I tighten the pull-down sprayhead connection?
Only inspect or use the faucet manufacturer's normal gentle procedure with the water off and the connection dry. Do not tighten a wet or pressurized joint, force a retainer, or use tools on an unknown fitting; a damaged seal, hose, or sprayhead may need model-specific service.
What if the leak is under the sink?
A wet hose, kink, abrasion, or quick connection can explain a spray-use leak and can damage the cabinet. Stop using the sprayer, avoid disconnecting the fitting, close a clearly identified fixture shutoff only if it moves normally, and arrange prompt plumbing service.
Could a diverter cause a leak during spray use?
Yes, a diverter or shared spout path can change spray behavior or cause water to appear at the faucet body or deck when spray mode is selected. That pattern does not identify a replacement part; record it and use model-specific instructions or a plumber.
Do pull-down faucet spray hoses use universal replacement parts?
No. Hose assemblies, seals, retainers, sprayheads, and diverter designs vary by model and age. Photograph the model marking and confirm the manufacturer's parts information before ordering or disassembling anything.
When should I call a plumber for a leaking pull-down sprayer?
Call promptly when water reaches the hose, quick connection, faucet body, deck, or cabinet, when the leak persists, or when the model or shutoffs are uncertain. Seek urgent help for uncontrolled flow, rapidly pooling water, electrical exposure, or a hot-water hazard.
Read the exact guide
Official sources
- Find Parts and Identify Your Product | Delta FaucetDelta Faucet Company · The opened Delta parts page directs users to enter a model number for product-specific parts and separately lists pull-down or pull-out hoses under hose issues.
- Sprayer Hose - Service & Parts FAQDelta Faucet Company · The opened Delta service FAQ discusses leaking vegetable sprayer hoses, displaced retainers or O-rings, hose routing, diverter behavior, and model- and age-dependent repair parts.
- TroubleshootingKohler Co. · The opened Kohler troubleshooting sheet covers K-6350, K-6352, and K-6353 and gives a sequence for a leak between the sprayhead and spray hose.
Community feedback
Share a repair observation
Share a plain-text repair observation. Accepted observations are published automatically; this page may take a moment to update.