
On this page
Start here
Quick answer
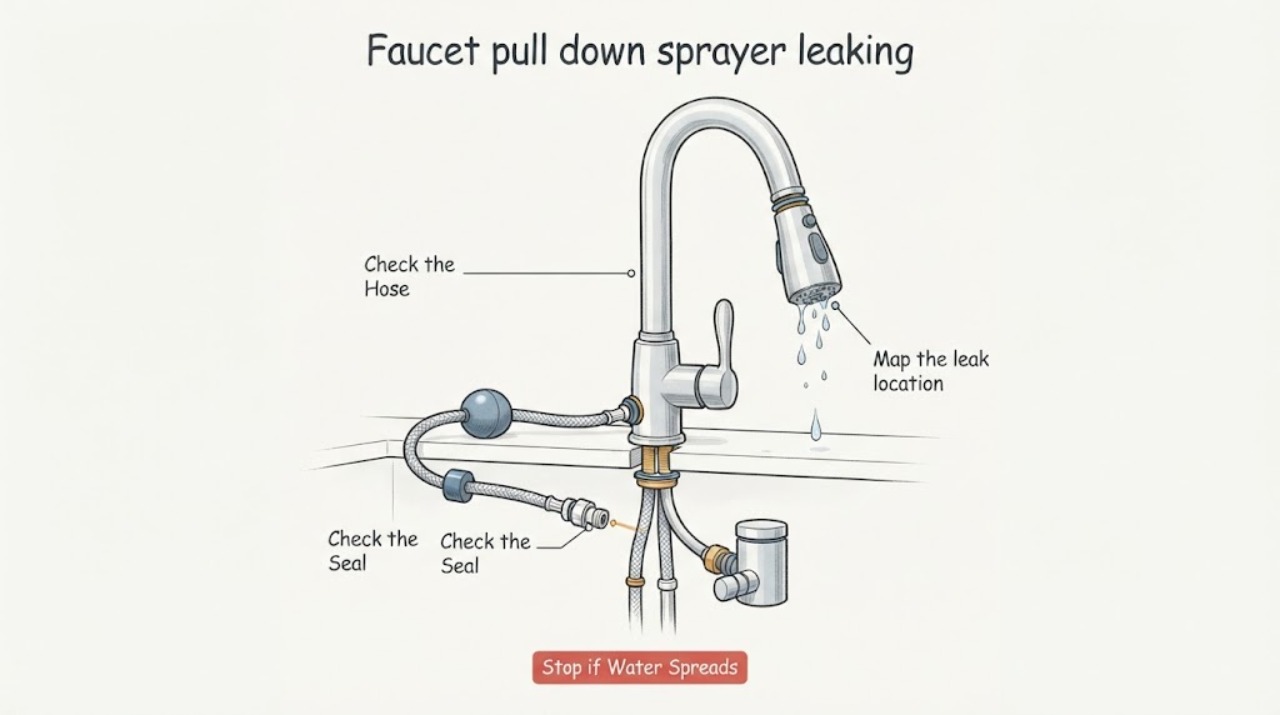
First locate where the pull-down sprayer leaks: at the wand, hose, quick connection under the sink, faucet body, or diverter path. From a dry position, inspect the wand, hose routing, visible fittings, and cabinet contents without pulling hard or opening the faucet. If any hose or fitting must be disconnected, shut off both fixture supply valves first and relieve pressure according to the faucet manual. Do not work on a pressurized connection, use unsupported replacement parts, or continue if water is reaching electrical equipment or the cabinet floor. A hose, spray head, seal, or diverter may be involved, but the exact part depends on the faucet model; arrange qualified plumbing service when the source is hidden, the leak persists, or disassembly is required.
Work through in order
Diagnostic checks
Use only checks that match the exact appliance or system and its official guide.
-
Map the leak location from a dry position
With the faucet off, dry the visible wand, hose, and under-sink area, then observe without pulling the sprayer hard. Note whether moisture appears at the spray head seam, wand-to-hose joint, along the hose, at the under-sink quick connection, around the faucet body, or only when spray mode is selected during normal use.
Expected result: A wet wand seam points toward the spray head or its seal; a wet hose or quick connection points toward the hose, retainer, or seal; a leak that occurs only during spray mode can involve the diverter or a pressurized connection. A dry exterior does not rule out a concealed cabinet or faucet-body leak.
Next step: Take close and wide photos, note whether the leak is continuous or use-dependent, and dry the cabinet. Do not run more water if the leak is reaching electrical equipment, the wall, or the cabinet base.
Stop if: Stop for a spray that reaches wiring, a split hose under pressure, water inside the faucet body, an uncontrolled leak, or any need to reach into a wet electrical area. Shut off fixture water if safely accessible and call a plumber.
Why this matters
Why: The first wet location narrows the service scope but does not prove which part failed. The source and model identity should be confirmed before ordering a replacement.
-
Inspect the retractable hose and under-sink routing
From outside the cabinet, observe the hose path, weight or guide if visible, nearby bottles and cleaning supplies, pipes, shutoff valves, and cabinet edges. Note kinks, abrasion, pinching, caught weight, stretched hose, wet spots, or a route that changes when the wand is pulled out. Do not tug the hose or remove the weight.
Expected result: A kink or obstruction can strain the hose and prevent the wand from returning; abrasion or a split indicates a hose problem; a clean route with a wet fitting shifts attention to a connection or diverter. Non-movable plumbing or cabinet features can require a professional routing solution.
Next step: Clear only loose, dry items that are not connected to plumbing and photograph the route. If the hose or connection must be moved or disconnected, shut off both fixture supply valves first and follow the model manual or call service.
Stop if: Stop for a stuck hose, corroded or seized fitting, leaking shutoff valve, wet outlet, cabinet damage, or any need to force, cut, pull, or disconnect a pressurized line.
Why this matters
Why: Delta and other manufacturer guidance identify hose routing, debris, and model-specific support or connections as distinct causes. A visible routing issue can be documented, but a safe repair still depends on the faucet design and water isolation.
-
Inspect the spray wand, screen, and visible seals
With the wand removed only if the owner's manual identifies that as a normal owner-accessible step and the water is isolated before any connection is opened, inspect the spray face, threaded or quick connection, visible screen, retainer, and seal. Look for cracks, mineral deposits, displaced O-rings, damaged threads, or a seal that is pinched or missing. Do not scrape with a sharp tool or disassemble the faucet body.
Expected result: A cracked wand or damaged seal supports a model-specific spray-head or seal replacement; deposits or debris may affect spray pattern without being the leak source; a wet connection or displaced retainer supports hose or fitting service.
Next step: Photograph the part markings and connection shape without exposing private information. Reassemble only according to the model instructions; if the seal, retainer, or connection is uncertain, leave the water off and request service.
Stop if: Do not open the faucet body, remove a diverter, scrape a seal seat, apply thread sealant by guesswork, or reconnect while water is pressurized. Stop for cracked plastic, sharp fragments, or a valve that will not isolate water.
Why this matters
Why: Delta notes that displaced retainers or O-rings can cause sprayer hose leaks and that the repair part depends on model and age. Visual evidence helps avoid ordering a generic seal that does not fit.
-
Separate spray-head symptoms from diverter symptoms
If the area is dry and there is no electrical or cabinet hazard, observe normal faucet behavior without repeated cycling. Note whether water continues from the main spout in spray mode, spray and stream mix unexpectedly, pressure changes when the wand moves, or the leak appears only at the diverter or under-sink connection. Do not test with the hose disconnected.
Expected result: Mixed flow or failure to switch can indicate debris or a worn diverter; a leak that follows wand movement can indicate hose or connection strain; a leak at the spray head points to the wand or seal. These patterns are not a license to open the cartridge or diverter.
Next step: Record the flow pattern and whether the leak occurs at rest or only during spray selection. Shut off the fixture supplies before any disassembly and provide the model and observations to a plumber.
Stop if: Stop for a continuous spray, sudden pressure change, spray toward wiring, a leak that cannot be isolated, or any need for live disassembly or internal faucet work.
Why this matters
Why: Kohler explains that diverters can be in the faucet or in an under-sink hose connection and that the correct part varies by model. The symptom pattern tells a technician where to start.
-
Decide whether to stop and arrange plumbing service
Answer yes or no: is the leak source still uncertain, does it require disconnecting a hose or opening the faucet, is a shutoff valve unavailable or leaking, or has water damaged the cabinet, wall, floor, or nearby electrical equipment?
Expected result: Yes means keep the faucet water isolated if safely possible and arrange qualified plumbing or water-damage service; no means a model-approved, water-off replacement may be considered only when the part and instructions are unambiguous.
Next step: Provide photos, model information, leak location, hose-routing observations, diverter symptoms, shutoff condition, and damage extent to the professional. Do not use a generic part or resume normal use until the connection is dry and secure.
Stop if: Do not disassemble with water on, force fittings, bypass shutoffs, perform live electrical work, or continue a leak test near energized equipment.
Why this matters
Why: A sprayer leak is often small but can damage cabinetry and can become uncontrolled when a pressurized connection is opened. The decision protects the fixture and the building while preserving useful diagnostic evidence.
Use your observations
Decision map
Find the observation that best matches what you see, then follow the next safe action.
-
PATH 01Safety boundary
What you see
The wand seam, spray face, O-ring, retainer, or visible connection is cracked, displaced, or wet while the hose route is dry.
Do this next
Use the faucet model to identify a compatible spray-head, seal, or wand assembly. Shut off both fixture supplies before opening any connection and follow the model instructions; use service if the connection is not clearly owner-accessible.
Why this path and its safety boundary
Safety stop: Do not force threads, substitute an unknown seal, use thread tape by guesswork, or operate while the joint is leaking.
-
PATH 02Safety boundary
What you see
The flexible hose, weight area, quick connection, retainer, or diverter housing is the first visible wet point.
Do this next
Shut off fixture water before any disassembly and arrange hose or connection service if the fitting, retainer, or model-specific routing is uncertain. Protect the cabinet and provide photos.
Why this path and its safety boundary
Safety stop: Do not disconnect a pressurized hose, pull against a stuck fitting, or continue if a shutoff valve leaks or cannot close.
-
PATH 03Safety boundary
What you see
Spray and stream mix, the leak appears only in spray mode, water is inside the faucet body, or the cabinet, wall, floor, outlet, or appliance area is wet.
Do this next
Keep water isolated and request qualified plumbing service; add water-damage or electrical assessment when building materials or energized equipment are affected.
Why this path and its safety boundary
Safety stop: Do not open the diverter or cartridge, run the faucet with connections removed, use electrical equipment in the wet area, or continue testing after damage appears.
Helpful context
Understand the symptom
Locate the leak before choosing a part
A pull-down sprayer can leak at the wand-to-hose joint, along the retractable hose, at a quick connection under the sink, or inside the faucet's diverter path. The visible drip point may be downstream from the actual failure, so a model-specific part should not be selected from appearance alone.
Water-off comes before opening a connection
If the inspection becomes more than a visual check, close the fixture's hot and cold supply valves before disconnecting any hose or fitting. Delta and Kohler manufacturer guidance both treat diverter and hose details as model-dependent. Keep a towel or container ready only after the water is isolated, and stop if the valves do not close or the leak continues under pressure.
Protect the cabinet and nearby systems
Dry the visible cabinet floor and check for swelling, staining, or water near outlets and appliances. Do not keep cycling a leaking faucet to reproduce the symptom. If water has reached electrical equipment, stored contents, or the wall, isolate the area and arrange plumbing or water-damage service.
Only after diagnosis
Potential parts
- pull-down faucet hose
Consider a hose only when the hose itself, its connection, or its routing is identified as the leak source after fixture water is isolated.
Confirm the faucet manufacturer, model, hose-end connection, length, weight or guide arrangement, and installation instructions before ordering. - faucet sprayer head
Consider a sprayer head only when the wand body, spray face, or wand-to-hose seal is visibly damaged or diagnosed as leaking.
Confirm the faucet model, spray/stream control, connection, finish, and seal requirements; generic heads may not fit or preserve the intended flow. - faucet diverter valve
Consider a diverter only when flow fails to switch correctly or a qualified diagnosis identifies the diverter as the source; a hose leak does not prove diverter failure.
Confirm the faucet model and the diverter location, part specification, and service procedure before ordering or opening the faucet.
When checks do not resolve it
Need a professional?
Call a plumber when the leak source is hidden or persistent, the hose or quick connection needs disassembly, a diverter or faucet body may be involved, a shutoff valve will not close, or water has damaged the cabinet, wall, floor, outlet, or nearby appliance.
Have this ready
- Provide faucet manufacturer and model, photos of the wand, hose route, quick connection, leak location, spray/stream symptoms, shutoff condition, recent installation or plumbing work, and any cabinet or electrical-area damage.
Common questions
FAQ
Where does a pull-down sprayer usually leak?
The visible source may be the spray head, wand-to-hose joint, flexible hose, quick connection under the sink, faucet body, or diverter path. Photograph the first wet point before choosing a part.
Do I need to shut off water before replacing a faucet hose?
Yes. Shut off both fixture supply valves before disconnecting any hose or fitting and follow the model instructions. If a valve will not close or the connection is pressurized, stop and call a plumber.
Could a kinked hose cause a sprayer leak?
A kink or cabinet obstruction can strain the hose and affect return and connections. Observe the route without pulling it; a split, wet fitting, or stuck hose needs model-specific service.
When should I stop troubleshooting a faucet sprayer leak?
Stop for uncontrolled water, a leaking shutoff, water near energized equipment, cabinet damage, a cracked fitting, or any need to disassemble, force, cut, bypass, or test with water on.
Read the exact guide
Official sources
- Sprayer Hose - Service & Parts FAQDelta Faucet · Delta faucet support information; connection details and repair parts vary by model and age.
- Not Diverting to SidesprayKohler Assist · Kohler kitchen faucet support information; other brands and models may locate or service the diverter differently.
Community feedback
Share a repair observation
Share a plain-text repair observation. Accepted observations are published automatically; this page may take a moment to update.