
On this page
Start here
Quick answer
First find where the water starts: the spray wand face or body, the wand-to-hose joint, the hose or quick-connect below the deck, or the faucet body. Put a towel or container under the connections, turn off the faucet's hot and cold supplies before loosening anything, and identify the faucet model. A loose or displaced seal, cracked wand, split hose, kink, or incompatible replacement connection can each look like a sprayer leak. Tighten only the accessible connection specified by the manufacturer; replace a damaged hose, wand, seal, or diverter only with a model-matched part. If the leak continues with the wand docked, appears at the faucet body or valve, reaches the cabinet or electrical equipment, or the shutoff will not stop flow, stop and call a plumber.
Before you begin
Safety first
- Turn off the hot and cold fixture supplies before loosening a spray head, hose, seal, screen, or quick-connect. Do not cut or tape a hose, force an unknown connector, dismantle a cartridge, work around an active leak near electricity, or leave a repaired connection unobserved while pressurized.
Work through in order
Diagnostic checks
Use only checks that match the exact appliance or system and its official guide.
-
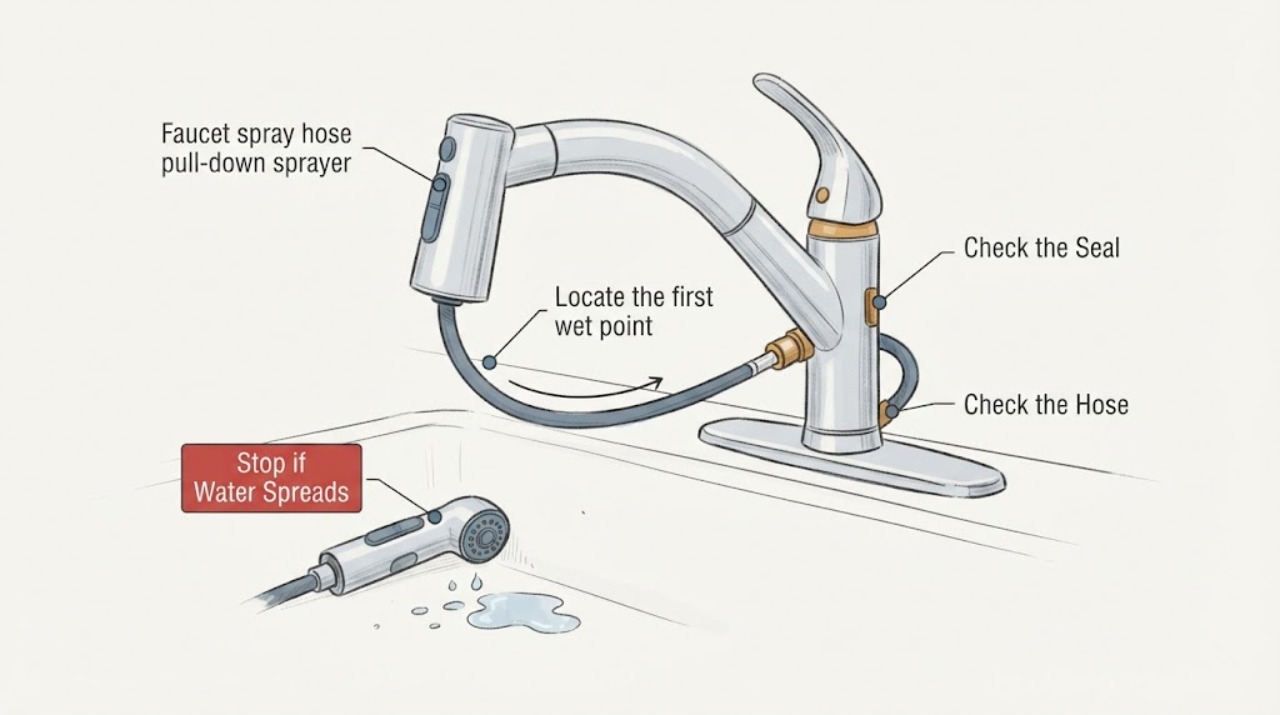
Locate the first wet point
Dry the spray wand, hose, faucet base, and the visible connections below the counter. With the cabinet cleared and a towel or container in place, turn the faucet on briefly at low flow while watching from a safe position, then turn it off. Do not reach near a moving hose weight or loosen any connection during this observation.
Expected result: Record whether water first appears from the spray-head face or buttons, the wand-to-hose seam, the flexible hose itself, the under-deck quick-connect, the faucet base, or a hot/cold supply connection. Note whether it leaks only while water is on or continues after shutoff.
Next step: Photograph the wet point and record the faucet brand/model if visible. Shut off the hot and cold fixture supplies before touching a hose, screen, seal, quick-connect, or spray head.
Stop if: Stop immediately if water reaches an outlet or electrical appliance, the leak is spraying, the cabinet floor is swelling, or the supply valves do not stop the flow.
Why this matters
Why: The first wet point narrows the repair: wand body or seal, hose, quick-connect/O-ring, or faucet valve/body. A leak that continues after shutoff is not explained by residual water in the hose and needs the supplies isolated before further work.
-
Check the hose path and weight for interference
With the faucet supplies off, look under the sink at the pull-down hose loop, hose weight, plumbing lines, cleaning products, disposal, and cabinet braces. Move loose items away without pulling the hose or changing plumbing. Inspect the hose from end to end for a kink, abrasion, bulge, crack, or a section that catches when the wand is gently returned to its dock.
Expected result: Classify the path as clear, kinked, rubbing, caught on an obstruction, or visibly damaged. Note whether the hose weight can travel freely and whether the leak is at a bend or rub point rather than at a threaded or quick-connect joint.
Next step: Leave a clear travel path and use the exact faucet model when sourcing a replacement hose. Do not tape a pressurized hose, clamp it, or force the weight past a cabinet obstruction.
Stop if: Stop if the hose is under tension, caught behind a fixed cabinet part, rubbing on a sharp edge, or would require removing a disposal, plumbing line, or cabinet panel to inspect.
Why this matters
Why: An obstructed or kinked hose can prevent smooth retraction and put stress on the hose or connections. A split, bulge, or abraded section is a hose replacement clue, not a seal-tightening problem. A clear path shifts attention to the connection, wand, diverter, or faucet body.
-
Inspect the wand-to-hose connection and seal
After the hot and cold supplies are fully off and pressure has been relieved at the faucet, inspect the accessible joint where the spray wand meets the hose. Follow the exact faucet manual for whether that joint is threaded or a quick connection. Look for a missing, displaced, flattened, or damaged O-ring or screen; do not substitute a seal by size alone or overtighten the wand.
Expected result: Record a dry, loose, cross-threaded, cracked, or visibly wet joint, and whether the screen or seal is present and seated. If the connection appears intact but the wand body or button is cracked, record that separately.
Next step: If the manufacturer's instructions permit it, reseat the identified screen/O-ring and hand-tighten the wand connection only as directed, then restore water slowly and observe. Otherwise, use a model-matched wand, seal, or hose and have a plumber perform the repair.
Stop if: Stop if the seal is torn, the threads are damaged, the connection cannot be identified, the faucet model is unknown, or restoring water causes a spray or immediate leak.
Why this matters
Why: A loose joint or displaced seal can leak at the wand, while a cracked wand needs a spray-head or wand replacement. A sound connection with water emerging from the hose means tightening the wand cannot solve the leak.
-
Check the under-deck quick-connect and hose end
With both fixture supplies off, use a dry towel to inspect the connection where the spray hose meets the faucet body below the countertop. Do not pull on the hose or release a clip unless the model-specific instructions identify the connection and you are prepared to catch residual water. Look for a connector that is not fully seated, a displaced retainer, a damaged O-ring, corrosion, or a hose end that does not match the faucet body.
Expected result: Record a dry and locked connection, a wet joint, visible movement, a missing retainer, a damaged seal, or a hose that appears incompatible or cannot lock. Note whether water is actually coming from above the connection along the hose rather than from the connection itself.
Next step: Use the faucet's official instructions to re-seat or replace the connection only after the supplies are off. If the connector, retainer, or hose end is damaged or uncertain, keep the supplies off and arrange plumbing service rather than improvising a fitting.
Stop if: Stop if the shutoff valves leak, a connector will not release as documented, water continues under pressure, or access requires moving electrical equipment or disconnecting other plumbing.
Why this matters
Why: A wet quick-connect can indicate an unseated connector, retainer, seal, or incorrect hose. Manufacturer guidance notes that pull-down faucets use multiple connection styles and that replacement hose ends differ; the model determines the correct repair path.
-
Separate a hose leak from a faucet-body or valve leak
Once the visible hose and wand area is dry and the cabinet is protected, turn the faucet on briefly only if the supplies and connections are stable. Watch the faucet body, base, handle area, and hose connection separately; then shut the faucet and supplies off before any further disassembly. Do not remove the cartridge or valve body as a diagnostic experiment.
Expected result: Record water from the hose wall or wand joint, from the faucet body or base, from the handle, or no new water after the connection was corrected. Note whether the faucet drips with the handle closed or leaks only when water is routed through the sprayer.
Next step: Keep the supplies off for a faucet-body or valve leak and call a plumber or manufacturer service channel. For a confirmed hose or wand fault, provide the model and photos before ordering the conditional replacement part.
Stop if: Stop if the leak is continuous, the faucet body is cracked, the handle will not shut water off, or water is entering the cabinet faster than towels can contain it.
Why this matters
Why: A body, base, handle, or continuing closed-handle leak points toward the faucet valve, cartridge, diverter, or body rather than the spray hose. A hose-wall or wand-joint leak supports a model-matched hose, seal, or wand repair.
-
Verify the repair without leaving the cabinet unattended
After a model-specific hose, spray head, seal, or connection has been installed according to its instructions, open the fixture supplies gradually while keeping the cabinet doors open. Observe the wand joint, hose loop, quick-connect, faucet base, and supply connections during stream and spray modes, then return the wand to its dock and check the cabinet and cabinet floor for new moisture.
Expected result: Record dry connections, a small residual drip that stops, a leak only in spray mode, a leak only while retracting, or a continuous leak. Note whether the hose catches or the weight strikes plumbing during movement.
Next step: Shut the fixture supplies off again for any new moisture and arrange service. Leave towels in place until the area is dry and the professional or manufacturer confirms the next repair.
Stop if: Stop testing for spraying water, a hose that pulls loose, a quick-connect that shifts, water near electrical equipment, or a supply valve that cannot shut off.
Why this matters
Why: A dry, freely moving hose after both modes supports a successful repair. A mode-specific leak can indicate the spray head, diverter, or wand connection; a leak during retraction can reflect hose routing or a damaged hose. Any continuous leak means the repair is not complete.
Use your observations
Decision map
Find the observation that best matches what you see, then follow the next safe action.
-
PATH 01Next step
What you see
Water starts at the wand-to-hose joint and the connection or seal is visibly loose or displaced.
Do this next
Shut off both fixture supplies, follow the exact model instructions to reseat the seal or connection without overtightening, and perform a slow leak check. Replace the model-matched seal, wand, or hose if damaged.
-
PATH 02Next step
What you see
The flexible hose is split, bulged, abraded, kinked, or caught on cabinet contents or plumbing.
Do this next
Keep the supplies off, clear only loose obstructions, and use the exact faucet model to select a replacement pull-down hose. Do not tape, clamp, cut, or force the hose as a temporary repair.
-
PATH 03Next step
What you see
The under-deck quick-connect is wet, will not lock, has a missing retainer or seal, or the replacement hose end does not match.
Do this next
Stop disassembly and arrange manufacturer or plumbing help with the model and connector photos. Different pull-down hose connection styles are not interchangeable by appearance.
-
PATH 04Next step
What you see
Water comes from the spray-head body, button, faucet base, handle, or valve area, or the faucet leaks with the handle closed.
Do this next
Leave the fixture supplies off and call a plumber or manufacturer service channel. A spray hose replacement will not correct a faucet-body, cartridge, or diverter fault.
-
PATH 05Next step
What you see
The leak is contained, the model-matched repair is installed, and no moisture returns during stream, spray, or retraction checks.
Do this next
Dry the cabinet, keep the hose path clear, and monitor the next few uses. If moisture returns, shut the supplies off and treat the repair as unresolved.
-
PATH 06Next step
What you see
A shutoff valve will not stop flow, water reaches electrical equipment, or the cabinet is actively flooding.
Do this next
Stop using the faucet, keep people away from wet electrical areas, and obtain urgent plumbing or local emergency assistance as appropriate. Do not continue testing.
Helpful context
Understand the symptom
Why the leak location matters
A pull-down faucet routes water through a flexible hose from the faucet body under the counter to the spray wand above the deck. Water at the wand-to-hose joint points toward that seal or connection; water along the hose points toward a split or damaged hose; water below the deck can come from the quick-connect, supply connection, or faucet body. A small amount of water left in a long hose can drip briefly after the faucet is shut off, but a continuing leak while the faucet is operating or a wet cabinet needs a more specific diagnosis.
Keep water damage contained
Empty the cabinet and protect the area with towels or a shallow container before observing. Do not leave a leaking faucet unattended, pull hard on the wand, or remove a connection while the supplies are pressurized. The faucet model controls the hose end, quick-connect, screen, O-ring, weight, and replacement part; a visually similar hose is not automatically compatible.
Only after diagnosis
Potential parts
- pull-down faucet hose
Consider only when the flexible hose is split, bulged, abraded, or leaking along its length, or when the model-specific instructions identify the hose as the failed part.
Match the faucet brand, model, connection style, hose end, length, retainer/clip, and weight arrangement; pull-down hoses that look similar are not universally interchangeable. - faucet sprayer head
Consider only when water begins at a cracked spray wand, button, face, or wand-to-hose seal after the hose path and connection have been identified.
Confirm the exact faucet model, thread or connector, screen/O-ring arrangement, and spray functions before ordering; do not assume a universal wand will seal. - faucet diverter valve
Consider only when the leak or spray-routing symptom is traced to the faucet body or diverter rather than the hose or spray head, and the model documentation identifies a replaceable diverter.
Use the faucet's exact model and manufacturer parts information; valve and diverter components are not universal and may require a plumber to install.
When checks do not resolve it
Need a professional?
Call a plumber or the faucet manufacturer when the leak is at the faucet body, base, handle, valve, or supply connection; the hose or quick-connect is damaged or unknown; the shutoffs do not stop flow; or moisture returns after a model-specific hose or wand repair. Escalate promptly for active flooding, water near electrical equipment, or a cracked faucet body.
Safety scope: Turn off the hot and cold fixture supplies before loosening a spray head, hose, seal, screen, or quick-connect. Do not cut or tape a hose, force an unknown connector, dismantle a cartridge, work around an active leak near electricity, or leave a repaired connection unobserved while pressurized.
Have this ready
- Provide the faucet brand and model if visible, the first wet point, whether the leak occurs only when on or continues after shutoff, photos of the wand-to-hose joint and under-deck connector, hose routing and weight position, shutoff behavior, and the exact part or seal already installed.
Common questions
FAQ
Why is my pull-down faucet spray hose leaking under the sink?
The first wet point may be a split hose, kink or abrasion, under-deck quick-connect, displaced retainer or O-ring, or water running down from the spray wand or faucet body. Dry the area, observe briefly, then turn off both fixture supplies before loosening any connection.
Can I tighten the pull-down sprayer hose myself?
Only if the faucet's exact instructions identify that connection and the hot and cold fixture supplies are off. A small amount of residual water can remain in a flexible hose, but do not overtighten, force an unknown connector, or use tightening to mask a split hose or cracked wand.
How do I know whether the spray head or hose needs replacing?
Water from the spray-head body, buttons, or wand-to-hose seal points toward the wand, screen, or seal; water along the flexible hose points toward the hose; water at the faucet body or a leak with the handle closed points toward the valve, diverter, or faucet body. Confirm the model before ordering either part.
Are pull-down faucet hoses universal?
No. Manufacturers use multiple threaded and quick-connect styles, hose ends, retainers, screens, O-rings, and weights. Match the exact faucet model and its documentation rather than choosing a hose by appearance or nominal length.
What should I do if the faucet still leaks after replacing the spray hose?
Turn off the hot and cold fixture supplies and recheck the first wet point without repeatedly pressurizing the repair. If the faucet body, valve, diverter, supply connection, or quick-connect still leaks, leave it off and call a plumber or the manufacturer; do not dismantle the cartridge or improvise a fitting.
Read the exact guide
Official sources
- How to Install a Pullout or Pulldown HoseMoen Solutions · Official manufacturer support article used to explain that pull-down hoses connect the spray wand to the faucet body, that supplies must be turned off before disconnection, and that multiple hose/quick-connect styles and end materials require model-specific identification; its part-era examples are not universal compatibility rules.
- Sprayer Hose - Service & Parts FAQDelta Faucet · Official manufacturer support FAQ used for the distinction between a hose leak and a diverter or spray-head issue, the role of a displaced retainer/O-ring, the effect of a kink or obstruction, and the need to identify the exact faucet model before selecting a replacement; individual answers may be model-specific.
- High-Rise Pull-Down Kitchen and Bar / Prep Faucet Installation and MaintenanceDelta Faucet · Official manufacturer manual used for the safe boundary that persistent leaks require the water supplies to be shut off, that the spray-head screen must be replaced, and that the faucet's internal cartridge is not a homeowner-repairable component; the depicted faucet series is model-specific.
Community feedback
Share a repair observation
Share a plain-text repair observation. Accepted observations are published automatically; this page may take a moment to update.