
On this page
Start here
Quick answer
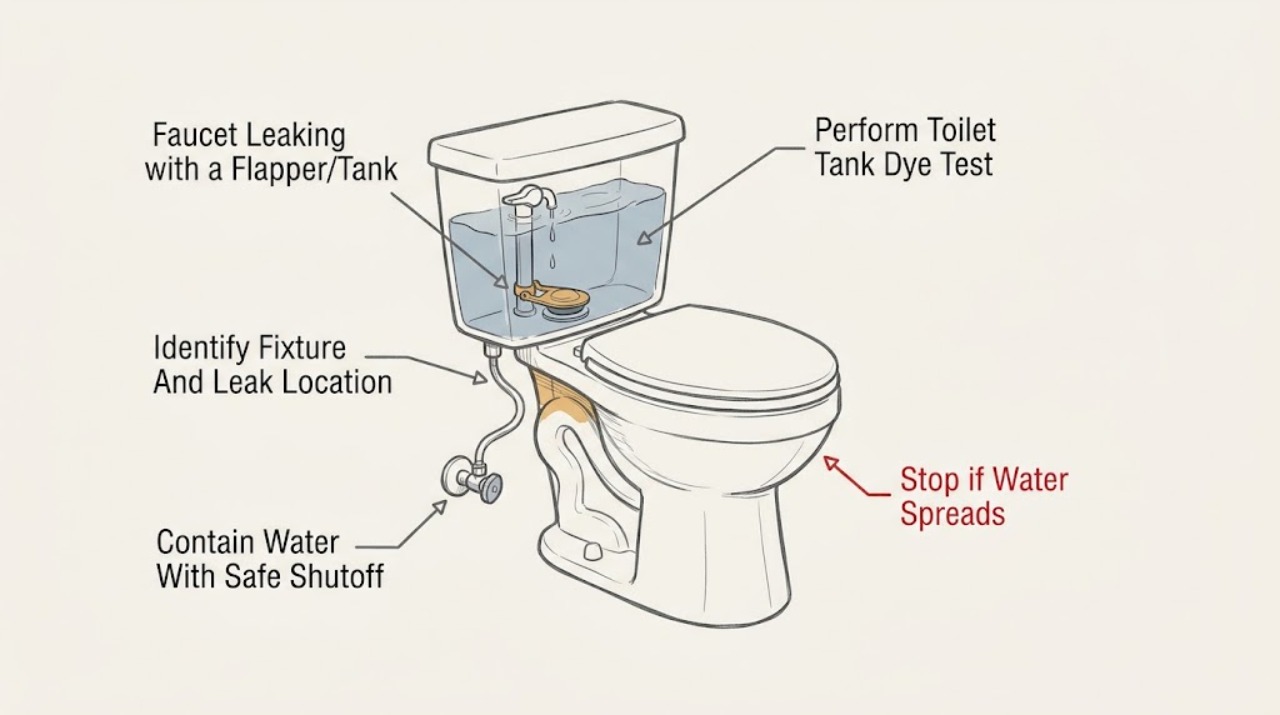
The words faucet and flapper/tank describe different fixtures, so identify the leaking fixture first. A rubber flapper and tank normally indicate a toilet: water may run from the tank into the bowl, rise into the overflow tube, or leak outside at the tank, supply connection, or floor. A faucet normally has no tank flapper; its leak is usually at the spout, handle, aerator, supply connection, or drain below the fixture. From a dry, safe position, locate the water, close the nearest clearly identified shutoff if water is escaping, and observe whether the toilet bowl changes color during a no-flush dye test or whether the faucet drips with its handles closed. Do not replace a part until the fixture and exact component are confirmed. Stop for active flooding, contaminated water, water near electrical equipment, a damaged valve or pipe, or a leak inside a wall or ceiling; call a licensed plumber.
Work through in order
Diagnostic checks
Use only checks that match the exact appliance or system and its official guide.
-
Check 1
Without reaching into moving water or energized equipment, trace the first wet point: toilet tank or bowl, faucet spout or handle, supply fitting, drain connection, cabinet floor, wall, or ceiling. Record whether the assigned flapper/tank wording matches a toilet or whether the leaking object is actually a faucet.
Expected result: A tank and bowl identify a toilet branch; a spout, handle, or under-sink fitting identifies a faucet/fixture branch. Water emerging from a wall, ceiling, cracked tank, or failed connection is an escalation branch.
Next step: Use the toilet checks only if a tank and bowl are present. For a true faucet, close the clearly identified local shutoff if safe and observe the spout and connections with the handles closed.
Stop if: Stop for active flooding, a failed or corroded shutoff, cracked porcelain, water near electrical equipment, a ceiling or wall leak, or contaminated wastewater.
Why this matters
Why: The fixture determines which seal and test are relevant. A toilet flapper test cannot diagnose a faucet cartridge, washer, supply hose, or pipe leak.
-
Check 2
If water is escaping and the local shutoff is clearly identified and accessible from a dry position, close it gently; place a container or towels only where they cannot contact electricity, and keep the area visible for the next observation.
Expected result: The flow stops, slows, or continues. A valve that will not close, continues leaking at its stem, or leaves water flowing indicates a failed isolation point rather than a flapper or faucet adjustment.
Next step: If flow continues or the leak is large, use the home's main shutoff only if it is known and safe, then call a plumber or building emergency service. If flow stops, continue with the fixture-specific check.
Stop if: Do not force a stuck valve, remove a pressurized connection, handle sewage-contaminated water, or work near wet electrical equipment.
Why this matters
Why: Stopping incoming water limits damage, but a shutoff that fails or a concealed leak needs professional isolation. Do not use force that could break the valve or piping.
-
Check 3
Only when the fixture is definitely a toilet, there is no external overflow, and the tank is stable, add a small amount of food coloring or a dye tablet to the tank without flushing; wait about 10 minutes as the EPA guidance describes, then inspect the bowl.
Expected result: Color in the bowl means tank water is crossing the flapper or flush-valve seal. A clear bowl does not show that internal leak during this test; water rising toward or into the overflow tube points instead to fill-level or fill-valve control.
Next step: Flush promptly after the test to clear the dye. If color appears, inspect only the visible chain, flapper seating, and tank water behavior if safe; otherwise arrange plumbing repair. If water is reaching the overflow tube or the tank leaks outside, stop and call a plumber.
Stop if: Do not flush repeatedly during the test, add harsh tank chemicals, force the flapper, or continue if the tank, floor, or supply connection is leaking heavily.
Why this matters
Why: The result separates a tank-to-bowl flapper/flush-valve leak from an overflow or external leak. It does not prove which replacement part fits a particular toilet.
-
Check 4
For a toilet branch, lift the tank lid carefully after the flush has stopped and observe the water line and overflow tube without touching the mechanism; compare the level with the manufacturer's marked level or the exact toilet instructions.
Expected result: Water continuously entering the overflow tube or a level that rises and then falls suggests a fill-valve or overflow problem; a normal level that slowly falls while the bowl receives water supports a flapper or flush-valve seal leak.
Next step: Close the local toilet shutoff if it is safe and clearly identified, then arrange a plumber for a fill valve, overflow, valve seat, or damaged tank diagnosis when the level is abnormal or the leak persists.
Stop if: Do not adjust an unfamiliar mechanism, remove the tank, use in-tank chlorine cleaners, or continue if the tank or supply line is cracked or actively leaking.
Why this matters
Why: A tank leak can be caused by more than the flapper. Changing the wrong part may leave the leak or create a new overflow condition.
-
Check 5
For a true faucet branch, dry the spout, handles, base, supply fittings, and cabinet area, close the faucet handles, then watch for the first new bead of water without dismantling the fixture.
Expected result: A drip from the spout with handles closed points toward an internal valve, washer, or cartridge; wetness at a handle or base points toward a seal or body path; wetness at a supply fitting or pipe points toward a connection or supply-line leak.
Next step: Close the clearly identified local shutoff if safe and arrange a plumber when the leak persists, the fitting is corroded, or the faucet body or supply line is involved. Use only model-specific instructions for a user-level repair.
Stop if: Do not force the handle, disassemble a pressurized faucet, use sealant as a substitute for a damaged pipe, or continue when water reaches electrical equipment.
Why this matters
Why: The location narrows the repair class, but faucet construction and parts vary by model. A flapper/tank part is not evidence for a faucet repair.
-
Check 6
If no source is obvious and the home is dry and safe, stop water use briefly and check the water meter's leak indicator; then isolate only a known house or fixture valve as directed by local utility guidance and observe whether the indicator changes.
Expected result: A moving indicator with no intended water use supports an active leak. If isolating the house leaves movement, the leak may be outside or upstream; if it stops, the leak is inside and the toilet, faucet, appliance, or hidden pipe needs narrowing.
Next step: Document the fixture and timing and call a licensed plumber when the leak is hidden, recurring, or not isolated by a safe visible shutoff.
Stop if: Do not excavate, open walls, test pressurized concealed lines, or enter a wet electrical area to trace the leak.
Why this matters
Why: Meter movement can confirm water loss but cannot identify a flapper, faucet, or concealed pipe. It is a triage observation, not a pressure or pipe repair test.
-
Check 7
Prepare a plumbing handoff stating that the request was labeled faucet/leaking with component flapper/tank, then provide the confirmed fixture, first wet point, shutoff result, dye-test result if it was a toilet, tank or bowl behavior, and any visible damage.
Expected result: A confirmed toilet flapper, fill valve, overflow, or tank leak is a different work description from a faucet spout, cartridge, supply fitting, or concealed pipe leak.
Next step: Keep the local shutoff closed when safe if water is escaping and request licensed plumbing service for persistent, concealed, structural, contaminated, or failed-shutoff leaks.
Stop if: Do not order a replacement solely from the words flapper or faucet, and do not resume use when the leak is active or near electrical equipment.
Why this matters
Why: Correcting the fixture identity prevents an incompatible part or repair plan and helps the plumber bring the appropriate diagnosis and replacement options.
Use your observations
Decision map
Find the observation that best matches what you see, then follow the next safe action.
-
PATH 01Next step
What you see
The wet fixture has a toilet tank and bowl, matching the flapper/tank component note
Do this next
Use the tank level observation and no-flush dye test. Color in the bowl supports a flapper or flush-valve seal leak; overflow behavior supports a fill-level or fill-valve branch.
-
PATH 02Next step
What you see
The wet fixture is a sink, tub, or other faucet with no toilet tank
Do this next
Ignore the flapper/tank assumption, close the clearly identified local shutoff if safe, and locate whether water starts at the spout, handle, base, supply fitting, or drain.
-
PATH 03Next step
What you see
Water is outside the tank, at a supply or pipe connection, in a wall or ceiling, or the first wet point cannot be found
Do this next
Contain water from a safe dry location, use a known shutoff if it turns normally, and call a licensed plumber; do not open walls or force valves.
-
PATH 04Next step
What you see
Rapid flow, contaminated water, structural damage, or water near electrical equipment
Do this next
Stop the water source only if safe, keep people clear, and use emergency maintenance, electrical, or plumbing help from a dry safe location.
-
PATH 05Next step
What you see
The leak returns after a safe visible check or the correct component remains uncertain
Do this next
Leave the fixture isolated when safe and give the plumber the confirmed fixture identity and observation record instead of guessing a replacement part.
Helpful context
Understand the symptom
Resolve the faucet versus tank mismatch first
A flapper is normally the rubber seal in a toilet tank, not a faucet component. If the water is in a toilet tank or bowl, the tank/flapper path applies. If the water is at a sink, tub, or hose faucet, use the faucet/fixture path and do not open a toilet tank. Keeping the assigned faucet identity while recording this ambiguity prevents a plausible but irrelevant repair.
A tank-to-bowl leak differs from an external leak
A toilet can lose water silently through a worn or misaligned flapper, or continuously refill when the water level reaches the overflow tube. Water on the outside of the tank, around the supply connection, or on the floor is a different leak that needs immediate containment and may involve a gasket, valve, or cracked porcelain. A faucet drip at the spout or wetness under the sink is not diagnosed by a toilet dye test.
Shutoff and professional boundaries
Close only a clearly identified local fixture shutoff when doing so is safe and the valve turns normally. Do not force a corroded valve, cut a pipe, open a wall, or handle sewage-contaminated water without appropriate protection. Active flooding, a failed shutoff, structural damage, or water near electrical equipment is a plumber or emergency-maintenance boundary.
Safety boundary
Stop conditions
- Stop for rapid flow, failed shutoff, cracked tank or pipe, water near electrical equipment, contaminated water, wall or ceiling damage, or structural wetness. Do not force valves, detach pressurized connections, open walls, dismantle a tank or faucet without model-specific instructions, add harsh in-tank chemicals, or order a part before confirming the fixture and component.
When checks do not resolve it
Need a professional?
Call a licensed plumber for a failed or corroded shutoff, active flooding, water in a wall or ceiling, cracked porcelain or pipe, contaminated wastewater, an inaccessible leak, a recurring leak after a safe observation, or any uncertainty between the assigned faucet identity and the flapper/tank component. Keep water away from electrical equipment and use emergency maintenance or electrical help when those hazards are present.
Common questions
FAQ
Is a flapper part of a faucet?
Usually no. A flapper is normally the rubber seal in a toilet tank. If the leaking fixture is a sink or tub faucet, confirm the faucet leak location instead of buying a toilet flapper.
How can I tell if a toilet flapper is leaking?
After the tank refills, add dye without flushing and wait about 10 minutes. Color in the bowl indicates tank water is crossing the flapper or flush-valve seal. Flush afterward to clear the dye.
What if water is running into the toilet overflow tube?
That points toward a fill-level or fill-valve problem rather than proving a flapper leak. Close the local shutoff if safe and arrange plumbing diagnosis if the level remains abnormal or the toilet continues to run.
What should I do if the actual faucet is dripping?
Dry the faucet and watch whether the first new water appears at the spout, handle, base, supply fitting, or drain. Close the clearly identified local shutoff if safe and use model-specific plumbing repair or a licensed plumber; a toilet dye test will not diagnose it.
When is a leak an emergency?
Rapid flow, a failed shutoff, water near electrical equipment, contaminated wastewater, cracked porcelain or pipe, or water entering a wall or ceiling needs immediate containment from a safe location and emergency maintenance or licensed plumbing help.
Read the exact guide
Official sources
- Home MaintenanceU.S. Environmental Protection Agency WaterSense · Government guidance on toilet flapper leaks, faucet leak observation, and household water fixtures
- Finding and Fixing Water LeaksCity of San José Environmental Services · Government household leak isolation, water-meter observation, toilet dye testing, and plumber escalation
- Toilet Leak Detection - DEPNew York City Department of Environmental Protection · Government toilet tank, flapper, fill-valve, overflow, dye-test, and plumber guidance
- Fix a Leak WeekU.S. Environmental Protection Agency WaterSense · Government leak detection and fixture-maintenance guidance for toilets and faucets
Community feedback
Share a repair observation
Share a plain-text repair observation. Accepted observations are published automatically; this page may take a moment to update.