
On this page
Start here
Quick answer
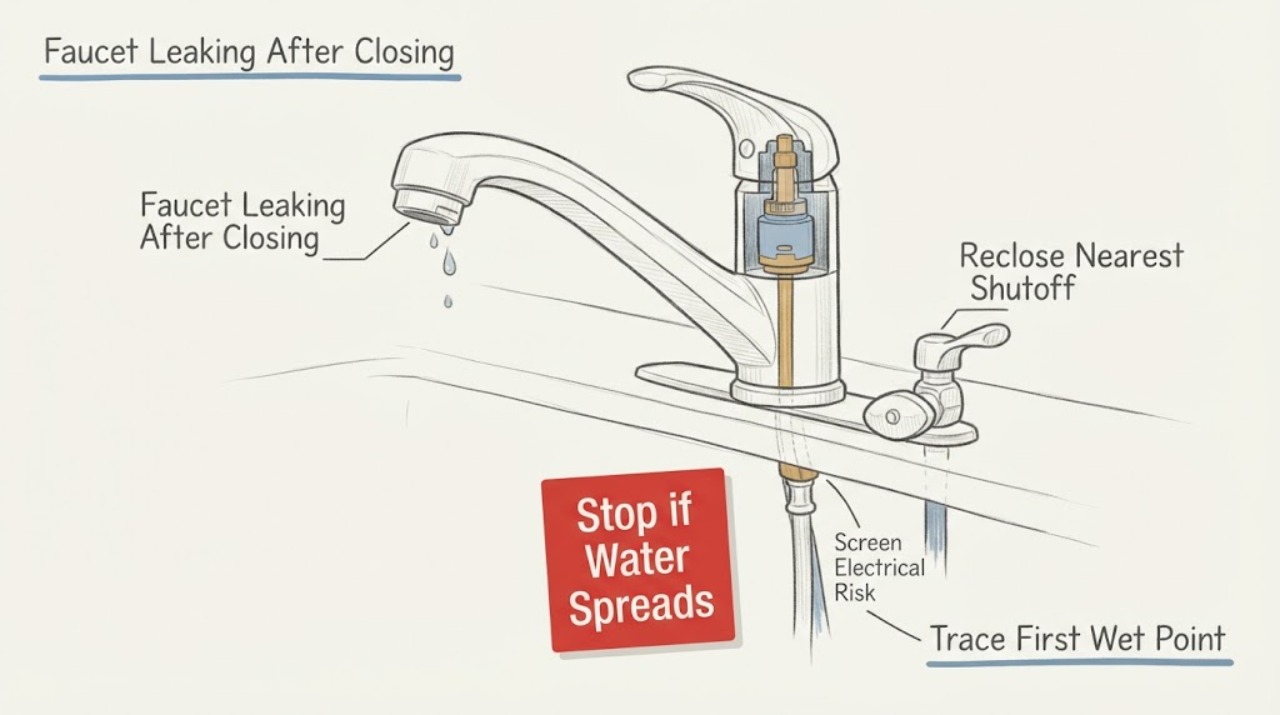
If a faucet starts leaking after its shutoff was closed and reopened, first close the nearest shutoff again without forcing it and identify the first wet point. A leak at the shutoff stem, valve body, or threaded connection is different from a leak at the supply hose, faucet base, handle, or spout. If the leak continues when the faucet is unused, the shutoff or supply side may still be pressurized; if it appears only when the faucet runs, the faucet body, hose, drain, or connection may be involved. Open the faucet briefly only from a dry, safe position to release residual pressure, then leave the supply isolated if water continues. Do not force a stiff valve, overtighten a fitting, remove a cartridge without model information, or keep testing when water is near electrical equipment or the cabinet is flooding. Request a plumber when the valve will not stop flow, the source is hidden, or the leak returns after the shutoff is operated.
Work through in order
Diagnostic checks
Use only checks that match the exact appliance or system and its official guide.
-
Check 1
Stop using the faucet and close the nearest cold and hot supply valves, or the single valve where applicable, using normal hand pressure only; if a valve is stiff, damaged, or inaccessible, do not force it.
Expected result: The drip stops, slows but continues, or the valve will not close and water continues to flow.
Next step: Keep the supply isolated and continue only with safe visual checks. If the valve will not stop flow, close the main supply only from a dry safe position or request emergency plumbing help.
Stop if: Do not force a stuck valve, use a wrench on a small handle, remove the valve, or cross standing water to reach a shutoff.
Why this matters
Why: A stopped drip supports a supply-side leak that can be isolated locally. Continued flow suggests residual pressure, a valve that does not seal, another active source, or a leak upstream of the local valve.
-
Check 2
From a dry position, check whether water has reached an outlet, switch, light, appliance, cord, or electrical panel; keep people out of standing water and do not operate a wet electrical device.
Expected result: The leak is confined to a dry cabinet or counter, water is near electrical equipment, wiring is wet or sparking, or the electrical shutoff cannot be reached safely.
Next step: Keep clear and contact a qualified electrician or emergency responder when power cannot be isolated safely. Leave the faucet supply closed and do not restore power until the area is cleared.
Stop if: Stop immediately for sparks, buzzing, burning odor, a wet outlet, frayed wiring, or standing water around electrical equipment.
Why this matters
Why: Clean tap water can still create shock and fire risk near electricity. The CDC says not to enter standing water to reach the main switch and not to restore power to wet equipment before qualified inspection and drying.
-
Check 3
Dry the visible shutoff, valve stem, valve body, threaded connection, supply hose, faucet base, handle, and spout with separate towels, then watch without turning the water back on if flow is active.
Expected result: The first wet point is the shutoff stem, shutoff body or connection, supply hose, faucet base, handle, spout, or a hidden cabinet or wall area.
Next step: Keep the appropriate supply closed and photograph or note the first wet point. Give that location to the plumber instead of tightening unrelated parts.
Stop if: Do not remove trim, cut the wall, dismantle a valve, or place hands into an area with unknown water or damaged wiring.
Why this matters
Why: The first wet point identifies the side of the system to report: the shutoff and supply are upstream, while the faucet base, handle, and spout are part of the fixture. A wall or cabinet origin can indicate concealed leakage rather than a faucet seal.
-
Check 4
Once the area is dry and the leak is not substantial, note whether water appears while the faucet is unused, immediately after the shutoff opens, only when the handle runs, or only after the faucet is closed; do not repeatedly cycle the valve.
Expected result: The leak is continuous under pressure, starts after reopening the shutoff, appears only during flow, or appears only as a short residual drip.
Next step: Keep the supply closed for continuous or returning leakage. If a residual drip does not stop or the flow-only leak wets the cabinet, request plumber diagnosis.
Stop if: Do not reopen the supply repeatedly to compare patterns, and do not assume a short drip is harmless if it returns or spreads.
Why this matters
Why: Continuous leakage favors a pressurized shutoff or supply connection. A leak after reopening points to the operated valve or a connection disturbed by pressure. Flow-only leakage favors the faucet body, handle, base, spout, drain, or a fitting that moves under flow. A short residual drip can be water left in the spout or hose, but it should stop.
-
Check 5
With the supply closed, inspect the outside of the shutoff for a wet stem, body seam, compression or threaded connection, corrosion, or a split connector; do not tighten a stuck handle or disassemble the valve.
Expected result: Water beads at the stem, emerges from the body or connection, the connector is damaged, or the shutoff remains dry while the faucet side is wet.
Next step: Leave the local supply closed and request plumbing service for a leaking or damaged shutoff. Tell the plumber that the valve was recently closed and reopened and identify the wet point.
Stop if: Do not apply sealant to a wet valve, use excessive torque, remove a packing nut, or attempt a valve replacement without confirming the main isolation and pipe support.
Why this matters
Why: A stem, body, or connection leak is a valve or supply-side service issue. A dry shutoff with a wet faucet side shifts attention to the faucet assembly or downstream connection.
-
Check 6
If the shutoff and supply hose remain dry, inspect the cool faucet body, base, handle area, spout, and under-counter connection for a wet seam or pooling; do not remove a cartridge, stem, or retaining nut without the exact faucet instructions.
Expected result: Water comes from the handle or stem, the base or body, the spout, the supply connection under the faucet, or only from the drain area.
Next step: Keep the supply isolated and provide the location to a plumber. A simple model-specific seal may be serviceable, but unknown faucet construction or cabinet leakage should be handled professionally.
Stop if: Do not pry the faucet, force a handle, remove a cartridge under pressure, or work where water can reach electrical equipment.
Why this matters
Why: Portland's guide separates handle, stem, and faucet-body leakage because each can involve a different seal or unit. Water at the supply connection is upstream of the faucet body, while water at the drain is not a faucet-pressure leak.
-
Check 7
Only after all visible connections are dry, the shutoff closes normally, and no electrical hazard exists, open the faucet briefly with the supply still isolated to release residual water; restore the supply slowly once, watching the valve and connections from a dry safe position.
Expected result: No leak appears, the same point leaks immediately, the shutoff handle or body moves, or water sprays or runs faster than before.
Next step: Close the supply again and request plumbing service for any returning or worsening leak. Do not repeat the restoration test.
Stop if: Do not perform this step if the valve is stiff, the leak is active, the cabinet is wet, the supply cannot be isolated, or water may contact electricity.
Why this matters
Why: A dry result after one controlled restoration suggests the earlier water may have been residual, but it does not prove the valve or connection is sound. Immediate or worsening leakage confirms a repair boundary.
-
Check 8
Keep the faucet out of service and provide the plumber with the faucet type, whether it has one or two handles, the shutoff location, first wet point, when the leak occurs, whether the valve closes, photos, and any hidden dampness; do not guess the replacement part.
Expected result: The leak is isolated locally, continues despite isolation, is hidden in the wall or cabinet, has damaged the floor, or has returned after a temporary dry period.
Next step: Follow the plumber's isolation, repair, drying, and leak-test plan. Restore water only after the repaired area and any wet electrical equipment are cleared.
Stop if: Stop all DIY work for flooding, hidden moisture, structural damage, sewage contamination, chemical residue, or unsafe electrical conditions.
Why this matters
Why: The evidence distinguishes a faucet seal or connector from a shutoff, supply, concealed pipe, or moisture-damage issue. A return after drying suggests an unresolved source rather than a finished repair.
Use your observations
Decision map
Find the observation that best matches what you see, then follow the next safe action.
-
PATH 01Next step
What you see
The shutoff will not close, water continues to flow, or the valve is stiff or damaged.
Do this next
Do not force the handle. Close the main supply only from a dry safe position if possible, keep clear of the water, and request emergency plumbing service.
-
PATH 02Next step
What you see
The first wet point is the shutoff stem, body, compression fitting, or threaded connection after the shutoff was operated.
Do this next
Leave that supply isolated and ask a plumber to assess the valve and connection. Do not overtighten, dismantle, or apply sealant as a guess.
-
PATH 03Next step
What you see
The shutoff is dry but the flexible supply hose or its connection is wet.
Do this next
Keep the shutoff closed, do not reuse a damaged connector, and request plumbing service for the hose and supported connection.
-
PATH 04Next step
What you see
The leak starts only during flow and the wet point is the faucet base, handle, stem, spout, or body.
Do this next
Keep the supply isolated and provide the exact leak location to a plumber. A model-specific seal may be involved, but do not remove the cartridge or stem under pressure.
-
PATH 05Next step
What you see
Only a short drip occurs after the supply is closed and it stops fully without returning.
Do this next
Dry the area and monitor without repeated valve cycling. Request service if the drip returns, spreads, or appears at a connection rather than the spout.
-
PATH 06Next step
What you see
Water appears at a wall, cabinet base, floor, ceiling below, or another location with no visible faucet source.
Do this next
Keep the supply isolated, protect the surrounding area, and arrange plumbing and moisture assessment. Do not cut into the structure or seal over damp material.
-
PATH 07Next step
What you see
Water is near outlets, switches, appliances, cords, or the electrical panel, or sparks or burning odor are present.
Do this next
Keep clear and isolate power only from a dry safe position. If the panel cannot be reached without standing in water, contact a qualified electrician or emergency responder and do not restore power until inspection and drying are complete.
-
PATH 08Next step
What you see
The leak returns after one controlled shutoff operation, cannot be isolated, or the source remains uncertain.
Do this next
Keep the faucet out of service and request a plumber with the first wet point, timing, valve behavior, and photos. Do not keep cycling the shutoff or guessing at parts.
Helpful context
Understand the symptom
Operating the shutoff can expose a weak valve or connection
A shutoff that was disturbed may begin leaking around its stem or body, while a supply connection may leak after pressure is restored. The faucet itself may also have a worn seal that becomes noticeable only when the water is turned back on. The operation is a clue, not proof of a particular part failure.
Find the first wet point before tightening anything
Dry the outside of the valve, hose, faucet base, and nearby surfaces, then watch from a safe position. A wet point that appears before the faucet is used favors the supply or shutoff side. Water that appears only while the handle is open can come from the spout, handle, base, drain, or a connection that is being stressed by flow.
A stuck shutoff is a stop condition
If the local valve will not close, do not use extra force or a long lever. Close the main supply only if it is safely reachable and dry; otherwise arrange plumbing help. Keep water away from outlets, switches, cords, and appliances, and do not use a wet electrical item until it has been inspected.
Only after diagnosis
Potential parts
- faucet cartridge, stem, or seal
Consider only after inspection confirms leakage from the handle, stem, body, or spout and the exact faucet design is identified.
Match the exact faucet make and model and confirm the water is fully isolated before service; a leak after shutoff operation does not identify this part. - faucet supply connector
Consider only when the first wet point is a damaged or leaking flexible supply connector and a plumber confirms the fitting and routing.
Confirm connection size, length, material, and local requirements. Do not reuse a connector that is split, corroded, or leaking. - fixture shutoff valve
Consider only after qualified diagnosis confirms the shutoff stem, body, or connection leaks or fails to isolate flow.
Main isolation, pipe support, connection type, and local requirements must be confirmed before replacement; do not force or dismantle a stuck valve.
When checks do not resolve it
Need a professional?
Request a plumber when the shutoff will not close, a stem or body leaks after operation, a supply connection leaks, the faucet-side leak returns, the source is hidden, water reaches a lower floor, or the leak cannot be safely isolated. Use qualified electrical help when water reaches electrical equipment or power cannot be isolated safely.
Have this ready
- Provide the faucet type and handle count, first wet point, whether the leak is continuous or flow-only, whether it started after closing and opening the shutoff, which valve stopped it, photos, cabinet or wall dampness, and any prior repair or chemical history.
Common questions
FAQ
Why did my faucet start leaking after I closed and reopened the shutoff?
Operating the shutoff can reveal a leak at its stem, body, or connection, or expose a supply hose that leaks when pressure returns. The faucet itself may also have a worn seal. Find the first wet point and keep the nearest supply closed rather than assuming one part failed.
How do I know whether the shutoff valve or faucet is leaking?
Dry the shutoff, supply connection, faucet base, handle, and spout, then watch from a safe position. Water at the valve or hose is upstream; water at the handle, body, base, or spout is on the faucet side. A leak that continues while the faucet is unused favors the pressurized supply side.
Should I tighten the shutoff valve if it leaks?
Do not force a stiff valve or overtighten a fitting. Close the supply with normal hand pressure if it is safe, keep the area dry, and request a plumber for a stem, body, or connection leak. Excess force can damage the valve or connected pipe.
What if the faucet leak is inside the cabinet?
Close the local supply, dry reachable surfaces, and check whether the first wet point is the shutoff, hose, faucet base, drain, or a hidden wall connection. Persistent cabinet or wall dampness needs plumbing and moisture assessment; do not seal over it or cut into the structure.
When is a leaking faucet an emergency?
Stop immediately for flow that cannot be isolated, flooding, water near electrical equipment, sparks, buzzing, burning odor, unsafe standing water, or hidden structural moisture. Keep clear, isolate water and power only from a dry safe position, and request qualified plumbing or electrical help.
Read the exact guide
Official sources
- A Brief Guide to Mold, Moisture and Your HomeU.S. Environmental Protection Agency · Residential moisture guidance; professional assessment is appropriate for hidden or extensive damage.
- Water Conservation Guidelines for Indoor/Domestic UseTexas Water Development Board · General conservation and faucet-maintenance guidance; use exact fixture instructions and professional limits.
- How to fix a faucet leakCity of Portland Water Bureau · General faucet guidance; exact fixture design and local plumbing rules vary.
- Home MaintenanceU.S. Environmental Protection Agency WaterSense · General residential water-efficiency and maintenance guidance.
- What to Do to Protect Yourself From Electrical HazardsCenters for Disease Control and Prevention · General household electrical hazard guidance; local emergency procedures may vary.
Community feedback
Share a repair observation
Share a plain-text repair observation. Accepted observations are published automatically; this page may take a moment to update.