
On this page
Start here
Quick answer
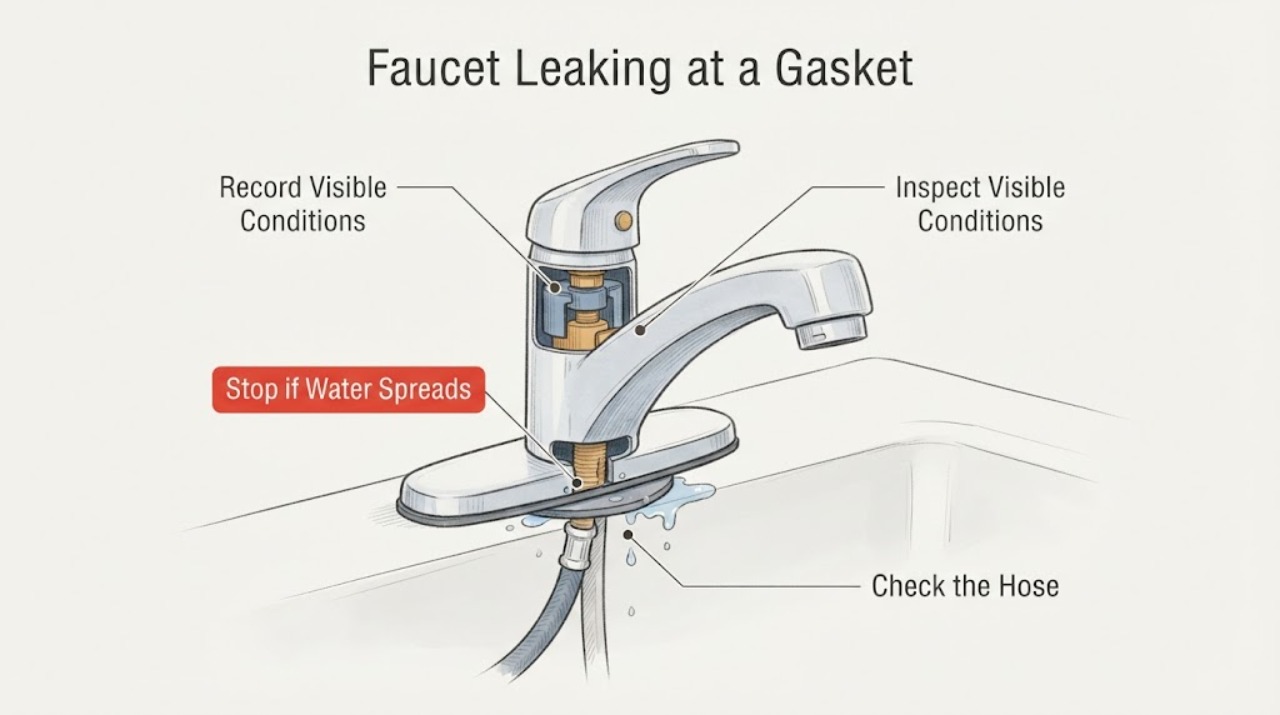
A faucet gasket may be worn, displaced, contaminated by scale, or not sealing because the leak is actually coming from the cartridge, stem, hose, supply connection, aerator, or the faucet base. First close the fixture's water supplies and identify the first wet point: spout, handle or stem, base or deck, supply connection, or filter or aerator. Dry the area and observe without pressurizing an unsafe connection. A gasket or washer is only a candidate after the leak location and faucet design are known; do not guess a size or interchange parts. If the shutoff will not close, water is inside a cabinet near electricity, the leak is spraying or uncontrolled, drinking-water contamination is suspected, or a fitting, wall, or counter is damaged, stop and call a qualified plumber.
Work through in order
Diagnostic checks
Use only checks that match the exact appliance or system and its official guide.
-
Check 1
Close the fixture's hot and cold shutoffs from a dry position, open the faucet briefly to release residual pressure, and dry the faucet, counter, spout, handle, base, supply fittings, and cabinet floor. Record whether the faucet has one handle or two and whether the leak appears only when open or also while closed.
Expected result: Water may stop when the shutoffs close, continue as residual water, or reappear at one point while the faucet is closed. The leak may drip from the spout, handle or stem, base or deck, hose, or supply connection.
Next step: Use the matching branch below and do not reopen the water merely to reproduce a leak that is already located. If the first wet point is unclear, leave the shutoffs closed and call a plumber.
Stop if: Stop for uncontrolled flow, a shutoff that will not close, water near electrical equipment, a split hose, or water entering the wall or cabinet structure.
Why this matters
Why: A leak while closed can involve a valve, cartridge, stem seal, or supply connection; a leak only while flowing can involve the spout, aerator, hose, or body. A continuing stream after the shutoffs close indicates a shutoff or upstream supply problem.
-
Check 2
Inspect the faucet spout, aerator or filter screen, and handle or stem area with the supplies closed. Look for a bead forming at the outlet, around the handle, under a trim cap, or at the joint between the body and spout; do not pry trim or turn a seized handle.
Expected result: The outlet may drip with the handle closed, water may emerge around a handle only while the faucet flows, or a screen or aerator may have scale and debris while the body remains dry.
Next step: Keep the supplies closed and use the faucet design and exact manufacturer instructions to identify the correct seal or valve service. Do not order a gasket from appearance alone; escalate when the trim or valve needs force.
Stop if: Stop for a seized handle, cracked body, damaged trim, a spray toward electricity, or any need to use heat or force on the valve.
Why this matters
Why: A closed-position drip points toward an internal valve or stem seal rather than a deck gasket. A handle-area leak during flow can involve a stem seal or cartridge seal. An aerator can affect flow and splash but does not prove that it caused a body leak.
-
Check 3
Inspect beneath the faucet at the base or deck and along the visible supply connections with a dry cloth. Check whether moisture starts at the counter opening, mounting area, hose nut, valve connection, or the underside of the faucet body; do not overtighten a fitting or disconnect a pressurized hose.
Expected result: Water may appear only at the base when the faucet is used, track down from a supply connection, or collect below the counter while the upper faucet remains dry.
Next step: Keep the supplies closed and arrange the exact gasket or connection repair through the faucet manual or a plumber. If the counter, wall, or cabinet is soft or swollen, include that damage in the service request.
Stop if: Stop for a wet electrical device, a split or bulging supply hose, a connection that spins or will not close, active spray, or damage inside the wall or counter.
Why this matters
Why: A deck gasket or mounting seal is plausible when water begins at the base, while a supply connection or hose seal is more likely when the highest wet point is below the shutoff or at the hose nut. Water under the counter can damage wood before it reaches the floor.
-
Check 4
After the water path is isolated, inspect the visible gasket or washer only if the faucet's manufacturer instructions identify it as user serviceable. Note its location, shape, seating, flattening, cracking, scale, and any debris; do not remove a sealed cartridge, valve, or supply line just to find a gasket.
Expected result: The seal may be visibly flattened, split, displaced, hardened, or clean and intact. The suspected gasket may also be dry while another point becomes wet when the faucet is used.
Next step: Use the exact model information and manufacturer instructions to identify a replacement, or provide the observation to a plumber. Do not improvise a washer, stack multiple seals, or use sealant in a drinking-water path.
Stop if: Stop for a corroded or seized fastener, hidden valve access, a cracked faucet body, unknown chemical residue, or any need to work while water is pressurized.
Why this matters
Why: A damaged or displaced seal supports a gasket repair, but a clean seal with a leak from the spout, stem, body, or hose points to another component. A gasket's visual size is not enough to establish compatibility.
-
Check 5
Check the water quality and contamination boundary before restoring use. If a gasket, aerator, hose, or fitting shed debris, was exposed to a cleaning chemical, or allowed cabinet water to enter the outlet, keep the fixture closed and record what happened; do not drink or prepare food with water from a suspect path.
Expected result: The water may look clear, contain rubber or metal debris, have an unusual taste or odor, or have contacted a chemical or dirty cabinet surface.
Next step: Follow the faucet and local water guidance for cleaning or flushing, or have a plumber replace and clean the affected water-contact parts. Use another known-safe source until the fixture is cleared.
Stop if: Stop for suspected chemical contamination, sewage or dirty-water intrusion, a damaged water line, illness symptoms, or any uncertainty about potable-water safety.
Why this matters
Why: A leak repair can be mechanically successful while the water path remains unsuitable for drinking. Clear water alone does not establish that a contaminated component or chemical residue has been removed.
-
Check 6
If a clearly identified external gasket or connection was corrected according to the exact faucet instructions, keep the cabinet open and observe the dry area without repeated cycling. Record whether moisture returns at the same point, whether the handle or spout moves normally, and whether the shutoffs remain dry.
Expected result: The area may remain dry, the same gasket edge may dampen again, a different point may wet, or the shutoff or hose may begin to seep after pressure returns.
Next step: Close the supplies again and call a plumber for a repeat leak, hidden damage, or a failed shutoff. Do not keep the cabinet closed over active moisture or use a towel as a permanent fix.
Stop if: Stop for renewed spray, cabinet flooding, water near electricity, structural damage, unusual odor, or any need to tighten a pressurized fitting aggressively.
Why this matters
Why: A recurring first wet point indicates the seal, mating surface, valve, hose, or faucet body still needs attention. A new wet point after restoration can reveal a second leak that the first repair did not address.
Use your observations
Decision map
Find the observation that best matches what you see, then follow the next safe action.
-
PATH 01Next step
What you see
The first wet point is the spout or outlet even when the handle is closed.
Do this next
Keep the supplies closed and treat the valve, cartridge, or stem seal as the leading path. A gasket may be involved, but identify the faucet design before ordering a part; a persistent closed-position drip needs a plumber if the valve is not clearly serviceable.
-
PATH 02Next step
What you see
Water emerges around the handle, stem, or trim only when the faucet is opened.
Do this next
Close the supplies and inspect only the visible trim and service guidance. Do not force a seized handle or remove a cartridge without the exact instructions; a stem seal or valve service may be required.
-
PATH 03Next step
What you see
The highest wet point is at the faucet base, counter opening, mounting area, or underside of the deck.
Do this next
Keep the cabinet dry and the supplies closed. A deck gasket or mounting seal is conditional on this location; a plumber should assess swollen counter material, hidden water damage, or a body crack before fitting a replacement.
-
PATH 04Next step
What you see
The first wet point is at a shutoff, supply hose, hose nut, or connection below the faucet.
Do this next
Close the affected supply and do not overtighten or disconnect a pressurized line. A hose seal or connection gasket may be conditional, but a split hose, seized shutoff, or wet cabinet needs prompt plumber service.
-
PATH 05Next step
What you see
The aerator or filter has scale or debris but the body and connections remain dry.
Do this next
Treat the screen as a flow or splash clue, not proof of a gasket failure. Follow the faucet instructions for a removable screen only after isolating water; if the body still leaks or the part is stuck, arrange service.
-
PATH 06Next step
What you see
The shutoff fails, water enters the cabinet or wall, a hose sprays, electricity is nearby, or the water path may be contaminated.
Do this next
Stop using the faucet, leave the area safe, and contact a qualified plumber or emergency water service. Do not restore pressure, use chemicals, or improvise a gasket repair.
Helpful context
Understand the symptom
The gasket is a location clue, not a diagnosis
A gasket can seal the faucet to the counter, seal a cartridge or stem, sit under a handle, or seal a supply connection. Those locations use different shapes and materials. Water also travels along the underside of a spout or hose, so the puddle below the sink may not be where the leak begins. The first wet point and when it appears are more useful than the faucet's general age or appearance.
Protect the cabinet and the water supply
Close the hot and cold fixture shutoffs before any inspection that could loosen a connection. If the shutoffs are inaccessible, seized, or do not stop flow, use the home's main shutoff only if it can be reached safely and arrange plumbing help. Keep cabinet contents and electrical equipment dry. Do not use sealant, tape, or a guessed washer to mask an active leak, and do not return the fixture to drinking-water use if debris or cleaning chemical entered the water path.
Safety boundary
Stop conditions
- Close the water supplies and stop for uncontrolled flow, a failed shutoff, a split hose, water inside a wall or cabinet, or water near electrical equipment.
- Stop for a cracked faucet body, corroded or seized connection, damaged counter or wall, or any need to force a handle, valve, cartridge, or pressurized fitting.
- Keep the fixture out of drinking-water use for suspected chemical, dirty-water, rubber, metal, or other contamination until the water path is cleared by appropriate guidance.
- Never use sealant, tape, an improvised washer, or repeated pressure cycling to hide an active leak; arrange qualified plumbing service.
Only after diagnosis
Potential parts
- faucet deck gasket
Consider only when moisture begins at the faucet-to-counter joint and the exact faucet design uses a replaceable deck gasket.
Confirm faucet model, mounting arrangement, gasket shape, and water-contact requirements before replacement. - stem or cartridge seal
Consider only when a closed-position spout drip or handle-area leak is traced to the valve or stem seal by the exact faucet instructions.
Do not select by appearance alone; handle design and valve platform determine fit. - supply hose washer or seal
Consider only when the first wet point is a supply-hose connection and the hose and shutoff are otherwise sound.
Verify connection type and exact hose requirements; replace a damaged hose rather than masking it with a seal. - aerator or filter seal
Consider only when the leak or splash is traced to the removable outlet screen and the faucet design uses a serviceable seal.
Confirm outlet thread, screen design, and water-contact suitability for the exact faucet.
When checks do not resolve it
Need a professional?
Call a qualified plumber when the first wet point is hidden, a gasket or valve cannot be identified from the exact faucet instructions, the shutoff will not stop flow, the leak returns after a safe correction, or water has reached the cabinet, wall, counter, or electrical equipment. Use emergency service for uncontrolled flow, major flooding, unsafe electrical conditions, or suspected contamination.
Have this ready
- Faucet type and handle count, first wet point, whether it leaks while open or closed, hot or cold side, shutoff behavior, supply and hose condition, gasket observations, cabinet or wall damage, water-quality concern, and any electrical or chemical exposure.
Common questions
FAQ
How do I know whether the gasket is causing my faucet leak?
Close the hot and cold supplies, dry the faucet, and identify the first wet point. A base or deck leak can support a deck-gasket path; a handle leak can involve a stem or cartridge seal; a supply connection can involve a hose washer. A drip from the spout while closed may be an internal valve issue, so do not choose a gasket by appearance alone.
Should I tighten the faucet fitting if it leaks?
Do not overtighten a fitting or disconnect a pressurized hose. Close the water supplies and identify the first wet point. A plumber should handle a seized shutoff, damaged hose, corroded fitting, hidden leak, or water that has reached the cabinet or wall.
Can a faucet aerator cause a leak?
An aerator can affect flow or splash, and its seal can leak when the outlet is the first wet point. Scale on the screen alone does not prove a body or gasket failure. Follow the exact faucet instructions only after isolating water, and stop if the screen is stuck or the body still leaks.
When should I call a plumber for a leaking faucet?
Call when the shutoff will not stop flow, the source is hidden, the leak returns, water reaches the cabinet or wall, a hose or fitting is damaged, electrical equipment is nearby, or the water path may be contaminated. Keep the fixture closed until the repair and water-safety boundary are clear.
Read the exact guide
Official sources
- Home MaintenanceU.S. Environmental Protection Agency WaterSense · Use for general visual leak checks and maintenance boundaries; it does not identify a particular faucet model or replacement part.
- Fix a Leak WeekU.S. Environmental Protection Agency WaterSense · Use for general faucet leak identification and water-line shutoff guidance; the exact faucet design determines any repair.
Community feedback
Share a repair observation
Share a plain-text repair observation. Accepted observations are published automatically; this page may take a moment to update.