
On this page
Start here
Quick answer
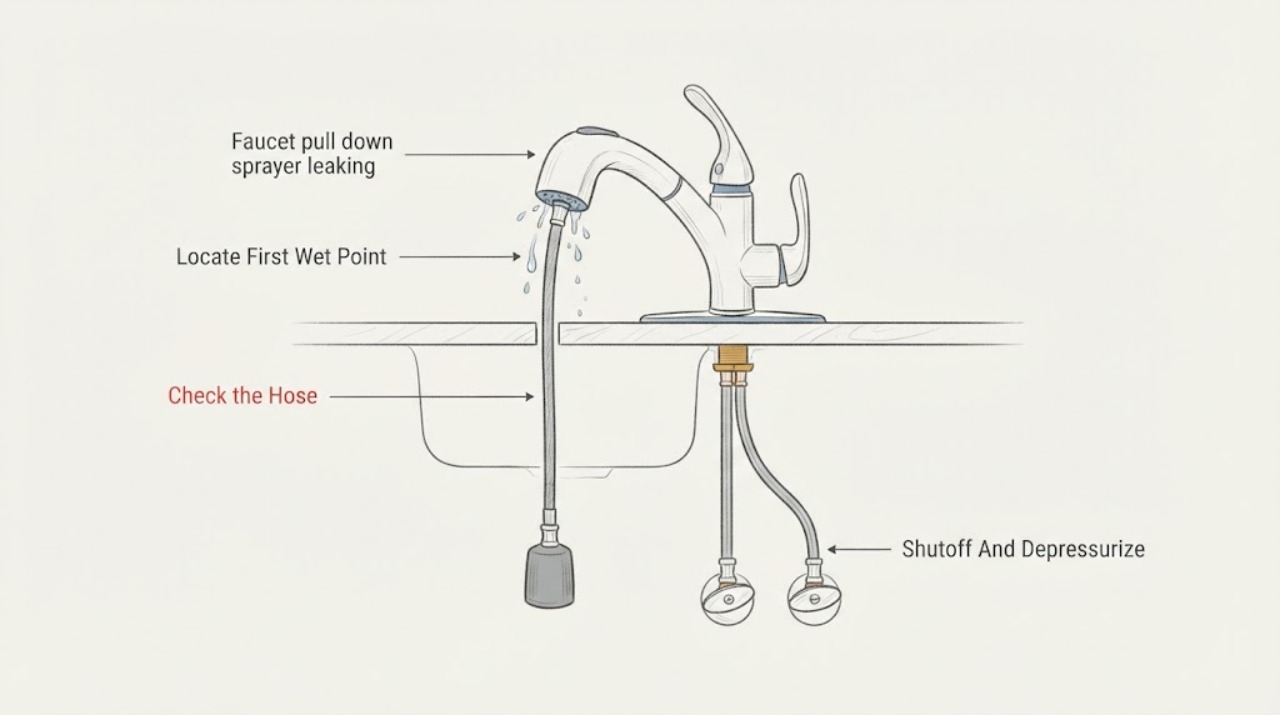
First identify whether water escapes at the sprayhead-to-hose connection, from the sprayhead face or body, along the pull-down hose below the counter, or at a supply connection. If water is spreading, close the hot and cold faucet shutoffs under the sink without force, open the faucet briefly to release residual pressure, and place a towel or bucket below the connections. Kohler's guidance for a leak between sprayhead and hose starts with the retainer connection, then a model-specific seal, sprayhead, or hose; its below-deck troubleshooting separates supply-stop, supply-hose, spray-hose, seal, and sprayhead locations. Tighten only an accessible connection that matches the exact model instructions. If the leak persists, the hose is damaged, a connection is wet or corroded, the shutoff will not close, or water is entering the cabinet, stop using the faucet and call a licensed plumber. Do not pull hard on the hose, disconnect a pressurized fitting, use thread sealant where the model does not specify it, or choose a replacement part from the Kohler name alone.
Before you begin
Safety first
- Owner checks are limited to safe leak observation, normal shutoff operation without force, a towel or bucket, a gentle model-supported retainer check, accessible sprayhead rinse, and visual hose routing. A licensed plumber must handle pressurized disconnections, supply stops and hoses, internal seals or cartridges, diverters, concealed leaks, cabinet or wall water, and any connection that is seized, corroded, or under tension.
Work through in order
Diagnostic checks
Use only checks that match the exact appliance or system and its official guide.
-
Check 1
Dry the visible sprayhead, hose, and nearby counter with a towel, then run a small amount of water while watching from above and below the counter. Keep fingers out of moving hose joints and do not activate a spray toward electrical equipment.
Expected result: Water first appears between sprayhead and hose, at the sprayhead body or face, along the hose below the deck, at a supply connection, or only after the faucet is turned off.
Next step: Follow the matching location branch. If the point cannot be seen, water is spreading into the cabinet, or a connection is under tension, stop using the faucet and call a plumber.
Stop if: Stop for a spray toward electrical equipment, active flooding, a burst hose, a cabinet connection that cannot be identified, or any need to reach through standing water.
Why this matters
Why: The first wet point separates a retainer or seal issue from a damaged sprayhead, spray hose, supply hose, valve, or connection leak. A delayed drip can be residual water, but recurring wetness still needs a location check.
-
Check 2
If the leak is more than a harmless single drip, close both hot and cold faucet shutoff valves under the sink if they turn normally, then open the faucet briefly to release residual pressure. Put a towel or bucket below the connections and cover the drain.
Expected result: The shutoffs close and stop the flow, one shutoff is stuck or leaking, water continues after closure, or there is no safe local shutoff.
Next step: Leave a stuck, leaking, or ineffective shutoff alone and call a licensed plumber. If flow has stopped and the area is dry, continue only with a gentle visual or model-supported connection check.
Stop if: Stop for a valve that will not close, sprays from its stem or connection, active flooding, water near electrical equipment, or any need to disconnect a pressurized fitting.
Why this matters
Why: A closed local supply limits water damage and makes a repair area safer. A stuck valve, continued flow, or absent shutoff means the line is not safely isolated for owner work.
-
Check 3
With water isolated, inspect the joint where the Kohler sprayhead meets the spray hose. If the retainer is visibly loose and the exact model instructions describe a hand-accessible tightening step, snug it gently without twisting the hose or applying excessive force.
Expected result: The retainer was loose and the leak stops, the joint is snug but still leaks, the seal is visible and damaged, or the connection does not match the model instructions.
Next step: If the joint still leaks, keep water off and use the exact model parts diagram or call a plumber. Do not add tape or sealant to a connection that relies on an internal seal, and do not force the sprayhead apart.
Stop if: Stop for a cracked fitting, damaged threads, a missing seal, a seized joint, water under the counter, or any need to use tools beyond the model-supported connection procedure.
Why this matters
Why: A loose retainer can allow a connection leak. Continued leakage after gentle tightening points toward a seal, sprayhead, hose, or incompatible connection rather than a loose joint alone.
-
Check 4
If the model instructions allow the sprayhead to be removed after water is off, hold the hose so it cannot fall back into the faucet and inspect only the accessible seal and sprayhead for cracks, distortion, mineral buildup, or missing pieces. Do not pull the hose through the faucet body.
Expected result: The sprayhead is cracked, the seal is flattened or damaged, debris is visible, or the sprayhead and seal look intact.
Next step: Clean only an accessible spray face or seal area with water and reinstall parts in their original order if the model instructions support it. Replace a damaged piece only after exact model fit is verified; otherwise call a plumber.
Stop if: Stop for a hose that starts retracting, a torn seal, a cracked body, a hidden retaining system, a connection that will not release, or any need to force or cut the hose.
Why this matters
Why: A damaged sprayhead or seal can leak at the joint or outlet. A clean, intact head shifts attention toward the hose, connection, diverter, valve, or another leak location.
-
Check 5
With the water off, use a dry paper towel to trace the pull-down hose and visible below-deck connections. Look for water running down the hose, a kink, abrasion, snag, loose visible connection, damaged supply stop, or water at the hose-to-supply junction; do not disconnect a hose.
Expected result: The spray hose is wet along its length, the hose-to-supply connection is wet, a supply hose or stop leaks, routing is kinked or strained, or all visible connections remain dry.
Next step: Clear only a loose visible snag without pulling the hose. Keep water off and call a plumber for a wet, abraded, kinked, or pressurized connection, a damaged stop, or an unexplained recurring leak.
Stop if: Stop for standing water, a split hose, corrosion, a loose supply stop, a connection under tension, or any need to loosen a fitting or enter a wet cabinet.
Why this matters
Why: Water along the hose or at its lower connection supports a hose or connection leak. A kink or strain can stress the hose and restrict or damage it. A dry underside makes an above-deck seal or sprayhead location more likely, but does not prove it.
-
Check 6
Only after the leak source is corrected or the exact model-supported connection is reassembled, place a towel below the faucet, open the shutoffs slowly, and run hot and cold water briefly while watching the sprayhead joint, hose, supply connections, and cabinet floor.
Expected result: No water appears, a slow drip returns at the same joint, water appears below the deck, the hose catches or leaks during movement, or the shutoff itself leaks.
Next step: Close the affected shutoff again and call a plumber for any recurring leak, hose movement leak, or shutoff leak. Do not keep cycling the faucet to see whether it improves.
Stop if: Stop for active spray, rapid dripping, water entering cabinetry, a wet electrical area, or any connection that shifts under water pressure.
Why this matters
Why: A dry test supports a successful connection or seal correction. A recurring drip identifies an unresolved part or connection; a new below-deck leak can be caused by disturbed seals or a damaged hose, and a shutoff leak is an upstream plumbing issue.
-
Check 7
Record the Kohler model if already visible, exact first wet point, whether the leak occurs while on or off, sprayhead and hose condition, shutoff behavior, and any recent installation or hose movement. Do not remove trim or disassemble the faucet just to find the model number.
Expected result: A gentle connection correction stops the leak, a model-specific seal or sprayhead is damaged, the hose or supply path leaks, or the source remains uncertain.
Next step: Use the exact Kohler parts diagram only when the model and failed part are confirmed. Otherwise keep the affected supply off and give the record and safe photos to a licensed plumber.
Stop if: Stop after location, safe shutoff, gentle connection, and visual hose checks; do not continue into cartridge, diverter, supply-stop, or pressurized line removal as a guess.
Why this matters
Why: A resolved retainer or confirmed model-specific seal issue supports a limited repair. A hose, supply, valve, or uncertain source requires plumbing diagnosis and may involve more than the sprayer.
Use your observations
Decision map
Find the observation that best matches what you see, then follow the next safe action.
-
PATH 01Next step
What you see
The first wet point is the sprayhead-to-hose joint, the retainer is loose, and there is no crack or missing seal.
Do this next
With water safely off, snug the model-supported retainer gently and test once. If it still leaks, keep the supply off and have the seal, sprayhead, and hose matched to the exact model by a plumber or manual.
-
PATH 02Next step
What you see
Water originates at the sprayhead body or joint, and inspection shows a cracked sprayhead, flattened seal, missing insert, or mineral buildup that prevents sealing.
Do this next
Rinse only accessible debris and replace a damaged component only after exact model fit is confirmed. Keep water off if the leak persists or removal is not straightforward.
-
PATH 03Next step
What you see
Water runs along the pull-down hose or appears at its lower connection, especially when the sprayhead is moved or the faucet is on.
Do this next
Stop using the pull-down function, close the affected shutoffs, and call a plumber for hose or connection service. Do not pull the hose through the faucet or disconnect it under pressure.
-
PATH 04Next step
What you see
The sprayhead appears dry, but water first appears at a supply hose, supply-stop connection, or other below-deck water feed.
Do this next
Close the safe local shutoff without force, protect the cabinet, and call a licensed plumber. Do not tighten or replace a pressurized supply connection as a guess.
-
PATH 05Next step
What you see
No active stream appears while the faucet runs, but a small recurring drip emerges after shutoff from the sprayhead, joint, or hose.
Do this next
Dry the area, observe whether the drip repeats, and call service for ongoing wetness or cabinet water. Do not keep the hose extended or repeatedly cycle the faucet to mask the leak.
-
PATH 06Next step
What you see
The first wet point cannot be found, water is entering the cabinet or wall, a shutoff will not close, the hose or fitting is corroded, or the leak is rapid.
Do this next
Stop using the faucet, close a safe upstream shutoff if available without force, keep water away from electrical equipment, and obtain urgent qualified plumbing help.
Helpful context
Understand the symptom
Leak location changes the repair
A pull-down faucet can leak above the counter where the sprayhead joins its hose, from the sprayhead itself, down the hose below the counter, or at a supply connection. Those locations are not interchangeable. Watch the first point that becomes wet with the faucet on and off, rather than replacing a sprayhead when the supply hose or a below-deck connection is the source.
Make the area safe before handling the sprayer
Kohler's general faucet guidance starts by closing the hot and cold shutoff valves under the sink, opening the faucet to release remaining pressure, covering the drain, and placing a towel or bucket below the work area. If a shutoff is seized, corroded, leaking, or does not stop the flow, do not force it or disconnect the hose; use a plumber. Keep water away from electrical equipment and protect stored items while the leak is contained.
A loose connection, seal, sprayhead, or hose are separate possibilities
For a leak between sprayhead and hose, Kohler's support path checks the retainer first, then the seal, sprayhead, and spray hose. A connection that is snug but still leaks may have a damaged seal; water running down the hose below the deck may indicate a hose or connection problem instead. Do not treat a model-specific troubleshooting flow as permission to interchange parts or open a pressurized connection without safe shutoff and exact instructions.
The hose must move without being kinked or strained
Kohler installation guidance warns that supply hoses must not be taut, kinked, or twisted and says to check for leaks after turning the water back on. A pull-down spray hose that catches, rubs a sharp cabinet edge, or is pulled sideways can leak or stress a connection. Inspect routing from below the counter without yanking the hose or reaching through a wet cabinet; correct only a loose, visible snag and call a plumber for a damaged hose or connection.
Safety boundary
Stop conditions
- Stop immediately for a rapid leak, burst or swollen hose, flooding, water near electrical equipment, a shutoff that will not close, contaminated water, or water entering a wall or cabinet base; isolate water only if safe and obtain urgent qualified help.
- Do not disconnect a hose under pressure, force a shutoff or sprayhead, pull the spray hose through the faucet, apply heat or unapproved chemicals, add thread sealant to an internal-seal connection, or work through standing water.
- Do not assume a Kohler sprayhead, seal, hose, cartridge, or supply fitting fits every model. Confirm the exact faucet model and parts diagram after the leak location supports a specific component.
- Stop owner troubleshooting after leak-location, safe shutoff, gentle model-supported connection, and visual hose checks. Persistent leakage, below-deck water, an uncertain source, or any pressurized connection or valve work needs a licensed plumber.
Only after diagnosis
Potential parts
- pull-down sprayhead
Relevant only when the sprayhead body or outlet is damaged, or the exact model troubleshooting path confirms a sprayhead leak after the retainer and seal are checked.
Confirm the exact faucet model, spray function, connector, seal arrangement, finish, and manufacturer parts diagram; do not substitute by appearance alone. - sprayhead seal or O-ring
Relevant only when the sprayhead-to-hose seal is visibly damaged or a qualified diagnosis confirms that seal as the leak source.
Match the exact model, seal location, material, dimensions, and installation orientation; do not add tape or use an unverified seal in a drinking-water connection. - pull-down spray hose
Relevant only when water runs along the spray hose, the hose is cracked or abraded, or testing confirms a hose or hose-connection leak.
Confirm exact model, hose length, connector style, routing, weight arrangement, and seals; replacement requires safe water isolation and careful below-deck work. - faucet supply hose or connection
Relevant only when the leak begins at a supply hose or below-deck connection rather than at the pull-down sprayhead.
Match connection ends, length, seal type, routing, and local plumbing requirements to the exact model; do not loosen a pressurized or corroded fitting. - faucet valve or cartridge
Relevant only when the leak is from the faucet body or handle and a qualified diagnosis rules out the sprayhead, seals, hoses, and supply connections.
Confirm the exact faucet model, valve configuration, cartridge revision, seals, and parts diagram; internal valve work requires safe isolation and model-specific reassembly.
When checks do not resolve it
Need a professional?
Call a licensed plumber when the leak persists after a gentle model-supported retainer check, water runs down the spray hose, a seal or sprayhead is damaged, a supply hose or shutoff leaks, the local shutoff is stuck or ineffective, water enters the cabinet, the model cannot be confirmed, or any pressurized connection, valve, cartridge, diverter, or hose replacement is needed.
Safety scope: Owner checks are limited to safe leak observation, normal shutoff operation without force, a towel or bucket, a gentle model-supported retainer check, accessible sprayhead rinse, and visual hose routing. A licensed plumber must handle pressurized disconnections, supply stops and hoses, internal seals or cartridges, diverters, concealed leaks, cabinet or wall water, and any connection that is seized, corroded, or under tension.
Have this ready
- Provide the faucet model if already visible, exact first wet point, whether the leak occurs while on or after shutoff, sprayhead and seal observations, hose routing and movement, supply-stop behavior, recent installation or hose work, and safe photos taken after water is isolated. Do not remove trim or disconnect fittings to collect more information.
Common questions
FAQ
Why is my Kohler pull-down sprayer leaking?
The leak may be at the sprayhead-to-hose joint, a seal, the sprayhead body, the pull-down hose, a supply hose, or a below-deck connection. Dry the area and identify the first wet point. The location determines whether a retainer, seal, sprayhead, hose, or plumbing connection is relevant.
How do I stop a Kohler pull-down sprayer leak safely?
Close the hot and cold faucet shutoffs under the sink if they operate normally, open the faucet briefly to release residual pressure, and place a towel or bucket below the connections. Do not force a stuck valve or disconnect a pressurized hose. Call a plumber if water continues or enters the cabinet.
Can I tighten the Kohler sprayhead connection?
If the leak is exactly at the sprayhead-to-hose joint and the retainer is visibly loose, a gentle model-supported tightening step may help. If it still leaks, the seal, sprayhead, or hose may be damaged. Do not force the joint, add unapproved tape, or twist the hose.
What if water runs down the Kohler pull-down hose?
Water along the hose or at its lower connection supports a hose, routing, or below-deck connection problem. Stop using the sprayer, close the safe shutoffs, and call a plumber. Do not pull the hose through the faucet or disconnect it under pressure.
Should I replace the Kohler sprayhead or the hose?
Do not choose from the symptom alone. A sprayhead is conditional when the head is cracked or the leak stops with the sprayhead removed; a hose is conditional when water runs along the hose or its connection leaks. Confirm the exact Kohler model and parts diagram first.
Why does the sprayer drip only after I turn the faucet off?
Some residual water can drain from a pull-down hose, but a drip that repeatedly wets the joint, hose, or cabinet can indicate a seal, sprayhead, hose, or valve problem. Dry the area and observe without repeatedly cycling the faucet; call service for recurring wetness.
Can a kinked pull-down hose cause a Kohler leak?
A kink, twist, snag, or strain can stress the hose or its connections and affect movement. Kohler installation guidance warns against kinked or twisted supply hoses. Clear only a loose visible snag without pulling hard; a damaged or constrained hose needs plumbing service.
What if the Kohler sprayer is dry but water leaks under the sink?
The source may be a supply hose, supply stop, hose-to-supply junction, valve, or another below-deck connection rather than the sprayhead. Close the safe local shutoff without force and call a plumber. Do not tighten or disconnect a wet pressurized connection as a guess.
Can I use any Kohler sprayhead or O-ring?
No. Kohler parts and connection arrangements are model-specific. Confirm the faucet model, connector, seal location, spray function, and parts diagram before ordering. A visual match or brand match alone does not establish fit.
What information should I give the plumber?
Share the faucet model if safely visible, first wet point, whether the leak occurs while on or after shutoff, sprayhead and seal condition, hose routing, supply-stop behavior, recent installation or hose work, and safe photos after isolation. Do not dismantle the faucet just to collect more details.
Read the exact guide
Official sources
- Leaking Between Sprayhead and Hose | Kitchen Faucets | Kohler AssistKohler Co. · Official Kohler Assist page identifying the sprayhead-to-hose leak path and a model-supported retainer check
- How to Fix a Leaky Sink FaucetKohler Co. · Official Kohler article covering hot and cold shutoffs, pressure release, drain protection, pull-down connections, model identification, and leak testing
- Low Flow from Hot and Cold Water | Kitchen Faucets | Kohler AssistKohler Co. · Official Kohler troubleshooting page distinguishing sprayhead debris, spray-hose or supply-line flushing, valve or cartridge restriction, and model-specific replacement parts
- Troubleshooting: Faucet Is Leaking Below The DeckKohler Co. · Official Kohler troubleshooting flow separating supply-stop, supply-hose, spray-hose, sprayhead, seal, and below-deck leak locations
- Pull-Down Kitchen Faucet Installation GuideKohler Co. · Official Kohler installation guide warning against taut, kinked, or twisted hoses and requiring leak checks after water is restored
Community feedback
Share a repair observation
Share a plain-text repair observation. Accepted observations are published automatically; this page may take a moment to update.