
On this page
Start here
Quick answer
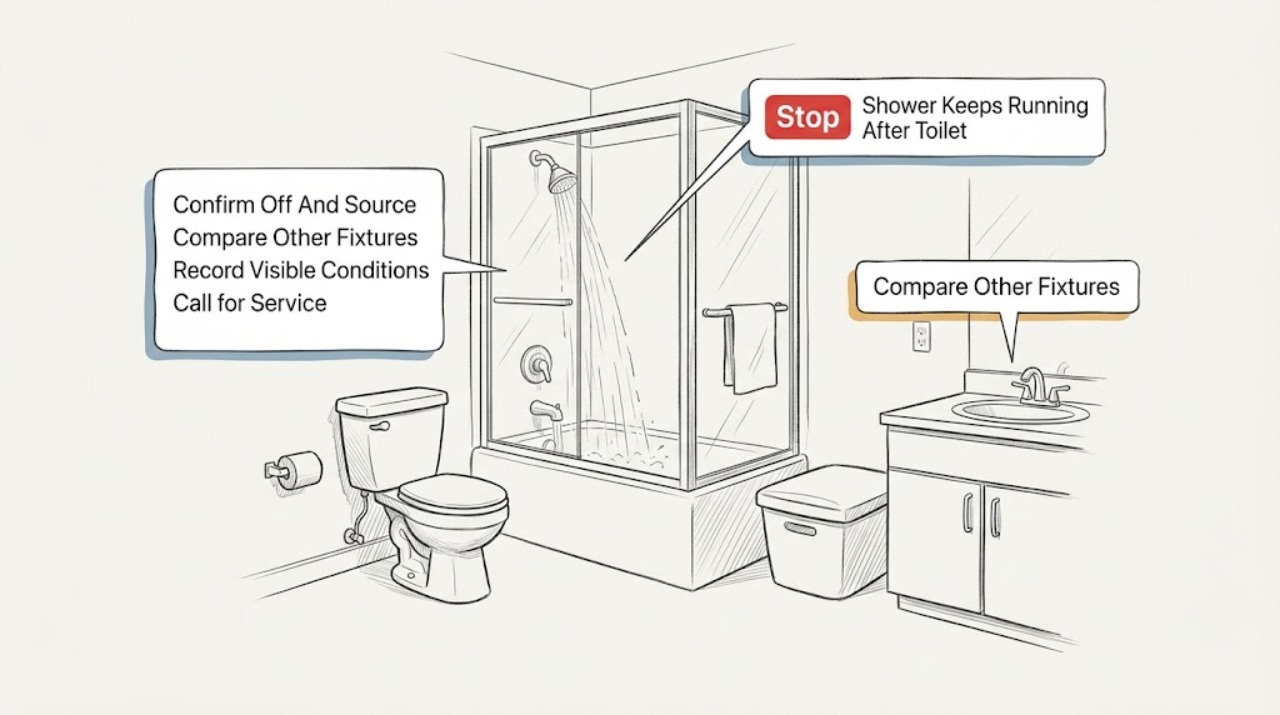
A shower that continues to run after the handle is in its normal off position is usually a shower-valve sealing, cartridge, handle-calibration, or concealed-leak problem; the earlier toilet visit may be related only if a shared shutoff, supply, or pressure condition changed, and timing alone does not prove the plumber caused it. First turn the shower control to its normal off position once, note whether water comes from the showerhead, tub spout, handle, or wall, and compare other fixtures without opening anything. If other fixtures work and only this shower runs, arrange shower-valve service. If the running began after a shared water shutoff or is accompanied by pressure changes, toilet overflow, wall moisture, or multiple leaking fixtures, ask the plumber to recheck the affected work and the shared supply. Stop for active leakage, ceiling or wall damage, gas odor, smoke, electrical contact, or any need to open the wall.
Before you begin
Safety first
- This article supports ordinary-control operation and dry visual observation only. Internal shower-valve, concealed-pipe, pressure-device, gas, and electrical work belongs to the appropriately qualified professional.
Work through in order
Diagnostic checks
Use only checks that match the exact appliance or system and its official guide.
-
Check 1
Turn the shower handle or control to its normal off position once, without forcing it, and observe the exact source of any remaining water.
Expected result: Record whether water stops, drips briefly and stops, runs continuously from the showerhead or tub spout, leaks around the handle or trim, or appears from the wall, ceiling, or floor.
Next step: Photograph the source from a dry position and use the matching branch; stop using the shower and request qualified service if water is concealed, active, or cannot be controlled normally.
Stop if: Do not force or repeatedly cycle the control, remove trim, open the wall, or continue if water reaches electrical equipment, the ceiling bulges, or the handle is damaged.
Why this matters
Why: A continuous outlet stream with the control off supports a valve, cartridge, or handle-calibration problem. A leak at the trim or from a wall points toward a seal, connection, or concealed-leak path. A brief residual drip is different from water that continues to flow and refill the line.
-
Check 2
From safe, ordinary access, compare the repaired toilet, a nearby sink, and any other shower or tub outlet for normal shutoff, flow, dripping, or filling; do not remove a toilet lid or disturb the repaired parts.
Expected result: Record whether only this shower runs, the toilet is still filling or overflowing, several fixtures drip, flow changes when another fixture opens, or all other fixtures appear normal.
Next step: Send the comparison and a short timeline to the plumber who completed the toilet work and request a focused recheck if the symptom began immediately after a shared shutoff or if more than one fixture changed.
Stop if: Stop using affected fixtures for testing if there is overflow, active leakage, sewage exposure, water near electricity, or a rapid increase in flow.
Why this matters
Why: An isolated running shower supports a local shower-valve fault. Several affected fixtures, a toilet that remains abnormal, or pressure-related changes support a shared supply, shutoff, or pressure review. Normal other fixtures do not prove the earlier work is unrelated, but they narrow the likely repair path.
-
Check 3
Review the plumber's invoice or ask what was operated during the toilet visit, recording whether a toilet stop, local bathroom stop, main shutoff, pressure device, or shared line was closed and reopened.
Expected result: Record the exact work, the time the shower began running, whether it ran before the visit, whether the shower valve or trim was touched, and whether the symptom changed when water was restored.
Next step: Give the timeline and source location to the original plumber and ask them to verify the accessible shutoff positions, connections, and any work area without asking you to open the wall or valve.
Stop if: Do not loosen fittings, operate an unlabeled valve, remove a pressure device, or assign a cause from timing alone; stop if the work area is wet or concealed damage is visible.
Why this matters
Why: A new symptom immediately after a shared shutoff or nearby valve work is useful evidence for a post-service inspection, but it cannot identify a failed part or prove fault. A symptom that predates the visit or affects only an old shower valve supports an independent valve diagnosis.
-
Check 4
Observe whether the shower stream changes when the toilet refills or another fixture is used, without deliberately reproducing a leak or altering a pressure-control device.
Expected result: Record steady running, pulsing, louder flow, water hammer, dripping at other fixtures, or no change when the other fixture operates.
Next step: Stop the comparison and provide the pattern to a qualified plumber, especially if the toilet repair involved a shared shutoff or pressure-related component.
Stop if: Do not attach a gauge, adjust a pressure-reducing valve, close an unfamiliar supply, or keep running fixtures when water damage or abnormal pressure noise is present.
Why this matters
Why: A steady one-shower stream with no shared change favors a local valve seal or cartridge. Pulsing, hammer, or several fixtures dripping can indicate a pressure or supply condition that should be assessed across the home; this observation does not establish a safe pressure level.
-
Check 5
Inspect only visible, dry surfaces around the shower trim, tub edge, ceiling below, and accessible pipework for fresh water, staining, swelling, corrosion, or a loose handle; do not probe, remove, or seal anything.
Expected result: Classify the area as dry, wet at the outlet or trim, wet behind or below the shower, newly stained, or structurally damaged; record whether water continues when the home supply is otherwise idle.
Next step: Keep the shower out of service, protect the area without sealing over wet materials, and request urgent plumbing or building-damage assessment for concealed moisture or structural signs.
Stop if: Stop for ceiling bulging, soft wall or floor, active flooding, mold growth, water near wiring or lights, sewage, or any need to cut into a wall or ceiling.
Why this matters
Why: Wetness behind trim, below the shower, or on a ceiling can be a concealed leak and is more urgent than a fixture drip. A dry surrounding area with a continuous outlet stream still requires valve service but may allow the qualified plumber to plan a controlled repair.
-
Check 6
If the continuous flow is wasting water or cannot be stopped at the shower, identify an accessible, clearly labeled water shutoff only from a dry, safe position and ask the plumber to isolate the shower or home; do not operate an unfamiliar valve or enter a wet area.
Expected result: Record whether the qualified person can isolate the affected shower, whether the flow stops, and whether other fixtures lose water or a new leak appears after isolation.
Next step: Leave the affected fixture isolated until qualified service, and provide the isolation result, flow source, and post-toilet-work timeline to the plumber.
Stop if: Do not remove covers, open walls, disassemble the valve, loosen pipe fittings, or operate a relief, gas, or electrical control; stop for flooding or water contacting electricity.
Why this matters
Why: A successful local isolation supports a shower-valve service path. If only a whole-home shutoff is available, the running shower may be in a shared line and the plumber should control the isolation; a new leak or inability to isolate requires prompt service rather than repeated valve operation.
Use your observations
Decision map
Find the observation that best matches what you see, then follow the next safe action.
-
PATH 01Safety boundary
What you see
Only one shower continues to run from the showerhead or tub spout while its control is off and other fixtures are normal.
Do this next
Keep the control intact, document the outlet and onset, and request qualified shower-valve service using the exact valve identity if available.
Why this path and its safety boundary
Why it matters: A local valve seal, cartridge, handle calibration, pressure-balancing component, or related shower assembly is more likely than a toilet-side fault.
Safety stop: Do not force the handle, remove trim, bypass a pressure-balancing or temperature-limiting feature, or replace a cartridge without identifying the valve.
-
PATH 02Safety boundary
What you see
The running began immediately after the toilet visit and the visit included a shared shutoff, supply change, pressure work, or nearby bathroom plumbing work.
Do this next
Provide the plumber the work scope, shutoff history, exact onset, and water source and ask for an inspection of accessible shared connections and the shower symptom.
Why this path and its safety boundary
Why it matters: The timing is relevant for a focused post-service inspection, but it does not prove that the work caused the shower fault; a valve that was already worn may have failed at the same time.
Safety stop: Do not remove or tighten fittings yourself, open walls, or continue testing if pressure surges, flooding, or concealed moisture appears.
-
PATH 03Safety boundary
What you see
The shower, toilet, or other fixtures also drip, pulse, bang, refill abnormally, or change when another fixture opens.
Do this next
Stop deliberate testing and ask a qualified plumber to assess the shared supply, pressure regulation, and the toilet repair without adjusting the pressure device yourself.
Why this path and its safety boundary
Why it matters: A shared pressure, shutoff, backflow, or supply condition may be contributing; high pressure can damage or make multiple fixtures leak.
Safety stop: Stop for a burst pipe, active flooding, wall or ceiling staining, a hot relief discharge, or any electrical contact with water.
-
PATH 04Safety boundary
What you see
Water appears around or behind the shower trim, in a wall or ceiling below, or continues to wet building materials.
Do this next
Keep the fixture out of service, use only a safe clearly labeled shutoff if it can be reached dry, and request urgent plumbing and water-damage assessment.
Why this path and its safety boundary
Why it matters: This may be a concealed valve or supply connection leak and can cause structural damage even if the visible shower stream is small.
Safety stop: Do not remove trim, cut the wall or ceiling, apply sealant over wet material, or touch electrical fixtures near water.
-
PATH 05Safety boundary
What you see
The shower produces a short residual drip after shutoff and then remains dry, with no other symptoms.
Do this next
Record how long the drip lasts and whether it returns after the line has settled; request service if it becomes continuous or water appears at the trim or wall.
Why this path and its safety boundary
Why it matters: Residual water in the showerhead or tub spout is different from a continuous 24/7 run; it should be monitored rather than treated as proof of a failed tank or toilet repair.
Safety stop: Stop if the drip becomes a stream, causes staining, or is accompanied by pressure changes or a concealed leak.
Helpful context
Understand the symptom
Treat the toilet visit as a timing clue, not a diagnosis
Write down what changed during the toilet visit: a local toilet stop, a main shutoff, a pressure-reducing device, a supply hose, or work near a shared bathroom line. A shower beginning to run afterward can be a valve fault that happened at the same time, debris or a seal disturbed by a shutoff cycle, or a pressure change affecting several fixtures. Do not assign responsibility from timing alone. The useful question is whether the symptom is isolated to the shower and whether pressure or other fixtures changed at the same time.
Identify where the water is escaping
With the shower control in its normal off position, observe from a dry, safe position whether water continues from the showerhead or tub spout, leaks around the handle or trim, or appears from the wall or ceiling. A continuous stream from the outlet points toward the valve not sealing; a leak at the handle or escutcheon can indicate a cartridge, seal, or installation issue; water emerging behind trim or elsewhere is a concealed-leak concern. Do not remove trim to investigate.
Separate a local valve fault from a shared pressure or supply problem
Check other fixtures only by ordinary operation and safe visual observation. If the toilet, sinks, and other showers are normal while one shower runs, prioritize the shower valve. If several fixtures drip, the toilet continues filling, flow surges, pipes bang, or the symptom varies when fixtures open and close, ask for a shared pressure, shutoff, or plumbing assessment. High pressure can stress toilets, showerheads, cartridges, and pipe joints, but a symptom pattern is not a substitute for pressure measurement or a diagnosis.
Do not turn a post-repair leak into a second leak
A shower cartridge, pressure-balancing unit, O-ring, retaining nut, or handle can require exact model-specific access and assembly. Manufacturer guidance for some systems treats a newly repaired or newly installed continuous leak differently from a leak that began after weeks of normal operation, and requires the water supply to be isolated before internal work. Because this shower has no identified brand or model, leave the valve intact and give the plumber the exact symptom, location, onset, and toilet-work details.
Safety boundary
Stop conditions
- Stop using the shower if water continues as a stream with the control off, the handle is damaged, or temperature and flow become unpredictable.
- Do not remove trim, open a wall or ceiling, loosen fittings, disassemble a cartridge, bypass pressure-balancing or temperature-limiting protection, or apply sealant over a wet concealed area.
- Do not operate unfamiliar shutoffs, pressure-reducing devices, relief valves, gas controls, or electrical controls as a guess; use only a clearly labeled accessible water shutoff from a dry safe position when necessary.
- Stop for active flooding, ceiling bulging, soft wall or floor, sewage, mold or structural damage, water near wiring or lights, or a leak that cannot be isolated.
- If there is gas odor, smoke, arcing, burning odor, or fire, leave the area, avoid flames and switches, and seek emergency or qualified help from a safe location.
Only after diagnosis
Potential parts
- shower valve cartridge
Consider this category only after a qualified diagnosis confirms that the identified shower valve is not sealing with its control off.
Confirm the exact valve series, cartridge, seals, pressure-balancing or thermostatic arrangement, and manufacturer procedure before ordering; do not infer fit from the symptom. - shower valve seal or O-ring kit
Consider this category only when the exact valve and leak location are identified and the manufacturer or plumber specifies a seal kit.
Match the exact valve and material requirements; do not substitute a generic seal or apply sealant to hide a concealed leak. - pressure-reducing or pressure-relief service component
Consider this category only when a qualified pressure assessment finds a shared pressure or regulation fault affecting the toilet and shower.
Pressure devices require system-specific sizing, settings, code compliance, and qualified installation; do not adjust them from a leak symptom alone.
When checks do not resolve it
Need a professional?
Request qualified plumbing service when the shower continues running with its control off, the valve or cartridge cannot be identified, the symptom began after shared plumbing work, multiple fixtures changed, or any water appears at the trim, wall, ceiling, or floor. Ask the original plumber to review the toilet visit when the onset was immediate or shared shutoffs were used, while treating causation as an open question. Escalate urgently for active flooding, structural water damage, sewage, water near electricity, or any gas, smoke, or fire warning.
Safety scope: This article supports ordinary-control operation and dry visual observation only. Internal shower-valve, concealed-pipe, pressure-device, gas, and electrical work belongs to the appropriately qualified professional.
Common questions
FAQ
Could the plumber who repaired the toilet have caused the shower to run?
The timing may justify a focused recheck, especially if a shared shutoff or supply was operated, but timing alone does not prove causation. Compare other fixtures, record the exact work and onset, and ask the plumber to inspect the accessible work and shower symptom without opening the wall yourself.
What does it mean if water keeps flowing from the showerhead with the handle off?
A continuous stream usually points toward the shower valve not sealing, a cartridge or pressure-balancing component, handle calibration, or a related assembly issue. Keep the valve intact and arrange model-specific or qualified plumbing service.
How can I tell whether it is a shared pressure problem?
Observe whether the toilet, sinks, and other fixtures also drip, pulse, bang, refill abnormally, or change when another fixture opens. Several affected fixtures support a shared plumbing assessment; do not adjust a pressure regulator or repeatedly operate unfamiliar shutoffs yourself.
Is a short drip after turning off the shower the same as a running shower?
No. Residual water can drip briefly and then stop, while a stream that continues or refills the line is a continuous leak. Record the duration and source, and request service if it becomes continuous or appears around the trim or wall.
When should I shut off water and stop troubleshooting?
Stop for active flooding, a concealed wall or ceiling leak, structural swelling, sewage, water near electrical equipment, a damaged control, or flow that cannot be safely controlled. Use only a clearly labeled accessible water shutoff from a dry location when necessary, then obtain qualified service.
Read the exact guide
Official sources
- Water Continues to Run After Mixer Cap and PBU InstallationKohler Assist · Kohler Rite-Temp valve families named on the page; it is an example of model-specific assembly sensitivity, not a generic part diagnosis.
- How to Operate PosiTemp Stop Check ValvesMoen Solutions · Moen PosiTemp valves with the optional stop-check configuration only; do not apply the location or operation to an unidentified valve.
- Troubleshooting GuideKohler Co. · Kohler valve troubleshooting guide; symptoms and service steps vary by valve model.
- Shower Faucet: Leaking- Standard ValveMoen Solutions · Moen standard-valve guidance; a different or unidentified valve may use different parts and procedures.
- Shower Faucet: Leaking-M-Core 4 Series ValveMoen Solutions · Moen M-Core 4 Series only; use the installed valve's exact instructions or a qualified plumber for other systems.
- Water Pressure Alerts: Why You Need a Pressure Releasing Valve and-or a Thermal Expansion TankMoen Solutions · General pressure education from Moen; it does not diagnose this home's pressure or authorize adjustment of a regulator.
Community feedback
Share a repair observation
Share a plain-text repair observation. Accepted observations are published automatically; this page may take a moment to update.