
On this page
Start here
Quick answer
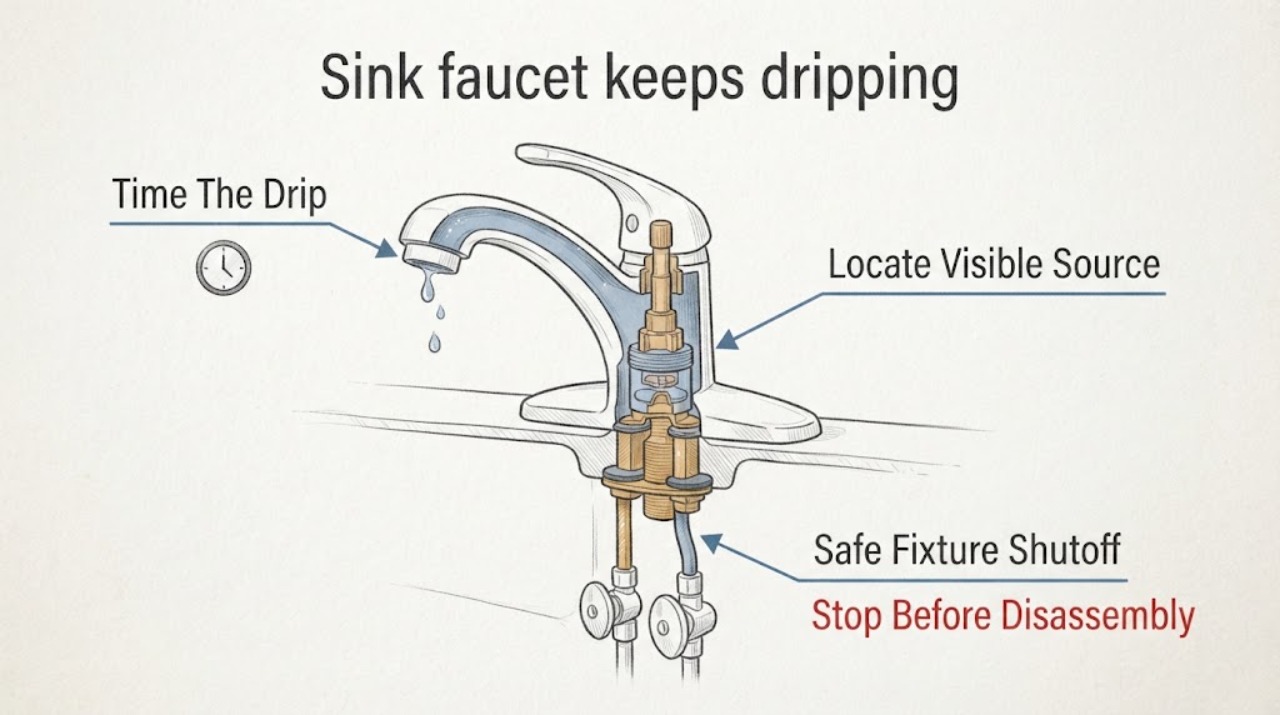
First separate a short-lived drip after shutoff from a faucet that continues dripping. From a dry, stable position, record whether water comes from the spout, handle, faucet base, or under the counter; whether it stops after a short settling period or continues while the handle is off; and whether the drip is accompanied by a spreading leak, cabinet moisture, or a failed fixture shutoff. If the fixture shutoff valves are clearly identifiable and operate normally, you may close them slowly for temporary isolation without removing anything. If a valve is stuck, damaged, inaccessible, or the drip continues, stop and call a plumber. Do not remove the aerator, handle, cartridge, stem, supply hose, or faucet body, and do not disassemble anything until the fixture water is safely isolated by a qualified person or according to the exact product instructions.
Work through in order
Diagnostic checks
Use only checks that match the exact appliance or system and its official guide.
-
Check 1
After the faucet has already been turned off during ordinary use, observe from a dry position whether the spout produces a few residual drops and then stops, or continues dripping without a new use cycle. Do not repeatedly open and close the handle to test it.
Expected result: The drip stops after a short settling period, continues for a long time, varies with handle position, or is present even when the faucet has not been used.
Next step: Record the approximate duration and arrange service if the drip persists, worsens, or returns after every use. Continue with location and shutoff observations only.
Stop if: Stop if the drip becomes a stream, reaches the cabinet or floor, or cannot be observed without standing in water.
Why this matters
Why: A short residual drip can be water remaining in the spout, while a persistent drip suggests that the valve or cartridge may not be sealing. Timing does not identify the exact part or prove that the faucet is safe to disassemble.
-
Check 2
Look without touching for water at the spout tip, around the handle, at the faucet base on the sink or counter, along a sprayer or pull-down hose path, or beneath the counter. Photograph the highest visible wet point and do not remove trim, a handle, or a supply connection.
Expected result: The drip is only at the spout, appears under or around the handle, runs from the base, appears below the sink, or has more than one visible location.
Next step: Provide the location and photos to a plumber or the manufacturer, including the faucet model only if it is visible without disassembly.
Stop if: Stop if water is near an outlet, appliance, disposal, cabinet contents, or an electrical device, or if the source is concealed.
Why this matters
Why: A spout-only drip points toward the faucet's closing path; moisture at a handle or base can involve seals or the faucet body; water below the counter can be a supply or hose issue rather than a spout drip. Water can travel, so the lowest wet mark is not always the source.
-
Check 3
If the hot and cold fixture shutoff valves are clearly identifiable, dry, and easy to reach, note whether each handle turns normally with gentle hand pressure. If you choose to isolate the fixture, close the valves slowly without force; do not use tools or continue if a valve is stuck, damaged, leaking, or unclear.
Expected result: Both valves close normally, one valve is stuck or damaged, the valve itself begins leaking, the valves are missing or inaccessible, or the faucet continues dripping after isolation.
Next step: Leave a successfully isolated fixture unused and call a plumber. For a stuck, damaged, inaccessible, or ineffective shutoff, stop manipulating it and seek prompt plumbing help; if water is spreading, use emergency service.
Stop if: Stop immediately for resistance, spray, valve leakage, uncertainty about which valve serves the fixture, or any need for a wrench, panel removal, or pipe work.
Why this matters
Why: Normal shutoff can limit water while service is arranged. A failed, leaking, or uncertain valve means the fixture cannot be safely isolated at that point and may require the building shutoff or professional service; continued dripping after isolation suggests stored water or another supply path and must not be chased by disassembly.
-
Check 4
From a dry standing position, look for water marks, swelling, soft cabinet material, staining, musty odor, or damp flooring below and around the sink. Do not reach into standing water, move heavy items, touch wet electrical equipment, or clean suspected contaminated material.
Expected result: The area is dry, has an old mark, is actively wet, shows swelling or odor, or has water near an outlet, disposal, or appliance.
Next step: Keep the faucet isolated or unused and arrange plumbing and appropriate water-damage or electrical service as needed. Do not conceal the evidence with caulk or cabinet work.
Stop if: Stop and keep people away for standing water, sewage odor, soft flooring, visible contamination, or wet electrical components.
Why this matters
Why: A spout drip may have caused little impact, but moisture below the sink shows that the leak may be traveling or that a second leak exists. Swelling, odor, contamination, or water near electricity increases urgency beyond a routine faucet-parts question.
-
Check 5
Record whether the faucet is single-handle or two-handle, the spout style, any pull-down or side sprayer, the model label if already visible, and whether the drip began after a filter, hose, cleaning, water-quality, or plumbing change. Do not remove a cover or handle to find the model.
Expected result: The faucet identity is known, the model is unknown, the drip started after recent work, or there is no clear trigger.
Next step: Send the model and history, timing, source location, shutoff status, and moisture observations to the plumber or manufacturer support team.
Stop if: Stop when the next step would require opening the faucet, disconnecting a line, using force, or making a compatibility decision from the symptom alone.
Why this matters
Why: Faucet construction and model determine whether a cartridge, stem valve, seal, or O-ring category is even relevant. The same dripping symptom can require different parts, so an unverified fit claim is unsafe.
Use your observations
Decision map
Find the observation that best matches what you see, then follow the next safe action.
-
PATH 01Next step
What you see
The drip stops after a short residual period and there is no other moisture
Do this next
Document the timing and monitor without repeated cycling. If the duration grows or the drip becomes continuous, arrange a faucet service call.
-
PATH 02Next step
What you see
The spout continues dripping while the handle is off
Do this next
Treat it as a possible valve or cartridge sealing issue and provide the faucet model and drip duration to a plumber. Do not remove the aerator, handle, cartridge, or stem under this observation-only workflow.
-
PATH 03Next step
What you see
Water appears around the handle, faucet base, sprayer, or under the counter
Do this next
Stop using the faucet, isolate it only with clearly identified valves that turn normally by hand, and request plumbing service. Do not assume a spout repair part addresses a base or supply leak.
-
PATH 04Next step
What you see
A fixture shutoff is stuck, damaged, leaking, inaccessible, or does not stop the drip
Do this next
Stop manipulating the valve and call a plumber promptly. If water is spreading, protect the area from a dry location and use emergency water service; do not force the handle or cut a line.
-
PATH 05Next step
What you see
Leakage is expanding or reaches cabinets, flooring, outlets, appliances, or electrical equipment
Do this next
Stop faucet use and keep people clear. Arrange prompt plumbing service and appropriate electrical or water-damage help; do not touch wet electrical equipment or contaminated water.
Helpful context
Understand the symptom
A short drip and a continuous drip are different
A small amount of water can remain at a spout after normal use, while a drip that continues for a long time after shutoff may indicate a valve or cartridge that is not closing. The correct part depends on faucet design, handle arrangement, model, and where the water appears. The safest homeowner contribution is a precise observation and safe isolation, not faucet disassembly.
Keep the check noninvasive
Do not loosen the handle, remove the aerator, turn hidden fittings with force, cut a supply line, or open the faucet body. Keep the sink and counter dry, protect the drain from loose items, and avoid repeated cycling of the handle. If water is reaching cabinets, flooring, outlets, or other equipment, stop using the faucet and escalate.
Only after diagnosis
Potential parts
- faucet cartridge
Only consider a cartridge when the faucet model and a professional diagnosis indicate that the valve or cartridge is the source of a persistent spout or handle drip.
Confirm the exact faucet model, handle configuration, cartridge design, and manufacturer fit information before ordering; a dripping symptom does not establish compatibility. - faucet stem valve
This category is relevant only for a compatible two-handle faucet after service identifies a worn stem or valve as the cause and safely isolates the fixture.
Match the faucet model, hot/cold side, stem geometry, and manufacturer-approved parts information; do not choose by appearance alone. - faucet o-ring kit
Consider an O-ring kit only when a professional or exact product documentation identifies a seal at the observed leak location and confirms that the seal is replaceable.
Confirm faucet model, seal material, dimensions, water-contact suitability, and manufacturer guidance; do not cover an active leak with an unknown seal or caulk.
When checks do not resolve it
Need a professional?
Call a plumber when the faucet continues dripping, the drip is constant after shutoff, the source is at the base, handle, hose, or supply, a fixture shutoff fails, or water reaches the cabinet, floor, outlet, appliance, or electrical equipment. Escalate promptly for expanding water or an uncontrolled flow.
Have this ready
- Provide single- or two-handle type, faucet model if visible without disassembly, drip duration, source location, whether the fixture valves close normally, moisture or cabinet impact, recent plumbing work, and whether the drip continues after safe isolation.
Common questions
FAQ
How long can a faucet drip after it is turned off?
A small residual drip may stop shortly after use, but a drip that continues for a long time or returns continuously after shutoff should be treated as a possible valve or cartridge issue. Record the duration and arrange service rather than repeatedly cycling the handle.
Should I shut off the water to a dripping sink faucet?
If the fixture shutoff valves are clearly identified, dry, accessible, and turn normally by hand, they may be closed slowly for temporary isolation. Stop if a valve is stuck, damaged, leaking, or ineffective and call a plumber; do not force it or cut a line.
Can I replace the cartridge because the faucet keeps dripping?
Do not choose or replace a cartridge from the symptom alone. Faucet design and model determine whether a cartridge, stem valve, O-ring, or another component is appropriate, and disassembly should follow safe isolation and exact product instructions or be handled by a plumber.
Read the exact guide
Official sources
- Leaking from End of SpoutKohler Assist · Kohler bathroom-sink faucet support; other faucet models may use different parts and procedures.
- Find Parts and Identify Your ProductDelta Faucet · Delta product family information used to support model-first part identification; other faucet designs may differ.
Community feedback
Share a repair observation
Share a plain-text repair observation. Accepted observations are published automatically; this page may take a moment to update.