
On this page
Start here
Quick answer
A sink faucet that keeps dripping may have a worn or displaced O-ring, but the drip location decides whether the cartridge is also in scope. A drip from the spout tip while the handle is off points toward the cartridge or valve seal; water between a rotating spout and its body, or around the spout base, makes a spout O-ring more relevant. First locate the water, check below the sink, identify the faucet model and handle style, and use the manufacturer’s parts diagram before shutting off water or choosing a part. Do not force the handle or spout, pry out a seal, or buy a generic O-ring by appearance.
Before you begin
Safety first
- Use ordinary standing access and visual observation only. Do not force, pry, disconnect pressurized plumbing, or disassemble the faucet unless the exact model procedure and water isolation are confirmed.
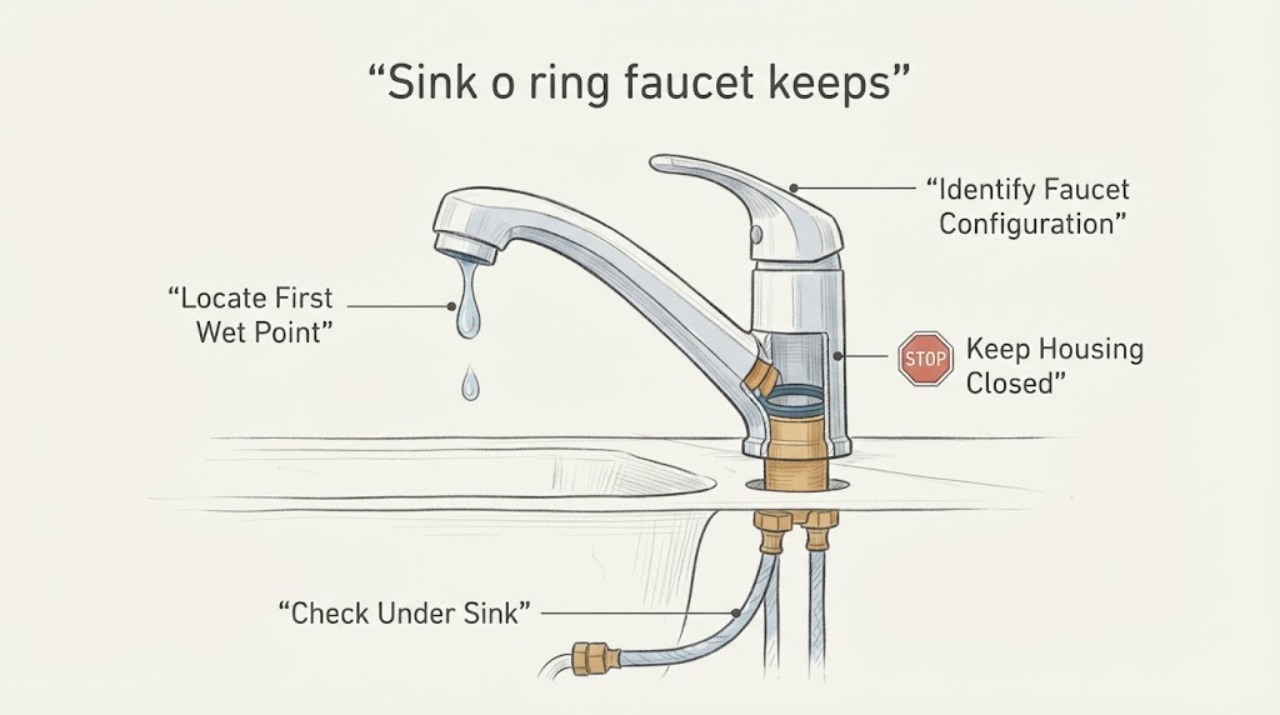
Work through in order
Diagnostic checks
Use only checks that match the exact appliance or system and its official guide.
-
Check 1
Close the faucet handle normally, dry only the already accessible surfaces, and use a small piece of tissue or dry paper towel at the spout tip, spout-to-body joint, around the handle, and faucet base. Do not remove the aerator, handle, retaining nut, or seal.
Expected result: The first wet point may be the spout outlet, the rotating-spout joint, the handle or base, or an area that cannot be seen safely.
Next step: Photograph the first wet point and continue to the under-sink check. If the water is spraying, running, or reaching an unsafe area, stop testing and isolate the water if it can be done without force, then call plumbing service.
Stop if: Stop if the handle or spout must be forced, the faucet is loose or unstable, water contacts energized equipment, or the wet point is inaccessible.
Why this matters
Why: A spout-tip drip is a valve or cartridge-sealing question; wetness at the spout joint makes a spout O-ring or grommet more relevant; water at the base or below the deck can be a different seal or connection. The location alone does not prove which part failed.
-
Check 2
From ordinary standing access, look below the sink for droplets, a wet cabinet floor, staining, or water tracking from the supply connections, shutoff valves, hoses, faucet mounting area, or sink deck. Do not crawl into the cabinet, disconnect a hose, or tighten a fitting as a diagnostic test.
Expected result: The underside may be dry, or water may first appear at a pipe connection, supply hose, valve, faucet base, mounting area, or cabinet surface rather than the spout tip.
Next step: If a connection or valve is actively leaking, stop repeated faucet use and contact a plumber. Provide a photo of the first wet point and whether the spout drip continues when the area below is dry.
Stop if: Stop for active spraying, a failed shutoff, water near an outlet or appliance, cabinet instability, or any need to disconnect pressurized plumbing.
Why this matters
Why: A separate under-sink leak can mimic or accompany a dripping faucet and is not fixed by replacing a visible O-ring. Puddling or water spots also increase the urgency of limiting use to protect the cabinet and surrounding area.
-
Check 3
Record the brand and model from an accessible label, installation record, receipt, or manufacturer document, and note whether the faucet is single-handle, two-handle, pullout, pulldown, or a rotating spout. Do not remove trim just to find a model number.
Expected result: The model and configuration may be confirmed, partly known, previously repaired, or unavailable from a safe viewpoint.
Next step: Save the model evidence and use the manufacturer’s parts or service information, or give it to a plumber. If the model is unknown, stop at observation rather than ordering a generic O-ring or cartridge.
Stop if: Stop if identification requires disassembly, reaching behind a fixed appliance, entering an awkward or contaminated cabinet, or moving the faucet.
Why this matters
Why: O-ring location, quantity, size, cartridge design, and access vary by model. A model-specific parts diagram can distinguish a spout-hub O-ring from the cartridge or another seal; an unknown model makes a generic part choice unreliable.
-
Check 4
With the model noted and no parts removed, compare the leak pattern during a normal handle-off state and while the spout is gently moved only if it already moves freely. Record whether water exits the spout tip, appears at the spout joint when it turns, or appears under the handle or base.
Expected result: The spout tip may continue to drip with the handle off; the spout joint may wet when the spout rotates; or the handle/base may wet without a tip drip. The pattern may also be unclear.
Next step: Use the model-specific repair diagram to choose between an O-ring service path and cartridge assessment. If the pattern is mixed or unclear, request a plumber’s diagnosis rather than opening the assembly.
Stop if: Stop if moving the spout causes a sudden stream, the faucet body shifts, the handle binds, or any force is needed.
Why this matters
Why: A continuing tip drip makes the cartridge or valve seal the primary branch. A joint leak that follows spout movement makes an O-ring or grommet branch more relevant. A handle/base or under-deck leak may involve another seal, mounting, or body path. These are prioritization clues, not proof without the model’s service information.
-
Check 5
Before buying or installing anything, check whether the manufacturer’s model-specific diagram names a spout O-ring or service kit for the observed leak location, or instead directs the model to a cartridge or valve replacement.
Expected result: The documentation either identifies a matching O-ring path, identifies a matching cartridge path, or does not resolve the observed pattern.
Next step: Use only the manufacturer-confirmed part category and procedure, or arrange plumbing service. Do not stretch, stack, glue, lubricate with a petroleum product, or substitute a generic seal; if water cannot be controlled, shut off the local supply only when the valve operates normally and safely.
Stop if: Stop all repair work for seized shutoffs, active flooding, damaged supply lines, concealed leaks, or any task requiring force or disassembly beyond the verified instructions.
Why this matters
Why: A documented O-ring path supports considering that conditional part; a documented cartridge path keeps the cartridge in scope even when an O-ring is visible. No match means the model, seal location, or cause remains unresolved.
Use your observations
Decision map
Find the observation that best matches what you see, then follow the next safe action.
-
PATH 01Next step
What you see
The handle is off but water continues to emerge from the spout tip, with no stronger evidence that the leak starts at the spout joint.
Do this next
Keep the cartridge in scope, identify the exact faucet model, and follow its manufacturer service path or call a plumber. Do not replace only a visible external ring without confirming the leak location.
Why this path and its safety boundary
Why it matters: The cartridge or valve sealing path is more likely than an external spout O-ring alone; Moen identifies cartridge, O-ring, or grommet causes and directs model-specific cartridge selection.
-
PATH 02Next step
What you see
Water appears between a rotating spout and its body or around the spout base, especially when the spout moves freely, while the spout tip is not the first wet point.
Do this next
Use the manufacturer’s parts diagram to verify the spout seal category and size, then arrange the model-specific repair. Stop if the spout is loose, seized, or requires force to remove.
Why this path and its safety boundary
Why it matters: A spout O-ring or grommet is more relevant than a cartridge-only explanation, although the model may use both seals and may require a cartridge as well.
-
PATH 03Next step
What you see
The first wet point is under the handle, at the faucet base or deck, at a supply connection, or on the cabinet floor rather than at the spout tip or spout joint.
Do this next
Limit use, document the wet path, and arrange plumbing diagnosis. Do not substitute a spout O-ring for a leak that begins below the faucet or at a pressurized connection.
Why this path and its safety boundary
Why it matters: The visible O-ring may not be the leaking seal. A mounting gasket, body seal, hose, valve, or supply connection needs consideration, and water damage can continue even if the tip drip is small.
-
PATH 04Next step
What you see
The faucet model is unavailable, the leak appears at more than one location, or the manufacturer diagram does not match the observed pattern.
Do this next
Stop part substitution and provide photos, configuration, timing, and model clues to a qualified plumber or the manufacturer’s support channel.
Why this path and its safety boundary
Why it matters: The named O-ring is not enough to establish the repair path; mixed symptoms can reflect more than one seal or a misidentified leak source.
Helpful context
Understand the symptom
“The O-ring is leaking” is a useful hypothesis, not a diagnosis. The first split is where the water appears: at the spout tip after the handle is closed, at the joint where a spout rotates, around the handle or faucet base, or at a connection below the sink. A tissue or dry paper towel placed at an already accessible spot can help show the first wet point without opening the faucet.
Keep cartridge scope separate from spout O-ring scope. Moen lists a scratched or torn cartridge, O-ring, or grommet as possible causes and says a model-specific cartridge is commonly involved in a continuing faucet drip. Its kitchen-faucet guidance separately describes O-rings in the spout or cartridge and notes that the correct repair depends on the faucet model and configuration.
The faucet style changes the likely path. Single-handle, two-handle, pullout, and pulldown faucets do not use the same parts or access sequence. Delta’s parts guide groups cartridges by drips from the spout, base, or under the handle and lists spout-hub O-rings only for specified faucet families. Use that kind of model-specific parts diagram rather than matching a loose rubber ring by diameter or color.
Water under the sink can be a separate supply, valve, hose, deck, or body leak even when the faucet also drips. EPA WaterSense recommends monitoring faucets by listening for drips and looking under sinks for leaks at pipe connections, puddling, or other water spots. If water is reaching cabinetry or electrical equipment, limit use and arrange plumbing service before experimenting with the faucet assembly.
Safety boundary
Stop conditions
- Stop testing for active spraying, flooding, a failed shutoff, a loose faucet body, or water near an electrical appliance or outlet.
- Do not force the handle or spout, pry out an O-ring, disconnect a supply hose, or open the cartridge housing as a casual diagnostic step.
- Do not order a generic O-ring or cartridge by appearance; model and leak location must support the part category.
- Limit use and arrange prompt plumbing service when water reaches the cabinet, countertop, wall, or flooring, or when the leak is concealed or inaccessible.
Only after diagnosis
Potential parts
- model-specific spout O-ring or grommet kit
Consider only when the leak begins at the spout-to-body joint or the manufacturer’s model-specific diagram lists that seal for the observed location.
Confirm the exact faucet model, spout configuration, seal location, and manufacturer part information before ordering. - model-specific faucet cartridge or valve cartridge
Consider when the spout tip continues to drip with the handle off or the manufacturer’s diagnosis identifies the cartridge or valve seal path.
Single-handle, two-handle, pullout, and pulldown faucets use different components; verify the model and manufacturer diagram first. - manufacturer-specified silicone-based faucet grease
Consider only if the exact manufacturer repair procedure calls for lubrication of the identified seal.
Use only the lubricant type permitted by the manufacturer; do not substitute petroleum-based products or sprays.
When checks do not resolve it
Need a professional?
Call qualified plumbing service when the drip continues after the faucet is closed, water appears under the sink or at a supply connection, the faucet is loose, the model-specific O-ring or cartridge path is unclear, the shutoff will not operate normally, or repair would require force or disassembly.
Safety scope: Use ordinary standing access and visual observation only. Do not force, pry, disconnect pressurized plumbing, or disassemble the faucet unless the exact model procedure and water isolation are confirmed.
Have this ready
- Provide photos of the first wet point, whether the spout tip drips with the handle off, whether moving the spout changes the leak, under-sink observations, faucet style and model evidence, recent repair history, and any water damage.
Common questions
FAQ
Does a visible O-ring prove it is causing the faucet drip?
No. If water exits the spout tip after the handle is off, the cartridge or valve seal remains in scope. An O-ring is more relevant when water starts at a spout joint or the manufacturer’s model diagram identifies that seal for the leak location.
How can I tell an O-ring leak from a cartridge leak?
Locate the first wet point. A spout-tip drip with the handle closed favors a cartridge or valve-sealing check; water at the rotating spout joint favors a spout O-ring or grommet check. The faucet model and manufacturer procedure are still needed to confirm the part.
Can I buy a generic O-ring for the sink faucet?
Avoid guessing by size or color. Manufacturers use model-specific locations and dimensions, and some faucet configurations need an O-ring and cartridge together. Confirm the model and parts diagram first.
What if the faucet is dripping and the cabinet is wet?
Treat the under-sink leak as a separate priority. Limit faucet use, document whether water starts at a hose, valve, connection, or faucet base, and arrange plumbing service before opening the faucet assembly.
When should I stop checking the faucet?
Stop for active spraying, flooding, a failed shutoff, a loose body, water near electrical equipment, concealed or inaccessible leakage, or any need to force or disconnect pressurized plumbing.
Read the exact guide
Official sources
- What causes a Moen faucet or valve to leak or drip?Moen Solutions · Manufacturer troubleshooting context; exact cause and part depend on the faucet model.
- Find Parts and Identify Your ProductDelta Faucet · Manufacturer parts directory; listed parts and faucet families are model-specific and are not compatibility claims for other brands.
- Home MaintenanceU.S. Environmental Protection Agency · General EPA WaterSense homeowner guidance used for safe leak monitoring, not for identifying a particular faucet part.
- Kitchen faucet leaks between the spout and the handleMoen Solutions · Manufacturer guidance for Moen kitchen faucet configurations; do not generalize the part sizes to another model or brand.
Community feedback
Share a repair observation
Share a plain-text repair observation. Accepted observations are published automatically; this page may take a moment to update.