
On this page
Start here
Quick answer
For a sink with low faucet pressure, first compare hot-only and cold-only flow, then inspect the matching supply stops and hoses for a fully open-looking position, abnormal resistance, leakage, kink, or crush point. If the exposed aerator turns by hand without force, remove it and compare flow with the screen off: improvement points toward the aerator, while no improvement keeps the supply path, cartridge, faucet body, or house pressure in scope. Compare another nearby faucet to separate one-sink trouble from whole-house pressure. Do not force a stuck valve, disconnect pressurized fittings, open the faucet body or a wall, or choose a part before diagnosis; leaking or inaccessible stops need a qualified plumber.
Before you begin
Safety first
- User checks are limited to normal faucet controls, dry visual inspection, gentle hand-removal of an exposed aerator, and documentation. Do not force valves, disconnect pressurized fittings, open the faucet body or a wall, or alter the main supply.
Work through in order
Diagnostic checks
Use only checks that match the exact appliance or system and its official guide.
-
Check 1
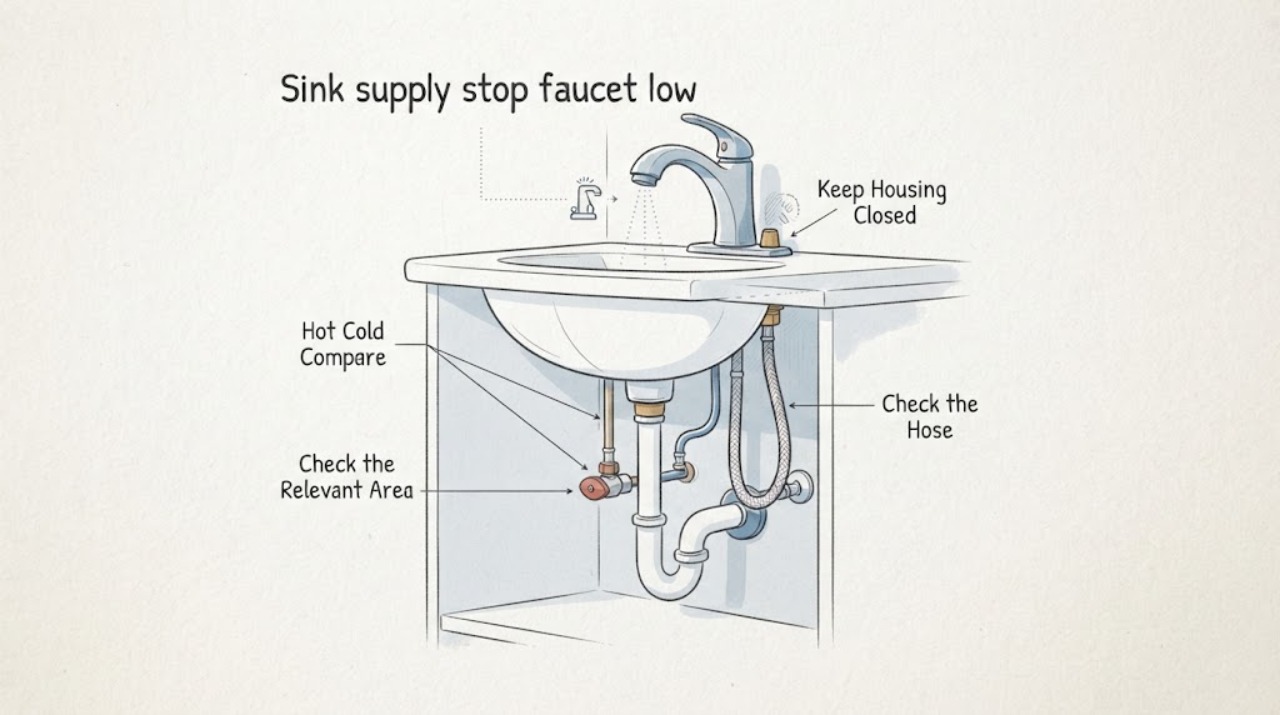
With the sink area dry and safe, run the faucet normally first on cold only and then on hot only, without forcing the handles. Compare the flow from each side and note whether the low flow is on one side or both.
Expected result: Cold flow may be low, hot flow may be low, both may be low, or the comparison may not be safe or clear.
Next step: Record the comparison before changing a part or adjusting a valve.
Stop if: Stop for active leaking, a hot or seized handle, electrical contact, scalding risk, or any unsafe access under the sink.
Why this matters
Why: One-sided low flow focuses the next check on that supply stop, supply hose, or faucet-side passage; low flow on both sides makes the aerator, faucet body, or whole-house supply more likely.
-
Check 2
From under the sink, visually inspect the hot and cold supply stops and their connections. Check whether each valve appears fully open, whether a handle feels abnormally stiff during only a gentle normal movement, and whether there is seepage, corrosion, or water at the valve or fitting. Do not force a stuck valve.
Expected result: A supply stop may appear open and dry, partly closed, stiff or seized, corroded, or wet at the stem or connection.
Next step: Photograph the valve position and wet area and tell the plumber which side is affected; do not remove the valve or fitting.
Stop if: Stop immediately for a valve that will not move normally, active leakage, a corroded connection, or water approaching electrical equipment.
Why this matters
Why: A partly closed or leaking stop can restrict one side or require valve service; stiffness or leakage is a stop condition, not a reason to apply more force.
-
Check 3
Follow each flexible supply hose from its stop to the faucet and look for a kink, crush point, twist, bulge, loose-looking connection, or dampness without disconnecting it or pulling on the faucet.
Expected result: The hose may be straight and dry, kinked or compressed, visibly damaged, wet at one end, or hidden from a safe view.
Next step: Keep the connection undisturbed and include the hose route and affected side in the service notes.
Stop if: Stop if the connection is leaking, the cabinet is saturated, or inspection requires moving the sink, faucet, or plumbing.
Why this matters
Why: A restricted or damaged hose can reduce one side or both sides depending on the installation; a clear dry hose shifts attention to the aerator, cartridge, valve body, or house supply.
-
Check 4
If the aerator is exposed, cool, and turns by hand without force, place a cloth over the outlet, remove the aerator and screen carefully, and briefly run the faucet into the sink to compare flow with the aerator removed. Do not pry a seized aerator or leave parts out as a permanent change.
Expected result: Flow may improve substantially with the aerator removed, remain low on one side, remain low on both sides, or the aerator may be inaccessible or seized.
Next step: Rinse and retain the screen only if it came off without force, then reinstall it; if the result is unclear or low flow remains, arrange plumbing diagnosis.
Stop if: Stop for a seized or damaged aerator, uncontrolled spray, leaking threads, scalding water, or any need to use tools aggressively.
Why this matters
Why: Improved flow points toward debris or a restricted aerator; no improvement keeps the supply stops, hoses, cartridge, valve body, or whole-house pressure in the diagnostic path.
-
Check 5
Run another nearby faucet briefly using its normal controls and compare its cold and hot flow with the affected sink. Note recent shutoff work, building-wide changes, or a pressure change without adjusting hidden plumbing.
Expected result: Only this sink may be weak, both sinks may be weak, or several fixtures may have reduced flow.
Next step: Give the plumber the fixture comparison, hot/cold results, timing, and any recent water work.
Stop if: Stop if another fixture leaks, water is discolored or unsafe, or the comparison requires inaccessible plumbing.
Why this matters
Why: A single-faucet result supports a local stop, hose, aerator, cartridge, or faucet-body path; reduced flow at several fixtures points toward a house supply or pressure issue.
Use your observations
Decision map
Find the observation that best matches what you see, then follow the next safe action.
-
PATH 01Safety boundary
What you see
Only hot or only cold flow is low at the sink.
Do this next
Document the affected side and supply-stop condition; request a plumber before forcing the valve or ordering a part.
Why this path and its safety boundary
Why it matters: The affected side may have a partly closed, stiff, leaking, or restricted supply stop or hose, though the faucet cartridge or valve body can also be involved.
Safety stop: Do not force, remove, or replace a supply stop that is seized, corroded, or leaking.
-
PATH 02Safety boundary
What you see
Flow improves when an accessible aerator is removed without force.
Do this next
Clean and reinstall the screen if it came off safely, or use the exact model information to select a compatible aerator.
Why this path and its safety boundary
Why it matters: The aerator screen or flow path is a stronger lead than the supply stop, but the exact replacement still depends on the faucet model.
Safety stop: Do not leave the aerator out permanently or pry a seized part.
-
PATH 03Safety boundary
What you see
Flow stays low with the aerator removed, or the aerator cannot be removed safely.
Do this next
Arrange plumbing diagnosis and provide hot/cold results, valve observations, hose photos, and the aerator comparison.
Why this path and its safety boundary
Why it matters: The restriction is likely upstream of the aerator or the cause is not established; the supply stop, hose, cartridge, valve body, or house supply remains in scope.
Safety stop: Do not disconnect supply lines, open the faucet body, or use live or pressurized testing.
-
PATH 04Safety boundary
What you see
Several nearby fixtures have reduced flow on the same timeline.
Do this next
Contact a qualified plumber or building service and report which fixtures and temperatures are affected.
Why this path and its safety boundary
Why it matters: A building supply, shutoff, pressure, or plumbing issue is more likely than a single faucet aerator or stop.
Safety stop: Do not open walls, alter the main shutoff, or make a pressure adjustment without diagnosis.
-
PATH 05Safety boundary
What you see
A supply stop or hose is wet, actively leaking, seized, severely corroded, or inaccessible.
Do this next
Stop using the affected faucet if operation worsens the leak, keep the cabinet clear, and request prompt plumbing service.
Why this path and its safety boundary
Why it matters: Further handling could turn a restricted flow into a water-damage event; the supply boundary needs professional attention.
Safety stop: Do not force the valve, disconnect the fitting, pull the faucet, or open a wall.
Helpful context
Understand the symptom
Start with a hot-and-cold comparison
For low pressure at one sink, first determine whether cold, hot, or both sides are weak. One-sided low flow makes that side’s supply stop and hose important; low flow on both sides keeps the aerator, faucet body, and whole-house supply in the path. The visible supply stop is a diagnostic clue, not automatically the failed part.
Inspect the supply stops and hoses without forcing them
From a dry, accessible position under the sink, look for a fully open-looking stop, abnormal resistance, corrosion, seepage, and kinked or crushed hoses. A valve that is stiff, stuck, or leaking is a plumber boundary. Do not force it, disconnect fittings, or open a wall.
Use the aerator result as a local branch
If the aerator is exposed and turns by hand, remove it carefully and compare flow with the screen removed. Improved flow points toward debris or a restricted aerator; unchanged flow keeps the supply stop, hose, cartridge, faucet body, or house pressure in scope. Reinstall the screen after a safe comparison and do not pry seized parts.
Separate one-faucet trouble from whole-house pressure
Compare another nearby faucet using its normal hot and cold controls. If several fixtures are weak, report the pattern as a possible building supply or pressure issue. If only this sink is affected, give the plumber the hot/cold comparison, valve and hose observations, aerator result, model information, and photos.
Safety boundary
Stop conditions
- Do not force a stuck or corroded supply stop, disconnect pressurized fittings, alter the main supply, open the faucet body, or open a wall.
- Stop for seepage, active leakage, wet electrical equipment, saturated cabinetry, uncontrolled spray, or an inaccessible connection.
- Remove an aerator only when it is exposed and turns by hand without force; reinstall the screen after comparison.
- Use a qualified plumber when flow remains low after safe observations, several fixtures are affected, or the cause and compatible part are uncertain.
Only after diagnosis
Potential parts
- faucet aerator
Consider only when flow improves with the aerator removed and the model-matched replacement is confirmed.
Confirm the faucet model, aerator attachment, screen, finish, and flow specification before ordering. - faucet cartridge
Consider only when the aerator and supply path are clear and a plumber confirms a cartridge or valve-body restriction.
Confirm the faucet model, handle configuration, cartridge type, and diagnosis before ordering. - angle stop valve
Consider only when the supply stop is diagnosed as faulty; do not replace a seized or leaking valve as a casual user test.
Confirm connection size, outlet type, installation access, and the plumbing professional’s selection.
When checks do not resolve it
Need a professional?
Call a qualified plumber when the low flow persists after the safe aerator comparison, affects one or both temperatures without a clear cause, appears at several fixtures, or involves a stiff, corroded, leaking, or inaccessible supply stop or hose.
Safety scope: User checks are limited to normal faucet controls, dry visual inspection, gentle hand-removal of an exposed aerator, and documentation. Do not force valves, disconnect pressurized fittings, open the faucet body or a wall, or alter the main supply.
Have this ready
- Whether hot, cold, or both sides are low
- Supply-stop position, resistance, corrosion, and leakage observations
- Photos of both supply hoses and accessible connections
- Flow result with the aerator installed and, if safely removable, removed
- Comparison with another nearby faucet and any recent water work
Common questions
FAQ
What does low flow on only one side of the sink mean?
Check that side’s supply stop and hose for a partly closed position, stiffness, leakage, corrosion, kink, or crush point from a safe position. The faucet cartridge or valve body can also be involved; do not force the stop.
What does flow improve with the aerator removed mean?
It points toward a clogged or restricted aerator screen or flow path. Remove it only if exposed and hand-removable without force, retain the screen, and match any replacement to the faucet model.
What if flow stays low without the aerator?
The restriction may be upstream of the aerator or may involve the supply stop, hose, cartridge, faucet body, or house supply. Arrange plumbing diagnosis rather than disconnecting lines or opening the faucet.
How can I tell if the problem is whole-house pressure?
Compare another nearby faucet on hot and cold. Reduced flow at several fixtures suggests a building supply, shutoff, pressure, or plumbing issue; one weak sink points more toward a local faucet path.
When should I stop and call a plumber?
Stop for a seized, corroded, or leaking supply stop, wet hose connection, active water, inaccessible plumbing, or any need to force a valve, disconnect a fitting, change the main supply, or open a wall.
Read the exact guide
Official sources
- Why does my faucet have low water pressure?Delta Faucet · Manufacturer guidance for kitchen and lavatory faucet flow checks; exact faucet model and plumbing installation control.
Community feedback
Share a repair observation
Share a plain-text repair observation. Accepted observations are published automatically; this page may take a moment to update.