
On this page
Start here
Quick answer
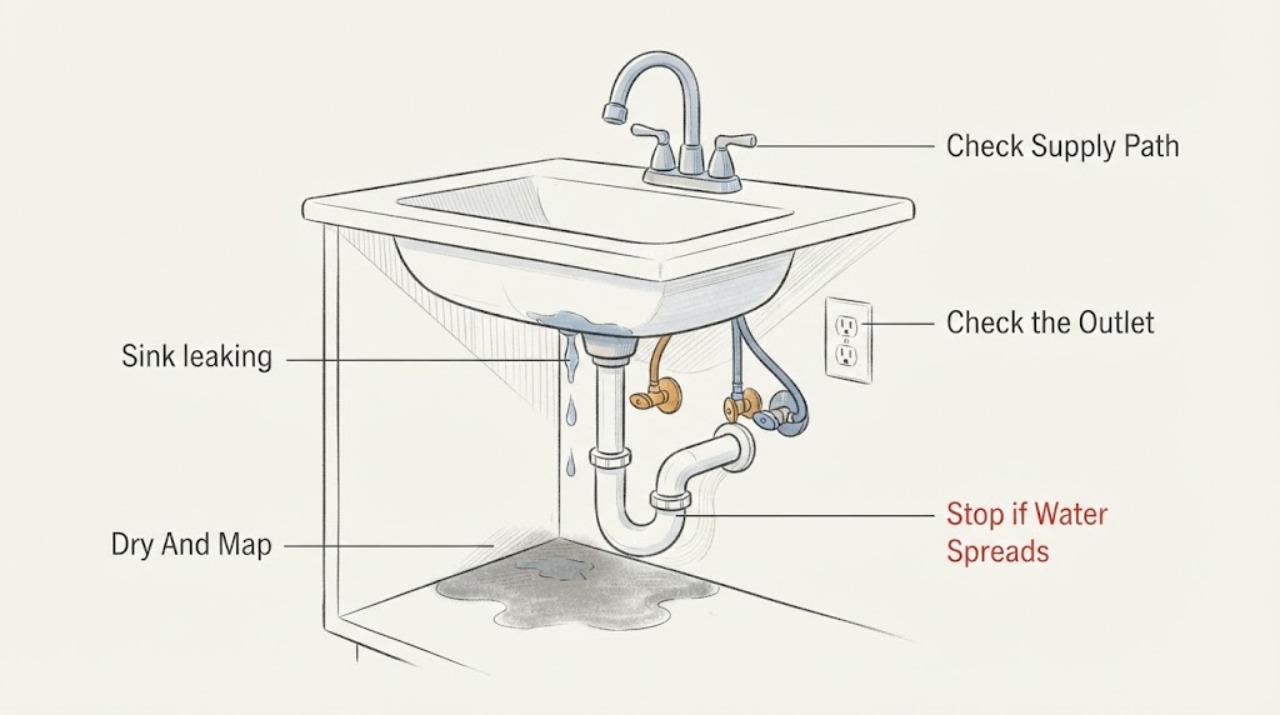
A leaking sink can leak from the faucet outlet, around the faucet base or handles, a hot or cold supply connection, the drain or strainer, the trap, an overflow opening, or a pipe hidden behind the cabinet. First dry the area, run the faucet briefly while watching from a safe position, and trace the first place that becomes wet. Old washers or gaskets can cause faucet leaks, while water at a hose, valve, or fitting needs a different repair. Do not guess from a wet cabinet or tighten parts until they stop; close an accessible shutoff if water is spreading and it is safe to do so. Arrange a licensed plumber for a leak inside a wall, a corroded or immovable valve, a persistent leak after isolation, sewage-like water, cabinet or floor damage, or any repair requiring pipe or drain disassembly.
Work through in order
Diagnostic checks
Use only checks that match the exact appliance or system and its official guide.
-
Check 1
Remove stored items, place a dry towel or paper towel under the sink, and observe from outside the cabinet where the first wet mark appears. Do not reach behind a sharp, corroded, or unstable pipe.
Expected result: The first wet point is at the faucet body, a supply connection, the drain or trap, the cabinet wall, or cannot be located.
Next step: Photograph the first wet point and continue only with the matching non-invasive observation. Arrange a plumber if the source is hidden or the cabinet material is swelling.
Stop if: Stop for active spraying, a corroded or unstable pipe, sewage-like water, water near electrical equipment, or a cabinet or floor that is soft or collapsing.
Why this matters
Why: The first wet point is more useful than the largest puddle. An uncertain or hidden source means water may be traveling behind the cabinet or wall and should not be diagnosed by replacing a visible part.
-
Check 2
With the area dry, run the faucet briefly and observe the outlet, handle or handles, faucet base, and underside of the sink without touching wet connections or opening the faucet.
Expected result: Water drips from the outlet when closed, appears around a handle or base while running, or the faucet remains dry while the cabinet wets.
Next step: Record which handle and faucet area becomes wet, then close the faucet and arrange the appropriate repair. Do not remove a cartridge or tighten the faucet from symptoms alone.
Stop if: Stop if the faucet is loose at the sink, water sprays toward an electrical device, the handle is stuck, or the leak cannot be controlled.
Why this matters
Why: A faucet outlet leak can involve a worn washer, gasket, cartridge, or aerator; water around the base or handle is a different seal path. A dry faucet shifts attention to supply, drain, trap, overflow, or concealed piping.
-
Check 3
Look at the visible hot and cold supply hoses, shutoff valves, and faucet connections while the faucet is off and briefly while it runs. Do not loosen a nut, force a valve, or disconnect a hose.
Expected result: A hose or valve is wet at its connection, the leak appears only while water flows, the valve is corroded or immovable, or the supply path stays dry.
Next step: If a clearly accessible shutoff closes without force, isolate the affected side and arrange plumbing service. If it will not turn or the leak continues, use the main shutoff only if safe and call a plumber.
Stop if: Stop for spraying water, a seized or corroded valve, a split hose, water near electrical equipment, or any need to pull the sink or cabinet apart.
Why this matters
Why: Water at a supply hose, valve, or fitting indicates a pressurized supply-side leak and is not fixed by changing the faucet washer. A dry supply path keeps the drain or faucet body in scope.
-
Check 4
Put a dry towel beneath the strainer, drain body, trap, and visible wall connection, then run a small amount of water into the basin and empty it while observing from the cabinet opening. Do not loosen the trap or drain fittings.
Expected result: Water appears during filling, only while draining, at the strainer or drain body, at a trap joint, or at the wall connection.
Next step: Record the exact joint and stop using the sink if water is reaching the cabinet or floor. Arrange a plumber for drain disassembly, a wall connection, corrosion, or a leak that persists after the basin is empty.
Stop if: Stop for sewage-like water, a loose or collapsing trap, a hidden wall leak, severe corrosion, or water spreading into flooring.
Why this matters
Why: A leak that starts during draining points toward the drain, strainer, trap, or wall connection rather than the pressurized faucet supply. Water at a wall connection or a corroded trap may require more than a simple seal.
-
Check 5
Inspect the visible basin, overflow opening, rim, caulk line, and underside of the sink for cracks, gaps, staining, or water appearing only when the basin is filled. Do not pry out caulk or seal over an active leak.
Expected result: The basin or overflow leaks when filled, the rim or caulk line wets, the underside stays dry, or water appears only below the bowl.
Next step: Stop filling the basin and document the level and leak location. Arrange repair for a cracked basin, failed overflow or rim seal, or any leak that has damaged the cabinet or wall.
Stop if: Stop for a cracked or unstable basin, a loose sink, water behind the wall, mold-like growth, or swelling structural material.
Why this matters
Why: A basin, overflow, rim, or seal leak can bypass the faucet and drain joints. A dry top with water below may indicate the underside, drain seal, supply, or concealed path and cannot be assigned from the puddle alone.
-
Check 6
After the sink is dry and no fixture is being used, observe whether new water appears and, if safely accessible, compare the home's water meter before and after a period with all water use stopped. Do not remove a meter lid in an unsafe location.
Expected result: No new moisture appears, water returns without use, the meter changes, or the meter cannot be checked.
Next step: Record the timing and arrange a leak investigation when water returns without use or the source remains uncertain. Do not seal cabinets or walls before the moisture source is understood.
Stop if: Stop for flooding, inaccessible or unsafe meter access, water near electrical systems, or any need to cut into a wall or floor.
Why this matters
Why: Water returning with no sink use supports a pressurized or concealed leak elsewhere. A stable dry area does not prove the sink is fixed if the leak occurs only under flow or draining.
Use your observations
Decision map
Find the observation that best matches what you see, then follow the next safe action.
-
PATH 01Next step
What you see
Water is spraying, spreading into a wall or floor, returning with no fixture use, or cannot be controlled at a safe shutoff.
Do this next
Use the main or local shutoff only if clearly accessible and safe, keep people away from the area, and request prompt plumbing service.
-
PATH 02Next step
What you see
The leak starts at the faucet outlet, handle, or base while the faucet is operated or afterward.
Do this next
Record the handle and exact wet point. A faucet washer, gasket, cartridge, or base seal may be involved; arrange repair without opening the faucet as a first diagnostic step.
-
PATH 03Next step
What you see
Water appears at a hot or cold hose, shutoff valve, or faucet supply connection.
Do this next
Isolate the affected supply only if the valve is accessible and turns safely. Do not force or disconnect it; request a plumber for hose, valve, or fitting service.
-
PATH 04Next step
What you see
The sink is dry until it is filled or emptied, then water appears at the strainer, drain, trap, or wall connection.
Do this next
Stop using the sink and arrange plumbing service for the drain or trap path, especially for corrosion, wall connections, or cabinet damage.
-
PATH 05Next step
What you see
Water appears only when the basin is filled or reaches the overflow, rim, caulk line, or a visible crack.
Do this next
Stop filling the basin and request repair for the basin, overflow, rim seal, or sink mounting; do not cover the leak with new sealant.
-
PATH 06Next step
What you see
The source is not visible, the area dries between uses, or the leak recurs without a clear pattern.
Do this next
Keep the area dry, record when moisture appears, and arrange a plumber rather than selecting a faucet or drain part from the puddle location.
Helpful context
Understand the symptom
Why the leak location matters
Water can travel along the underside of a sink or cabinet, so the lowest puddle is not necessarily the source. A faucet outlet leak follows the handle state; a base or supply leak may appear only when water is flowing or when pressure is present; a drain leak appears when the basin is filled or emptied. A leak at the strainer, trap, or wall connection needs a different part and boundary than a worn faucet washer or gasket.
Keep the first checks controlled
Remove items from under the sink and dry only accessible surfaces. Do not crawl into a cabinet, force a corroded shutoff, cut the wall, loosen a pressurized supply connection, or dismantle the drain before you know where water will go. If water is near an electrical appliance or outlet, keep away and get appropriate help. Use a local or main shutoff only when it is clearly accessible and safe to operate.
What to record for a plumber
Record the first wet point, whether it appears with the faucet on, during draining, or continuously, which side of a two-handle faucet is involved, the visible hose or valve condition, and any staining, swelling, odor, or water-meter movement. Photos after drying can show the path without disassembly. A plumber can then decide whether the faucet, supply valve, strainer, trap, or concealed piping needs service.
Safety boundary
Stop conditions
- Stop for uncontrolled flow, water entering a wall or floor, sewage-like water, structural swelling, severe corrosion, water near electrical equipment, or a shutoff that is seized or unsafe.
- Do not force valves, loosen pressurized connections, dismantle a trap or faucet, cut walls, pry out caulk, or seal over an active leak during these checks.
- Supply, drain, trap, wall, basin-mounting, and concealed-pipe repairs belong to a licensed plumber when the source is hidden, persistent, corroded, or requires disassembly.
Only after diagnosis
Potential parts
- faucet washer, gasket, or cartridge
Consider only if the leak is confirmed at the faucet outlet, handle, or body and the exact faucet type is identified.
Match the faucet design, cartridge or washer dimensions, seals, and manufacturer fit information; a generic part may not seal. - sink supply hose or shutoff valve
Consider only if inspection confirms water at the pressurized supply connection and the connection can be safely isolated.
Confirm connection sizes, valve arrangement, hose routing, material, and local requirements with a plumber before replacement. - sink drain, strainer, or trap seal
Consider only if the leak appears during filling or draining at the strainer, drain body, trap, or visible wall connection.
Identify the exact drain and trap configuration, seal surfaces, and corrosion condition before selecting a part.
When checks do not resolve it
Need a professional?
Use a licensed plumber for persistent or hidden leaks, supply valves or traps, wall connections, basin or mounting damage, sewage-like water, cabinet or floor damage, or any repair requiring disassembly. Use a safe shutoff and request prompt help when water is spreading.
Common questions
FAQ
Why is my sink leaking underneath?
Water may come from a supply hose or valve, faucet base, drain or strainer, trap, overflow, or a hidden connection and travel to the lowest point. Dry the area and trace the first wet point during a brief controlled use rather than replacing the visible part at the puddle.
Can a worn faucet washer cause a sink leak?
Yes. EPA WaterSense notes that old or worn faucet washers and gaskets frequently cause faucet leaks. Confirm that the leak is at the faucet before choosing a washer, gasket, or cartridge, and turn off the water line before any repair.
How can I tell if the drain or supply line is leaking?
A supply leak usually appears at a hose, valve, or faucet connection while water is under pressure; a drain leak often appears only while the basin is filled or emptied. Observe without loosening fittings and arrange a plumber for corrosion, a wall connection, or persistent water.
Should I tighten the fitting under the sink?
Do not tighten blindly. A corroded, cross-threaded, or pressurized connection can worsen the leak, and water may be traveling from elsewhere. Identify the first wet point and use a plumber when the connection is not clearly safe and accessible.
When is a leaking sink urgent?
Use a safe shutoff and request prompt plumbing help when water is spreading, entering a wall or floor, returning with no fixture use, reaching electrical equipment, damaging the cabinet, or coming from sewage or a failed drain connection.
Read the exact guide
Official sources
- Fix a Leak WeekU.S. Environmental Protection Agency WaterSense · Household leak detection, faucet gasket and washer causes, visible faucet and pipe-fitting checks, and water shutoff before repair.
- Technical Reference Manual for WaterSense Labeled HomesU.S. Environmental Protection Agency WaterSense · WaterSense leak verification and the locations to inspect at bathroom and kitchen faucets, supply hoses and valves, drains, traps, and visible fixture connections.
- Home MaintenanceU.S. Environmental Protection Agency WaterSense · Leak monitoring at faucets, pipe connections, puddling, water-meter checks, and visible shower, faucet, and fixture leak inspection.
Community feedback
Share a repair observation
Share a plain-text repair observation. Accepted observations are published automatically; this page may take a moment to update.