
On this page
Start here
Quick answer
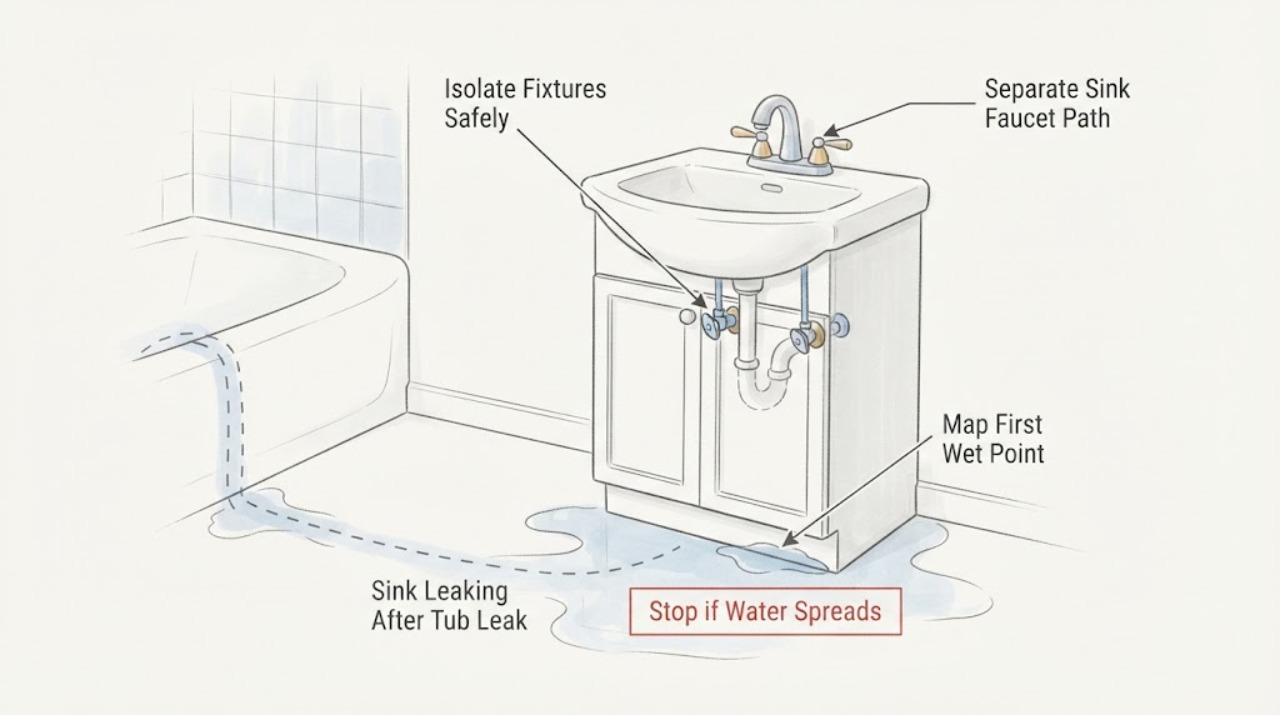
A sink that starts leaking after tub leak problems may have a separate faucet, supply, drain, or seal failure, or the tub event may have exposed a shared drain, wall, floor, or cabinet path. Do not assume the tub caused the sink leak. Close the sink and tub supply valves only if they turn normally and are safely reachable, keep people away from standing water, and locate the first wet point with dry paper from a safe position. Compare whether water appears when the sink is used, when the tub drains, or while both fixtures are unused; do not deliberately run a leaking tub or overflow a fixture to reproduce the problem. A leak at a sink faucet base can actually come from a handle or hose, while a strainer, trap, or disposal seal follows the drain branch. Stop for rapid flow, sewage, a cracked pipe, hidden wall or floor water, or water near electrical equipment and call a qualified plumber; use an electrician or emergency response for an electrical hazard.
Before you begin
Safety first
- This article supports only dry, visible observation, safe shutoff operation without force, and a small controlled sink test when no active tub leak, sewage, structural, or electrical hazard exists. It does not authorize fixture disassembly, pressurized plumbing work, concealed access, disposal operation in a wet cabinet, chemical drain treatment, or work in standing water.
Work through in order
Diagnostic checks
Use only checks that match the exact appliance or system and its official guide.
-
Check 1
Stop using the sink and tub. If the sink and tub shutoff valves are clearly accessible and turn normally, close the affected valves without force; if water is near an outlet, disposal cord, appliance, or other electrical equipment, keep clear and do not touch it.
Expected result: The sink leak slows when sink supplies are closed, the tub still leaks or cannot be isolated, water continues with both fixtures unused, or standing water has reached electrical equipment.
Next step: Keep both fixtures unused, protect the area only from a dry position, and call a plumber for an ineffective shutoff, continuing leak, or active tub leak. Use an electrician for wet electrical equipment and emergency response for immediate danger.
Stop if: Do not force a stuck valve, stand in water while touching equipment, run the disposal, or continue for rapid flow, sewage, smoke, shock, sparks, or fire.
Why this matters
Why: A sink-side shutoff response supports a supply or faucet branch, while continuing flow may be a valve, drain, wall, floor, or stored-water path. A tub that remains uncontrolled may require a whole-home shutoff and urgent plumbing service; electrical exposure changes the safety response.
-
Check 2
From a safe, dry position, dry the cabinet and place separate paper towels under the sink faucet supplies and base, drain strainer, trap joints, disposal flange and discharge if present, cabinet wall, and floor. Do not deliberately run the tub while it is leaking; inspect only existing moisture or a small sink test when safe.
Expected result: The first wet point is at a sink faucet or supply, sink drain or trap, disposal, cabinet wall or floor, or water appears only after the tub drains.
Next step: Repeat only the safe sink test that matches the suspected trigger and follow the local or shared-plumbing branch. If the source is concealed or tub-triggered, keep both fixtures off and arrange plumber service.
Stop if: Stop for rapid leakage, hidden wall or floor water, sewage, a cracked sink or pipe, standing water near electrical equipment, or any need to dismantle plumbing.
Why this matters
Why: The first wet point is more useful than the lowest puddle. A sink fitting points to a local branch; a wall, floor, or tub-triggered wet point suggests shared, concealed, or tub-related plumbing and does not prove a sink seal has failed.
-
Check 3
If the sink's first wet point appears at the faucet base, handle, or supply hose and the tub is not actively leaking, observe the sink faucet briefly from above and below without removing parts. Record whether the leak occurs only when the sink faucet is on or continues with the sink unused.
Expected result: Water appears around the handle or base only during sink use, drips continuously from a supply or shutoff, or the faucet area remains dry while the cabinet wets when the tub drains.
Next step: Record the faucet model and have the correct O-ring, cartridge, mounting seal, hose, or valve identified before replacement. If the tub trigger remains, stop sink testing and call a plumber to trace the shared or concealed route.
Stop if: Do not force the faucet, use a guessed seal, work in standing water, or continue for a split hose, corroded fitting, uncontrolled flow, or water near electrical equipment.
Why this matters
Why: Moen notes that water at a faucet base can be runoff from a handle leak, while steady under-sink leakage can come from a shutoff or supply line. A dry faucet during a tub-triggered leak shifts attention away from a sink seal.
-
Check 4
If the sink cabinet remains dry until the sink is filled or drained, use only a small amount of clean water and watch the strainer, overflow, trap, and disposal connection from the side. Do not use drain chemicals, overflow the sink, or put hands into a disposal.
Expected result: The strainer or flange wets first, the trap joint wets first, a disposal mounting or discharge connection wets first, or the sink drain stays dry while the tub-related moisture returns.
Next step: Record the exact wet point and sink or disposal model, then follow its manual or arrange plumber service for the appropriate seal or connection. Do not remove a fitting to prove a theory.
Stop if: Stop for sewage, backup, a cracked or displaced pipe, chemical cleaner, rapid flow, water near electrical equipment, or any need to dismantle concealed or loaded plumbing.
Why this matters
Why: This identifies a local sink drainage branch when reproduced by sink water. A tub-triggered return with a dry sink drain points to a shared or concealed drainage path, floor, wall, or previous tub damage rather than a generic sink gasket.
-
Check 5
Use the existing tub-leak history and any safe observation already made to compare timing: note whether the sink wet point appeared during the tub leak, after the tub drained, only when the sink drained, or while all fixtures were unused. Do not run a leaking tub or fill a fixture to reproduce the event.
Expected result: The sink leak is independent of the tub, follows tub drainage, appears from a wall or floor, or continues when both fixtures are unused.
Next step: Keep both fixtures off for a tub-triggered, hidden, or continuous leak and call a plumber to inspect the shared route, access points, and prior tub leak area. Do not replace a sink seal based on timing alone.
Stop if: Stop for ceiling or wall staining, bulging material, sewage, rapid flow, mold or structural damage, water near electrical equipment, or an inaccessible source.
Why this matters
Why: An independent sink trigger supports a local faucet or drain branch. A tub-drain trigger or wall/floor source suggests shared drain, overflow, supply, or concealed damage; continuous wetness suggests a pressurized supply, valve, or hidden leak.
-
Check 6
From dry, accessible areas only, inspect the cabinet wall, floor, adjacent ceiling or wall below, and visible drain path for staining, swelling, corrosion, or a wet track from the tub area. Do not open walls, ceilings, flooring, or pressurized connections.
Expected result: Water tracks from the tub area or wall, the sink cabinet is wet without a local sink trigger, the drain path backs up, or all accessible surfaces remain dry.
Next step: Keep fixtures unused and arrange plumber service for hidden, shared, structural, or recurring leaks. If a drain backs up or sewage is present, use urgent service and do not add chemicals.
Stop if: Do not cut into a wall or ceiling, remove flooring, use drain chemicals, enter contaminated water, or continue near compromised structure or electrical equipment.
Why this matters
Why: A hidden or shared-path sign means the apparent sink seal is downstream evidence and may require leak tracing or structural access. A dry visible area does not clear concealed plumbing; it only means the current observation did not reproduce it.
-
Check 7
Prepare a service note with the earlier tub leak symptoms, dates and locations, the sink's first wet point, whether water appears during sink use, sink draining, tub draining, or with fixtures unused, shutoff behavior, fixture models, and any wall, floor, sewage, structural, or electrical evidence.
Expected result: The record distinguishes a local sink faucet or drain leak from a tub-triggered shared-path leak, a continuous supply leak, or an unresolved hidden source.
Next step: Keep the sink and tub unused until the source is repaired and the affected areas are dry. Have the plumber verify for more than one leak before returning either fixture to normal use.
Stop if: Do not dismantle shared plumbing, run the leaking tub, use a wet disposal, force shutoffs, apply chemicals, or continue after rapid flow, sewage, structural damage, or electrical exposure.
Why this matters
Why: Separating fixture trigger from first wet point helps a plumber inspect the correct seal, connection, branch drain, overflow, supply, or concealed area without assuming the tub history proves causation.
Use your observations
Decision map
Find the observation that best matches what you see, then follow the next safe action.
-
PATH 01Safety boundary
What you see
The sink wets first at the faucet, handle, supply hose, or shutoff and the leak is independent of tub use.
Do this next
Close the sink supply if safe, identify the model, and have a plumber select the correct O-ring, cartridge, hose, mounting seal, or valve repair.
Why this path and its safety boundary
Why it matters: This supports a local faucet or supply branch; water at a faucet base may still originate at the handle, and continuous wetness may be a supply or valve issue.
Safety stop: Do not force a valve, use a guessed gasket, or work in water near electrical equipment.
-
PATH 02Safety boundary
What you see
The sink wets first at its strainer, overflow, trap, disposal flange, or discharge during a safe sink fill or drain observation.
Do this next
Keep the sink unused, record the exact wet point and model, and follow the correct manual or call a plumber for the seal or connection repair.
Why this path and its safety boundary
Why it matters: This is a local sink drainage branch, but strainer, trap, disposal mounting, and discharge seals are different components and may be model-specific.
Safety stop: Stop for sewage, backup, cracked plumbing, chemical drain cleaner, rapid flow, or water near electrical equipment.
-
PATH 03Safety boundary
What you see
The sink area wets only when the tub drains or the first wet point is a wall, floor, ceiling, cabinet seam, or shared visible drain path.
Do this next
Keep both fixtures off and arrange prompt plumber leak tracing and inspection of the tub, shared branch, access points, and affected structure.
Why this path and its safety boundary
Why it matters: The tub may have exposed or coincided with a shared drain, overflow, supply, or concealed leak; a sink seal is not established as the cause.
Safety stop: Do not run the leaking tub, open walls or ceilings, remove pressurized fittings, enter sewage or standing water, or continue near electrical equipment.
-
PATH 04Safety boundary
What you see
Water appears with both fixtures unused, the shutoff cannot isolate it, or no safe test identifies a local sink source.
Do this next
Close the appropriate valve only if it moves safely, protect the area from a dry position, and call a plumber or emergency service for uncontrolled, concealed, or structural leakage.
Why this path and its safety boundary
Why it matters: A pressurized supply, valve, concealed pipe, structural leak, or residual water path remains possible; the puddle is not enough to select a seal.
Safety stop: Stop for rapid flow, wall or ceiling damage, sewage, mold or structural concerns, standing water near electrical equipment, or an ineffective shutoff.
-
PATH 05Safety boundary
What you see
The sink leak followed a tub incident but timing and first wet point do not distinguish an independent sink leak from shared or concealed plumbing.
Do this next
Keep both fixtures unused and provide the complete timeline and observations to a plumber for system-level diagnosis.
Why this path and its safety boundary
Why it matters: The tub history is relevant context but does not prove that the sink seal failed or that one leak caused the other.
Safety stop: Do not replace a seal by guesswork, deliberately reproduce a tub leak, use drain chemicals, or dismantle concealed plumbing.
Helpful context
Understand the symptom
Treat the tub history as a clue, not a diagnosis
A tub leak can wet a floor, ceiling, wall cavity, or shared drain area and make a sink look guilty. It can also be unrelated to a new sink leak at a faucet, strainer, trap, or supply hose. Record whether the sink leak is continuous, follows sink use, follows tub draining, or appears with both fixtures unused before selecting a seal.
Use the first wet point and fixture trigger
Dry the cabinet and place paper beneath separate sections of the sink plumbing. A small, controlled sink test is appropriate only when the tub issue is not actively leaking and there is no electrical or sewage hazard. If water appears when the tub drains or from a wall, floor, ceiling, or cabinet seam, stop testing: that evidence needs plumbing access rather than a generic sink gasket.
Do not mix sink seals with tub-valve repairs
A sink faucet O-ring, drain flange gasket, disposal mounting gasket, trap seal, and tub/shower valve seal are different components. Delta's sink drain guidance and tub/shower guidance use separate product-specific procedures, and Moen emphasizes model identification for faucet connection parts. Keep the tub unused and have a plumber confirm whether one shared route or two independent leaks are present.
Safety boundary
Stop conditions
- Stop immediately for rapid or uncontrolled flow, a valve that will not close, sewage, a cracked sink or pipe, wall or ceiling swelling, hidden water, structural damage, or water reaching an outlet, disposal cord, appliance, or other electrical equipment.
- Do not run a leaking tub to reproduce the problem, work in standing or contaminated water, open walls or ceilings, remove pressurized fittings, use drain chemicals, or operate a disposal in a wet cabinet.
- Do not assume the earlier tub leak caused the sink leak or order a generic sink gasket before locating the first wet point and identifying the faucet, strainer, overflow, trap, or disposal configuration.
- Arrange qualified plumber service when the leak is tub-triggered, continuous, hidden, structural, sewage-related, inaccessible, or still uncertain. Use an electrician for wet or damaged electrical equipment and emergency responders for smoke, fire, shock, or immediate danger.
When checks do not resolve it
Need a professional?
Call a qualified plumber when the sink leak follows a tub leak event, appears during tub drainage, comes from a wall, floor, ceiling, or shared drain path, continues with fixtures unused, cannot be isolated, or remains uncertain after safe observation. Stop immediately for rapid flow, sewage, structural damage, or water near electrical equipment; use an electrician or emergency response as appropriate.
Safety scope: This article supports only dry, visible observation, safe shutoff operation without force, and a small controlled sink test when no active tub leak, sewage, structural, or electrical hazard exists. It does not authorize fixture disassembly, pressurized plumbing work, concealed access, disposal operation in a wet cabinet, chemical drain treatment, or work in standing water.
Common questions
FAQ
Does a sink leak after a tub leak mean the tub caused it?
Not necessarily. The leaks can be independent, or water from a shared or concealed path can travel to the sink cabinet. Compare the first wet point and trigger without running a leaking tub; call a plumber for a tub-drain, wall, floor, ceiling, or continuous leak.
How can I tell whether the sink faucet seal is leaking?
Dry the area and observe whether the first wet point is at the faucet handle, base, or supply while the sink faucet is used. Water at the base can be runoff from the handle, and a continuous under-sink drip may be a supply or shutoff issue, so identify the model before selecting a seal.
What if water appears under the sink when the tub drains?
Keep both fixtures off and do not deliberately run the leaking tub. A tub-triggered sink wet point can indicate a shared drain, overflow, concealed pipe, wall, floor, or structural path rather than a sink gasket. Arrange prompt plumber leak tracing.
Can I keep using the sink while I wait for the tub repair?
Only a plumber who has confirmed the sink branch is independent should clear continued use. Until then, keep both fixtures unused when the source is uncertain, tub-triggered, continuous, hidden, sewage-related, or near electrical equipment.
Read the exact guide
Official sources
- Why doesn't my pop-up sink stopper stop the water from draining?Delta Faucet · Delta sink drain support used for the general distinction between sink drain flange and fixture-seal branches; exact sink and drain model controls repair.
- What do I do about water dripping from the spout of my two-handle (or three-handle) tub/shower faucet?Delta Faucet · Delta tub/shower guidance used to show that tub valve leaks have their own supply and valve branch; exact tub/shower model controls any repair.
- Bathroom Faucet: Leaking Under The Sink BaseMoen Solutions · Moen faucet support used for the general distinction between continuous and use-triggered under-sink leaks; exact fixture and plumbing configuration controls the repair.
- Garbage Disposal Leaking at the DischargeInSinkErator · InSinkErator support used only for disposal-specific examples and locating leaks under a sink; exact disposal model instructions govern access.
- Bathroom Faucet: Leaking Around the Base of the FaucetMoen Solutions · Moen faucet support used for the general principle that water at a faucet base can originate at the handle or spout; exact faucet model controls parts and repair steps.
Community feedback
Share a repair observation
Share a plain-text repair observation. Accepted observations are published automatically; this page may take a moment to update.