
On this page
Start here
Quick answer
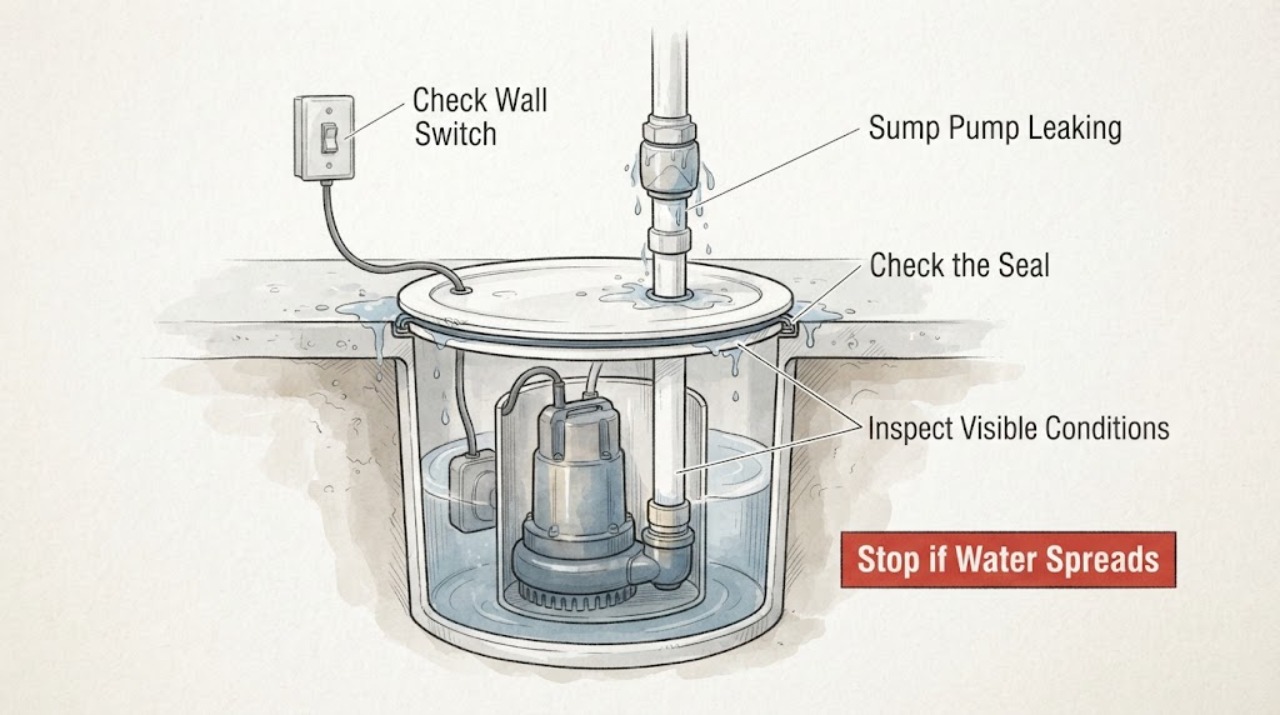
First decide whether water is leaking from the pump or piping, and whether it is near energized equipment or a rising sump. Keep clear of water around the plug, outlet, or control box, and disconnect the pump only from a safe, dry position; if the pit is flooding or the pump cannot keep up, use a backup pump or qualified emergency help. With power isolated and the area stable, inspect the discharge joints, check valve, basin lid gasket, and pump housing. A leak from the pump body, a damaged gasket, persistent backflow, or a leak that returns after an accessible joint is snugged needs qualified pump or plumbing service.
Work through in order
Diagnostic checks
Use only checks that match the exact appliance or system and its official guide.
-
Check 1
Stop and assess the water level before touching the pump. Look from a dry position for water reaching the receptacle, plug, float switch, control box, or other electrical connection; also note whether the pit level is rising, the pump is silent, or water is actively spraying or streaming.
Expected result: Water is near energized equipment, the level is rising quickly, the pump is not removing water, or the leak is actively worsening.
Next step: Do not stand in water or reach toward the pump or cord. From a safe, dry position, isolate power if possible; if that cannot be done safely, keep clear and obtain qualified electrical or emergency plumbing help. Use only a safe backup pump or water-control method appropriate to the situation.
Why this matters
Why: The immediate risk is electrical shock or flooding, not a routine fitting adjustment. A pump that cannot control the water level may need backup capacity or urgent service.
-
Check 2
With the pump disconnected from power and the area dry enough to inspect safely, trace the highest wet point using a dry cloth or paper towel on the accessible outside of each connection. Check the discharge pipe joint, check-valve unions or clamps, basin lid, lid gasket, cord seal, inlet connection, and the outside of the pump housing; do not remove the pump or open its motor casing.
Expected result: The first wet point is at a discharge fitting or check valve, around the lid or cord seal, at the basin or inlet, or on the pump body.
Next step: Mark the location and keep power isolated while choosing the matching branch below. Do not infer a pump-body failure just because the floor is wet; trace from the highest accessible wet point and account for water running down the pipe or basin.
Why this matters
Why: The highest wet point is a useful source distinction: external piping and gasket leaks can be separate from a failed pump seal or housing, while water from the pump body is an internal service concern.
-
Check 3
Inspect the discharge connection and check valve without dismantling a flooded or pressurized system. Look for a loose coupling, cracked pipe, wet clamp, valve body leak, or water returning toward the pit after the pump stops; check whether the pump cycles when no fixture or known inflow is adding water.
Expected result: The check valve or discharge joint is wet, water visibly returns to the pit, or the pump cycles periodically while fixtures are not in use.
Next step: Keep the pump disconnected if the leak is near electrical parts or the water level is unsafe. Have the joint, valve orientation, seal, and discharge route repaired or tested by a qualified plumber or pump technician; do not cut the pipe or remove a valve while water is rising.
Why this matters
Why: A leaking or stuck-open check valve can allow discharge water to flow back into the pit, and a leaking joint can release water during pumping. Periodic cycling can also reflect an unrelated plumbing inflow, so the valve is not proven faulty by cycling alone.
-
Check 4
Inspect the basin lid, gasket, cord seal, and visible inlet area for a shifted seal, uneven lid, cracked cover, or water entering around a penetration. If the area is dry and the manufacturer's instructions allow it, check that accessible lid fasteners are evenly seated without forcing them; do not overtighten or disturb the pump wiring.
Expected result: Water begins at the lid edge, cord seal, inlet penetration, or an uneven or damaged gasket rather than at the discharge pipe.
Next step: Leave the pump off until the seal or fitting is correctly repaired. Replace a damaged gasket or cover only with the exact model-approved component, and use qualified service if the basin, inlet, cord seal, or lid cannot be safely accessed without moving the pump.
Why this matters
Why: A lid or penetration seal can leak even when the pump and discharge line are sound. Over-tightening can deform a cover or fitting and make the seal worse.
-
Check 5
Check the outside of the pump housing and the area beneath the motor for a concentrated leak, oil-like residue, cracked housing, or water entering from the pump rather than from a pipe or lid. Keep the pump out of service and do not turn it over, open it, or attempt to reseal the motor enclosure.
Expected result: Water or residue originates from the pump housing, motor area, base, or a seam that is not an accessible pipe or lid joint.
Next step: Keep power disconnected and arrange qualified pump service or replacement assessment. If the pit is filling, use safe backup pumping and protect the electrical supply; do not reinstall or run a pump with a suspected housing or seal leak.
Why this matters
Why: The pump seal, housing, or internal assembly may be compromised. A submersible pump can also retain pressure or heat after operation, and an internal leak cannot be safely identified by external tightening.
-
Check 6
If all accessible joints appear dry, review the system while it is safely isolated: note whether the water enters from the building drain or foundation side, whether a nearby fixture is leaking, whether the discharge line drains back, and whether the basin or floor around the pit is cracked or settling. Do not excavate or remove a sealed basin to investigate.
Expected result: The water enters around the basin or inlet, follows a nearby plumbing leak, or cannot be traced to the pump assembly or accessible piping.
Next step: Keep the pump available only if it is electrically safe and not the leak source; otherwise isolate it. Arrange plumbing or sump-system service to trace the inlet, basin, and discharge route before sealing or replacing components.
Why this matters
Why: The source may be building drainage, basin installation, groundwater entry, or another plumbing leak rather than a replaceable pump part. A pump cannot correct a leaking fixture or damaged basin connection.
Use your observations
Decision map
Find the observation that best matches what you see, then follow the next safe action.
-
PATH 01Next step
What you see
Water is near the outlet, plug, float control, control box, or the rising pit cannot be controlled safely.
Do this next
Stay out of the water and do not handle the pump or cord. Isolate power only from a safe dry position and obtain qualified electrical or emergency plumbing help; use safe backup pumping if available.
-
PATH 02Next step
What you see
The leak starts at a discharge pipe joint, coupling, clamp, or check-valve body.
Do this next
Keep power isolated while the area is wet or unsafe. Have the joint or valve repaired with the model-appropriate seal and connection method, and verify that water cannot return or spray toward electrical parts.
-
PATH 03Next step
What you see
Water returns to the pit after pumping or the pump cycles with no known new inflow.
Do this next
Treat a leaking or stuck-open check valve and other plumbing inflow as separate possibilities. Arrange qualified inspection rather than repeatedly running the pump or cutting the discharge pipe.
-
PATH 04Next step
What you see
The leak is around the basin lid, cord seal, inlet penetration, or gasket.
Do this next
Keep the system off until the seal is correctly seated or replaced. Do not overtighten fasteners or move pump wiring; use model-specific instructions or qualified service for a damaged cover or basin.
-
PATH 05Next step
What you see
Water or residue comes from the pump body, base, motor area, or an internal seam.
Do this next
Do not open or run the pump. Keep it disconnected and have a qualified pump technician assess the seal, housing, and replacement decision.
-
PATH 06Next step
What you see
The leak persists after an accessible external joint is correctly repaired, or the basin or inlet is the source.
Do this next
Arrange qualified plumbing or sump-system service to trace the basin, inlet, discharge, and pump together. Do not seal over an unknown leak or assume a new pump will fix a building-side water entry.
Helpful context
Understand the symptom
A sump pit normally contains water, so the important question is where water is escaping: from a pipe joint or valve, around the basin lid, through the basin or inlet, or from the pump itself. A wet floor near a sump pump is also an electrical hazard when the cord, outlet, float control, or control box can be reached by water.
Do not lift a submersible pump by its cord, remove it while standing in water, open the motor housing, or keep running a pump that is spraying water toward electrical connections. If the leak is increasing the water level, protect the area with a safe backup pumping method and call a professional rather than experimenting with the pump.
Only after diagnosis
Potential parts
- discharge coupling or pipe seal
Consider only after inspection confirms that an accessible discharge joint or coupling is the leak source and the pipe itself is sound.
Pipe size, material, seal, clamp, and connection method must be confirmed against the installed system and local plumbing requirements. - check valve
Consider only if testing confirms backflow, a leaking valve body, or a stuck valve rather than a separate fixture or discharge-pipe leak.
Valve direction, connection type, pipe size, and pump application are system-specific; verify the model and installation instructions. - basin lid gasket or cord seal
Consider only when the wet point is the lid edge, cord penetration, or inlet seal and inspection confirms a damaged or displaced gasket.
Gasket profile, cover design, and cord-seal arrangement vary by basin; confirm exact fit and sealing requirements. - pump seal or housing assembly
Relevant only when a qualified inspection confirms a leak from the pump body, base, or internal seal; external pipe moisture alone does not justify this part.
Submersible pump internals require model-specific service and may be safer to replace as an approved assembly than to open in the field.
When checks do not resolve it
Need a professional?
Stop immediately for water near electrical connections, a rapidly rising pit, an active spray, a pump that will not control the level, a leak from the pump body or motor area, a damaged cord, or any need to stand in water. Do not remove a submersible pump while standing in water, lift it by the cord, open the motor housing, or dismantle a flooded discharge system. Use qualified plumbing or pump service, and qualified electrical help for the circuit or control hardware.
Common questions
FAQ
Where does a leaking sump pump usually need to be checked first?
Trace the highest wet point rather than assuming the pump itself is leaking. Check the discharge joint and check valve, lid and gasket, cord or inlet seal, basin, and then the outside of the pump housing with power disconnected and the area safe.
Why does water come back into the sump pit after the pump stops?
A missing, leaking, stuck, or incorrectly installed check valve can allow discharge water to return. A leaking fixture or another inflow can look similar, so the valve and the rest of the discharge route need inspection rather than repeated cycling.
Can I tighten the sump pump fitting myself?
Only an accessible external joint may be snugged when the area is electrically safe and the model instructions permit it; do not overtighten, open the pump, disturb wiring, or work while standing in water. A returning leak needs qualified service.
Is a leak from the pump housing a gasket problem?
It may involve a seal or housing, but the source cannot be identified safely by opening a submersible pump. Keep power disconnected and have a qualified pump technician assess the internal leak and whether an approved repair or replacement is appropriate.
Read the exact guide
Official sources
- FM1923Zoeller Pump Company · Zoeller 2000-series sump pump installation, discharge, check valve, electrical, and authorized service guidance
- S30-Series Builder Series Sump Pumps,Installation ManualLiberty Pumps · Liberty sump-pump troubleshooting for check valves, discharge restrictions, fittings, float operation, and service
- Notice to installer: instructions must remain with installationZoeller Pump Company · Zoeller sump system electrical precautions, pump handling, tank or fitting leaks, and service boundaries
Community feedback
Share a repair observation
Share a plain-text repair observation. Accepted observations are published automatically; this page may take a moment to update.