
On this page
Start here
Quick answer
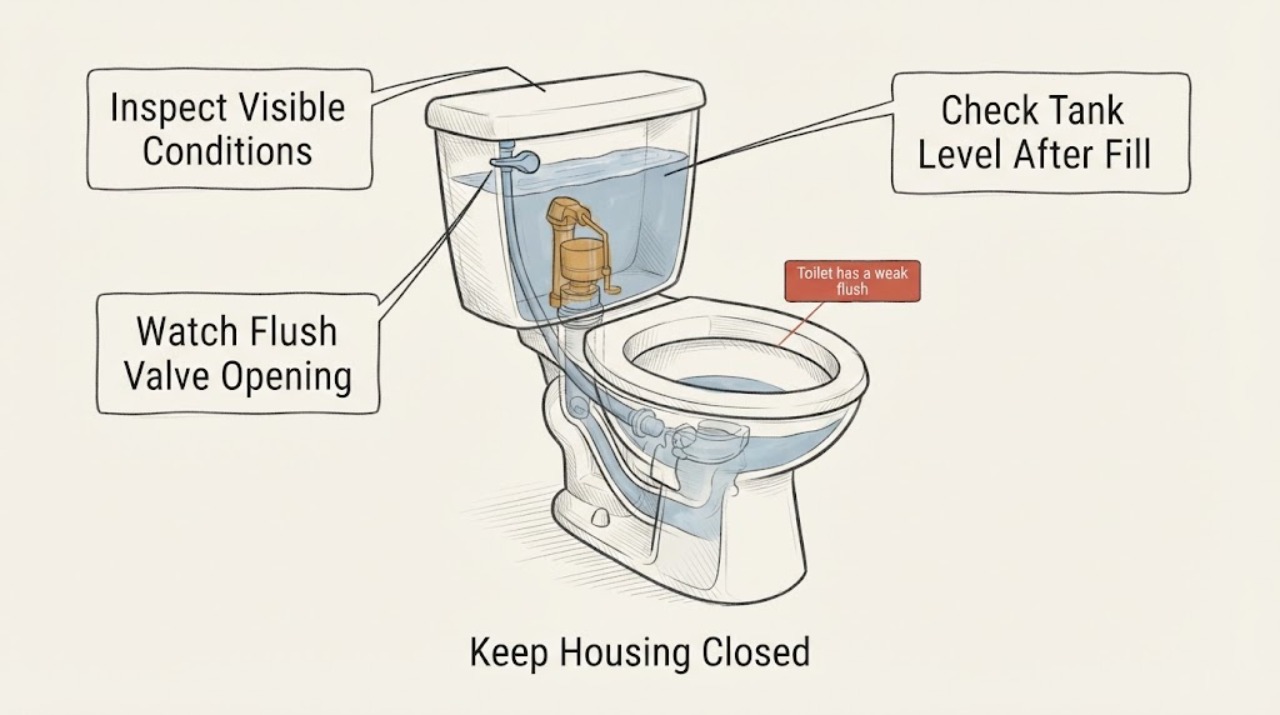
A toilet can fill to its normal level and still flush weakly when the flush valve or flapper does not stay open long enough, the refill tube is not restoring the bowl, the rim or siphon jets are restricted, or the bowl trapway has a partial obstruction. Watch one flush from a safe position: compare the tank water line with the marked line or overflow tube, note whether the valve opens fully and the bowl swirls, and observe whether the bowl rises, gurgles, or drains slowly. Do not keep flushing a bowl that rises, do not use in-tank chlorine or bleach tablets, and do not force sharp tools or unapproved chemicals into the toilet. If water threatens to overflow, there is a leak or crack, several fixtures gurgle, or the next step requires removing the tank, opening a drain, or changing hardwired or concealed plumbing, shut off the supply if it turns freely and call a qualified plumber.
Before you begin
Safety first
- Owner checks are limited to safe observation, comparing the marked water line, viewing the flush valve and refill path from above, and inspecting visible rim or siphon flow without chemicals or force. A qualified plumber must handle disassembly, tank removal, drain or vent access, trapway clearing, sewage contact, concealed leaks, cracked fixtures, and any step not covered by the exact model instructions.
Work through in order
Diagnostic checks
Use only checks that match the exact appliance or system and its official guide.
-
Check 1
Stand clear of the bowl and observe one flush without repeatedly pressing the handle. Note the starting bowl level, the strength and direction of the swirl, whether the water rises above its usual level, whether it drains promptly, and whether there is gurgling or a leak at the base.
Expected result: Record a weak swirl with normal bowl height, a bowl that rises and drains slowly, a low bowl level after the cycle, bubbling or gurgling, or water on the floor.
Next step: If the bowl rises, approaches the rim, or leaks, stop flushing and shut the supply valve only if it turns freely; otherwise keep clear and call a plumber. If the bowl remains stable, continue with the tank and valve observations.
Stop if: Stop immediately for imminent overflow, a cracked bowl or tank, water escaping at the base, sewage backup, or a ceiling or wall leak below the toilet.
Why this matters
Why: A weak swirl with no rise keeps the flush delivery, rim or siphon passages, and valve timing in consideration. A rise or slow drain makes a partial trapway or drain restriction more likely. Gurgling can involve venting or a shared drain. A base leak or crack is a stop condition, not a cue to adjust the tank.
-
Check 2
After the fill valve shuts off, remove only the tank lid if it is stable and safe to lift. Compare the resting water level with the manufacturer's marked line or the overflow-tube reference; do not assume a visually full tank is correctly set and do not bend parts by force.
Expected result: Record water at the marked level, clearly below the mark, above the overflow opening, or no safe or readable reference mark.
Next step: If the level is wrong and the fill valve has an adjustment intended for the model, follow that model's instructions; otherwise leave the setting alone and arrange service. If the level is correct, continue to the flush-valve movement and bowl-refill checks.
Stop if: Do not adjust a seized valve, remove the fill valve, or continue if the tank, bolts, porcelain, or lid is cracked or unstable.
Why this matters
Why: A level below the model's reference can reduce the water delivered during a flush even when the tank appears to fill. A level above the reference can cause overflow or running. No reliable mark means the exact manual or a plumber is needed rather than a guessed adjustment.
-
Check 3
With the lid still off and hands clear, operate the handle or button once and watch the flapper, canister, or other flush valve from above. Note whether it lifts fully, stays open through the main surge, returns smoothly, and whether a chain is tangled or has no slack when the valve is closed.
Expected result: Record a full opening, an immediate drop or early closure, a handle or button that must be held, a tangled or taut chain, a damaged seal, or a valve that binds or cannot be identified.
Next step: If the valve does not open and close as the exact fixture instructions describe, stop at visual diagnosis and identify the model for a compatible service part or plumber visit. Do not hold the valve open as a workaround or force the linkage.
Stop if: Stop if the tank hardware cracks, the valve will not close, water runs continuously, the handle or button binds, or the next step requires removing the tank or seal without the model instructions.
Why this matters
Why: Early closure, a chain or linkage problem, or a valve that does not lift fully can reduce the surge even though the fill cycle is normal. A cracked, hardened, warped, or damaged seal can leak and alter valve behavior. An unfamiliar canister or concealed mechanism needs model-specific instructions.
-
Check 4
After the flush, watch the refill stream and its final bowl level. From above, confirm that the small refill tube is positioned as the fixture instructions specify at the overflow tube and is not visibly kinked, detached, or spraying outside the tank; do not pull on fittings.
Expected result: Record a bowl that returns to its usual level, a low bowl level, a refill tube that is detached or misdirected, a tube that is kinked, or a tank that fills while the bowl remains low.
Next step: If the tube is visibly detached or misdirected and the exact instructions show a user-safe correction, follow those instructions without forcing it; otherwise arrange plumbing service. If the bowl level is low and the drain or vent clues are present, stop flushing and use the plumbing branch below.
Stop if: Stop for a split tube, uncontrolled spray, water entering the overflow continuously, a tank leak, or any correction that requires disassembling the valve.
Why this matters
Why: The tank can refill while the bowl receives too little or misdirected refill water. A low bowl level can also result from a partial trapway or vent problem, so a low bowl alone does not prove a fill-valve failure.
-
Check 5
During a stable flush, observe the openings under the bowl rim and any visible siphon-jet outlets with a mirror from a safe position. Look for a weak or uneven flow, mineral scale, or a stream that falls straight down instead of producing the normal swirl; do not scrape porcelain or pour cleaner into the passages unless the exact manufacturer instructions approve the method.
Expected result: Record an even swirl, visibly restricted or scaled openings, spray directed away from the bowl, or openings that cannot be safely seen.
Next step: If deposits or restricted flow are visible, use only the exact toilet manual's approved cleaning method, with water supply and chemical precautions observed; otherwise have a plumber clean or inspect the passages. Never use in-tank chlorine or bleach tablets and never mix cleaners.
Stop if: Stop for chemical exposure, splashing, a cracked or damaged rim, porcelain damage, or a cleaning step that calls for unapproved acid, drain chemical, force, or a sharp tool.
Why this matters
Why: Restricted rim or siphon passages can reduce the water entering the bowl and weaken the siphon even when the tank level is correct. An inaccessible passage is not evidence that the valve is bad; it means the safe cleaning method is model-dependent.
-
Check 6
With the supply left on only while the bowl is stable, compare the weak flush with the behavior of another fixture in the same bathroom. Listen for gurgling when another fixture drains and note whether the toilet water level slowly falls, remains low, or rises after a flush; do not run more test flushes if the bowl is slow to drain.
Expected result: Record a single toilet with a stable bowl, a bowl that slowly loses water, a toilet that rises or drains slowly, gurgling shared by nearby fixtures, or multiple fixtures with slow drainage.
Next step: Stop flushing when drainage is abnormal and arrange a qualified plumber to assess the trapway, drain, vent, and any safe clearing method. Do not use a chemical drain opener or push an unapproved object into the toilet.
Stop if: Stop for sewage backup, an overflowing bowl, contaminated water, a floor leak, or a condition affecting several fixtures at once.
Why this matters
Why: A slow rise or drain suggests a partial trapway or downstream drain restriction. A bowl that slowly loses water can also reflect a partial clog, vent issue, or damaged trapway. Several fixtures or gurgling together make a shared drain or vent problem more likely than a tank component.
-
Check 7
Record the toilet brand and model if safely visible, the tank-line result, flush-valve movement, refill-tube and bowl-level result, rim or jet pattern, drain behavior, recent work, and any leak or overflow warning. Keep the toilet out of service if the pattern is unsafe; do not remove the tank or attempt a hidden drain repair to gather more information.
Expected result: Confirm that the notes contain direct observations and the exact part or manual identity when available, rather than an assumed failed flapper, fill valve, jet, or trapway.
Next step: Arrange qualified plumbing service when the weak flush persists after safe checks, a part or setting is model-dependent, the fixture is leaking or cracked, or the next diagnostic step requires disassembly or drain access.
Stop if: Stop owner troubleshooting when the next step requires removing a tank, opening a drain or vent, lifting the toilet, handling sewage, using chemicals, or working around a concealed leak.
Why this matters
Why: This combination lets a plumber distinguish a delivery problem at the valve or refill path from restricted bowl passages, a partial trapway or vent issue, a damaged fixture, or a model-specific mismatch. A normal tank refill alone cannot select a replacement part.
Use your observations
Decision map
Find the observation that best matches what you see, then follow the next safe action.
-
PATH 01Next step
What you see
The tank reaches its marked level, but the valve lifts only briefly or incompletely, the handle or button must be held, the chain or linkage binds, or the bowl surge is visibly short while drainage is otherwise normal.
Do this next
Treat the flush valve, flapper, canister seal, or linkage as conditional possibilities. Follow the exact model instructions for a user-safe adjustment or have a plumber identify the compatible part; do not hold the valve open or substitute a generic seal as a test.
-
PATH 02Next step
What you see
The valve opens normally and the bowl does not rise, but rim or siphon outlets show uneven flow, scale, or a missing swirl; the bowl and nearby fixtures drain normally.
Do this next
Use only the exact fixture's approved passage-cleaning procedure or arrange plumbing service. Avoid in-tank chlorine or bleach products, mixed chemicals, abrasive tools, and force that could damage porcelain or tank components.
-
PATH 03Next step
What you see
The tank appears to refill, but the bowl remains below its normal trap-seal level or the refill tube is detached, kinked, or misdirected; there is no clear overflow or shared drain symptom.
Do this next
Verify the marked tank level and model-specific refill-tube routing. Correct only a clearly user-safe setting shown by the manual; otherwise call a plumber because low bowl water can also reflect a partial trapway, vent, or trapway damage.
-
PATH 04Next step
What you see
The bowl rises, drains slowly, loses water between flushes, bubbles, or gurgles, especially when another fixture drains, or more than one fixture has a drainage symptom.
Do this next
Stop flushing and arrange qualified plumbing diagnosis of the trapway, shared drain, and vent. Do not pour drain opener into the toilet, force an unapproved tool, or keep testing a bowl near the rim.
-
PATH 05Next step
What you see
There is a crack, water at the base, sewage backup, uncontrolled spray, a tank leak, imminent overflow, or a leak into a wall or ceiling.
Do this next
Keep clear, shut off the toilet supply only if the valve turns freely, protect people and flooring from contact, and arrange prompt qualified plumbing service. Do not restore flow to reproduce the symptom.
Helpful context
Understand the symptom
A normal refill is only one part of the flush
The fill valve refills the tank and bowl after the flush, but the flush valve, bowl passages, and trapway still have to move enough water to start and sustain the siphon. A tank that reaches its usual line can therefore coexist with a short valve opening, a poorly directed refill, blocked rim or siphon jets, or a partial obstruction. Start by observing the flush and separating a weak swirl from a bowl that rises and drains slowly; those patterns point to different next steps.
Use the toilet's own marks and instructions
Tank water lines and valve designs vary. Use the marked water line inside the tank, the overflow-tube relationship, and the exact owner's or installation instructions for the fixture. A generic replacement flapper, canister seal, fill valve, or jet-cleaning method may change the flush or cause a leak if it does not match the model. Do not choose a part merely because it looks similar.
Avoid chemicals and escalation when the bowl is not draining
Do not use in-tank chlorine or bleach products: Gerber warns that they can damage tank components and contribute to flooding. Do not mix cleaners or pour an unapproved drain chemical into a toilet. If the bowl rises, drains slowly, bubbles, or gurgles, stop repeated flushing; that is a drain, vent, or trapway clue rather than evidence that replacing a tank part will solve the problem. Keep water off and arrange service if the safe external checks do not separate the cause.
Safety boundary
Stop conditions
- Do not keep flushing if the bowl rises, drains slowly, bubbles, or approaches the rim; shut off the supply only if the valve turns freely and arrange plumbing service.
- Do not use in-tank chlorine or bleach tablets, mix cleaners, pour chemical drain opener into the toilet, or use an unapproved sharp tool or force in a passage. Follow the exact fixture instructions for any cleaning method.
- Do not remove the tank, lift the toilet, open a drain or vent, handle sewage, or replace a valve or seal without the model-specific instructions and appropriate plumbing skill.
- Stop for a crack, base leak, sewage backup, uncontrolled spray, tank leak, or water damage to a wall, ceiling, or floor; keep clear and call a qualified plumber.
Only after diagnosis
Potential parts
- flush valve flapper or canister seal
Consider this only if observation shows early closure, incomplete lift, a damaged seal, or a model-specific flush-valve fault after the drain and bowl passages are not the leading cause.
Confirm the exact toilet model, flush-valve design, seal dimensions, and manufacturer instructions before ordering or installing; visually similar parts are not proof of fit. - toilet fill valve or refill-tube assembly
Consider this only if the marked tank level is wrong, the refill tube is damaged or misrouted, or the bowl fails to return to its model-specific level after the flush.
Verify the exact tank model, valve height, connection, refill routing, and adjustment instructions; do not replace a normally functioning valve solely because the tank refills. - rim or siphon-jet passage service component
Consider service for this area only when uneven or restricted rim or siphon flow is observed and the approved cleaning method does not restore the flush.
Passage design and cleaning access vary by toilet; confirm the model procedure and avoid aftermarket chemicals, abrasive tools, or unapproved modifications. - toilet trapway or drain-clearing service
This is a service category, not a part to buy, and is relevant when the bowl rises, drains slowly, bubbles, loses water, or shares symptoms with other fixtures.
A plumber should select a fixture-appropriate clearing method after confirming the obstruction and protecting the bowl, drain, occupants, and surrounding finishes.
When checks do not resolve it
Need a professional?
Call a qualified plumber when the weak flush remains after safe observations, the bowl rises or drains slowly, several fixtures gurgle or drain poorly, the bowl level slowly falls, the tank or bowl is cracked, water leaks at the base, the valve or refill path needs disassembly, or the passages or trapway require cleaning beyond the exact fixture instructions. Stop immediately for imminent overflow, sewage backup, uncontrolled spray, water entering a wall or ceiling, or a damaged fixture.
Safety scope: Owner checks are limited to safe observation, comparing the marked water line, viewing the flush valve and refill path from above, and inspecting visible rim or siphon flow without chemicals or force. A qualified plumber must handle disassembly, tank removal, drain or vent access, trapway clearing, sewage contact, concealed leaks, cracked fixtures, and any step not covered by the exact model instructions.
Have this ready
- Provide the toilet brand and model if safely visible, tank water-line result, flush-valve movement, refill-tube and bowl-level result, rim or siphon flow pattern, whether the bowl rises or drains slowly, gurgling in nearby fixtures, recent repairs, and photos taken only from a safe, dry position.
Common questions
FAQ
Why is my toilet flush weak if the tank fills normally?
The refill cycle does not prove that the flush valve released enough water or that the bowl passages and trapway are clear. Check valve movement, the model's water line, bowl refill, rim or siphon flow, and whether the bowl rises or drains slowly.
How high should the toilet tank water be?
Use the marked water line inside the tank or the exact manufacturer's instructions. If the level is clearly below or above that reference, do not guess at a setting; use the model-specific adjustment or ask a plumber.
Can a flapper cause a weak flush even when the tank refills?
Yes. A flapper or canister can close too soon, lift incompletely, bind, or have a damaged seal. Watch its movement from above and use the exact toilet instructions before considering a compatible replacement.
Why is the bowl swirl weak but the tank level is correct?
Restricted rim or siphon-jet passages can reduce the directed flow that starts the siphon. Look for uneven or straight-down flow from a safe position, then use only the model-approved cleaning method or arrange service.
What if the toilet bowl rises after a weak flush?
Stop flushing. A rising or slow-draining bowl points toward a partial trapway or drain restriction rather than simply a low tank level. Shut off the supply only if the valve turns freely and call a plumber if the water does not promptly return to normal.
Can I use a bleach tablet or drain cleaner to fix a weak flush?
Do not use in-tank chlorine or bleach tablets, and do not pour chemical drain opener into a toilet. These can damage tank components or create a hazardous mixture. Use only the exact fixture's approved cleaning instructions or ask a plumber.
Why does the toilet tank fill but the bowl stay low?
A detached or misdirected refill tube, an incorrect tank setting, a partial trapway or vent problem, or a damaged trapway can all be involved. Observe the refill path and nearby-fixture symptoms rather than assuming the fill valve is defective.
Should I replace the fill valve first?
Not if the tank reaches its model-marked level and the bowl refills normally. First separate flush-valve timing, rim or siphon restrictions, and drain behavior. Choose a fill valve only when the observations and exact model instructions support it.
When should a plumber diagnose a weak toilet flush?
Call when the symptom persists, the bowl rises or drains slowly, several fixtures gurgle, the fixture leaks or is cracked, the cause requires tank or drain disassembly, or the approved cleaning method is not clear. Stop immediately for overflow, sewage backup, or water damage.
Read the exact guide
Official sources
- How to test toilet flapper for a leak?Gerber USA · Gerber flapper guidance used for visual linkage and seal clues; exact valve style and model instructions govern.
- How a Toilet FlushesKohler Assist · Manufacturer educational explanation of common gravity-flush mechanics; the exact toilet design and instructions govern.
- How Do I Remove and Replace The Fill Valve from a Toilet Tank?Gerber USA · Gerber installation guidance used only for high-level refill-path and model-specific-setting context; it is not a universal replacement procedure.
- Poor toilet rim washKohler Assist · Kohler guidance used to support the restricted-rim-hole diagnostic; cleaning products and methods must be checked against the exact fixture and safety instructions.
- Why is the toilet bowl water level is low?Gerber USA · Gerber support guidance used for symptom branching; bowl geometry and exact water-level specifications vary by model.
- How do I clean the toilet, toilet seat and bowl rim holes?Gerber USA · Gerber support guidance used for general symptom recognition and chemical safety; exact toilet model instructions control any cleaning work.
Community feedback
Share a repair observation
Share a plain-text repair observation. Accepted observations are published automatically; this page may take a moment to update.