
On this page
Start here
Quick answer
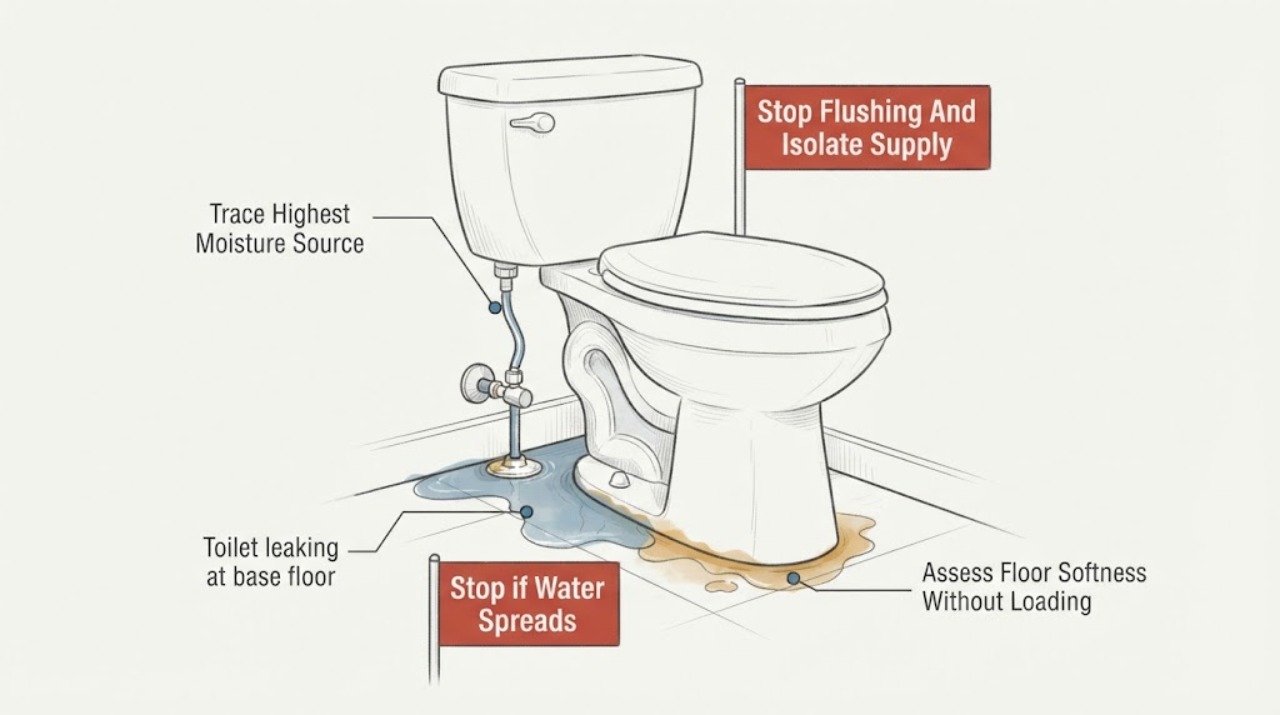
Stop flushing, close the toilet's accessible supply valve without forcing it, and keep weight off the area. Dry the visible water enough to trace where new moisture appears, but do not rock or lift the toilet, overtighten fasteners, caulk over a wet base, or pull the toilet as a first step. Water that appears at the supply connection or tank may have a local source; water that appears at the base after a flush makes the base seal, flange, or toilet itself more concerning. A soft, spongy, stained, or flexing floor suggests water may have reached porous flooring or the subfloor and needs prompt plumbing and possibly flooring or water-damage assessment. Sewage-like water, an active leak that continues with the supply closed, a cracked toilet, or a floor that feels unsafe is a stop-and-call condition.
Before you begin
Safety first
- This article supports stopping flushes, closing an accessible supply without force, observing and photographing the leak, protecting people from slips, and drying accessible clean water. A qualified plumber should disconnect or remove the toilet, inspect the seal, flange, porcelain, tank and supply connections, and determine whether the floor or subfloor needs repair; contaminated-water or structural cleanup may require a specialist.
Work through in order
Diagnostic checks
Use only checks that match the exact appliance or system and its official guide.
-
Check 1
Stop flushing and turn the toilet supply valve clockwise only if it is clearly accessible and turns freely; do not force a seized valve, disconnect the hose, or lift the tank lid unnecessarily.
Expected result: The water may stop, the valve may continue to seep, the valve may be stuck, or water may continue even though the toilet supply is closed.
Next step: Keep the toilet unused, protect the floor from slipping, and arrange plumbing service if the supply cannot be isolated or the leak continues.
Stop if: Stop for spray, a rapidly growing pool, water approaching electrical equipment, a broken valve, sewage-like water, or a bowl, tank, or toilet body crack.
Why this matters
Why: A stopped supply limits tank refill and helps contain a local toilet leak. A valve that cannot isolate the toilet or water that continues suggests an upstream supply, stored tank water, or another plumbing source that should not be explored by force.
-
Check 2
After the visible area is safely dried, look without moving the toilet for fresh moisture at the supply valve and hose, tank-to-bowl joint, tank bolts, bowl sides, and the floor line; do not flush to recreate the leak.
Expected result: Moisture may start above the base, collect at a tank or supply connection, appear only along the bowl-to-floor line, or be absent after the area dries.
Next step: Photograph the wet path and leave the toilet unused; arrange a plumber when the source is at the base, uncertain, or inaccessible without disconnecting plumbing.
Stop if: Do not tighten fittings by force, remove supply connections, scrape the base, or apply caulk to hide a wet seam.
Why this matters
Why: A source above the floor can run down and mimic a base leak. Moisture that reappears at the bowl-to-floor line, especially after prior flushing, makes the base seal, flange, or porcelain more likely. No recurrence does not prove the leak is fixed while the toilet is out of use.
-
Check 3
From a dry, stable position, visually check for swollen flooring, staining, a gap at the base, mold or musty odor, and flexing or sponginess in accessible floor outside the toilet footprint; do not rock the toilet or deliberately load the wet area.
Expected result: The floor may be firm and dry, stained but firm, soft or swollen, visibly separating, or unsafe to stand on; odor or visible mold may be present.
Next step: Keep people off an unsafe or soft area, stop the plumbing source, and arrange a plumber plus appropriate flooring or water-damage assessment before the toilet is moved or reseated.
Stop if: Stop immediately for floor collapse, exposed structural damage, extensive wet materials, sewage contamination, visible mold beyond a small surface area, or symptoms triggered by the area.
Why this matters
Why: Softness, swelling, or separation suggests water may have reached porous flooring or the subfloor and can also leave the toilet inadequately supported. Odor or mold indicates the moisture problem may be older or more extensive than the visible puddle.
-
Check 4
Without touching the water with bare hands, note whether it is clear supply or condensation water, cloudy or foul-smelling flush water, or an unknown mixture; keep towels and nearby porous materials separate from clean areas.
Expected result: The water may be clear and odorless, have a sewage odor or discoloration, contain debris, or be too uncertain to classify safely.
Next step: Keep the toilet unused, disclose the water type to the plumber, and use a qualified water-damage or remediation professional when contamination or extensive wet materials are involved.
Stop if: Do not handle sewage-like water, mold, or soaked porous materials bare-handed, and do not mix cleaners or seal contaminated or wet materials.
Why this matters
Why: Clear water can still damage flooring, but foul or unknown water adds hygiene and exposure risk and may have spread under the toilet or into porous materials. The cleanup method depends on the water source and extent.
-
Check 5
Record the toilet model if known, the time the leak occurs, whether the supply valve was closed, the highest wet point, floor condition, odor or discoloration, and photos taken before moving anything; do not remove the toilet to find a part number.
Expected result: The pattern may show a supply or tank leak, a base leak associated with flushing, a persistent leak with the supply closed, or water damage that predates the latest puddle.
Next step: Arrange qualified plumbing service and provide the photos and symptom history; ask the plumber to inspect the base seal, flange, toilet, and supporting floor before reseating the toilet.
Stop if: Do not rock, lift, pull, shim, overtighten, or reseat the toilet yourself when the floor may be soft or the leak source is at the base.
Why this matters
Why: The repair could involve a supply seal, tank gasket, base seal, floor flange, cracked porcelain, or subfloor. The visible water alone does not identify a compatible part or prove that a toilet seal is the only failure.
Use your observations
Decision map
Find the observation that best matches what you see, then follow the next safe action.
-
PATH 01Safety boundary
What you see
Fresh moisture begins at the supply valve, hose, or toilet inlet and the bowl-to-floor line stays dry while the toilet is unused.
Do this next
Keep the supply isolated if it can be done safely and arrange plumbing repair; have the connection inspected rather than tightening it repeatedly.
Why this path and its safety boundary
Why it matters: A supply connection, valve, or inlet seal is more likely than a base seal, although water can travel and obscure the starting point.
Safety stop: Stop for a spray, seized valve, damaged hose, or water that continues after the toilet supply is closed.
-
PATH 02Safety boundary
What you see
Moisture starts at the tank-to-bowl joint, tank bolts, or another upper toilet connection and runs downward.
Do this next
Keep the toilet unused and have a plumber identify the exact connection and compatible gasket or tank repair; do not overtighten porcelain hardware.
Why this path and its safety boundary
Why it matters: A tank gasket, bolt seal, flush-valve connection, or tank crack is more likely than a floor flange leak; the base may only be the collection point.
Safety stop: Stop for a cracked tank or bowl, rapid leakage, water reaching the floor structure, or an inability to isolate the supply.
-
PATH 03Safety boundary
What you see
The area is dry while unused, but water reappears at the bowl-to-floor line after the toilet has been flushed or the floor-side seam is the highest wet point.
Do this next
Do not flush again or move the toilet; arrange plumbing service to inspect the seal, flange, porcelain, and supporting floor.
Why this path and its safety boundary
Why it matters: A failed or disturbed base seal, damaged flange, cracked porcelain, or movement at the toilet base is more likely than a tank leak.
Safety stop: Stop for sewage-like water, a rocking toilet, visible floor separation, a crack, or any soft or unsafe floor.
-
PATH 04Safety boundary
What you see
The floor is soft, swollen, stained, flexing, separating, or unsafe near the toilet, or a musty odor suggests hidden moisture.
Do this next
Keep people off the area, stop the leak, and coordinate plumbing and flooring or water-damage assessment before the toilet is moved or reinstalled.
Why this path and its safety boundary
Why it matters: Water damage may extend into porous flooring or the subfloor, and the toilet may no longer have a stable support surface. A seal replacement alone may not resolve the condition.
Safety stop: Do not stand on a collapsing area, cover wet materials, caulk over the seam, or conceal damage with new flooring.
-
PATH 05Safety boundary
What you see
The water is foul-smelling, discolored, contains waste, or cannot be safely classified as supply water or condensation.
Do this next
Keep the toilet and affected floor out of use, avoid bare-hand contact, and arrange plumbing plus qualified contaminated-water cleanup when needed.
Why this path and its safety boundary
Why it matters: The leak may involve the toilet waste path and contaminated or porous materials, adding hygiene and cleanup risk beyond a simple fitting leak.
Safety stop: Do not wipe, vacuum, launder, or seal contaminated materials without appropriate protection and guidance.
-
PATH 06Safety boundary
What you see
Water continues after the toilet supply is safely closed, or the source remains active and cannot be localized without disconnecting plumbing.
Do this next
Use a safe upstream shutoff only if known and accessible, keep clear of electrical equipment, and obtain prompt plumbing service to isolate the source.
Why this path and its safety boundary
Why it matters: Stored tank water, a separate supply or drain leak, or a failure outside the accessible toilet shutoff is possible; continued water threatens the floor.
Safety stop: Stop for flooding, water near electrical equipment, a broken shutoff, ceiling or wall damage, or any need to dismantle the plumbing under pressure.
Helpful context
Understand the symptom
Control water before diagnosing the base
Do not flush again to see whether the leak returns. Close the supply stop near the toilet if it turns freely, keep the bowl and tank undisturbed, and use towels only to protect people from slipping. If the valve will not close, sprays, or leaks when moved, leave it alone and use a safe upstream shutoff or plumbing service.
Water at the base is not always a failed wax ring
Water can travel down from a supply hose, shutoff, tank connection, or condensation and collect around the base. A base leak that appears after flushing, a toilet that rocks, or sewage-like water makes the floor flange, base seal, or porcelain more concerning. Trace the highest fresh moisture you can see without moving the toilet; do not hide the source with caulk.
Soft flooring changes the boundary
A soft, swollen, stained, or flexing floor can mean the leak has affected flooring or the subfloor, not just the replaceable toilet seal. Keep people off the area, dry accessible water, and do not seal, paint, or cover wet materials. Persistent dampness, musty odor, visible mold, or a large wet area may require a water-damage or remediation assessment after the plumbing source is stopped.
The repair may require removing the toilet
A plumber may need to remove the toilet to inspect the base seal, floor flange, porcelain outlet, and subfloor. The correct seal, supply connection, flange repair, or flooring repair depends on the toilet design and what the inspection finds. A new bead of caulk or tightening visible nuts cannot confirm that a hidden seal or wet floor is repaired.
Safety boundary
Stop conditions
- Stop flushing and isolate the accessible toilet supply without forcing the valve whenever water appears at the base; keep the toilet unused until the source is known.
- Do not rock, lift, shim, pull, reseat, or overtighten the toilet when the floor may be soft; movement can disturb the base seal and a soft floor may not support the toilet safely.
- Do not caulk, paint, cover, or seal a wet or moldy floor to hide the leak. Dry accessible clean water promptly after the plumbing source is controlled and keep porous materials out of unaffected areas.
- Arrange prompt plumbing service for base-line moisture, a recurring leak after flushing, a cracked toilet, an active leak with the supply closed, or an uncertain source; add flooring or water-damage assessment when the floor is soft or wet.
- Stop handling the area for sewage-like or unknown water, extensive wet materials, visible mold, structural floor damage, a collapse hazard, or water reaching electrical equipment; use qualified cleanup or emergency help as appropriate.
Only after diagnosis
Potential parts
- toilet supply line or inlet seal
Consider this only when inspection confirms that the fresh water starts at the supply valve, hose, or toilet inlet rather than at the base seal.
Match the toilet inlet, valve connection, hose ends, seal type, and local installation requirements; do not disconnect a pressurized or damaged connection as a test. - tank-to-bowl gasket or bolt seals
Consider this only when service traces the leak to the tank-to-bowl or flush-valve connection.
Match the toilet design and tank hardware; porcelain can crack if hardware is overtightened, and this part does not repair a base seal or wet floor. - toilet base seal and mounting hardware
Consider this only when the plumber confirms a base leak and finds the flange, porcelain, and supporting floor suitable for resealing.
The seal and hardware must suit the toilet outlet, flange height, floor condition, and installation method; moving the toilet can break an existing seal. - floor flange or subfloor repair materials
Consider this only after service confirms that a damaged flange or water-affected floor supports the leak or prevents a stable reseat.
The repair depends on the existing drain, floor construction, damage extent, and local requirements; do not cover wet or weakened material before it is assessed and dried.
When checks do not resolve it
Need a professional?
Arrange qualified plumbing service before using the toilet again when water reaches the bowl-to-floor line, the leak returns after flushing, the source is uncertain, the toilet rocks, or the floor is soft, swollen, stained, or flexing. The plumber should inspect the base seal, floor flange, porcelain, tank and supply connections, and supporting floor. Use prompt water-damage or remediation help for sewage-like water, extensive wet porous materials, visible mold, or structural floor damage; treat flooding near electrical equipment or a collapsing floor as an immediate safety hazard.
Safety scope: This article supports stopping flushes, closing an accessible supply without force, observing and photographing the leak, protecting people from slips, and drying accessible clean water. A qualified plumber should disconnect or remove the toilet, inspect the seal, flange, porcelain, tank and supply connections, and determine whether the floor or subfloor needs repair; contaminated-water or structural cleanup may require a specialist.
Common questions
FAQ
Is water at the toilet base always a bad wax ring?
No. Water can run down from the supply connection, tank, or bowl and collect at the base. Trace the highest fresh moisture without flushing or moving the toilet. Water that starts at the bowl-to-floor line or returns after flushing needs a plumber to inspect the base seal, flange, porcelain, and floor.
Can I tighten the toilet bolts if the base leaks?
Do not use tightening as a first response, especially if the floor is soft. Rocking or lifting can break the seal, and overtightening can damage porcelain. Keep the toilet unused and have the base and floor inspected.
What should I do if the bathroom floor feels soft?
Keep people off the soft or swollen area, stop the leak, dry accessible clean water, and arrange plumbing plus flooring or water-damage assessment. Do not caulk or cover wet material, and do not move the toilet across an unstable floor.
Read the exact guide
Official sources
- Toilet Occasionally Leaking or RunningKohler Assist · Kohler troubleshooting guidance for one- and two-piece toilets, used to distinguish an upper tank leak from a base collection point; it does not diagnose the user's specific toilet.
- Kohler Toilet Installation GuideKohler Co. · Kohler installation guide used for general toilet base and seal boundaries; the installed toilet's model instructions and local plumbing requirements control the repair.
- A Brief Guide to Mold, Moisture and Your HomeU.S. Environmental Protection Agency · EPA residential moisture guidance used for the floor and water-damage portion of this article; it does not diagnose or repair the toilet or floor flange.
Community feedback
Share a repair observation
Share a plain-text repair observation. Accepted observations are published automatically; this page may take a moment to update.