
On this page
Start here
Quick answer
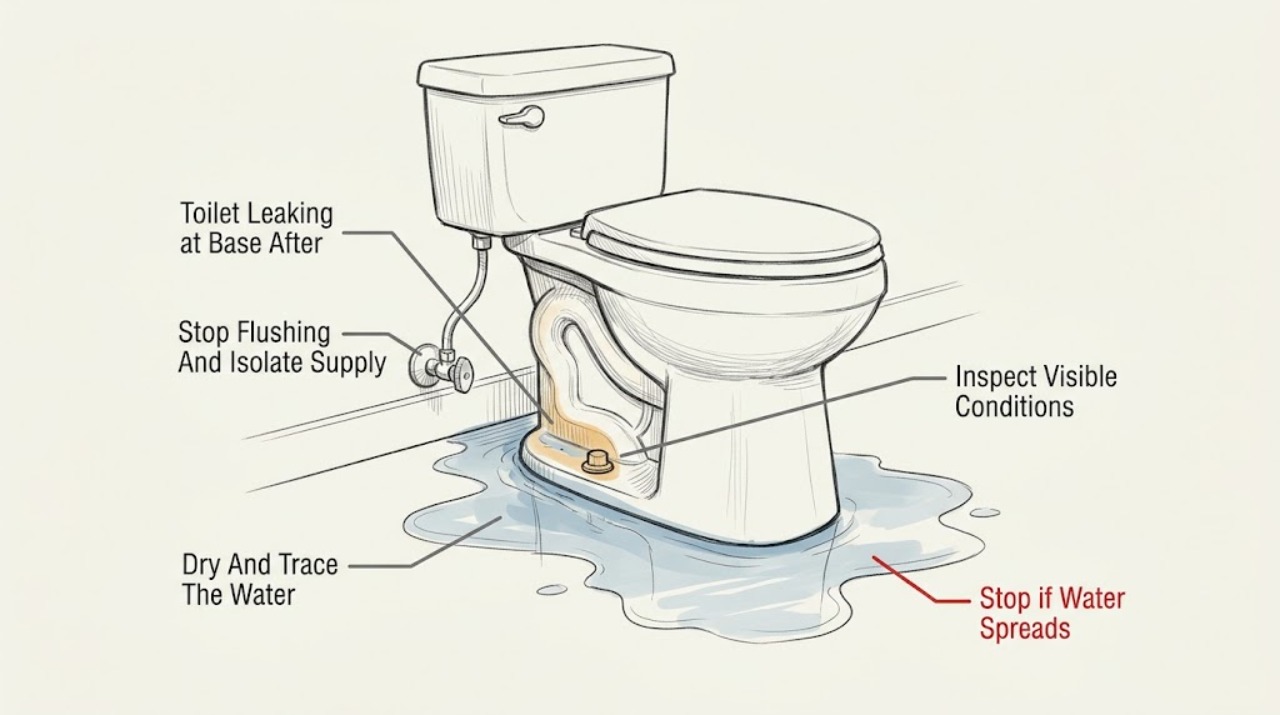
If water appears around the base of a toilet after flushing, stop using it and close the toilet supply valve. Dry the floor, then watch one controlled visual check from a safe position to see whether water starts at the supply connection, tank-to-bowl area, bowl base, or the nearby floor or drain. Water that appears only as the bowl empties and comes from the base can indicate a failed wax or rubber seal, a loose or damaged floor flange, or a rocking toilet; water running down from above can be a supply, tank, or flush-valve leak instead. Do not keep flushing, caulk around the base to hide the leak, or overtighten the mounting bolts. A confirmed base leak generally requires toilet removal and a new seal, and a cracked flange, rocking bowl, sewage odor, wet subfloor, or uncertain source needs a plumber.
Work through in order
Diagnostic checks
Use only checks that match the exact appliance or system and its official guide.
-
Check 1
Stop flushing and turn the toilet's supply valve clockwise if it is dry and safely reachable. Keep the lid closed if water is splashing, and place towels or a shallow container beside—not under unstable porcelain—to limit a safe external drip.
Expected result: The leak stops when the supply is closed, water continues to spread, the bowl or floor is cracked, or the water is near an electrical outlet or below-floor ceiling.
Next step: Keep the toilet out of service and arrange prompt plumbing service. Leave the area and isolate electricity only from a dry, safe location if water reaches electrical equipment; do not touch wet equipment.
Stop if: Do not flush again, pour water into the bowl, move a rocking toilet, or reach into contaminated water.
Why this matters
Why: A stopped flow may indicate a supply-side source, but water already in the bowl or drain can still escape during a flush. Continued spreading water, cracked porcelain, or wet electrics is a damage and safety escalation.
-
Check 2
After the area is safe, dry the exposed floor and the outside of the toilet with separate paper towels. Without flushing, inspect the supply shutoff, supply hose, tank-to-bowl joint, tank underside, bowl sides, and base perimeter for a fresh trail or drip.
Expected result: A fresh trail starts above the base, the supply connector drips, water is visible at the tank joint, the base remains dry while unused, or no source is visible.
Next step: If water comes from an exposed supply connection, keep the valve closed and arrange repair without forcing the fitting. If the trail reaches the base or the source is unclear, do not use the toilet and continue only with a plumber-directed inspection.
Stop if: Do not remove tank bolts, tighten a supply fitting aggressively, seal over a wet joint, or use a flush to reproduce an unidentified leak.
Why this matters
Why: A trail from above or a supply connector points away from the base seal. A dry toilet that becomes wet only after a flush keeps the base seal, flange, or bowl-to-floor joint in focus, but an unseen leak cannot be safely classified.
-
Check 3
If the upper connections are dry, leave the supply closed and observe the previously dried base during normal bowl settling without adding water. Note whether moisture first appears at the bowl-to-floor joint, behind the toilet, or from a nearby wall or drain.
Expected result: Moisture first appears at the bowl-to-floor joint after a flush, water comes from behind the bowl, the nearby wall or floor is already damp, or the base stays dry.
Next step: Treat a base-origin leak as a stop-use condition and call a plumber to remove the toilet, inspect the flange and floor, and renew the seal if needed. Do not attempt another flush to increase certainty.
Stop if: Do not wipe away evidence and keep using the toilet, push sealant into the joint, or lift the bowl without a plan for a new seal and safe waste-line handling.
Why this matters
Why: Water beginning at the bowl-to-floor joint after a flush is consistent with a failed base seal or flange connection. Water behind or beside the toilet can be a supply or drain connection, while dampness away from the bowl may be an unrelated plumbing leak.
-
Check 4
From a standing position, look for a gap, cracked porcelain, broken or missing bolt covers, or signs that the bowl rocks. If the bowl is stable, do not deliberately rock it; if it moves under ordinary light contact, stop and leave the mounting hardware for a plumber.
Expected result: The bowl rocks, the porcelain or flange area is cracked, bolts appear loose, the bowl is stable with no visible damage, or the floor feels soft or swollen.
Next step: Keep the toilet unused and arrange plumbing service for movement, cracks, flange damage, or floor damage. Do not tighten bolts as a trial; a plumber must protect the porcelain and verify alignment.
Stop if: Do not sit on or rock the toilet to test it, overtighten mounting nuts, pry the base, or continue if the floor is unstable.
Why this matters
Why: Movement can break the seal and a crack or damaged flange can prevent a reliable repair. A stable bowl does not rule out a compressed seal. Soft, swollen, or stained flooring suggests water damage beyond the visible puddle.
-
Check 5
With the supply closed and no flushing, inspect the tank waterline, flapper or flush-valve area, and tank-to-bowl connection from above without dismantling parts. If needed, mark the tank level and observe whether it falls while the toilet remains unused.
Expected result: The tank level falls, water moves into the bowl, the tank-to-bowl joint is wet, or the tank and upper connections remain dry while the base leak is tied to flushing.
Next step: Keep the supply closed and report the observed path to a plumber. Replace a tank component only when its exact defect is confirmed; do not use a tank repair to excuse a base-origin leak.
Stop if: Do not flush during the observation, dismantle the tank, use chemical in-tank cleaners, or assume a base leak is fixed because the tank stops running.
Why this matters
Why: A falling tank level or water entering the bowl points to a tank flush-valve or flapper leak rather than proving a base-seal failure. A wet tank-to-bowl joint is a separate seal path. Dry upper areas with a post-flush base puddle keep the floor seal or flange more likely.
-
Check 6
Record whether the water was clear or contaminated-looking, when it first appeared, the exact origin, bowl movement, visible cracks, odors, floor or ceiling damage, and whether the toilet is the only fixture affected. Photograph the dry-to-wet path from a safe position.
Expected result: The leak recurs after every flush, sewage odor or dirty water is present, another fixture backs up, the floor or ceiling is damaged, or the source remains uncertain.
Next step: Keep the toilet out of service and give the record to a plumber. Stop using nearby fixtures if wastewater backs up or the floor/ceiling is wet, and obtain urgent help for spreading contamination or structural damage.
Stop if: Do not continue flushing for a before-and-after comparison, mop contaminated water without protection, or remove the toilet without a safe sanitary plan.
Why this matters
Why: Recurring post-flush water and a sewage odor increase concern for the base seal or waste connection. Shared backups can indicate a downstream drain problem. Structural damage or uncertainty makes continued use unsafe and can hide a larger repair.
Use your observations
Decision map
Find the observation that best matches what you see, then follow the next safe action.
-
PATH 01Next step
What you see
After drying, water first reappears at the supply connector, tank-to-bowl joint, tank underside, or an upper side of the toilet rather than at the bowl-to-floor joint.
Do this next
Leave the supply closed and arrange plumbing repair. Do not tighten or dismantle fittings while the source is wet or uncertain; provide the observed trail to the technician.
Why this path and its safety boundary
Why it matters: An exposed supply or tank-path leak is more likely than a failed base seal, although water can travel before it reaches the floor.
-
PATH 02Next step
What you see
The upper toilet connections stay dry, the bowl-to-floor joint becomes wet only after a flush, and the water originates at or behind the base.
Do this next
Stop using the toilet and call a plumber to remove it safely, inspect the flange and floor, install a new seal if appropriate, and test for leaks before returning it to service.
Why this path and its safety boundary
Why it matters: A failed wax or rubber base seal, damaged floor flange, or bowl movement is more likely than a tank leak. The seal is below the installed toilet and cannot be reliably repaired from the visible perimeter.
-
PATH 03Next step
What you see
The bowl rocks, porcelain or the flange is cracked, mounting hardware is damaged, or the floor feels soft, swollen, or stained.
Do this next
Keep the toilet out of service and arrange prompt plumbing and, if needed, building repair. Do not move the toilet or attempt a cosmetic caulk repair.
Why this path and its safety boundary
Why it matters: The leak may involve failed mounting, a broken flange, cracked fixture, or water-damaged flooring. Further tightening or flushing can worsen damage and does not restore the waste seal.
-
PATH 04Next step
What you see
The tank level falls while unused, water moves into the bowl, or a tank-to-bowl component is wet while the bowl base remains dry.
Do this next
Keep the supply closed until the leak path is repaired. Have the correct tank component identified for the toilet model, and recheck the base after repair rather than assuming one cause.
Why this path and its safety boundary
Why it matters: A flapper, flush valve, fill valve, or tank-to-bowl seal is more likely than a base leak. A tank leak can still run down and collect near the base, so the dry-to-wet path matters.
-
PATH 05Next step
What you see
Dirty-looking water or sewage odor appears at the base, another fixture backs up or gurgles, water reaches a wall or ceiling, or the leak source cannot be separated safely.
Do this next
Stop using the toilet and nearby fixtures, keep people and pets away, and arrange urgent plumbing service. Isolate water or electricity only from a safe location and do not handle contaminated materials unnecessarily.
Why this path and its safety boundary
Why it matters: A waste-line, shared drain, or hidden structural issue may be involved in addition to a base seal. Contaminated water and hidden damage require sanitary controls and prompt professional assessment.
Helpful context
Understand the symptom
A post-flush puddle is not automatically a failed base seal
Water can run down the outside of a toilet from the supply hose, tank connection, or flush valve and collect at the base. If the floor is dry before the flush and becomes wet at the bowl-to-floor joint only while water leaves the bowl, the base seal, floor flange, or bowl stability becomes more likely. The first goal is to identify the path without spreading contaminated water.
Do not hide the leak with caulk or bolt force
A seal under the toilet is not repaired by caulking the visible perimeter. Extra tightening can crack porcelain or pull the bowl out of alignment, while a rocking bowl can break the seal again. Replacing a base seal normally requires lifting the toilet, checking the flange and floor, and testing the installation; that work is often best handled by a plumber, especially when water may have reached the subfloor.
Keep the toilet out of service until the source is known
A base leak after flushing may contain drain water, and repeated tests can wet flooring or a ceiling below. Close the supply valve, use a container or towels only to limit a safe external drip, and call a plumber for an active base leak, sewage odor, a rocking or cracked bowl, structural damage, or a source that cannot be separated from a tank or supply leak.
Safety boundary
Stop conditions
- Stop flushing and close the toilet supply valve when water appears at the base. Keep the toilet out of service for a confirmed or suspected base-origin leak, bowl movement, cracked porcelain, damaged flange, sewage odor, dirty water, recurring water after flushes, soft or stained flooring, water at a wall or ceiling, or an uncertain source. Do not caulk over the leak, overtighten mounting hardware, use chemical cleaners, rock or lift the toilet, or remove it without a safe plan for residual water, waste-line exposure, and a new seal. Seek urgent help for spreading contamination, structural damage, or water near electrical equipment.
Only after diagnosis
Potential parts
- toilet wax ring or rubber base seal
Consider this only after a plumber confirms that water originates at the bowl-to-floor joint and the toilet must be removed to renew the failed seal.
Confirm toilet outlet, floor-flange condition, installation height, and the seal design for the toilet and plumbing configuration; a visible puddle alone does not establish the correct seal. - toilet floor-flange repair component
Consider this only when inspection after toilet removal confirms a cracked, corroded, misaligned, or otherwise damaged floor flange that cannot support a reliable seal.
The flange repair method depends on floor construction, waste-pipe material, and local plumbing requirements; do not select a generic part before the flange is exposed. - toilet mounting hardware
Consider this only when the plumber confirms damaged or unusable mounting hardware while correcting bowl alignment and renewing the base seal.
Hardware length, shape, and flange interface vary; tightening force must protect the porcelain and maintain alignment rather than substitute for a seal. - toilet flush valve or flapper seal
Consider this only if the tank-level or bowl observation confirms a separate flush-valve or flapper leak rather than a base-origin leak.
Confirm toilet model, valve style, dimensions, and manufacturer fit information before selecting a tank component; repairing a tank leak does not repair a failed base seal.
When checks do not resolve it
Need a professional?
Call a plumber when water first appears at the bowl-to-floor joint after flushing, the leak recurs, the bowl rocks, a flange or porcelain may be cracked, the floor is soft or stained, a sewage odor is present, the source is hidden, or another drain backs up. A supply or tank leak also needs prompt repair if closing the valve does not stop it or the fitting cannot be safely isolated.
Have this ready
- Provide the toilet location, whether water appears only after flushing, the dry-to-wet path, water appearance and odor, bowl movement, visible cracks, supply-valve behavior, tank observations, photos from a safe position, and any floor, ceiling, wall, or nearby-fixture symptoms.
Common questions
FAQ
Why does water come from the toilet base only after I flush?
When the upper tank and supply connections stay dry and water first appears at the bowl-to-floor joint as the bowl empties, a failed base seal, damaged flange, or bowl movement is more likely. Water can also run down from above, so dry the toilet and trace the first wet point without repeatedly flushing.
Should I keep using a toilet that leaks at the base?
No. Close the supply valve, stop flushing, and arrange plumbing service. Continued use can wet the floor or subfloor and may spread drain water. A base-origin leak generally needs the toilet removed so the seal, flange, and floor can be inspected.
Could a tank or supply leak look like a leak at the toilet base?
Yes. Water from the supply connector, tank-to-bowl joint, or flush valve can run down the outside and collect at the base. Dry the exposed surfaces, then look for the first fresh trail with the supply closed and no flush in progress. Repair the actual source rather than sealing the visible puddle.
Can I tighten the toilet bolts to stop a base leak?
Do not use bolt tightening as a trial repair. A rocking or loose toilet may have damaged the seal, but overtightening can crack the porcelain or misalign the bowl. A plumber should inspect the seal and flange, then secure the toilet evenly as part of the repair.
Does caulking around the toilet base fix the leak?
No. Caulk can hide where water is escaping and does not renew the wax or rubber seal below the toilet. Keep the toilet out of service and have the base, flange, and floor inspected; a removed toilet normally needs a new seal.
What does a sewage odor with water at the toilet base mean?
A sewage odor or dirty-looking water raises concern that the leak is from the waste connection or a shared drain, not just clean supply water. Stop using the toilet and nearby fixtures, keep people and pets away, and call a plumber promptly rather than wiping and flushing again.
When does a toilet base leak require a plumber?
Call a plumber for any confirmed base-origin leak, recurring water after flushes, bowl movement, a cracked bowl or flange, soft or stained flooring, sewage odor, water reaching a wall or ceiling, another fixture backing up, or a source you cannot identify safely. Toilet removal and waste-seal work require sanitary controls and a new seal.
Read the exact guide
Official sources
- Leak Prevention and DetectionCentral Alabama Water · Utility guidance identifying a base leak after flushing as potentially related to the base seal or mounting bolts, recommending prompt professional repair, and describing leak containment and source checks.
- Best Management Practice #6: Toilets and UrinalsU.S. Department of Energy · Federal facilities guidance describing tank, flapper, fill-valve, and flush-valve mechanisms and a simple observation test for tank-to-bowl leakage.
- How to Install a ToiletKOHLER · Manufacturer installation guidance explaining that a floor-mounted toilet uses a floor flange, a wax ring creates the seal, movement can break the seal, overtightening can damage the bowl, and leaks should be checked after installation.
- Toilet Leak DetectionNew York City Department of Environmental Protection · Municipal guidance using tank and bowl observations to distinguish flapper, fill-valve, flush-valve, and other toilet leak paths and advising prompt repair or a licensed plumber.
Community feedback
Share a repair observation
Share a plain-text repair observation. Accepted observations are published automatically; this page may take a moment to update.