
On this page
Start here
Quick answer
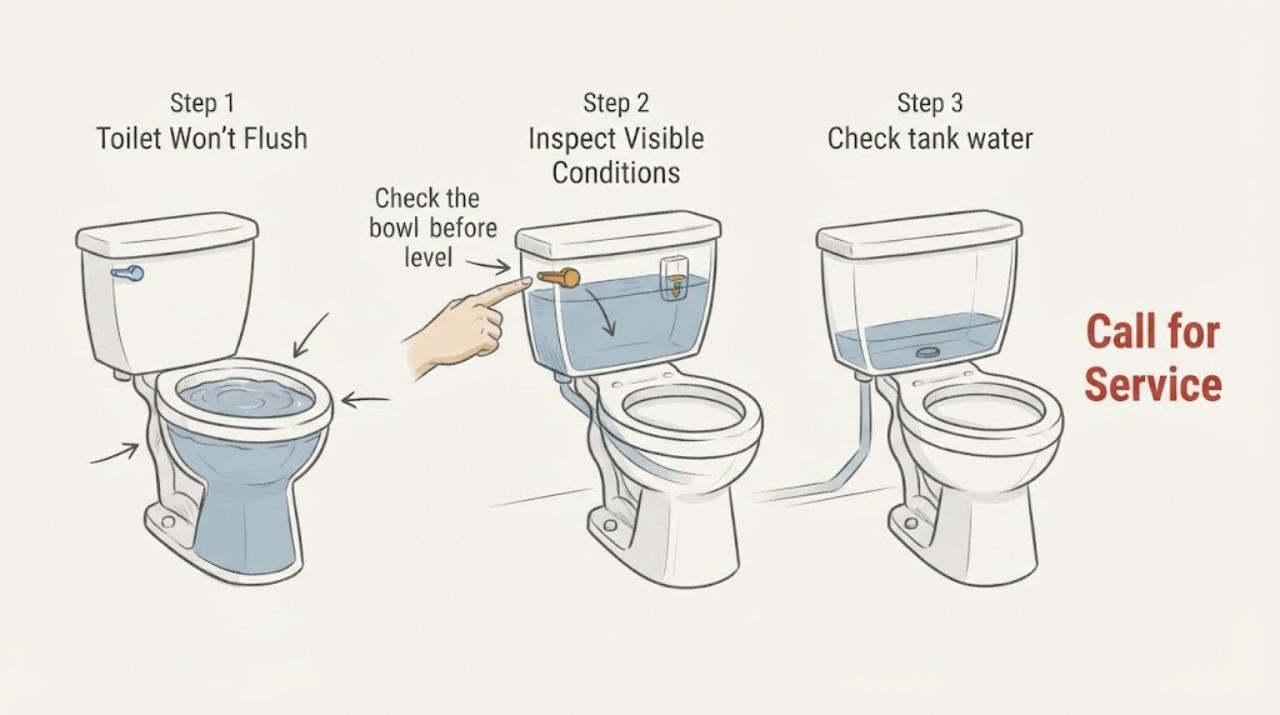
If a toilet won't flush, do not keep pressing the handle or button, especially if the bowl water is rising. First observe whether the control moves normally, whether the tank has water, whether the supply valve is open, and whether the bowl is already full or draining slowly. A loose handle or button, an empty tank, a closed supply, a misaligned internal linkage, and a blocked trapway produce different next steps. If the bowl is near the rim, stop flushing and close the accessible toilet supply valve if it moves normally. Do not use chemical drain opener, force a stuck valve, remove the toilet, or work on a hidden drain or flush valve. Clear a simple blockage only with a toilet plunger or model-appropriate auger when the water level is safe and the fixture is stable; persistent blockage, a leak, sewage backup, a broken tank, or a flushometer fault needs a qualified plumber.
Work through in order
Diagnostic checks
Use only checks that match the exact appliance or system and its official guide.
-
Check the bowl level before another flush
Look at the bowl without pressing the handle or button again. If the water is near the rim or rising, keep people away from splashes and turn the accessible toilet supply shutoff toward its closed position only if it moves normally; do not force it.
Expected result: The bowl is at its normal level, nearly full, rising, draining slowly, or overflowing onto the floor.
Next step: For a high bowl, stop flushing and use only a safe, appropriate plunger or arrange plumbing service. For a normal bowl, continue to the control and tank observations.
Stop if: Stop all fixture checks for active overflow, sewage on the floor, contaminated water, a cracked bowl, or water approaching electrical equipment; contain the area and arrange urgent plumbing or local emergency help as appropriate.
Why this matters
Why: A high or slow-draining bowl makes an obstruction or downstream drainage problem more likely and makes another flush an overflow risk. A normal bowl level allows the control and tank checks to continue.
-
Observe the handle, lever, or push button
With the bowl level safe, operate the normal handle, lever, or button once and note its movement. Do not force a stuck control or keep actuating it.
Expected result: The control has normal resistance and the tank mechanism moves, the control is loose or has no resistance, the button or rods do not engage, or the control is jammed or broken.
Next step: Record the control type and result. If the manufacturer's guide identifies an accessible linkage adjustment, follow that guide only; otherwise stop at observation and use a plumber for a broken, concealed, or flushometer control.
Stop if: Stop if the control breaks, the tank or bowl cracks, water leaks from the control area, or the tank must be dismantled to continue.
Why this matters
Why: Normal control movement with no flush shifts attention to water level, the internal seal or valve, or the drain path. A loose handle or button can mean the exposed control is not transferring movement to the flush mechanism; a jammed or broken control needs model-specific repair.
-
Check tank water and the visible supply
If the toilet has a tank, lift the lid carefully and look without reaching into the mechanism. Note whether the tank contains water and whether the visible supply shutoff below or beside it appears open. Do not remove parts or adjust the fill valve by guesswork.
Expected result: The tank is empty or low, at its normal waterline, continuously filling, or not present because the fixture is a flushometer or concealed-tank design.
Next step: For a tank toilet, use the model manual to confirm the waterline and supply-valve position, then allow normal refill. If the supply is shut, stuck, leaking, or the tank remains empty, arrange plumbing service. For a flushometer or concealed tank, use its exact manual or a plumber.
Stop if: Stop if the tank is cracked, the supply connection leaks, the water cannot be stopped, or the fixture is a commercial or concealed design requiring valve access.
Why this matters
Why: An empty or low tank can prevent a gravity flush; a continuously filling tank can indicate a fill or seal problem. Flushometer and concealed designs use different valves and cannot be diagnosed from a tank-toilet procedure.
-
Separate a no-water flush from a blocked flush
From the bowl and tank observations, compare what happens after one normal control operation: no water enters the bowl, water enters but does not leave, or water leaves slowly and the bowl level changes only after a delay.
Expected result: There is no flush-water movement, the bowl water rises without clearing, the bowl drains slowly, or the bowl clears but the tank does not refill correctly.
Next step: Choose the matching branch instead of repeating the flush. Keep the bowl below the rim before any plunger attempt; use a plumber when the obstruction may be beyond the fixture or the symptom persists.
Stop if: Stop if the water level rises toward the rim, sewage backs up into another fixture, or the toilet leaks at its base or supply connection.
Why this matters
Why: No water movement points toward the control, tank valve, supply, or flush valve. Water that rises or drains slowly points toward a trapway or waste-line obstruction. A bowl that clears but a tank that fails to refill points back to the fill or supply side.
-
Clear only a safe, fixture-level obstruction
If the bowl is stable and below the rim, use a toilet plunger with a seal suited to the bowl, or a toilet auger only when the fixture and tool instructions support it. Work gently and stop if the level rises; do not use a chemical drain opener, coat hanger, or forceful improvised tool.
Expected result: The water level falls and the toilet resumes a normal drain path, the obstruction does not move, the tool meets hard resistance, or the bowl or fixture begins to leak.
Next step: If the path clears, perform at most one cautious normal flush while watching the bowl, then stop if it behaves abnormally. If it does not clear or the symptom returns, stop flushing and arrange a plumber.
Stop if: Stop immediately for a rising bowl, sewage exposure, hard resistance, a suspected solid object, a cracked fixture, or water leaking at the base.
Why this matters
Why: Improvement after a gentle fixture-level clearing suggests a local obstruction, but a recurring or partial blockage can remain. No movement, hard resistance, a dropped object, or a leak raises the need for professional diagnosis and may indicate a deeper blockage or damaged trapway.
-
Look for a wider drainage symptom
Without opening pipes or removing the toilet, check whether a nearby sink, tub, shower, or floor drain is also slow, gurgling, backing up, or changing level when the toilet is operated.
Expected result: Only this toilet is affected, several fixtures share the symptom, another fixture backs up, or there is a sewage odor or visible wastewater.
Next step: Stop using affected fixtures and arrange plumbing service for multiple-fixture symptoms, sewage, or repeated backup. Do not open a cleanout, enter a crawlspace, or run a cable into an unknown line as a first check.
Stop if: Stop for sewage backup, contaminated water, an unknown drain opening, strong gas or sewer odor, or any need to enter a confined or wet equipment area.
Why this matters
Why: A single-fixture symptom can remain local to the toilet, while several affected fixtures or wastewater movement suggests a shared drain, vent, or sewer-side problem. Kohler notes restricted venting as one possible cause when a bowl will not evacuate, but a home observation cannot identify the hidden location.
-
Prepare the service handoff
Record the toilet type, brand and model if visible without disassembly, control behavior, tank water level, bowl level, supply-valve position, what was flushed before the failure, whether plunging changed anything, and whether other fixtures are affected.
Expected result: The issue is a control failure, low or missing tank water, a local obstruction, a recurring partial blockage, a flushometer or concealed design, or a wider drainage symptom.
Next step: Give the notes and photos to a qualified plumber, especially if the toilet remains unusable or water cannot be controlled. Do not order a valve, seal, flushometer insert, or other part until the fixture model and diagnosis are confirmed.
Stop if: Stop all DIY work if the next step requires removing the toilet, opening a concealed valve, cutting a pipe, dismantling a flushometer, or accessing a hidden drain.
Why this matters
Why: These observations narrow the professional starting point without claiming a failed part. A recurring obstruction, hidden design, or shared-drain symptom requires site-specific access and diagnosis.
Use your observations
Decision map
Find the observation that best matches what you see, then follow the next safe action.
-
PATH 01Safety boundary
What you see
The bowl is high, rising, or already overflowing.
Do this next
Stop flushing, keep the area clear, close the accessible supply valve only if it moves normally, and arrange plumbing help if the water does not settle or the fixture is contaminated.
Why this path and its safety boundary
Safety stop: Do not press the control again, use chemical drain products, remove the toilet, or touch contaminated water without appropriate protection.
-
PATH 02Safety boundary
What you see
The handle, lever, or button is loose, broken, jammed, or does not move the visible mechanism.
Do this next
Use the exact fixture manual for a simple exposed-control check; otherwise have a plumber identify the linkage or flush valve and repair it.
Why this path and its safety boundary
Safety stop: Do not force the control, remove a concealed cover, or select a replacement mechanism from appearance alone.
-
PATH 03Safety boundary
What you see
A tank toilet has no or very little water, and the supply is closed, stuck, or not delivering water.
Do this next
Confirm the model's normal waterline and supply-valve position without force. If the valve, connection, or fill mechanism is faulty, arrange plumbing service.
Why this path and its safety boundary
Safety stop: Do not dismantle the fill valve, force a stuck shutoff, or continue flushing an empty tank.
-
PATH 04Safety boundary
What you see
Water enters the bowl but rises, drains slowly, or does not evacuate.
Do this next
Treat it as a possible trapway or waste-line obstruction. With the bowl below the rim, try one appropriate toilet plunger or model-appropriate auger attempt; call a plumber if it does not clear or returns.
Why this path and its safety boundary
Safety stop: Do not use a chemical drain opener, force an unknown object, or keep flushing to push the blockage downstream.
-
PATH 05Safety boundary
What you see
The toilet clears briefly but the problem recurs, or another fixture is slow, gurgling, or backing up.
Do this next
Stop using the affected fixtures and arrange a plumber to assess the shared drain, vent, or sewer-side path.
Why this path and its safety boundary
Safety stop: Do not open an unknown cleanout, remove the toilet, or run improvised tools into hidden piping.
-
PATH 06Safety boundary
What you see
The fixture is a flushometer, concealed-tank toilet, or other design not covered by a visible residential tank procedure.
Do this next
Use the exact manufacturer or facility procedure and arrange qualified plumbing service for valve, sensor, pressure, or concealed-component diagnosis.
Why this path and its safety boundary
Safety stop: Do not open the flush valve, change pressure settings, or substitute an insert or seal without model confirmation.
-
PATH 07Safety boundary
What you see
There is a leak at the bowl, tank, base, supply connection, a cracked fixture, sewage exposure, or an uncontrolled water flow.
Do this next
Stop using the toilet, isolate water only if the shutoff is safe and operable, protect people from the area, and seek prompt plumbing service.
Why this path and its safety boundary
Safety stop: Do not tighten structural fasteners, lift the toilet, dismantle the tank, or handle contaminated water as a repair procedure.
Helpful context
Understand the symptom
Start with the bowl level
‘Won't flush’ can mean the handle or button does not activate the mechanism, the tank has no usable water, or water enters the bowl but cannot leave through the trapway or waste line. A bowl that is already high changes the priority: prevent an overflow before checking the control. A toilet that flushes weakly, fills slowly, or drains only after a delay can have a partial obstruction or a water-supply or tank problem rather than a completely failed control.
Use only fixture-level checks
Keep observations at the exposed handle or button, tank lid, bowl, and accessible supply shutoff. Do not remove the toilet, dismantle a flushometer, open a concealed valve, or pour a chemical drain product into the bowl. Kohler's guidance identifies the trapway and venting as possible causes when bowl water will not evacuate, while its installation guide separates no-flush control problems from tank and water-level problems. Those distinctions are useful for a service handoff but do not prove which hidden part has failed.
Keep non-flushable items out
Only human waste and toilet paper belong in a sewer-connected toilet. Wipes, paper towels, hygiene products, litter, chemicals, and other unsuitable items can block the fixture or downstream pipe. If the symptom followed a dropped object or an unsuitable item, do not keep flushing to force it through; record what happened and choose a safe plunger or professional assessment based on the bowl level.
When checks do not resolve it
Need a professional?
Arrange a qualified plumber when the toilet remains unable to flush after the model-approved control, water-supply, and safe obstruction checks; when a blockage returns; when multiple fixtures are affected; or when the fixture is concealed, flushometer-operated, leaking, cracked, or connected to a suspected shared drain problem. Seek prompt help for overflow, sewage backup, uncontrolled water, or contaminated water.
Have this ready
- Provide the toilet type, brand and model if visible, bowl and tank levels, handle or button behavior, supply-valve observation, exact sequence of water movement, what was flushed before the failure, plunger or auger result, other affected fixtures, and photos taken without dismantling the fixture.
Common questions
FAQ
What should I do first when a toilet won't flush?
Check the bowl level before trying again. If it is high or rising, stop flushing and close the accessible supply valve if it moves normally. If the level is safe, observe whether the handle or button moves the mechanism and whether a tank toilet has water.
Can I keep flushing if the toilet is slow?
No. Repeated flushing can turn a partial blockage into an overflow. Stop when the bowl rises or drains slowly, and use one appropriate toilet-plunger or auger attempt only while the water level is safe; arrange a plumber if it does not clear or returns.
Why does the handle move but the toilet does not flush?
The tank may be empty, the exposed linkage may not be engaging the flush valve, the flush valve or seal may have a problem, or the trapway or waste line may be obstructed. Observe the tank and bowl response rather than guessing at a replacement part.
Should I pour drain cleaner into a toilet that won't flush?
No. Do not use chemical drain opener as a toilet-flush fix. It can leave hazardous liquid in a fixture that still needs plunging or professional work. Use a suitable toilet plunger or model-appropriate auger only within a safe bowl-level boundary, or call a plumber.
When does a toilet problem need a plumber?
Call a plumber for a persistent or recurring blockage, multiple affected fixtures, a concealed or flushometer design, a leak or crack, sewage backup, an object that will not clear, or any condition that requires removing the toilet or opening hidden plumbing.
Read the exact guide
Official sources
- Best Management Practice #6: Toilets and UrinalsU.S. Department of Energy · Government facilities guidance used to distinguish tank and flushometer toilets and to support checking the manufacturer's waterline, fill valve, and compatible flush mechanism. It does not diagnose a particular residential fixture.
- Toilet Water Not Leaving BowlKohler Assist · Manufacturer support used for the limited point that a bowl that will not evacuate may have a trapway obstruction and, if that is not the cause, restricted venting may be involved. It does not identify a universal repair for every toilet.
- Home MaintenanceU.S. Environmental Protection Agency WaterSense · Government household-maintenance guidance used for the point that a toilet that will not flush is a plumbing problem to investigate with appropriate guidance or a local plumber; it is not a model-specific repair manual.
- Installation and Care GuideKohler Co. · Manufacturer guide used for the distinction between no-flush control problems, water level and supply checks, trapway or waste-line obstructions, and model-specific limits. The guide is not a universal procedure for every toilet design.
- What you can (and can't) flushCity of Portland Bureau of Environmental Services · Municipal wastewater guidance used for the warning against flushing wipes, paper towels, hygiene products, litter, chemicals, and other unsuitable materials; local sewer rules may differ in detail.
Community feedback
Share a repair observation
Share a plain-text repair observation. Accepted observations are published automatically; this page may take a moment to update.