
On this page
Start here
Quick answer
If an American Standard toilet fill valve is overflowing, close the toilet's accessible water shutoff and protect the floor first. With the tank lid off, determine whether water is entering continuously through the fill valve, the refill tube is sending water into the overflow, or a flush valve or flapper is letting water escape into the bowl and causing repeated refilling. Check only the water-level and refill-tube arrangement described for the exact toilet model. American Standard documents an accessible debris-clearing procedure for a water-control valve that shuts off but still leaks slowly, but do not remove an unknown valve top, use in-tank chemicals, overtighten porcelain hardware, or keep running a toilet that cannot shut off. Arrange qualified plumbing service for an active spill, a damaged or seized shutoff, a cracked tank, a leak outside the tank, or a valve that remains uncontrolled after model-safe checks.
Before you begin
Safety first
- This article covers water isolation, dry-surface observation, and model-specific accessible checks only. A qualified plumber must handle concealed or pressurized connections, porcelain or tank removal, seized shutoffs, persistent leaks, and any replacement requiring uncertain fitment.
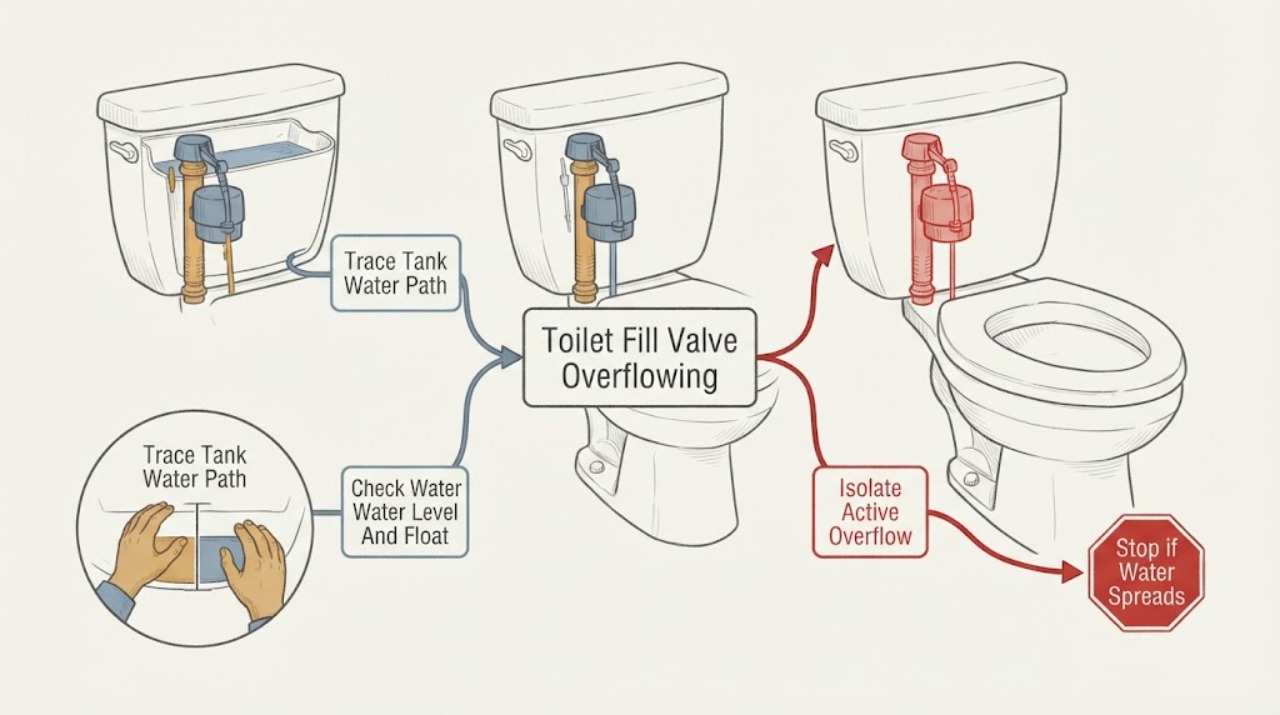
Work through in order
Diagnostic checks
Use only checks that match the exact appliance or system and its official guide.
-
Check 1
If water is actively running into the overflow or onto the floor, turn the toilet's accessible shutoff clockwise only until it stops normally; remove the tank lid carefully and keep the floor dry without touching the moving valve parts.
Expected result: The shutoff stops the flow, the shutoff will not turn or will not stop the flow, water is outside the tank, or the tank or bowl is cracked.
Next step: Keep the toilet out of service and arrange qualified plumbing service for a seized shutoff, cracked porcelain, uncontrolled water, or a spill that reaches the floor or a room below.
Stop if: Do not force the shutoff, keep flushing, or open a pressurized connection when water cannot be isolated.
Why this matters
Why: A controllable shutoff gives a safe pause for diagnosis. A seized shutoff, cracked porcelain, or water outside the tank is a plumbing and property-damage risk rather than a simple fill-valve adjustment.
-
Check 2
With the supply isolated and the tank dry on the outside, restore water only long enough to observe the tank's internal path from a safe position; note whether water comes from the fill valve, the refill tube, the overflow opening, the tank wall, or the tank-to-bowl area.
Expected result: Water enters through the fill valve and rises, the refill tube discharges incorrectly, water passes into the overflow, water runs into the bowl, or water appears at a seam or fitting.
Next step: Close the shutoff again after the observation. Follow the branch for water level, refill tube, flush seal, or an external tank leak; use a plumber if the source is hidden or the tank connection must be opened.
Stop if: Do not put hands into a moving mechanism, hold a valve open, or continue this observation if water could reach the floor or electrical equipment.
Why this matters
Why: The first visible path separates an inlet-control problem from a flush-seal loss, refill-tube routing issue, or tank connection leak. A seam or fitting leak is not corrected by changing the float setting.
-
Check 3
Compare the tank water level with the marked level or overflow reference in the exact American Standard instructions; inspect the visible float, arm, or adjustment head for contact with the tank wall, lid, chain, or other hardware without forcing it.
Expected result: The water level rises above the model reference, the float is obstructed or stuck, the adjustment is clearly accessible and identified by the manual, or the level is correct but water still enters.
Next step: Clear only an obvious external obstruction and make only the adjustment expressly shown for the model, then refill once to verify the level. Stop and call a plumber if the control is stuck, the level cannot be set, or water still reaches the overflow.
Stop if: Do not bend a float arm, force a threaded adjustment, remove an unknown valve top, or set the water above the overflow reference.
Why this matters
Why: An obstructed or misadjusted float can prevent the fill valve from closing. A correct level with continuing inlet flow makes debris, a worn seal, or an internal fill-valve fault more likely than a simple height setting.
-
Check 4
Inspect the small refill tube and its clip from above the tank. Confirm that it is attached as the model instructions show, is not kinked, and is not positioned in a way that can siphon or continuously send water into the overflow; do not pull the tube from a fitting.
Expected result: The tube is detached, kinked, submerged or routed incorrectly, the clip is missing, or the tube is correctly positioned while the fill valve itself continues to run.
Next step: Reclip or reposition the tube only as the exact model guide shows, then restore water briefly and verify that the valve shuts off. If the tube, clip, fitting, or overflow is damaged, request model-specific plumbing service.
Stop if: Do not plug the overflow, extend the tube below the tank water, or improvise a clip or connection.
Why this matters
Why: Incorrect refill-tube routing can create a continuous water path and make the tank appear to overflow or refill repeatedly. Correct routing with continued inlet flow shifts suspicion back to the fill valve or a separate flush leak.
-
Check 5
If the American Standard valve matches the manufacturer's water-control guide and the shutoff works, use the guide's debris-clearing sequence only: isolate the water, remove the valve top as shown, prevent splashing, briefly clear the valve with the documented water sequence, and reinstall the top in its locked position.
Expected result: The valve shuts off after the documented cleaning, still leaks slowly, will not turn on or off, or its top and design do not match the guide.
Next step: Restore water once and verify that the tank stops at the model reference. If the valve remains uncontrolled or the design is uncertain, close the shutoff and arrange qualified plumbing service rather than disassembling further.
Stop if: Do not perform this procedure with a seized shutoff, an unidentified valve, a cracked tank, or water that cannot be contained; do not use chemicals or force the valve top.
Why this matters
Why: Debris can keep a compatible water-control valve from sealing, but a successful cleaning does not prove that every American Standard valve uses the same design. Continued leakage points toward a seal or valve fault.
-
Check 6
After the fill valve has stopped at the correct model level, watch the bowl for a continuing trickle and watch the tank level without flushing again; keep the supply closed if the tank level falls or the toilet starts refilling by itself.
Expected result: The bowl receives water while idle, the tank level falls and the fill valve cycles, the fill valve alone keeps admitting water, or the level remains stable.
Next step: Use only the exact model instructions to inspect an accessible flush seal; replace a seal or fill valve only after the observed path and model fit are confirmed. Call a plumber for persistent cycling, an inaccessible mechanism, or any leak outside the tank.
Stop if: Do not hold the flush valve open, remove the tank, use in-tank cleaners, or replace parts based only on the refill sound.
Why this matters
Why: Water passing a flapper or flush seal can make a sound fill valve restart and may be mistaken for an overflowing fill valve. A stable tank with continued inlet flow makes the fill valve or its adjustment the stronger suspect.
Use your observations
Decision map
Find the observation that best matches what you see, then follow the next safe action.
-
PATH 01Safety boundary
What you see
Water continues to run, the shutoff is seized or ineffective, water reaches the floor, or porcelain is cracked.
Do this next
Use the home's appropriate water isolation if needed, keep the toilet out of service, contain the spill, and obtain qualified plumbing service.
Why this path and its safety boundary
Why it matters: The immediate risk is uncontrolled water and property damage; the fill-valve diagnosis is secondary.
Safety stop: Do not force the shutoff, keep flushing, or open a pressurized fitting.
-
PATH 02Safety boundary
What you see
The tank level rises above the model reference, the float is obstructed or stuck, and water enters through the fill valve until it reaches the overflow.
Do this next
Clear only an obvious external obstruction and use the exact model's adjustment guidance. If the valve still does not shut off, close the supply and call a plumber.
Why this path and its safety boundary
Why it matters: A float obstruction, incorrect adjustment, debris, worn seal, or fill-valve fault is more likely than a floor or drain leak.
Safety stop: Do not bend the float, force an adjustment, or plug the overflow.
-
PATH 03Safety boundary
What you see
The refill tube is detached, kinked, submerged, or routed into the overflow differently from the model instructions.
Do this next
Restore the tube and clip only as documented for the exact toilet, then verify one refill. Call a plumber for a damaged tube, missing fitting, or continuing overflow.
Why this path and its safety boundary
Why it matters: Incorrect refill-tube routing can create a continuous discharge path or cause repeated refilling without a failed fill-valve body.
Safety stop: Do not seal, plug, extend, or improvise the tube connection.
-
PATH 04Safety boundary
What you see
The fill valve stops at the correct level, but water trickles into the bowl, the tank level falls, and the valve cycles again while the toilet is idle.
Do this next
Follow model-specific flush-seal instructions or arrange plumbing service for a worn seal, chain or actuator issue, or inaccessible flush mechanism.
Why this path and its safety boundary
Why it matters: A leaking flapper or flush seal is more likely than an inlet valve that cannot close; the fill valve is replacing lost tank water.
Safety stop: Do not keep cycling the toilet, add tank chemicals, or remove the tank to inspect the seal without qualified help.
-
PATH 05Safety boundary
What you see
The valve matches the manufacturer's cleaning guide but continues to leak slowly after the safe debris procedure, or the valve will not shut off even with a clear, correctly positioned float.
Do this next
Close the shutoff and have a plumber identify the toilet model and replace or service the correct fill-valve assembly only after diagnosis.
Why this path and its safety boundary
Why it matters: A contaminated or worn water-control seal, failed fill valve, or model-specific valve fault is more likely than a simple water-level setting.
Safety stop: Do not keep the supply open to an uncontrolled valve or install an unverified replacement.
Helpful context
Understand the symptom
First stop the overflow and identify where water is going
An overflowing tank is different from water leaking around the base. Close the toilet shutoff if it turns normally, dry the area, and observe the tank with the lid safely removed. Water continuing into the overflow while the fill valve runs points toward the fill valve, its float or water-level setting, or the refill-tube arrangement. A valve that stops but restarts later may be replacing water lost past the flush seal.
The model determines the adjustment and cleaning method
American Standard toilets use different fill-valve and flush-valve designs. The manufacturer's support site provides model resources, and its water-control guide describes a limited debris-clearing procedure for a valve that shuts off but continues to leak slowly. Use that procedure only when the valve matches the guide and the shutoff works; otherwise stop at visual checks and arrange plumbing service.
A fill valve may be reacting to another leak
If the tank level falls when the toilet is idle, the fill valve may be doing its job by refilling after water passes the flapper or flush seal. If the tank level rises all the way to the overflow while the valve is still admitting water, the fill valve or its water-level control is the stronger suspect. Separate these observations before replacing a part.
Keep porcelain, wastewater, and pressurized connections in the service boundary
Do not use in-tank cleaners, force a stuck adjustment, disconnect the supply line, or remove the tank to diagnose an overflow. A cracked tank, water at the floor, a seized shutoff, or a leak that cannot be isolated can cause property damage and needs a qualified plumber.
Safety boundary
Stop conditions
- Close the toilet shutoff and stop using the toilet for an uncontrolled overflow, water at the floor, a cracked tank or bowl, a failed shutoff, or water that can reach a ceiling below.
- Do not force a seized shutoff, disconnect the supply line, remove the tank, or open a pressurized connection as a user check.
- Do not bend a float arm, force an unknown valve adjustment, plug the overflow, or improvise refill-tube routing.
- Do not use in-tank cleaners or chemical tablets; they can damage tank components and create leakage.
- Use the debris-clearing procedure only when the valve design matches the American Standard guide and the shutoff can isolate water; stop if the valve remains uncontrolled or the design is uncertain.
- After model-safe checks fail, arrange qualified plumbing service instead of repeatedly flushing, resetting, or replacing parts without identifying the water path.
Only after diagnosis
Potential parts
- American Standard compatible fill valve or water-control valve
Consider only when the float and refill-tube arrangement are correct and the valve still admits water or leaks after the model-safe debris check.
Confirm the exact toilet model, valve height, connection, water-level control, and manufacturer's fit information before ordering or replacing. - fill-valve seal or diaphragm
Consider only when the exact valve design supports a service seal and qualified diagnosis finds a worn or debris-damaged sealing element.
Seal shape and valve design vary; use only the documented component for the identified valve rather than assuming a universal fit. - refill tube and retaining clip
Consider only when the tube or clip is damaged or missing and the observed overflow or refill path is caused by incorrect routing.
Confirm the toilet model, tube connection, clip style, and required routing before replacing or repositioning. - flush valve seal or flapper
Consider only when the tank level falls into the bowl and the fill valve cycles to replace water lost through the flush seal.
Flush-valve design, seal profile, chain, and actuator arrangement are model-specific; verify the exact toilet documentation. - toilet supply shutoff or supply connector
Consider only when the shutoff or external supply connection is the first wet point or cannot isolate the toilet and a plumber confirms replacement is needed.
Connection type, tubing, wall fitting, and access must be inspected; do not select or replace a pressurized fitting from the symptom alone.
When checks do not resolve it
Need a professional?
Call a qualified plumber immediately for an overflow that cannot be isolated, a seized or ineffective shutoff, water at the floor or ceiling below, a cracked tank or bowl, a loose tank connection, or any leak outside the tank. Arrange service after the model-specific water-level, refill-tube, debris, and flush-seal checks if the fill valve still runs, the toilet cycles by itself, or the correct replacement cannot be identified.
Safety scope: This article covers water isolation, dry-surface observation, and model-specific accessible checks only. A qualified plumber must handle concealed or pressurized connections, porcelain or tank removal, seized shutoffs, persistent leaks, and any replacement requiring uncertain fitment.
Common questions
FAQ
Why does my American Standard toilet fill valve keep running into the overflow?
The float or water-level control may be obstructed or misadjusted, debris may keep the water-control seal from closing, or the refill tube may be routed incorrectly. A flush-seal leak can also make the valve restart after it appears to shut off. Isolate the water and identify the path before replacing a part.
Could a leaking flapper look like an overflowing fill valve?
Yes. If water trickles into the bowl while the toilet is idle, the tank level falls and the fill valve cycles to replace that loss. If the tank level rises to the overflow while the valve continues admitting water, the fill valve or its water-level control is the stronger suspect.
Can I clean an American Standard toilet fill valve myself?
American Standard publishes a limited debris-clearing procedure for a water-control valve that shuts off but continues to leak slowly. Use it only when the valve matches the guide and the shutoff can isolate water; otherwise use model resources or call a plumber.
Should the refill tube go into the overflow tube?
The refill tube's attachment and position are model-specific. Use the exact American Standard installation instructions and its retaining clip or fitting; do not plug the overflow or leave the tube submerged in a way that creates a continuous water path.
Should I use a toilet tank cleaning tablet for an overflowing valve?
No. In-tank cleaners can damage tank components and cause leakage. Isolate the water, use only the model-specific accessible check, and arrange plumbing service when the valve or seal remains uncontrolled.
When should I call a plumber for an American Standard toilet overflow?
Call immediately if water cannot be isolated, reaches the floor, the tank or bowl is cracked, or the shutoff is seized. Arrange service after safe model-specific checks fail, the toilet cycles on its own, or identifying the correct valve or seal requires disassembly or pressurized connection work.
Read the exact guide
Official sources
- How to Clean the Toilet Water Control Valve of DebrisAmerican Standard · Official American Standard guidance for a water-control or fill valve that shuts off but continues to leak slowly; the valve design and exact procedure must match the user's model.
- SupportAmerican Standard · Official American Standard support hub providing FAQ, model resources, toilet part service guidance, and support pathways; use the exact toilet model for fit and repair details.
- How To Change The Silicone Seal On A Vormax ToiletAmerican Standard · Official American Standard instructions for a specific VorMax flush-seal design; used to distinguish a flush-seal leak from a fill-valve admission problem, not as a universal repair procedure.
Community feedback
Share a repair observation
Share a plain-text repair observation. Accepted observations are published automatically; this page may take a moment to update.