
On this page
Start here
Quick answer
If a toilet seems to be overflowing around the fill valve, stop pressing the handle and close the accessible toilet supply valve if it turns normally. Then identify where the water is going: water still entering the tank and spilling into the overflow tube points toward an over-high setting or a fill valve that is not shutting off; a bowl that rises after a flush points toward a drain clog; a tank that refills on its own but stays below the overflow points more toward a flapper or other tank leak; and water on the floor points toward an external connection, tank, bowl, or seal. Do not assume the fill valve is failed until the flow path is observed, and do not use drain chemicals, force parts, or keep flushing.
Before you begin
Safety first
- This article is limited to safe observation and closing an accessible supply valve without force. A plumber should handle disassembly, valve replacement, drain clearing, concealed leaks, contaminated water, cracked porcelain, and any repair requiring force.
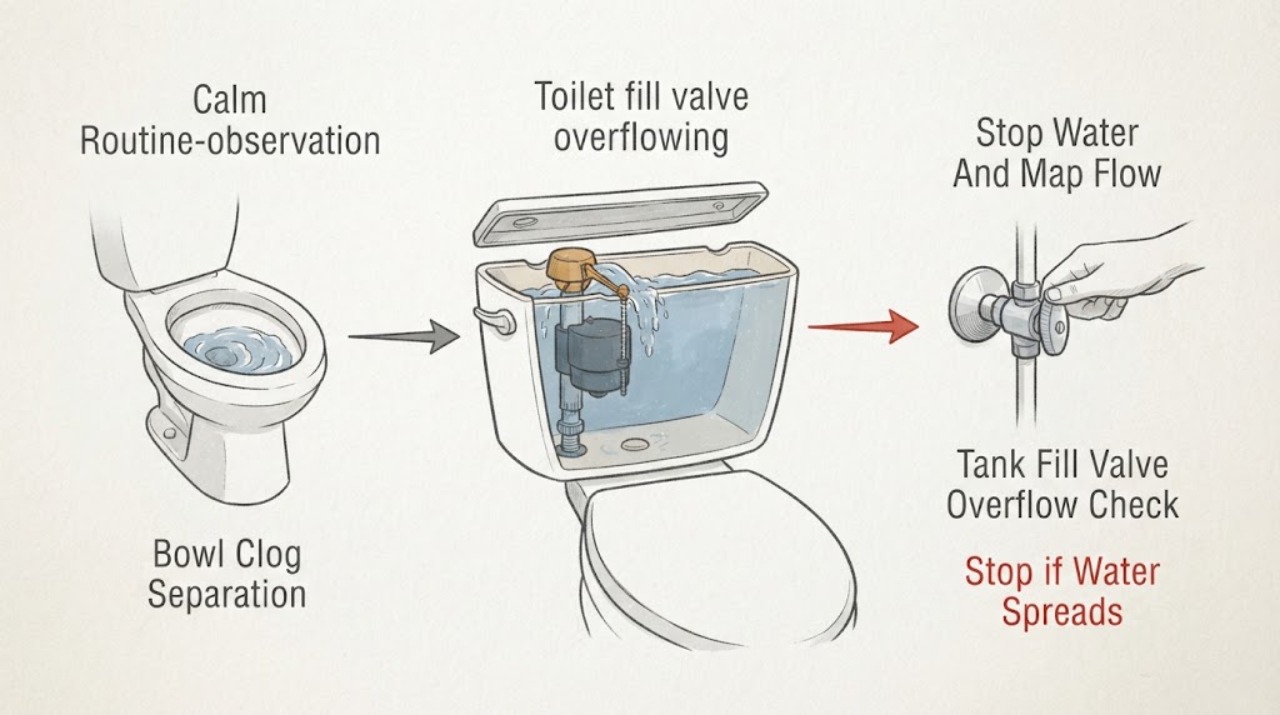
Work through in order
Diagnostic checks
Use only checks that match the exact appliance or system and its official guide.
-
Check 1
Stop pressing the flush handle. From the floor, look at the bowl rim and the area around the base; if the toilet's accessible supply valve is easy to turn, close it normally and do not force it.
Expected result: Record whether the bowl is near the rim, the tank is visibly spilling into the overflow tube, the water has stopped after supply shutoff, or water is escaping onto the floor.
Next step: Keep the supply off if water was rising or escaping, photograph the safe view, and use the matching branch below. If the supply valve will not close without force, stop and call a plumber.
Stop if: Stop for sewage contact, a bowl at risk of spilling, a cracked tank or bowl, a valve that binds, or water spreading beyond the toilet.
Why this matters
Why: A high bowl is an immediate no-flush condition and may be a drain clog. Water entering the tank or overflow is a tank-side condition. A floor puddle can be a supply, tank, bowl, or seal leak and is not proof of a failed fill valve.
-
Check 2
Only if the tank lid is already safely accessible and the bowl is not near the rim, observe the tank from above without removing or forcing components; identify the fill valve, float, refill tube, and overflow tube.
Expected result: Before the supply was closed, water was still entering the tank and reached the overflow tube; the tank level stopped below the overflow; or the path cannot be seen safely.
Next step: For the overflow result, keep the supply off and request plumbing service or a model-matched fill-valve assessment. Do not lift the float forcefully, remove the valve cap, or treat the observation as a confirmed diagnosis.
Stop if: Stop if the lid, float, valve, or refill tube is stuck, if access requires force, or if water contacts an unsafe surface.
Why this matters
Why: Water reaching the overflow while the fill valve is being supplied is the component-specific fill-valve path: an over-high adjustment, obstructed float movement, debris, or a valve that cannot shut off are possibilities. A level that stops below the overflow makes a simple fill-valve shutoff failure less likely and requires checking the bowl and other leak paths.
-
Check 3
With the supply off and without flushing, observe the bowl level and any visible surface water for several minutes; do not add water or chemical opener.
Expected result: Yes: the bowl remains unusually high or drains very slowly without another flush; no: the bowl is at its usual level and the tank-side symptom is the prominent finding.
Next step: Use the toilet auger branch only after a qualified person confirms the obstruction path and tool fit; keep the toilet out of service in the meantime. If the bowl is normal, continue with the tank and external-leak observations.
Stop if: Stop if the bowl approaches the rim, contains sewage or chemical residue, or any clearing attempt would require force or repeated flushing.
Why this matters
Why: A high or slow-draining bowl separates a likely trap or drain restriction from a fill-valve shutoff problem. A normal bowl does not establish that the fill valve is good, but it makes the immediate bowl-clog branch less likely.
-
Check 4
After the supply has been closed, listen and look without touching the mechanism; note whether the tank had been continuously refilling, cycling on by itself, or staying quiet while water appeared in the bowl.
Expected result: The tank kept admitting water until the supply was closed; the tank had stopped below the overflow but restarted periodically; or the tank stayed quiet while the bowl showed a slow ripple or water loss.
Next step: Give the sound pattern and water-level relationship to the plumber. Consider a flapper only when the diagnostic result supports a tank seal leak; do not replace the fill valve merely because the toilet runs.
Stop if: Stop if the bowl is rising, the floor is wet, or investigating the seal would require removing or forcing parts.
Why this matters
Why: Continuous admission that reaches the overflow supports a fill-valve shutoff or water-level issue. Periodic refill with a tank below the overflow is more consistent with water escaping past a flapper or flush seal. A quiet tank with bowl water movement points away from the fill valve and toward a tank-to-bowl leak or another path.
-
Check 5
From a dry, standing position, inspect only the visible floor, supply connection, tank-to-bowl junction, and bowl base for fresh water, staining, cracking, or a wet trail; do not tighten or dismantle a connection.
Expected result: Water is present at the supply connection or hose; at the tank-to-bowl joint; around the bowl base; or no external water is visible.
Next step: Keep the supply closed for any external leak and request plumbing service, especially for cracked porcelain or water entering flooring. Share the exact wet location rather than ordering a fill valve from the overflow symptom alone.
Stop if: Stop for a crack, contaminated water, soaked flooring, water near an electrical device, or a connection that needs force to move.
Why this matters
Why: A connection, tank, bowl, gasket, or floor-seal issue can create an external leak even when the tank also has a fill-valve symptom. No visible puddle does not rule out a concealed leak, but it keeps the investigation focused on the tank and bowl paths.
-
Check 6
Photograph the toilet exterior, tank markings, fill-valve shape, overflow-tube height, and the safe water-level observations without removing the tank lid or any part.
Expected result: The model or tank markings are readable; only a partial identifier is available; or no identifier can be found without disassembly.
Next step: Give the photos, whether water entered the overflow, bowl behavior, external wet location, timing, and supply-valve status to a plumber. Keep the toilet out of service until the cause is confirmed.
Stop if: Do not remove covers, pry parts, disassemble the valve, or continue inspection where water or sanitation hazards are present.
Why this matters
Why: Fill valves, flappers, overflow arrangements, and service methods vary by toilet design. A readable model improves compatibility; a partial or missing identifier means a professional should confirm fit before a part is ordered.
Use your observations
Decision map
Find the observation that best matches what you see, then follow the next safe action.
-
PATH 01Next step
What you see
Water keeps entering the tank and reaches or spills into the overflow tube before the supply is closed.
Do this next
Keep the supply off and arrange plumbing service or a model-matched fill-valve evaluation. Do not repeatedly cycle the valve or force an adjustment.
Why this path and its safety boundary
Why it matters: This is the strongest fill-valve-specific branch. The water-level setting, float movement, debris, or fill valve shutoff may be at fault, but observation alone does not identify which one.
-
PATH 02Next step
What you see
The tank spills into the overflow but the flow eventually stops and the bowl is not rising.
Do this next
Document the level relative to the overflow tube and have the setting checked according to the toilet's model instructions; replace the fill valve only if the inspection confirms it cannot be adjusted or shut off.
Why this path and its safety boundary
Why it matters: A water-level adjustment or float-position issue is more plausible than a valve that cannot shut off at all, though the exact valve design still matters.
-
PATH 03Next step
What you see
The bowl is high or drains slowly after a flush, while the tank is not continuously feeding the overflow.
Do this next
Do not flush again or add chemicals. Keep the supply closed and have a plumber assess the obstruction; a toilet auger is conditional on that diagnosis and proper fit.
Why this path and its safety boundary
Why it matters: A trap or drain restriction is a separate bowl-overflow path and is not corrected by changing the fill valve.
-
PATH 04Next step
What you see
The tank level remains below the overflow but the toilet periodically refills, hisses, or shows a ripple in the bowl.
Do this next
Have the tank seal and related flush components assessed; consider a flapper only after the leak path and model compatibility are confirmed.
Why this path and its safety boundary
Why it matters: Water may be leaking past the flapper or flush seal, causing the fill valve to refill normally. The fill valve is reacting to water loss rather than necessarily being the source.
-
PATH 05Next step
What you see
Fresh water appears at the supply connection, tank joint, bowl base, or floor, or porcelain is cracked.
Do this next
Keep the supply closed, protect people from the wet area without spreading contaminated water, and request prompt plumbing service. Do not tighten, lift, or dismantle the fixture.
Why this path and its safety boundary
Why it matters: An external plumbing or fixture leak can cause water damage and may coexist with an internal fill-valve symptom.
-
PATH 06Next step
What you see
The tank, bowl, or floor path cannot be safely observed, or the supply valve will not close normally.
Do this next
Leave the toilet unused, keep people away from contaminated water, and give a plumber the photos, timing, model clues, and access limitations.
Why this path and its safety boundary
Why it matters: The source is unresolved and continued operation could worsen water or sanitation damage.
Helpful context
Understand the symptom
First separate tank overflow from bowl overflow
The word overflowing describes the result, not the failed part. A fill valve problem is inside the tank: the valve may keep admitting water, or its setting may leave the level high enough to enter the overflow tube. A clogged bowl is a different path: the bowl level rises when water cannot leave through the trap or drain. A toilet that quietly refills while the tank stays below the overflow can instead be losing water through the flapper or another tank seal. Water on the floor is an external leak until a plumber proves otherwise.
Make the toilet safe before observing it
Do not press the flush handle again to test an already high bowl, and do not pour drain opener, bleach, or another chemical into it. If the accessible supply valve can be closed without force, turn off the toilet's water supply and leave it off. Do not force the valve, pull on the refill tube, remove a stuck component, or continue if water is spreading, porcelain is cracked, or sewage may be present.
What each visible result changes
With the water supply stopped, record whether the tank was above its normal line or spilling into the overflow tube, whether the bowl was high, and whether any water was reaching the floor. Water continuing into the overflow before shutoff is the fill-valve branch; a high bowl after a flush is the clog branch; a normal tank with intermittent hissing is a tank-seal or refill-cycle branch; and an outside puddle is an external leak branch. A part should be chosen only after that distinction and the toilet model are known.
Safety boundary
Stop conditions
- Do not flush repeatedly, force the supply valve or tank components, or disassemble the fill valve as part of these checks.
- Do not pour drain opener, bleach, or other chemicals into a toilet that may already contain another product, and do not mix cleaning chemicals.
- Keep the supply closed and call promptly for a bowl near the rim, sewage contact, spreading floor water, cracked porcelain, or a supply valve that will not close normally.
- A fill valve is not confirmed failed merely because the toilet runs; distinguish overflow-tube flow, bowl restriction, periodic tank refill, and external leakage first.
Only after diagnosis
Potential parts
- toilet fill valve
Consider only when observation confirms water continues through the tank fill path or the valve cannot shut off, and after the toilet model and valve style are confirmed.
Match the toilet model, tank arrangement, inlet connection, overflow-tube layout, and manufacturer guidance; a generic-looking valve may not fit or set the correct water level. - toilet flapper
Consider only when the tank stays below the overflow but periodically refills or the bowl shows a slow tank-to-bowl leak; that pattern is different from a fill valve that cannot shut off.
Confirm the flush-valve style, model, seal shape, chain or linkage, and water-level behavior before ordering. - toilet auger
Consider only after a plumber or clear observation supports a bowl or trap restriction; it will not repair an overflowing tank fill valve.
Use only a tool suited to the fixture and follow professional guidance; do not use it to force a suspected obstruction or after chemical opener has been added.
When checks do not resolve it
Need a professional?
Request prompt plumbing help for a tank that continues feeding the overflow, a bowl near the rim, a clogged bowl, an external puddle, cracked porcelain, sewage contact, or any leak that could damage flooring.
Safety scope: This article is limited to safe observation and closing an accessible supply valve without force. A plumber should handle disassembly, valve replacement, drain clearing, concealed leaks, contaminated water, cracked porcelain, and any repair requiring force.
Have this ready
- Provide dated photos, toilet model or tank markings, whether water entered the overflow tube, whether the bowl rose or drained slowly, whether the tank cycled below the overflow, the exact external wet location, and whether the supply valve closed normally.
Common questions
FAQ
Does water in the overflow tube prove the fill valve is broken?
No. It proves the tank water level is reaching the overflow path. A high setting or float issue can let the flow stop eventually, while a fill valve that keeps admitting water may need service or replacement. Observe whether the water stops and provide the model before choosing a part.
How can I tell a bowl clog from a fill valve problem?
A bowl clog usually shows as a high or slow-draining bowl after a flush. A fill-valve issue is tank-side: water continues entering the tank and may reach the overflow tube. Do not flush repeatedly to compare them; close the supply and call a plumber if the bowl is near the rim.
Why does the toilet refill even though the fill valve seems to stop?
If the tank remains below the overflow and periodically refills, water may be leaking past the flapper or flush seal. The fill valve may be responding normally to that water loss, so replacing it first could miss the cause.
What if the water is on the floor instead of in the bowl?
Treat floor water as an external leak until assessed. It may come from the supply connection, tank joint, bowl base, a seal, or cracked porcelain, and it can coexist with a tank overflow. Close the supply if it turns normally and request plumbing service.
Can I use drain cleaner or keep flushing to clear this?
No. Do not use drain chemicals, mix cleaning products, or repeatedly flush a toilet that is already high or overflowing. Those actions can worsen the spill or create a chemical exposure; keep the supply off and arrange appropriate plumbing help.
Read the exact guide
Official sources
- How to Fix a Running ToiletKohler · Supports separating a tank overflow or fill-valve shutoff issue from a flapper or seal issue; this article does not assume the reader has a Kohler toilet.
- Home MaintenanceU.S. Environmental Protection Agency · Supports the need to investigate toilets that run, will not flush, or continuously send water into the overflow tube, and to contact a plumber when the cause is not resolved.
- Toilet Constantly Leaking or RunningKohler Assist · Used for the diagnostic distinction between debris or water-level problems in the fill valve and a tank seal or flush mechanism leak; exact parts remain model-dependent.
- How to Clean the Toilet Water Control Valve of DebrisAmerican Standard · Supports the possibility that a fill valve can shut off but leak slowly because of debris; the article keeps valve-cap cleaning and replacement within the professional boundary rather than instructing forceful disassembly.
Community feedback
Share a repair observation
Share a plain-text repair observation. Accepted observations are published automatically; this page may take a moment to update.