
On this page
Start here
Quick answer
Stop flushing immediately. If the bowl is rising, turn the toilet's supply stop clockwise until the water stops, if it is accessible and turns normally; keep towels and gloves nearby and do not use chemical drain opener. A bowl that stays high or drains slowly points first to a blocked trapway or waste path, while water entering the tank overflow tube points to a fill-valve, float, water-level, or flush-valve problem. Once the bowl level is safely down, use a toilet flange plunger with controlled strokes and make one test flush only after the level remains stable. If the bowl will not clear, the overflow returns, the supply stop will not isolate the water, sewage reaches the floor, the porcelain is cracked, or more than one fixture is affected, stop and arrange qualified plumbing service.
Before you begin
Safety first
- This article covers ordinary-access water isolation, observation, a controlled toilet-flange-plunger attempt, and exact manufacturer-permitted tank adjustment only. A plumber should handle concealed drains or vents, toilet removal, failed isolation valves, cracked porcelain, recurring overflow, and compatible valve replacement.
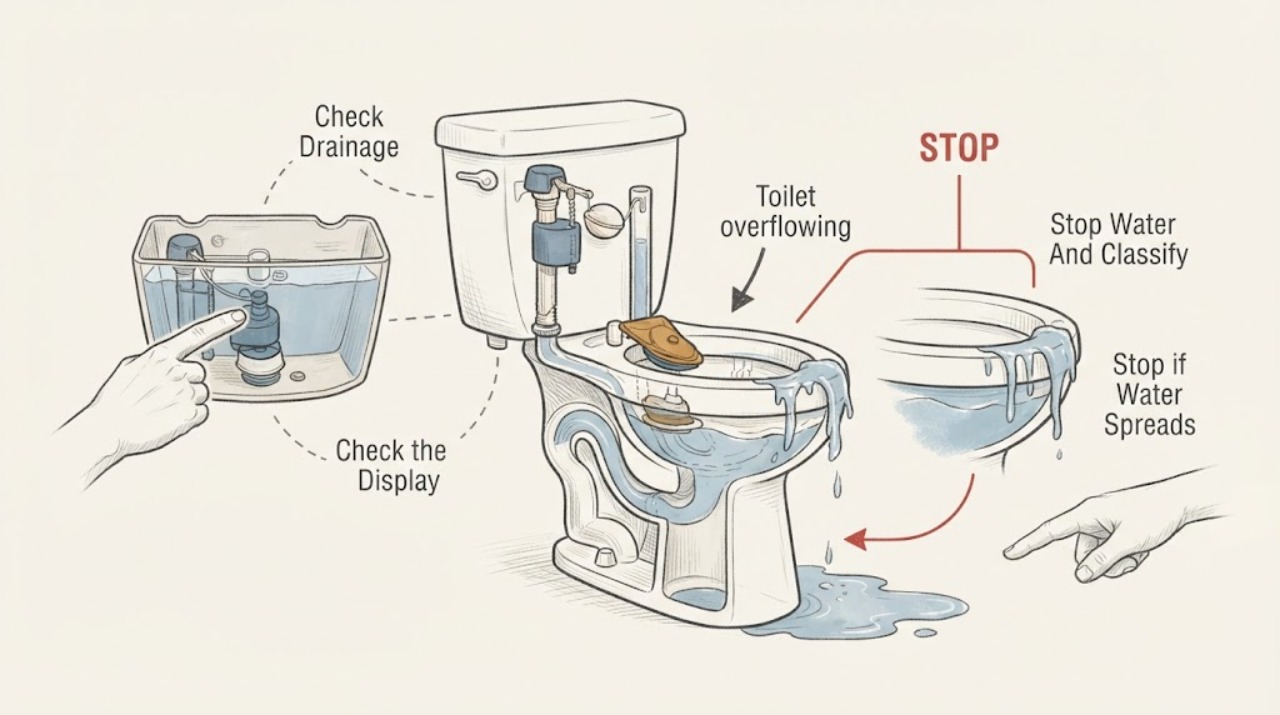
Work through in order
Diagnostic checks
Use only checks that match the exact appliance or system and its official guide.
-
Check 1
Stop flushing, keep the bowl and floor area clear, and close the toilet supply stop clockwise only if it is accessible and turns normally; do not force a seized or damaged stop.
Expected result: Note whether the bowl is rising or already high, whether water is coming from the tank overflow tube, whether water is on the floor, and whether the supply stop actually stops incoming water.
Next step: If the bowl is rising, keep the supply isolated and wait for the level to fall before plunging. If the tank is overflowing, leave the supply off and inspect only ordinary-access tank parts. If isolation fails, sewage is present, or the porcelain is cracked, arrange urgent qualified plumbing service.
Stop if: Do not force the supply stop, reach into contaminated water, remove the toilet, or continue flushing while the water path is uncontrolled.
Why this matters
Why: A rising bowl with slow drainage makes a trapway or waste-path blockage more likely. Water entering the tank overflow makes a fill, float, water-level, flush-valve, or flapper issue more likely. A stop that will not isolate water or water already reaching the floor increases the urgency.
-
Check 2
With the supply off and the bowl level safely below the rim, observe the drain without inserting objects; remove only an obvious, reachable item with gloves if it can be lifted without pushing it deeper.
Expected result: Record whether the bowl remains high, drains slowly, drains normally but the tank continues filling, or whether another nearby fixture also backs up.
Next step: For a bowl blockage, use a toilet flange plunger only after the level is controlled. For normal drainage with tank overflow, move to the tank-water check. For multiple affected fixtures, stop household testing and call a plumber.
Stop if: Do not use chemical drain opener, push a rod or object through the trapway, or dismantle the toilet to reach a concealed blockage.
Why this matters
Why: A high or slow-draining bowl supports a toilet trapway blockage. Normal bowl drainage with water still entering the tank points away from a bowl clog. Backups in more than one fixture make a shared waste or vent problem more likely.
-
Check 3
If the bowl is safely below the rim and the supply remains off, center a toilet flange plunger over the outlet and use controlled push-pull strokes that preserve the seal; stop if water splashes or the bowl rises.
Expected result: After the strokes, observe whether the water level falls and stays down, the blockage only partly improves, or the bowl remains high or backs up again.
Next step: If the level falls and remains stable, restore the supply and make one controlled test flush while watching the bowl. If it does not clear or quickly returns, stop and arrange qualified plumbing service.
Stop if: Do not keep plunging against a rising bowl, use a closet auger without confirming it is appropriate for the fixture and situation, or add chemicals before or after plunging.
Why this matters
Why: A stable drop in level supports a cleared or loosened toilet blockage. Partial or temporary improvement leaves a trapway or downstream obstruction unresolved, while a bowl that remains high indicates that more plunging is not a safe diagnosis.
-
Check 4
If the bowl drains normally but the tank water reaches or enters the vertical overflow tube, keep the supply off and inspect the visible float, fill valve, flush valve, flapper or seal, refill tube, and chain without forcing any part.
Expected result: Note whether the float is stuck, the water level is set above the overflow, the flapper or seal is held open, the chain has no slack, the refill tube is pushed below the tank water, or the fill valve continues admitting water.
Next step: Follow the exact American Standard model instructions for a permitted water-level or flush-valve adjustment; otherwise leave the supply off and provide the model and observations to a plumber. Do not substitute a valve by appearance alone.
Stop if: Do not force the float, bend the flush-valve assembly, cut the refill tube without model guidance, use in-tank chlorine products, or work on a cracked tank.
Why this matters
Why: A stuck float, incorrect water level, open flapper, taut chain, or fill-valve fault can send tank water into the overflow. A clean visible arrangement with continued filling suggests a failed or model-specific valve rather than a bowl blockage.
-
Check 5
After a successful controlled plunge or an allowed model-specific adjustment, restore the supply slowly and make one test flush while watching the bowl, tank water level, floor, and the ceiling or room below if accessible without opening anything.
Expected result: Record whether the bowl drains normally, the tank stops filling below the overflow, the supply connection stays dry, and the overflow or backup returns during or after the single test.
Next step: If the test is normal, monitor the next few uses without repeated test flushes. If any abnormal pattern returns, keep the supply off when practical and arrange qualified plumbing service with the observations and fixture identity.
Stop if: Stop immediately for another rising bowl, sewage, a leak at the supply or tank, a cracked fixture, a failed shutoff, or water damage to a wall, floor, or lower level.
Why this matters
Why: A normal drain and stable tank level support a resolved, localized problem but do not rule out recurrence. Any repeat overflow, leak, slow drain, water damage, or involvement of another fixture means the underlying fault is not resolved.
Use your observations
Decision map
Find the observation that best matches what you see, then follow the next safe action.
-
PATH 01Safety boundary
What you see
The bowl rises after flushing and drains slowly or not at all, while the tank is no longer sending water into its overflow.
Do this next
Keep the supply off, wait for the level to fall, and use a toilet flange plunger with controlled strokes. Call a plumber if the level does not clear, returns, or other fixtures are affected.
Why this path and its safety boundary
Why it matters: A blockage in the toilet trapway is more likely; if another fixture also backs up, a shared waste or vent path becomes more likely.
Safety stop: Do not flush repeatedly, add chemical drain opener, or push an object deeper into the trapway.
-
PATH 02Safety boundary
What you see
The bowl drains normally, but water continues entering the tank and runs into the vertical overflow tube.
Do this next
Keep the supply off and follow only the exact model's permitted water-level or valve procedure; arrange service if the valve continues filling or the model procedure is unavailable.
Why this path and its safety boundary
Why it matters: The likely area is the fill valve, float, tank water-level setting, flapper or seal, flush valve, or refill arrangement rather than a bowl clog.
Safety stop: Do not force or bend tank parts, use chlorine products in the tank, or install a valve without confirming compatibility.
-
PATH 03Safety boundary
What you see
The bowl level falls after controlled plunging and remains stable before one test flush.
Do this next
Restore the supply slowly and make one controlled test flush. Monitor normal uses and call a plumber if the bowl rises, drains slowly, or backs up again.
Why this path and its safety boundary
Why it matters: A localized blockage may have cleared, but temporary improvement can still leave an obstruction or damaged trapway.
Safety stop: Do not repeat flushes to prove the repair or continue plunging if the bowl starts rising again.
-
PATH 04Safety boundary
What you see
The bowl remains high, plunging produces only partial relief, or the overflow returns after the first apparently successful test.
Do this next
Keep the supply off when practical and arrange qualified plumbing diagnosis; tell the technician whether other fixtures are backing up and when the return occurs.
Why this path and its safety boundary
Why it matters: The trapway may still be blocked, an object may be lodged, or the restriction may be in a downstream waste or vent path.
Safety stop: Do not remove the toilet, open a wall, or improvise a concealed drain or vent repair.
-
PATH 05Safety boundary
What you see
The supply stop will not close, sewage is on the floor, porcelain is cracked, water is damaging the room below, or the bowl cannot be kept below the rim.
Do this next
Keep people and pets away, stop using the toilet, protect nearby materials without spreading contamination, and seek urgent qualified plumbing help; use the building's main isolation only if you know its location and safe operation.
Why this path and its safety boundary
Why it matters: The immediate water or contamination risk exceeds ordinary troubleshooting, and continued flushing could increase damage.
Safety stop: Do not force a failed valve, handle cracked porcelain, or enter contaminated water without appropriate protection and cleanup procedures.
-
PATH 06Safety boundary
What you see
A toilet overflow coincides with slow drains, gurgling, or backup at another fixture.
Do this next
Stop using connected fixtures and arrange qualified plumbing diagnosis rather than testing with more water.
Why this path and its safety boundary
Why it matters: A shared drain, waste, or vent obstruction is more likely than an isolated American Standard toilet tank adjustment.
Safety stop: Do not use chemical drain opener or attempt to access a shared drain or vent as an improvised repair.
Helpful context
Understand the symptom
Control the water before diagnosing the overflow
Do not flush again while the bowl is rising. Close the supply stop beside the toilet if it is accessible and operates normally, then remove the tank lid only if doing so does not put you in contact with contaminated water or a damaged fixture. The first distinction is whether water is escaping from the bowl because it cannot drain, or whether water in the tank is continuing into the overflow tube. Keep children and pets away, and treat water on the floor as potentially contaminated until cleaned safely.
A rising bowl usually needs a blockage check
If the bowl level rises after a flush and then drains slowly or not at all, a blockage in the toilet trapway or a downstream waste path is more likely than a simple tank adjustment. Once the water level is low enough to avoid splashing, use a toilet flange plunger that seals the outlet and work with controlled strokes. Do not add chemical drain opener, force an object through the trapway, or keep testing with repeated flushes.
A tank flowing into its overflow tube is a different fault
If the bowl is not blocked but water continues entering the tank and runs into the vertical overflow tube, inspect only the ordinary-access parts described for the installed model: the float or water-level setting, fill valve, flush valve, and flapper or seal. American Standard's Vormax instructions place the water level relative to the overflow and call for a controlled test after adjustment. A worn, dirty, or incompatible valve may need a model-specific replacement rather than repeated adjustment.
Know when the toilet is no longer a safe DIY diagnosis
Stop and arrange plumbing help if the supply stop will not close, the bowl cannot be kept below the rim, sewage reaches the floor, the porcelain or tank is cracked, several fixtures back up, or the overflow returns after a proper plunger attempt. Those patterns can involve a deeper waste or vent obstruction, a failed isolation valve, hidden water damage, or a fixture that needs compatible parts. Do not remove the toilet, open a wall, or work on a concealed drain or vent as an improvised next step.
Safety boundary
Stop conditions
- Do not repeatedly flush a rising bowl or use chemical drain opener in the toilet.
- Do not force a seized supply stop, remove the toilet, open a wall, or work on a concealed drain or vent.
- Do not handle cracked porcelain, sewage, or contaminated water beyond ordinary safe cleanup; keep people and pets away and arrange qualified help.
- Do not force, bend, cut, or substitute tank components without the exact manufacturer's procedure and compatibility information.
- Stop for a failed isolation valve, recurring overflow, multiple affected fixtures, a leak, or water damage to the floor, wall, or lower level.
Only after diagnosis
Potential parts
- toilet flapper or flush-valve seal
Consider this category only when the bowl drains normally but the tank water continues into the overflow, and inspection confirms a worn, damaged, or model-specific seal problem.
Confirm the exact American Standard toilet model and flush-valve design before ordering; do not select a seal by appearance alone. - toilet fill valve
Consider this category only when the fill valve continues admitting water or the exact model instructions identify it as the failed component after the water-level check.
Confirm the model, valve geometry, refill requirements, and manufacturer's instructions; a generic-looking valve may not be compatible. - toilet supply stop
Consider this category only when the existing isolation valve will not close or leaks during normal operation and a plumber confirms replacement is needed.
Do not force or replace a supply stop while water is uncontrolled; verify the connection and building isolation procedure with a qualified plumber.
When checks do not resolve it
Need a professional?
Arrange qualified plumbing service when the bowl will not clear with a controlled flange-plunger attempt, the overflow returns, the supply stop will not isolate water, sewage reaches the floor, porcelain or the tank is cracked, more than one fixture is affected, or a fill or flush valve needs replacement and exact compatibility is uncertain. Seek urgent help when water cannot be controlled or is damaging another room or level.
Safety scope: This article covers ordinary-access water isolation, observation, a controlled toilet-flange-plunger attempt, and exact manufacturer-permitted tank adjustment only. A plumber should handle concealed drains or vents, toilet removal, failed isolation valves, cracked porcelain, recurring overflow, and compatible valve replacement.
Common questions
FAQ
What should I do first when an American Standard toilet starts overflowing?
Stop flushing and close the toilet's supply stop if it turns normally. Then determine whether the bowl is rising because it cannot drain or whether tank water is entering the overflow tube. Do not add chemical drain opener or keep testing with flushes.
Can I plunge an overflowing toilet?
Yes, after the supply is off and the bowl level is safely below the rim. Use a toilet flange plunger with controlled strokes. If the bowl remains high, only partly improves, or backs up again, stop and arrange plumbing service.
Why is water going into the toilet tank overflow tube?
A float or water-level setting, fill valve, flapper or seal, flush valve, or refill arrangement may be allowing the tank to overfill. Follow the exact installed model's instructions; do not force or substitute tank parts by appearance alone.
When is an overflowing toilet an urgent plumbing problem?
Seek urgent help when the supply stop will not isolate water, the bowl cannot be kept below the rim, sewage reaches the floor, the porcelain is cracked, water is damaging another room or level, or another fixture is backing up too.
What if plunging fixes the overflow but it happens again?
Treat recurrence as unresolved. Keep testing to one controlled flush only, then stop using the toilet if the bowl rises or drains slowly and arrange qualified diagnosis for a remaining trapway, waste, vent, or fixture problem.
Read the exact guide
Official sources
- One-Piece ToiletKohler · Kohler one-piece toilet installation and troubleshooting guidance used for general toilet mechanics; it is not a model-specific American Standard repair instruction.
- Toilet Constantly Leaking or RunningKohler · Kohler support guidance for running or leaking toilets; use the installed American Standard model instructions for any actual adjustment or replacement.
- How To Unclog A ToiletAmerican Standard · American Standard's consumer guidance for a clogged toilet; exact installed-model instructions and local plumbing requirements control where they differ.
- How To Adjust Your Vormax Toilet Flush Valve SettingsAmerican Standard · American Standard Vormax toilet instructions; do not generalize the adjustment to another model without confirming the installed instructions.
Community feedback
Share a repair observation
Share a plain-text repair observation. Accepted observations are published automatically; this page may take a moment to update.