
On this page
Start here
Quick answer
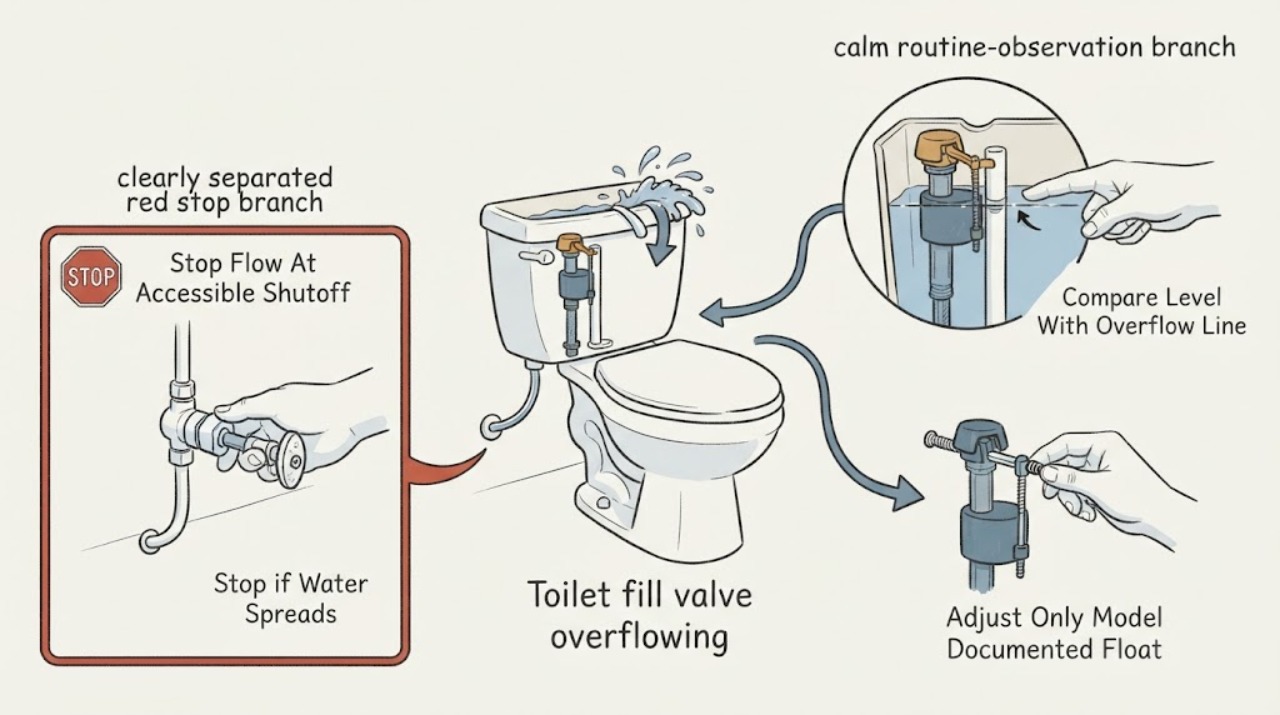
If a Glacier Bay toilet's tank water is rising above the water line and entering the overflow tube, the float may be set too high or the fill valve may not be shutting off. First prevent further overflow with the accessible fixture shutoff, then compare the tank level with the marked line. If the level is high, use only the model's fill-valve adjustment instructions; if the level is at the line but the tank still runs, check whether water is leaking past the flush seal. If the level stays at the line with the supply closed, debris or a failing fill valve is more likely. Do not remove the valve cap, disconnect the supply, or replace parts unless the model instructions and a safe shutoff are clear; persistent running, a leak, or water on the floor warrants a qualified plumber or manufacturer support.
Work through in order
Diagnostic checks
Use only checks that match the exact appliance or system and its official guide.
-
Check 1
If water is actively rising or spilling, close the toilet's accessible fixture shutoff using normal hand force, then remove the tank lid carefully and keep the lid where it cannot fall. Do not force the shutoff or pull on the supply line.
Expected result: The flow stops, slows but does not stop, or continues with the shutoff closed; the floor, wall, or supply connection may also be wet.
Next step: If the flow does not stop or water is spreading, protect nearby belongings and call a plumber promptly. If it stops, continue with the tank-level check while leaving the shutoff closed until the cause is understood.
Stop if: Stop immediately if the shutoff is seized, the connection twists, water reaches electrical equipment, or the leak cannot be contained without tools.
Why this matters
Why: A shutoff that stops flow gives a safe pause for observation. Flow that continues suggests a shutoff or supply problem and raises the risk of water damage; the toilet should not be used until a plumber addresses it.
-
Check 2
With the tank quiet, locate the water line marked on the flush-valve overflow tube and compare the resting water level with that line. Do not add markings or adjust anything while you are only identifying the level.
Expected result: The water is above the marked line and entering the overflow tube, exactly at the line, or below the line while the toilet still runs.
Next step: For an above-line level, use the exact model's adjustment procedure in the next check. For an at-line or below-line level, perform the supply-closed loss check instead of lowering the float blindly.
Stop if: Stop if the line is missing, the overflow tube or tank is cracked, the tank is unstable, or you cannot identify the model-specific water line.
Why this matters
Why: Above-line water supports a float setting that is too high or a fill valve that is failing to shut off. At-line water that falls points away from an over-high float and toward a flush-seal leak. Below-line water with continued refill can also reflect water escaping through the flush valve or a fill-valve control problem.
-
Check 3
If the water is above the marked line, identify whether your exact Glacier Bay model uses a float cup and adjustment screw or another control. Follow only that model's written adjustment direction in small changes, keeping the supply accessible and watching where the new fill stops.
Expected result: The valve shuts off at the line after the model-specific adjustment, the level remains high, or the float does not move or the valve continues to run.
Next step: If the level reaches and holds at the line, reopen the supply slowly and watch one complete refill for leaks. If it will not stop or the adjustment is unclear, leave the supply closed and arrange service rather than removing the cap or changing a part by guesswork.
Stop if: Stop if the adjustment requires removing the valve, disconnecting the water line, scraping internal parts, or using force; stop for any leak at the tank connection.
Why this matters
Why: A stable line-level stop after adjustment supports a mis-set float. No response, a sticking float, or continued flow after the documented adjustment makes debris, a worn seal, or a failed fill valve more likely.
-
Check 4
When the tank is at the marked line, close the fixture shutoff, wait about 30 minutes, and compare the water level with its starting point. Keep the tank lid off only long enough to observe and do not flush during the wait.
Expected result: The level drops, or it remains essentially unchanged with the supply closed.
Next step: If the level drops, inspect only the visible flush seal and chain for obvious misalignment or debris; if the level remains stable but the valve had been running, use the model-specific fill-valve service path. Persistent symptoms require a plumber or manufacturer support.
Stop if: Stop if the tank, flush valve, seal, or chain requires disassembly, if the bowl is rising, or if water is escaping outside the tank.
Why this matters
Why: A drop means water is leaving the tank even though the fill supply is closed, which makes a flush seal, flapper, flush-valve seal, or related leak more likely. A stable level shifts suspicion toward debris or an internal fill valve that is not closing correctly when supplied.
-
Check 5
For a level that drops, look from above at the visible flush seal, flapper or dual-flush panel, chain or push-button clearance, and refill-tube routing. Compare what you see with the exact manual; do not pull on a seal, pry the flush assembly, or push a refill tube deeper into the overflow tube.
Expected result: The flush seal is visibly held open, warped, obstructed, or misaligned; the chain or push-button is applying pressure; the refill tube is interfering; or the visible parts look normal.
Next step: Correct only an obvious external alignment described by the model instructions and recheck for a complete seal. If the seal is damaged, the flush valve is not closing, or the issue is not visible, close the supply and request service.
Stop if: Stop if the toilet uses a flapperless or dual-flush design you cannot identify, the seal is damaged, the bowl level rises, or correction would require removing the flush assembly.
Why this matters
Why: A visible closure or clearance problem can let water leak into the bowl and make the fill valve refill. A normal visible arrangement does not rule out a worn seal or internal flush-valve fault, but it makes a guessed adjustment less useful.
-
Check 6
Record the complete Glacier Bay model number, whether the toilet is single-flush or dual-flush, the tank level relative to the line, whether the level drops with the supply closed, and whether the flow is from the overflow tube, bowl, tank connection, or floor.
Expected result: The model and symptom pattern are clear, or the label cannot be found and the valve/flush design is uncertain.
Next step: Use the model information to locate the manufacturer's instructions or contact support. If the cause remains uncertain, request a plumbing service visit and describe the level and supply-closed test rather than naming a part as a certainty.
Stop if: Stop DIY work when the model cannot be identified, the shutoff or tank connection leaks, or the next diagnostic step involves internal disassembly or water-line removal.
Why this matters
Why: Glacier Bay support publishes different procedures for different model families, and the same running sound can come from a fill valve, flush seal, debris, adjustment, or supply connection. Model and symptom details prevent an incompatible part or procedure from being selected.
Use your observations
Decision map
Find the observation that best matches what you see, then follow the next safe action.
-
PATH 01Next step
What you see
The tank rests above the marked water line and water enters the overflow tube.
Do this next
Use the exact Glacier Bay model's adjustment procedure once. If the level will not hold at the line, keep the supply closed and arrange service for debris, seal, or fill-valve diagnosis.
-
PATH 02Next step
What you see
The tank is at the line, but the level falls during the supply-closed wait and the toilet refills when the supply is open.
Do this next
Check only visible seal, chain, button, and refill routing against the model instructions. A damaged or non-closing flush seal/valve needs service or a model-confirmed replacement.
-
PATH 03Next step
What you see
The tank remains at the line with the supply closed, but the fill valve had been running or would not shut off when supplied.
Do this next
Do not open the valve cap unless the exact model instructions, shutoff, and splash control are clear. Otherwise leave the supply closed and have a plumber or manufacturer support diagnose the fill valve.
-
PATH 04Next step
What you see
The fixture shutoff cannot stop the flow, the tank connection leaks, or water reaches the floor or nearby electrical equipment.
Do this next
Stop using the toilet, keep people away from the wet area, and call a qualified plumber promptly. Do not force the shutoff, remove the supply line, or continue testing while water is uncontrolled.
-
PATH 05Next step
What you see
The model number is missing or the toilet's single-flush, dual-flush, flapper, or flapperless design cannot be identified.
Do this next
Use the manufacturer's model-identification/support path or arrange a plumber visit. Keep the water supply closed if the toilet runs continuously.
Helpful context
Understand the symptom
Overflowing tank versus a toilet that keeps running
Water in the overflow tube can look like a fill-valve problem, but two different paths can create the same noise. A tank that fills above its marked line is not being stopped at the intended level. A tank that reaches the line and then slowly falls is losing water through the flush seal or another path, so the fill valve is refilling normally. Identify which pattern you have before buying a valve.
Glacier Bay designs are not all the same
Glacier Bay support separates single-flush and dual-flush toilets and lists model-specific procedures. A wire arm, float cup, adjustment screw, push-button assembly, or flush seal may not be arranged the same way on another model. Record the model number and use its instructions rather than assuming a generic adjustment direction or part fit.
Protect the room before troubleshooting
An overflowing toilet can damage flooring and the ceiling below. Keep the tank lid and floor stable, keep hands dry, and close the nearby fixture shutoff only when it is plainly accessible and operates normally by hand. Never force a stuck valve or reach into a wet area near electrical equipment. If the shutoff does not stop the flow, call for urgent plumbing help.
Safety boundary
Stop conditions
- Close the accessible fixture shutoff and stop troubleshooting if water cannot be controlled, reaches the floor or electrical equipment, or the shutoff is stuck.
- Do not force a shutoff, twist a tank connection, pull on supply tubing, or remove the valve cap without a model-specific procedure and safe isolation.
- Do not scrape, pry, puncture, or replace a flush seal or valve based only on the sound of running water.
- Do not use in-tank chemical cleaners as a substitute for diagnosis; they can damage tank fittings and create leaks.
- Stop if the tank or porcelain is cracked, unstable, or leaking, or if the bowl is rising toward a backup.
Only after diagnosis
Potential parts
- toilet fill valve
Consider only when the tank is at the marked line or remains high after the documented adjustment, the flush side is not losing water, and service confirms the valve is not closing or has an internal fault.
Confirm the complete toilet model, valve style, tank connection, and manufacturer's fit information; Glacier Bay designs vary. - fill-valve seal or internal service component
Consider only when model-specific instructions identify a replaceable internal seal or debris-related service path and the valve will not shut off despite a correct float setting.
Do not assume a seal is separately replaceable or interchangeable; confirm the exact model instructions before ordering. - flush valve or flush seal
Consider only when the tank level is at the line but falls with the supply closed, or when a visible flush seal is damaged or cannot close.
Single-flush, dual-flush, flapper, and flapperless designs use different components; confirm model and design before selecting a part. - toilet supply shutoff valve
Consider only when the accessible fixture shutoff is seized, does not stop flow, or leaks during a plumber's diagnosis.
Water-line connections and local plumbing conditions affect fit; this is a plumbing repair best confirmed by a qualified professional.
When checks do not resolve it
Need a professional?
Call a qualified plumber or manufacturer support when the shutoff cannot stop the flow, the tank level remains above the line after the model-specific adjustment, the tank loses water with the supply closed, the fill valve continues to run at the correct level, the tank connection leaks, or the next step requires removing a valve, flush assembly, or water line. Provide the full model number, flush design, water-line comparison, supply-closed result, and leak location.
Have this ready
- Complete Glacier Bay model number; single-flush or dual-flush design; tank level relative to the marked line; whether the level falls with the supply closed; whether water enters the overflow tube, bowl, tank connection, or floor; and whether the shutoff works.
Common questions
FAQ
Why is my Glacier Bay toilet overflowing into the overflow tube?
If the tank is above the marked line, the float may be set too high or the fill valve may not be closing. If the water is already at the line but the toilet keeps refilling, water may be leaking through the flush seal instead. Compare the tank level and perform the supply-closed observation before selecting a part.
How do I adjust a Glacier Bay toilet fill valve?
The adjustment depends on the exact Glacier Bay model and its float design. Use the model's instructions and make only small documented adjustments while watching the level against the marked line. If the valve does not respond or the procedure is unclear, leave the supply closed and call a plumber rather than removing the cap or forcing the float.
What does it mean if the tank is at the water line but the toilet still runs?
Close the fixture shutoff and watch whether the tank level falls. A falling level indicates water is escaping through the flush side, such as a seal or flush-valve problem. If the level remains stable but the supplied valve would not stop, debris or an internal fill-valve fault becomes more likely.
Can a dirty fill valve cause a Glacier Bay toilet to overflow?
Glacier Bay support says debris can prevent the fill valve from opening or closing properly on applicable models. Do not open or flush the valve unless the exact model procedure is clear and the water supply is safely isolated; otherwise arrange service.
Should I replace the fill valve or the flapper first?
Do not choose by sound alone. A tank that stays above the line points toward the float or fill valve, while a tank at the line that loses water with the supply closed points toward the flush seal or flush valve. Identify the pattern first and confirm the model before ordering anything.
When is an overflowing Glacier Bay toilet an emergency?
Treat it as urgent when the fixture shutoff cannot stop the flow, water is reaching the floor or a ceiling below, the tank or supply connection is cracked, or the bowl is rising toward a backup. Stop using the toilet and call a qualified plumber; do not force a stuck shutoff or disconnect the supply line.
Read the exact guide
Official sources
- What should I do if my Glacier Bay Made in Mexico Dual Flush Toilet 215-583 is having a flushing performance issue?Globe Union · Glacier Bay dual-flush toilet water line, refill-tube clearance, flush-valve seal, and model-specific support
- Troubleshooting, Help and SupportNiagara Conservation Corporation · Glacier Bay toilet support model families, fill-valve-running topics, and manufacturer support routing
- What should I do if the water continuously runs or ghost flushes for my Single Flush Glacier Bay Made in Mexico Toilets 340-995 or 686-826?Globe Union · Glacier Bay single-flush toilet water level, fill-valve adjustment, flush-seal leakage, debris, and continuous-running support
Community feedback
Share a repair observation
Share a plain-text repair observation. Accepted observations are published automatically; this page may take a moment to update.