
On this page
Start here
Quick answer
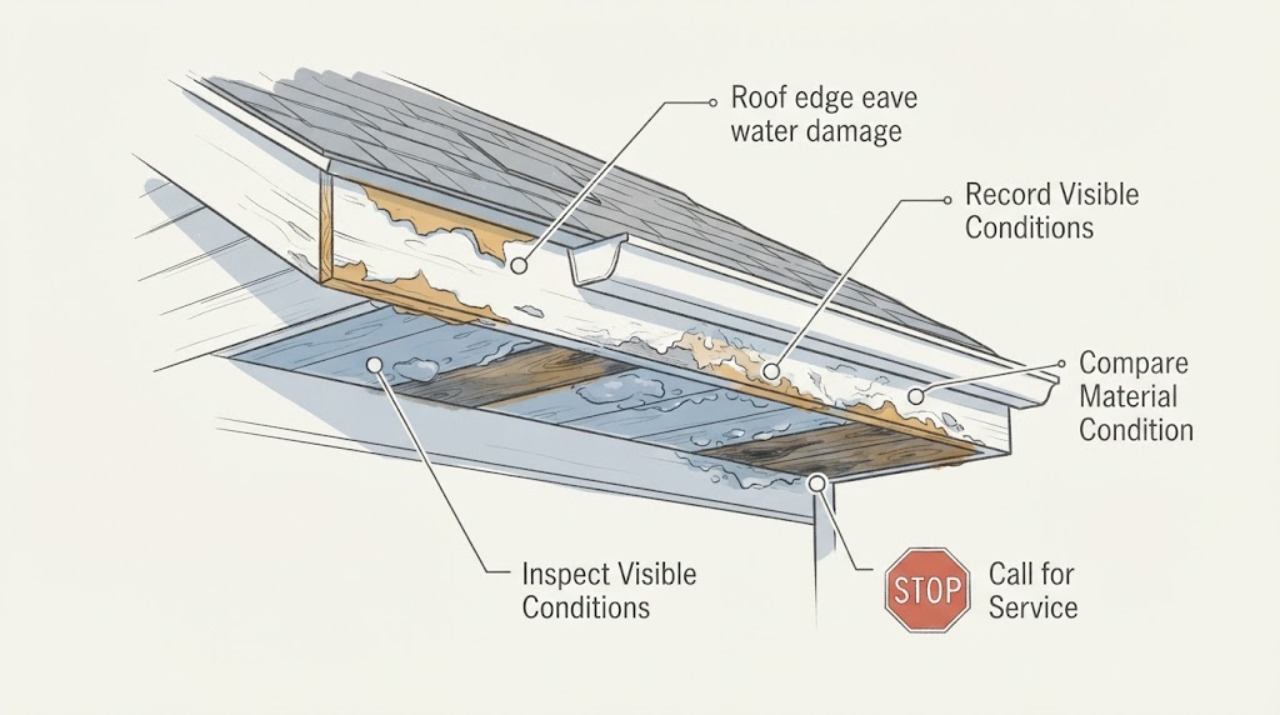
Peeling paint at a roof-edge eave is not automatically a cosmetic problem. From a safe ground-level or already accessible interior viewpoint, record where it starts and whether it follows rain, gutter overflow, a roof-to-wall transition, or a persistently damp area. Dry, stable paint with no staining, swelling, soft wood, or spread may be a coating failure, but paint should wait until moisture is ruled out. Dampness, fresh staining, bubbling that returns after rain, soft or swollen fascia or soffit, gutter overflow, a displaced drip edge, or wet insulation calls for a prompt roofing or building-envelope assessment. Do not use a ladder, climb onto the roof, scrape old paint, remove the soffit or fascia, or probe concealed materials yourself.
Before you begin
Safety first
- The professional traces water from the roof, transition, drip edge, gutter, or wall assembly, evaluates the fascia, soffit, and concealed moisture risk, and then chooses repair, replacement, flashing, drainage, or coating work. A coating recommendation should follow correction of any active moisture source.
Work through in order
Diagnostic checks
Use only checks that match the exact appliance or system and its official guide.
-
Check 1
From the ground or another already accessible viewpoint, photograph the peeling area and note its eave location, the date, recent rain or wind, and whether the paint is flaking, blistered, stained, or merely faded. Do not climb, reach over the edge, scrape paint, or move trim.
Expected result: The area is dry and stable between weather events; it is damp or newly stained; or the defect returns, spreads, or changes after rain.
Next step: Keep the photos and timing record for a roofing or envelope assessment; use the dry-versus-wet result to choose the corresponding branch.
Stop if: Stop if viewing requires a ladder, roof access, reaching over an edge, contact with unstable material, or work near exposed electrical equipment.
Why this matters
Why: Stable dry paint keeps coating failure in consideration. Recurring, spreading, or weather-linked change is evidence of active or intermittent moisture and should not be covered with new paint.
-
Check 2
From a safe viewpoint, compare the affected fascia, soffit, and adjacent wall or ceiling with a nearby unaffected section. Look only for visible swelling, sagging, open joints, discoloration, mold-like growth, peeling layers, or a musty odor; do not probe, drill, remove panels, or open the roof edge.
Expected result: Only the paint film looks aged and the substrate appears unchanged; or the wood, soffit, wall, ceiling, or insulation shows dampness, swelling, softness, sagging, or spread.
Next step: Document the boundary of the damage and arrange service at the first visible material change, not just at the most heavily peeled paint.
Stop if: Stop for unstable fascia or soffit, falling material, mold or health concern, water near electricity, or any need to open the assembly.
Why this matters
Why: An unchanged substrate supports a possible coating-only repair after the cause is checked. Substrate or interior changes indicate water damage or hidden moisture and move the job to professional envelope or roofing diagnosis.
-
Check 3
During or after ordinary rain, observe from the ground whether the gutter overflows, a downspout discharges against the eave, water appears to track behind the fascia, or runoff concentrates at a roof-to-wall, roof-to-rake, or other transition. Do not clean a gutter, hose the roof, lift shingles, or alter the drip edge.
Expected result: Runoff is controlled and no wet path is visible; one gutter or eave joint concentrates water; or water tracks at the roof edge or a transition.
Next step: Give the professional the exact segment, weather condition, and direction of observed flow so the roof edge, gutter, drip edge, and transition can be inspected as one path.
Stop if: Stop if rain, wind, ice, electrical exposure, falling debris, or inaccessible height makes observation unsafe.
Why this matters
Why: A controlled, dry route leaves coating failure possible. Local concentration points toward gutter or edge drainage work; tracking behind the fascia or at a roof transition points toward flashing or roof-envelope work rather than painting.
-
Check 4
Compare dated photos after the area has had time to dry naturally and again after the next ordinary weather event, without applying a coating or trying to force a leak.
Expected result: The paint remains unchanged while the substrate stays dry; the stain or bubbling reappears after rain; or the condition cannot be safely seen.
Next step: Use the result to request either a surface-repair review or a roofing/building-envelope moisture investigation, and preserve the before-and-after photos.
Stop if: Stop rather than repeat observations if the damage spreads, material sags, water enters indoors, or access would require a ladder or roof work.
Why this matters
Why: A stable dry record supports planned surface assessment but does not prove the eave assembly is sound. Reappearance after weather is a strong reason to investigate active moisture; an inaccessible condition remains unresolved.
-
Check 5
Prepare a service handoff listing the eave segment, paint pattern, rain and wind timing, gutter or downspout behavior, visible drip-edge or transition condition, fascia or soffit changes, interior symptoms, and what could not be viewed safely.
Expected result: The record points to a dry surface-only issue, a local edge or gutter path, broader roof or transition moisture, damaged wood or soffit, or an unresolved inaccessible condition.
Next step: Request a qualified roofing or building-envelope assessment when moisture, material damage, or uncertainty remains; surface coating can be considered only after the source and substrate are addressed.
Stop if: Do not perform the restricted inspection or repair yourself, and do not authorize removal or replacement based only on the paint color or size of the peeled area.
Why this matters
Why: This distinction helps the contractor plan the correct inspection scope. It prevents a coating quote from being treated as a water-entry repair when the eave assembly or framing may be wet.
Use your observations
Decision map
Find the observation that best matches what you see, then follow the next safe action.
-
PATH 01Safety boundary
What you see
The peeling, staining, dampness, or bubbling returns after rain, or the area is currently wet.
Do this next
Request prompt roofing or building-envelope service and report the weather timing and first visible wet point; do not repaint over it.
Why this path and its safety boundary
Why it matters: Treat this as active or intermittent moisture until a professional traces the path.
Safety stop: Do not scrape, seal, open, or climb to chase the leak.
-
PATH 02Safety boundary
What you see
The paint is dry and stable, with no visible staining, swelling, soft substrate, odor, spread, or runoff path.
Do this next
Arrange a planned assessment for compatible surface preparation and coating after the substrate and water path are confirmed dry.
Why this path and its safety boundary
Why it matters: A coating failure is possible, but a safe visual check cannot certify concealed eave framing or flashing.
Safety stop: Escalate if any moisture or material change appears before surface work.
-
PATH 03Safety boundary
What you see
Overflow, concentrated discharge, tracking behind the fascia, or a displaced-looking drip edge is visible at one eave segment.
Do this next
Ask a roofing or gutter professional to inspect the gutter, downspout, drip edge, and eave integration together.
Why this path and its safety boundary
Why it matters: The local drainage or edge detail may be directing water onto the fascia or soffit.
Safety stop: Do not clean from a ladder, move the drip edge, remove gutter parts, or apply a surface patch as diagnosis.
-
PATH 04Safety boundary
What you see
The damage aligns with a roof-to-wall, roof-to-rake, valley-end, penetration, or other roof transition, especially after wind-driven rain.
Do this next
Request a roofing or building-envelope inspection that follows the water path upslope and at the transition, not just a fascia repaint.
Why this path and its safety boundary
Why it matters: Water may be entering at a flashing or roof-layer transition and traveling to the eave before appearing.
Safety stop: Do not lift shingles, remove flashing, walk the roof, or perform a hose test.
-
PATH 05Safety boundary
What you see
Fascia or soffit looks swollen, soft, sagging, cracked, separated, or missing, or interior material shows a damp or musty change.
Do this next
Keep people clear of unstable material and request prompt professional assessment of the roof edge and supporting assembly.
Why this path and its safety boundary
Why it matters: The issue may include damaged wood, soffit components, or hidden insulation and is beyond a paint-only repair.
Safety stop: Do not pull loose pieces, open the soffit, or stand below falling material.
-
PATH 06Safety boundary
What you see
The eave cannot be viewed from a safe position, or access would require a ladder, roof entry, reaching over an edge, or handling unstable material.
Do this next
Tell the contractor what is visible from the ground and arrange an assessment using appropriate access and fall protection.
Why this path and its safety boundary
Why it matters: The cause remains unknown; an unsafe view is not evidence that the paint failure is harmless.
Safety stop: Do not improvise access or continue observation in wind, rain, ice, or near exposed electricity.
-
PATH 07Safety boundary
What you see
Peeling or staining extends across multiple eave bays, appears on an interior ceiling or wall, or occurs with wet insulation, mold-like growth, or a persistent musty odor.
Do this next
Request a broader building-envelope or roofing investigation and provide the extent, timing, and interior observations.
Why this path and its safety boundary
Why it matters: The water path may be broader than one coating or edge joint and may involve the roof, wall drainage plane, or ventilation condition.
Safety stop: Do not conceal the area with paint or remove interior/exterior finishes before the source is assessed.
Helpful context
Understand the symptom
Use the peeling paint as a water-path clue
At an eave, paint can fail from age, sun, or poor adhesion, but recurring moisture can make the same area blister, flake, stain, swell, soften, or spread. The useful first distinction is whether the surface stays dry and stable between weather events. If the defect returns after rain or the material behind it looks damp, repainting would hide the symptom without correcting the source. The U.S. Department of Housing and Urban Development advises finding and fixing the moisture source before repairing and repainting a damaged painted surface.
Observe from a safe viewpoint
Use a ground-level view, a window, or another already accessible position. Note the exact eave segment, the date, recent rain or wind, and whether water appears to overflow the gutter, run behind the fascia, or collect at a roof-to-wall or roof-to-rake transition. Do not reach over an edge, place a ladder against the gutter, walk on the roof, scrape paint, pull trim, or spray water to reproduce a leak.
Trace the likely path without opening the edge
Runoff can arrive at the peeling area from the roof covering, a roof-to-wall transition, the drip edge, a gutter or downspout, or wind-driven rain entering near a soffit. Compare the damaged spot with nearby eaves from the ground: a single wet line below one joint points toward a local drainage or flashing detail, while staining along several bays or wetness after ordinary rain suggests a broader envelope problem. A visible drip edge helps shed water at the eave, but its condition and integration with the roof layers require a roofing professional to confirm.
Choose surface repair or envelope service
Surface-only repair is reasonable to discuss only when the area is dry and stable, there is no recurring stain or odor, wood and soffit surfaces do not look swollen or soft, and no runoff path is evident. A roofing or envelope assessment takes priority when moisture is active or hidden, the fascia or soffit is damaged, the drip edge or gutter is displaced, the defect follows a roof transition, or the area cannot be safely viewed. The professional should identify the water entry and drying condition before selecting preparation, replacement, flashing, gutter, or coating work.
Safety boundary
Stop conditions
- Stop for ladder or roof access, reaching over an edge, wind, rain, ice, unstable fascia or soffit, falling material, exposed electricity, indoor water near electrical equipment, mold or health concerns, or any need to open the assembly.
- Do not scrape old paint, remove or move the soffit, fascia, gutter, drip edge, flashing, or roof covering, probe concealed wood, or perform a hose test.
- Do not repaint or apply a surface patch until recurring moisture and substrate damage have been ruled out by an appropriate assessment.
When checks do not resolve it
Need a professional?
Call promptly for active or recurring water, wet insulation, interior staining, soft or sagging fascia or soffit, concentrated runoff, a displaced drip edge, a roof-transition pattern, mold-like growth, or any water near electrical equipment. Arrange planned service for a stable dry paint defect only after the moisture source and substrate can be assessed safely.
Safety scope: The professional traces water from the roof, transition, drip edge, gutter, or wall assembly, evaluates the fascia, soffit, and concealed moisture risk, and then chooses repair, replacement, flashing, drainage, or coating work. A coating recommendation should follow correction of any active moisture source.
Have this ready
- Exact eave segment and photos taken from a safe viewpoint
- Dates of peeling, staining, or dampness and whether the change follows rain or wind
- Gutter, downspout, drip-edge, fascia, soffit, roof-transition, and interior observations
- Whether the substrate appears swollen, soft, sagging, or unchanged
- Access limits, unstable material, electrical exposure, or areas that could not be viewed
Common questions
FAQ
Is peeling paint at an eave only cosmetic?
Not necessarily. If it is dry and stable with no staining, swelling, soft material, odor, spread, or weather-linked return, coating failure is possible. Reappearing bubbles or dampness point to active moisture and should be assessed before painting.
What does the first wet point tell me?
A wet line below one gutter or eave joint suggests a local drainage or edge path. A pattern at a roof-to-wall or other transition calls for a roofing or envelope inspection because water may travel before reaching the peeling paint.
When is fascia or soffit damage more than a paint repair?
Swelling, softness, sagging, open joints, missing pieces, interior staining, wet insulation, or a musty odor means the substrate or concealed assembly may be affected. Keep clear of unstable material and arrange professional service.
Can I scrape and repaint the eave myself?
Do not use a ladder or roof access, scrape old paint, remove the soffit or fascia, or probe the edge as a first step. The moisture source and substrate should be assessed before any surface preparation, and elevated work needs appropriate access controls.
Should I seal the peeling spot until a roofer arrives?
Do not cover a recurring leak with a surface patch as a diagnosis. Photograph it, protect belongings from interior drips only when safe, and tell the professional when the water appears and where the first visible wetness occurs.
Read the exact guide
Official sources
- Moisture damageU.S. Department of Housing and Urban Development · Supports checking for the moisture source before repairing and repainting a damaged painted surface.
- Drip Edge at Roof Eaves and RakesU.S. Department of Energy Building Science Education · Supports the explanation that a drip edge at an eave helps shed water and protect against moisture intrusion; installation details are professional work.
- eTool: Construction - Falls - Ladder SafetyOccupational Safety and Health Administration · Supports the access boundary: ladder placement, footing, clear areas, and intended use require safety controls; this article limits the reader to safe viewpoints.
Community feedback
Share a repair observation
Share a plain-text repair observation. Accepted observations are published automatically; this page may take a moment to update.