
On this page
Start here
Quick answer
Treat eave water damage as a roof-and-drainage inspection need, not a caulk or soffit replacement job. From inside and from safe ground-level positions, photograph ceiling or wall stains, observe soft-looking or sagging eave and fascia materials without touching or probing, record gutter overflow history, and note whether moisture is active or follows rain. If water is entering, staining is spreading, the eave or soffit appears unstable, or electrical equipment is nearby, keep people away and arrange urgent roofing or water-damage service. Do not climb, access the roof, probe or cut the eave, remove soffit panels, disturb mold, or attempt a storm inspection.
Before you begin
Safety first
- The reader should limit work to interior and stable ground-level observation. Do not climb, access the roof, probe or cut the eave, remove soffit panels, touch unstable materials, disturb mold, or inspect after a storm from an unsafe position.
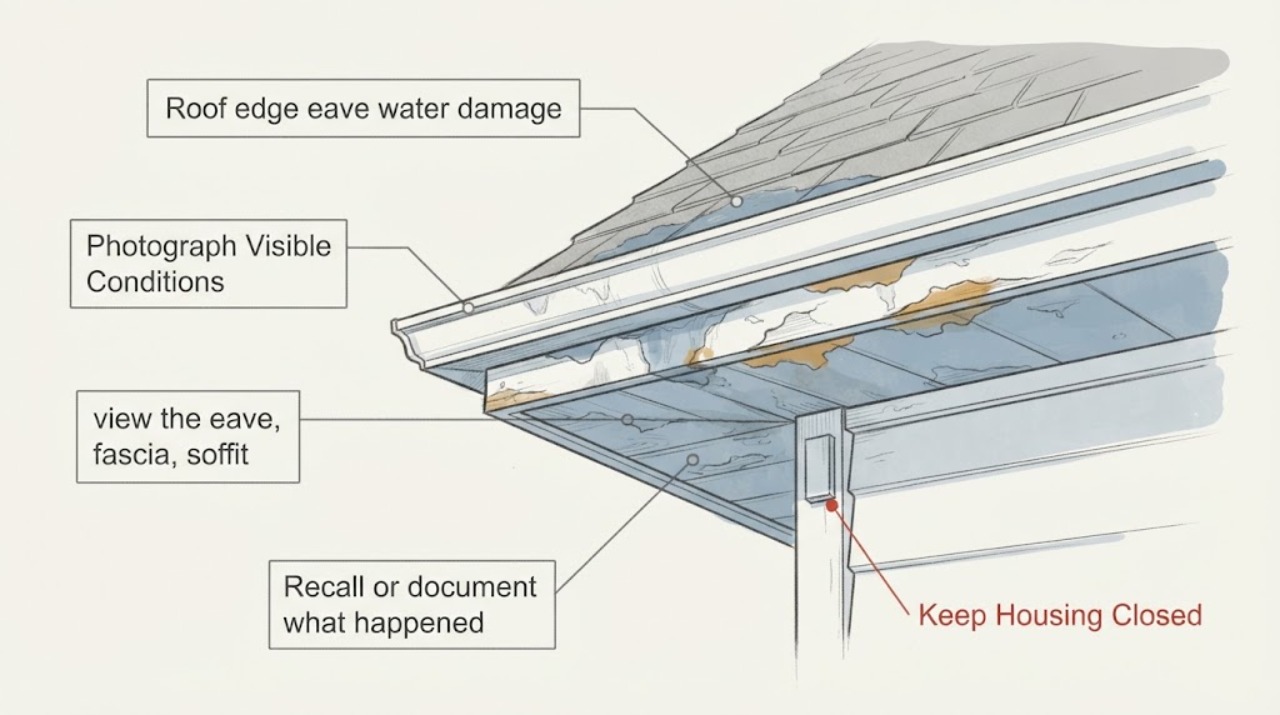
Work through in order
Diagnostic checks
Use only checks that match the exact appliance or system and its official guide.
-
Check 1
From inside the building, photograph any ceiling, upper-wall, window-head, or corner stain near the affected eave without opening the ceiling or wall.
Expected result: The stain is old and dry-looking, has a damp edge or active drip, has expanded after recent rain, or is accompanied by peeling finish or a musty odor.
Next step: Record the room, approximate location relative to the exterior eave, recent weather, and whether the mark changed, then provide the photos to a roofing or water-damage professional.
Stop if: Stop if the ceiling bulges, material is falling, water approaches an electrical fixture, or the room becomes unsafe.
Why this matters
Why: A changing or active interior sign raises urgency. A dry-looking stain still records a past water path and may need the eave, gutter, or roof edge assessed even when no drip is visible today.
-
Check 2
From a stable ground-level position, view the eave, fascia, soffit edge, and gutter line without a ladder, roof access, reaching, or touching the materials.
Expected result: The line appears intact, or there is visible sagging, separation, peeling, discoloration, corrosion, a displaced gutter, or a loose-looking soffit or fascia section.
Next step: Photograph the section from the ground and mark its location by room, corner, or downspout so the professional can assess it safely.
Stop if: Stop and keep people away if any eave, soffit, fascia, gutter, or trim appears detached or likely to fall.
Why this matters
Why: A visible edge or drainage defect can help locate the service area. A loose-looking or sagging section may be unstable and needs professional access and controls rather than a closer homeowner inspection.
-
Check 3
Recall or document what happened during recent rain from a safe position: whether the gutter overflowed, water sheeted over the edge, a downspout discharged poorly, or water splashed against the wall or foundation.
Expected result: Overflow was localized, repeated along the run, associated with one downspout, or not observed despite interior staining.
Next step: Share the rain timing, affected section, downspout location, and ground-level photos; do not attempt to clean, flush, or redirect the gutter from an elevated position.
Stop if: Stop observing outdoors in lightning, high wind, icy conditions, or when water creates a slip or electrical hazard.
Why this matters
Why: Localized overflow may identify a drainage section for inspection. Repeated or full-run overflow may require a broader gutter and roof-edge assessment. No observed overflow does not rule out wind-driven rain, flashing, or another concealed path.
-
Check 4
Look from the ground and inside for non-contact signs of material distress—bowing, sagging, open joints, peeling finish, darkened wood-like surfaces, or a widening gap—without pressing, poking, or removing a soffit or fascia panel.
Expected result: No visible distress is present, distress is limited to finish discoloration, or the edge appears deformed, soft-looking, open, or progressively worse.
Next step: Provide a close and wide photo from a safe position and ask the professional to evaluate the eave assembly, adjacent wall, and drainage path.
Stop if: Do not probe for softness, pull trim, cut the soffit, scrape suspected mold, or test the edge by leaning on it.
Why this matters
Why: Finish discoloration can be a record of moisture, while deformation or an open edge increases concern for damaged materials or an active water path. The appearance cannot establish hidden rot or structural condition.
-
Check 5
Compare the eave and interior signs with an unaffected nearby section after the same weather event, using only indoor or stable ground-level views.
Expected result: Only one corner is affected, multiple eave sections show similar signs, or the comparison is not possible.
Next step: List affected corners and rooms and ask for an inspection scope that separates gutter, roof edge, soffit/fascia, and interior water damage.
Stop if: Do not access the roof or upper eave to complete the comparison.
Why this matters
Why: A localized pattern supports a focused inspection. Repeated signs may indicate a drainage, roof-edge, ventilation, or weather exposure issue that needs broader assessment; an unavailable comparison should not delay service when water is active.
Use your observations
Decision map
Find the observation that best matches what you see, then follow the next safe action.
-
PATH 01Safety boundary
What you see
Interior water is active, a stain is expanding, or water is near an electrical fixture.
Do this next
Keep people clear, stop using the affected area, and arrange urgent roofing or water-damage and electrical-safety assessment as appropriate.
Why this path and its safety boundary
Safety stop: Do not touch wet electrical equipment, open ceilings, or attempt to locate the entry from the roof.
-
PATH 02Safety boundary
What you see
Ground-level viewing shows a displaced, sagging, or loose-looking gutter, soffit, fascia, or eave edge.
Do this next
Request professional roof-edge and drainage inspection using the location photos and keep the area below clear.
Why this path and its safety boundary
Safety stop: No ladder, roof access, reaching, bracing, fastening, or removal by the reader.
-
PATH 03Safety boundary
What you see
Gutter overflow was localized or repeatedly observed near the stained eave.
Do this next
Ask a roofing or gutter professional to assess drainage, edge flashing, and adjacent materials as one water-control path.
Why this path and its safety boundary
Safety stop: Do not clean or flush the gutter from an elevated position or assume replacing one gutter section solves the roof-edge condition.
-
PATH 04Safety boundary
What you see
Staining is old-looking, dry, and stable, with no visible edge distress or active moisture.
Do this next
Schedule a normal-priority professional inspection and preserve dated photos for comparison after rain.
Why this path and its safety boundary
Safety stop: Escalate if staining spreads, odor appears, materials deform, or water returns.
-
PATH 05Safety boundary
What you see
Visible growth, widespread damp materials, or suspected concealed moisture is present.
Do this next
Arrange qualified water-damage or mold-assessment service together with roofing evaluation; keep the area undisturbed.
Why this path and its safety boundary
Safety stop: Do not scrape, bleach, remove soffit panels, demolish, or perform mold remediation yourself.
Helpful context
Understand the symptom
The eave is where roof covering, edge metal, fascia, soffit, wall, and gutter drainage meet. Water can travel along or behind one layer before a stain appears inside, so the visible spot may not be directly below the entry. A gutter overflow history can be useful evidence, but it does not prove that the gutter is the only cause.
Keep the inspection at ground level or indoors. Use a camera or binocular view from a stable location if useful, and look for patterns without touching, probing, lifting, cutting, or removing anything. Do not enter an attic or crawlspace if access is unsafe, and do not stand under a loose or visibly failing edge.
Official moisture-control guidance treats roof drainage and roof-wall intersections as part of the building water-control system and recommends recording interior staining and exterior signs of moisture, cracking, or movement. Those observations help a professional choose the right inspection scope; they are not a homeowner roof-repair procedure.
Use the sequence below to document urgency and the likely area of service. Stop before ladder work, roof access, eave probing, soffit removal, mold cleanup, or any storm-related roof inspection.
When checks do not resolve it
Need a professional?
Safety scope: The reader should limit work to interior and stable ground-level observation. Do not climb, access the roof, probe or cut the eave, remove soffit panels, touch unstable materials, disturb mold, or inspect after a storm from an unsafe position.
Have this ready
- Share room and corner locations, dated interior and ground-level photos, rain and gutter-overflow history, active-moisture timing, visible staining or deformation, downspout location, and nearby electrical or access hazards.
Common questions
FAQ
Does a stained soffit prove the roof is leaking?
No. Water can travel through the roof-edge, gutter, wall, and ceiling assembly before appearing as a stain. Record the stain location, rain timing, gutter overflow history, and any visible ground-level edge condition, then have a professional trace the water path.
Can I inspect the eave with a ladder to find the damage?
This workflow does not recommend ladder or roof access. Use interior and stable ground-level observations and arrange roofing service for elevated inspection, especially when the eave, gutter, soffit, or fascia appears loose.
What should I do if the eave damage includes visible mold-like growth?
Do not scrape, bleach, remove soffit panels, or disturb the material. Keep people away and arrange qualified water-damage or mold-assessment service together with a roofing evaluation.
Read the exact guide
Official sources
- Moisture Control Guidance for Building Design, Construction and MaintenanceU.S. Environmental Protection Agency · Supports safe visual documentation of moisture, drainage, staining, and movement signs and professional escalation; it is not a homeowner roof-access or repair manual.
- Stairways and LaddersOccupational Safety and Health Administration · Supports the article's prohibition on user ladder and roof access; it does not provide a roof inspection procedure for this page.
Community feedback
Share a repair observation
Share a plain-text repair observation. Accepted observations are published automatically; this page may take a moment to update.