
On this page
Start here
Quick answer
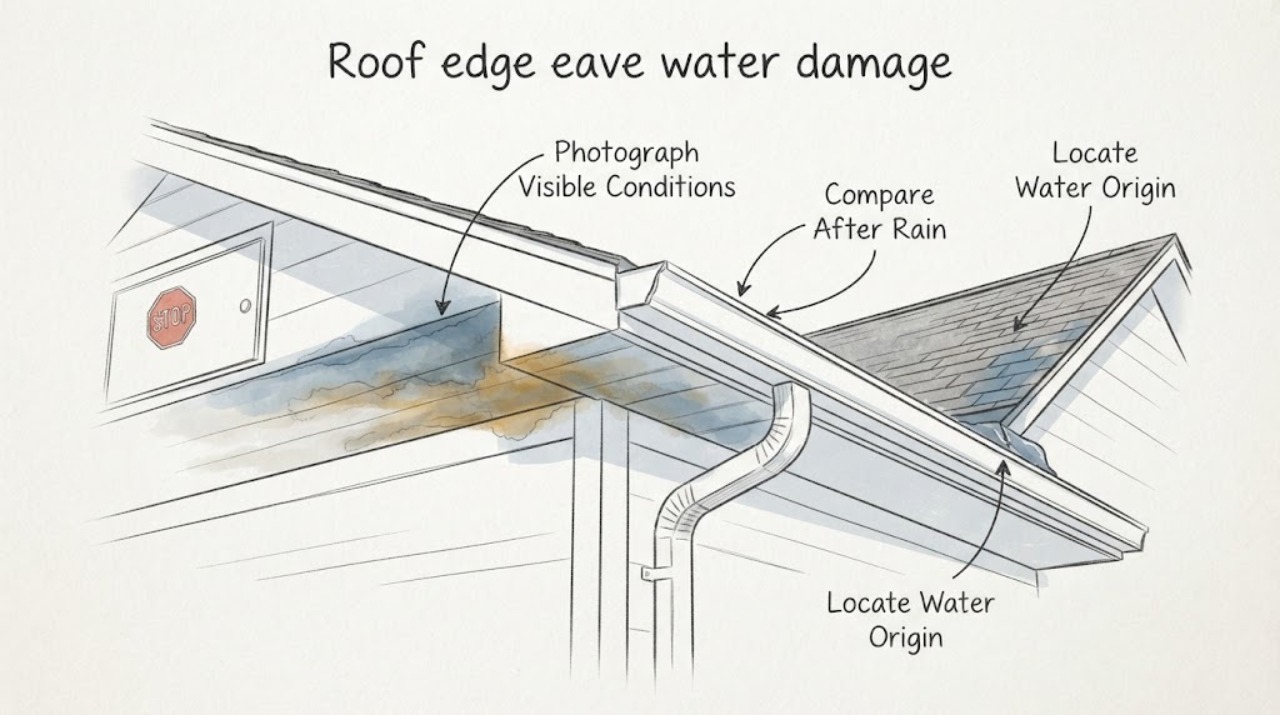
A stain at the roof edge or eave is evidence to document, not proof that an active leak is happening now. Photograph it from the ground and from safe interior living areas, then compare the same spot after rain: an old, dry, unchanged mark follows a different path from one that darkens, feels damp, spreads, or develops a musty odor after a storm. Record whether water first appears at a gutter overflow, drip edge, valley or upper-roof discharge, fascia, soffit, or an interior wall or ceiling. Do not climb, walk the roof, run a hose, open a wall or ceiling, or probe a downspout. A roofing professional should trace the roof-edge and drainage path before the stain is painted over, sealed, or called a confirmed leak.
Before you begin
Safety first
- Do not use ladders, climb the roof, hose-test, pressure-flush, probe downspouts, open walls or ceilings, lift roof-edge materials, or work during lightning, high wind, hail, flooding, or unstable conditions.
Work through in order
Diagnostic checks
Use only checks that match the exact appliance or system and its official guide.
-
Check 1
From stable ground and safe interior living areas, photograph the stain with a wide view and a close view, note its location relative to the eave, fascia, soffit, gutter, wall, ceiling, or window, and record whether the surface is dry without touching damaged material.
Expected result: The mark may be old and dry, newly darker, damp, swollen, peeling, or accompanied by odor. Its apparent edge may stay fixed or expand after weather.
Next step: Keep the dated photographs and avoid painting, caulking, sanding, or scrubbing the mark before the water path is assessed.
Stop if: Stop for loose or falling trim, a sagging ceiling, wet electrical equipment, active flooding, mold-like contamination, or any need for elevated access.
Why this matters
Why: A stain establishes prior discoloration or moisture evidence but does not identify the source or prove current water entry. Location and condition give the professional a baseline for later comparison.
-
Check 2
After each safe rain event, compare the stain with the baseline and record whether it darkens, feels damp only if a safe non-damaged surface can be touched, spreads, drips, develops odor, or remains unchanged; note rain intensity and when the change appeared.
Expected result: An old dry mark may remain unchanged through rain, while a mark that repeatedly darkens or grows after rain supports recent moisture movement. A delayed change can appear after the exterior has dried.
Next step: Add each event to the log and request prompt roofing assessment if the mark becomes wet, spreads, or returns after drying; do not simulate rain with a hose.
Stop if: Stop observing for lightning, high wind, hail, active water near electricity, or any surface that is unstable or contaminated.
Why this matters
Why: Rain-linked change raises the priority of tracing an active or recurring moisture path, but even a darkened stain does not identify whether the source is gutter overflow, roof edge, flashing, or another leak.
-
Check 3
From the ground during or soon after safe rain, identify the first visible water path near the stain: gutter lip or seam, downspout connection, drip edge, roof valley or upper-roof discharge, fascia or soffit joint, or water tracking down the wall.
Expected result: Water may spill from a gutter, bypass the edge below a valley, emerge at a seam, run behind fascia, or appear only indoors. The first visible path can remain the same or change with rain intensity and wind.
Next step: Photograph the full elevation and mark the roof area above the interior or exterior stain; do not lift shingles, flashing, drip edge, or gutter material.
Stop if: Stop if the view requires a ladder, roof access, standing under falling debris, or entry onto flooded or eroded ground.
Why this matters
Why: An overflow or drip-edge path points to drainage and roof-edge inspection; a stain with no visible exterior path may require professional investigation of concealed flashing, underlayment, or wall movement. The stain itself is not the origin.
-
Check 4
At ground level, observe the gutter and downspout discharge during and after rain and record whether the outlet is strong, weak, absent, backing up, or directing water toward the wall, lower roof, foundation, or the stained eave.
Expected result: A weak or absent outlet while the gutter spills supports a restriction or disconnected route; strong discharge with water escaping at the edge can shift attention to incoming flow, gutter slope, valley concentration, or drip-edge detail.
Next step: Photograph the outlet and where water lands and ask the professional to inspect the full drainage route; do not probe, hose, pressure-flush, or remove a downspout.
Stop if: Stop if water approaches electrical equipment, enters the building, undermines soil, creates deep pooling, or may be contaminated.
Why this matters
Why: Discharge behavior helps distinguish a drainage source from a roof-edge entry path but cannot rule out a concealed clog or flashing defect. GAF notes that clogged gutters can redirect water beneath roofing and that heavy-rain dripping can expose roof leaks.
-
Check 5
Compare the fascia, soffit, eave trim, siding, nearby wall, and safe interior ceiling or wall area after each event; record dampness, swelling, peeling finish, soft-looking trim, musty odor, bubbling paint, or a new drip without opening anything.
Expected result: The exterior may be stained but dry, repeatedly wet at the same edge, or damaged along a path that continues indoors. An interior mark may sit below the eave, at a wall corner, or away from the actual entry point.
Next step: Keep belongings away from safe dry areas, photograph the change, and request prompt service when the surface is damp, soft, spreading, or actively leaking.
Stop if: Stop and keep clear for a sagging ceiling, wet light fixture or wiring, structural movement, active flooding, or suspected hazardous contamination.
Why this matters
Why: Repeated wetness or interior change raises urgency and may require coordinated roof, gutter, eave, wall, and moisture assessment. A stable old stain can still conceal a past repair or trapped moisture.
-
Check 6
Align the stain condition and location with a multi-event log showing rain intensity, wind, overflow origin, downspout discharge, fascia or soffit changes, interior impact, and any recent roof or gutter work.
Expected result: The mark may stay dry and unchanged, darken only after intense rain, return at a gutter or valley path, or spread indoors after a delay. A repair may have stopped visible wetting while leaving an older stain.
Next step: Give the timeline and photos to a qualified roofing or gutter professional and ask for source tracing before cosmetic repair or replacement decisions.
Stop if: Do not climb, walk the roof, hose-test, open a wall or ceiling, probe a downspout, or disturb wet or damaged materials.
Why this matters
Why: The event pattern determines whether the next decision is monitor a stable old mark, correct gutter or downspout drainage, investigate a roof-edge or drip-edge path, or address active interior moisture. A stain alone cannot choose repair versus replacement.
-
Check 7
Prepare a service handoff with the exact stain location, baseline condition, each post-rain change, first visible exterior water path, gutter and downspout behavior, fascia and soffit condition, interior signs, and all safe photographs.
Expected result: A complete handoff lets the professional distinguish an old dry stain from recurring moisture and decide whether gutter, roof-edge, flashing, roof, wall, or interior moisture inspection is needed.
Next step: Arrange qualified roofing or gutter service when the stain changes, returns, spreads, or cannot be safely explained, and request a documented source and repair scope.
Stop if: Stop the DIY path if inspection requires ladders, roof access, hoses, downspout probing, opening walls or ceilings, electrical work, or disturbing structural material.
Why this matters
Why: The correct next step is source confirmation, not treating every stain as an active roof leak or covering it before the cause is understood.
Use your observations
Decision map
Find the observation that best matches what you see, then follow the next safe action.
-
PATH 01Next step
What you see
The stain is dry, unchanged through safe rain observations, and there is no damp trim, odor, active drip, or new interior impact.
Do this next
Preserve the baseline, monitor after future rain, and ask a professional to review it before painting or sealing if its history is unknown.
Why this path and its safety boundary
Why it matters: It may be an old mark or repaired moisture event, but the source is not proven absent from appearance alone.
-
PATH 02Next step
What you see
The stain repeatedly darkens, becomes damp, spreads, or develops odor after rain and later lightens as it dries.
Do this next
Request prompt roofing and gutter source tracing with the event log and avoid cosmetic covering until the path is addressed.
Why this path and its safety boundary
Why it matters: A recurring moisture path is more likely, but the stain still does not identify whether the entry is gutter, roof edge, valley, flashing, or wall.
-
PATH 03Next step
What you see
The first visible water is at the gutter lip, seam, end cap, or downspout connection above or beside the stained eave.
Do this next
Arrange ground-safe gutter and roof-edge inspection and do not reach, probe, or climb to clear or adjust it.
Why this path and its safety boundary
Why it matters: Drainage, slope, joint, outlet, or downspout discharge may be wetting the roof edge and trim.
-
PATH 04Next step
What you see
Water begins below a roof valley, upper roof, drip edge, or eave transition rather than at the gutter itself.
Do this next
Request coordinated roofing and gutter assessment of the upper roof, valley, edge detail, receiving run, and interior path.
Why this path and its safety boundary
Why it matters: Concentrated runoff, flashing, edge detail, or concealed roofing damage may be bypassing or overwhelming the gutter.
-
PATH 05Next step
What you see
A ceiling or wall stain darkens, bubbles, drips, smells musty, or remains damp after the exterior stain is observed.
Do this next
Keep clear of sagging ceilings and wet electrical fixtures, move belongings only from dry areas, and request prompt roofing and moisture assessment.
Why this path and its safety boundary
Why it matters: The issue has an interior moisture consequence and should not wait for cosmetic repair or another storm.
-
PATH 06Next step
What you see
The stain changes or returns but no exterior water path is visible from safe ground and interior living areas.
Do this next
Give the professional the timing and locations and do not open a wall, ceiling, attic, or roof to search for the source.
Why this path and its safety boundary
Why it matters: Concealed flashing, underlayment, wall, plumbing, condensation, or delayed moisture movement remains possible.
-
PATH 07Next step
What you see
Confirming the stain or suspected source requires a ladder, roof access, hose testing, downspout probing, or opening a wall or ceiling.
Do this next
Stop and arrange qualified roofing or gutter service with the dated photographs and event log.
Why this path and its safety boundary
Why it matters: The remaining uncertainty is beyond safe observation and is not permission for a risky test.
Helpful context
Understand the symptom
A stain is evidence, not a leak diagnosis
Start with a dated baseline from safe ground and ordinary interior areas. An old, dry, unchanged stain follows a different path from one that darkens, becomes damp, spreads, or develops odor after rain. Neither appearance alone proves whether water is currently entering or where it began.
Follow the edge and drainage path
For each rain event, record the first visible water at the gutter lip, seam, downspout connection, drip edge, valley, upper-roof discharge, fascia, or soffit and compare it with the interior mark. GAF identifies clogged gutters as a way water can be redirected beneath roofing and lists ceiling stains and heavy-rain dripping among roof-leak signs, so a professional should trace the source before cosmetic repair.
Stay off the roof and out of the wall
Do not climb, walk the roof, hose-test, pressure-flush, probe a downspout, open a wall or ceiling, or lift roof-edge materials. Keep belongings away from safe dry areas and arrange prompt roofing or gutter service when a mark changes after rain, trim is soft or loose, or water reaches the interior.
Safety boundary
Stop conditions
- Do not use a ladder, climb or walk on the roof, lean over an edge, or stand below unstable trim or roof material.
- Do not hose-test, pressure-flush, probe a downspout, remove roof or gutter fasteners, or open a wall or ceiling as a user test.
- Stop for lightning, high wind, hail, slippery or undermined ground, falling debris, active flooding, wet electrical equipment, or a sagging ceiling.
- Keep people clear of contaminated water and damaged or loose material and arrange qualified roofing, gutter, or moisture service.
When checks do not resolve it
Need a professional?
Arrange prompt roofing or gutter service when the stain changes after rain, returns, spreads, affects fascia or soffit, or appears with interior dampness, odor, bubbling finish, or active dripping.
Safety scope: Do not use ladders, climb the roof, hose-test, pressure-flush, probe downspouts, open walls or ceilings, lift roof-edge materials, or work during lightning, high wind, hail, flooding, or unstable conditions.
Common questions
FAQ
Does a roof-edge stain mean there is an active leak?
Not necessarily. An old dry mark can remain after a repair, while a mark that darkens, becomes damp, spreads, or smells musty after rain supports recurring moisture. Track its condition across events and have the source assessed before calling it active.
What should I record after rain?
Record rain intensity and timing, whether the stain changed, the first visible overflow or drip point, downspout discharge, fascia and soffit condition, and any ceiling or wall impact. Use dated photos from safe ground and interior living areas.
Could a gutter overflow stain the fascia or soffit?
Yes. Water escaping at the gutter, seam, outlet, or valley can repeatedly wet the roof edge and trim. A professional should distinguish that drainage path from a drip-edge, flashing, or concealed roof leak.
What if the stain gets darker after rain but the gutter looks clear?
A clear-looking gutter does not rule out a downspout restriction, valley concentration, drip-edge or flashing problem, or concealed roofing path. Document the timing and request coordinated roofing and gutter source tracing.
Should I paint over or seal the stain?
Not before the moisture path is understood. Cosmetic covering can hide a recurring change or trap moisture. Photograph it and have the source assessed, especially if trim is soft, damp, spreading, or the interior is affected.
Should I climb up or run a hose to find the source?
No. Do not climb, walk the roof, hose-test, probe a downspout, open a wall or ceiling, or lift roof-edge materials. Use safe observations and arrange qualified roofing or gutter service.
Read the exact guide
Official sources
- When to schedule a roof leak repairGAF · The opened GAF manufacturer page identifies clogged gutters as a cause that can redirect water beneath roofing, describes ceiling stains, damp attic, mold, and dripping as possible leak signs, and recommends professional roof evaluation.
Community feedback
Share a repair observation
Share a plain-text repair observation. Accepted observations are published automatically; this page may take a moment to update.