
On this page
Start here
Quick answer
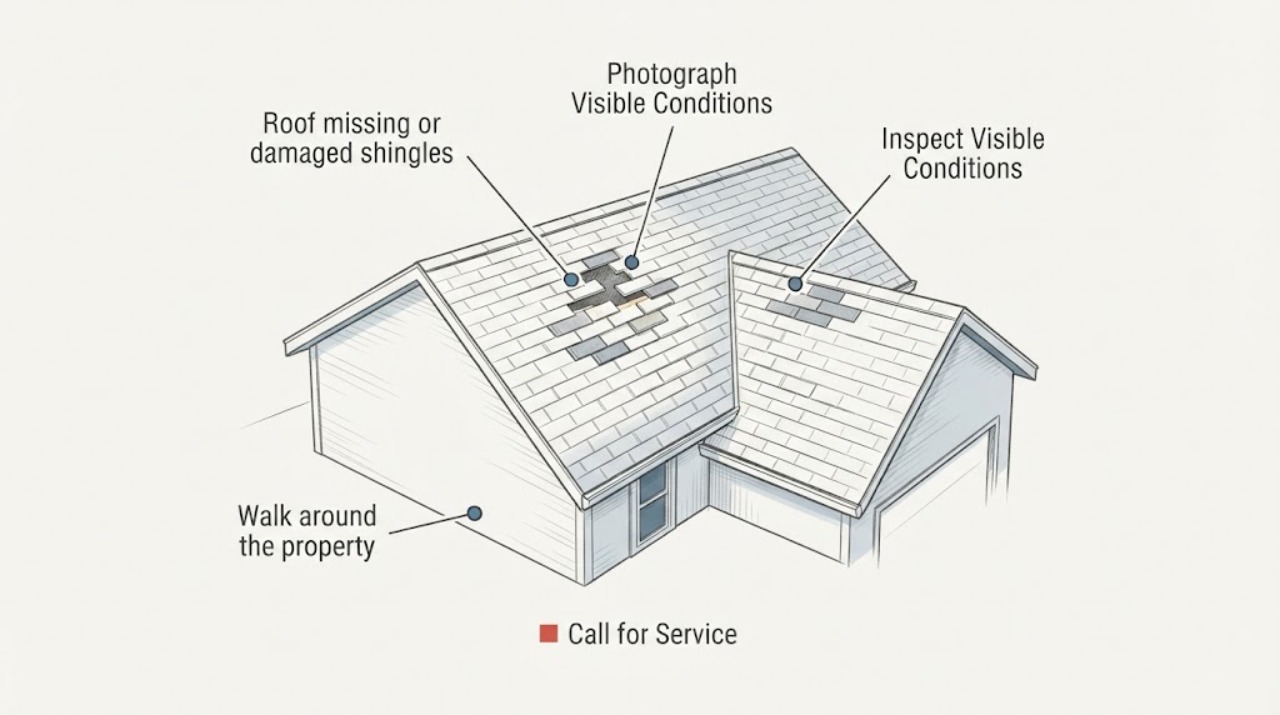
A visible gap from a missing or badly damaged shingle can let wind-driven rain reach the roof layers, so document it and arrange a roofing inspection promptly. Stay on the ground or at a safe interior observation point: use binoculars or a camera from the ground to record the gap, then check ceilings and a safely reachable attic area for stains, dampness, daylight, sagging, or active dripping. Do not walk on the roof, use a ladder to reach it, pull at shingles, drive nails, spread sealant, or install a tarp yourself. Treat an active leak, sagging ceiling or roof, exposed decking, loose debris, multiple missing areas, or forecast rain as a prompt professional call; a roofing professional can decide whether a temporary cover and repair are appropriate.
Before you begin
Safety first
- Do not climb or work on the roof, use a ladder to reach the gap, enter an unsafe attic, touch wet electrical equipment, pull shingles, apply sealant, drive fasteners, or install a tarp. Keep the area below the roof edge clear until the professional arrives.
Work through in order
Diagnostic checks
Use only checks that match the exact appliance or system and its official guide.
-
Check 1
From the ground or another stable location, photograph the roof with binoculars or a zoom lens and compare the shingle pattern around the visible gap; do not climb, lean a ladder against the roof, or reach toward the damaged area.
Expected result: Record the roof slope and plane, approximate location, number of missing or torn shingles, exposed dark or light layers, curled or cracked neighboring shingles, open seams, sagging, loose flashing, and any debris below.
Next step: Send the photos and location to a qualified roofer for an exterior inspection. Keep the observation ground-based even if the damaged shingle appears easy to reach.
Why this matters
Why: One isolated gap with intact surrounding rows may be a localized repair, while several gaps, exposed layers, open seams, sagging, or damaged flashing make wider wind or water intrusion more likely.
-
Check 2
From the rooms below and only from a safely supported attic access point, look for ceiling stains, dampness, dripping, dark spots, daylight through the roof, mold or mildew, wet insulation, or sagging sheathing; do not step onto uncertain attic surfaces or touch wet material near wiring.
Expected result: There is no interior evidence, or there is a new stain, active drip, damp insulation, visible hole, daylight, sagging ceiling or roof deck, or water near electrical equipment.
Next step: For a leak, sagging, or water near wiring, keep clear and request prompt roofing service, adding electrical service if wiring or fixtures are wet. Do not cut the ceiling, move wet insulation, or investigate by walking farther into the attic.
Why this matters
Why: No visible interior evidence does not prove the gap is watertight. A new or active leak indicates that the roof layers or flashing may be compromised; sagging or water near electrical equipment adds structural or shock risk.
-
Check 3
Walk around the property at ground level and inspect gutters, downspouts, roof edges, eaves, and the ground for fallen shingles or granules; do not clean gutters from a ladder or pull on any roof material.
Expected result: Find matching shingle pieces, unusual granule piles, blocked or sagging gutters, loose edge material, or no debris below the visible gap.
Next step: Photograph the debris and drainage condition for the roofer. Leave gutter or edge repairs to a professional when access requires a ladder or the roof edge is unstable.
Why this matters
Why: Matching debris or granule loss can support recent wind or material damage, while a clear ground area does not rule out damage because pieces may have blown away or remained attached. Gutter or edge damage can redirect water toward the structure.
-
Check 4
From the ground, inspect the visible roof planes and penetrations for open seams, exposed nails, displaced flashing, damaged vent covers, curled or cracked shingles, or a gap around a chimney, skylight, or pipe; do not seal or cover the opening yourself.
Expected result: The gap is in an open field of shingles, at an edge or valley, or near a roof penetration, and neighboring materials appear intact or damaged.
Next step: Mark the location on a simple roof sketch or photo and ask the roofer to inspect the related flashing, underlayment, decking, and surrounding shingles. Do not apply generic caulk or roofing cement to hide the evidence.
Why this matters
Why: A gap near flashing, a valley, or a penetration can involve more than one roofing layer and may not be solved by replacing one shingle. Damage spreading across adjacent rows or planes suggests a larger inspection scope.
-
Check 5
Check the weather and the condition of the rooms below without climbing: note whether rain, high wind, hail, snow or ice is expected, whether water is currently entering, and whether furniture or stored items are beneath the affected ceiling; do not attempt a roof tarp or exterior patch.
Expected result: Rain or wind is imminent, water is entering, the ceiling is bulging or sagging, or the area is dry with no imminent weather.
Next step: Move valuables only from a safe, dry location and use a container for minor interior drips if it can be done without contact with electrical equipment. Request prompt roofing service for weather exposure; leave ceiling bulges, major leaks, and electrical hazards alone and seek emergency help as needed.
Why this matters
Why: Imminent weather or active water increases the chance of further interior damage and makes roof access more hazardous. A dry gap still needs repair, but the immediate response can focus on documentation and scheduling if no other warning is present.
-
Check 6
Assemble the roof photos, interior observations, approximate roof age if known, recent storm date, prior repairs or warranty documents, and the number and location of visible gaps before contacting a roofing professional; do not choose a replacement shingle or fastener from appearance alone.
Expected result: The damage appears isolated and dry, spans multiple areas or roof planes, follows a storm, or is accompanied by recurring leaks, sagging, or aging brittle shingles.
Next step: Ask for an inspection that addresses the visible gap and the underlying layers, the need for temporary weather protection, and whether the proposed material matches the existing roof system. Keep all roof access and repair work with a qualified professional.
Why this matters
Why: An isolated event may be repairable, while widespread, recurring, or age-related damage can require a broader roof-system assessment. A photo cannot confirm whether the underlayment, decking, or flashing is sound.
Use your observations
Decision map
Find the observation that best matches what you see, then follow the next safe action.
-
PATH 01Next step
What you see
A single visible gap is dry inside, neighboring shingles look aligned from the ground, and no sagging, open flashing, or additional debris is visible.
Do this next
Document it and schedule a roofer promptly for a close inspection and repair decision; do not climb up for a quick replacement.
Why this path and its safety boundary
Why it matters: The damage may be localized, but the gap still leaves the roof system exposed and cannot be judged fully from ground level.
-
PATH 02Next step
What you see
Several shingles are missing or torn, debris is scattered around the property, or damage crosses more than one roof plane after wind or hail.
Do this next
Keep clear of the roof and falling-material area, photograph each visible plane from the ground, and request prompt professional inspection and weather-protection advice.
Why this path and its safety boundary
Why it matters: A broader storm or roof-system inspection is more likely than a one-shingle repair.
-
PATH 03Next step
What you see
The gap is near a valley, roof edge, chimney, skylight, pipe, or vent, with displaced or open flashing visible from the ground.
Do this next
Give the roofer the exact penetration or edge location and ask that the connected flashing and underlayment be assessed; do not seal the visible opening with generic material.
Why this path and its safety boundary
Why it matters: Water may be able to bypass the shingle through a related flashing or penetration detail, so the apparent missing shingle may not be the whole defect.
-
PATH 04Next step
What you see
A ceiling or attic observation shows a new stain, active dripping, wet insulation, daylight, sagging, or water near electrical equipment below the gap.
Do this next
Keep people away from the area, avoid touching wet electrical equipment or walking farther into the attic, and arrange prompt roofing service with electrical help when wiring or fixtures are affected.
Why this path and its safety boundary
Why it matters: The opening may already be allowing water intrusion, and sagging or wet electrical components add structural or shock risk.
-
PATH 05Next step
What you see
Rain, strong wind, hail, snow, or ice is imminent while the gap is exposed, but there is no safe way to reach the roof.
Do this next
Call a roofing professional for temporary weather protection, move belongings only from a safe interior position, and do not climb or install a cover yourself.
Why this path and its safety boundary
Why it matters: The risk of further water entry and an unsafe attempted tarp installation is elevated.
-
PATH 06Next step
What you see
Many shingles are curled, brittle, cracked, or repeatedly missing, or the roof has a history of recurring repairs even if the current interior is dry.
Do this next
Request a roof-system assessment that compares repair and replacement scope, including underlayment, decking, flashing, ventilation, and warranty considerations; do not select materials by color alone.
Why this path and its safety boundary
Why it matters: Age-related or widespread roof-system deterioration is more plausible than one isolated wind loss.
Helpful context
Understand the symptom
Treat the visible gap as an exposure, not a repair invitation
The visible gap tells you that the shingle pattern is no longer continuous, but it does not reveal whether the underlayment, decking, flashing, or interior has also been affected. Photograph the area from the ground and record whether it appeared after wind, hail, or another event. A small isolated gap can still admit water, while several gaps, exposed layers, or a sagging area suggest a wider inspection is needed.
Use the interior to find water evidence without entering an unsafe roof space
Look at ceilings and at the attic hatch or another stable, adequately lit area for stains, damp insulation, dark spots, daylight, mold or mildew, dripping, or sagging sheathing. Do not step on attic surfaces that are not clearly supported, move wet insulation, or reach toward a leak near electrical equipment. Interior evidence can help the roofer locate the affected roof area, but it cannot safely replace an exterior inspection.
Roof access and temporary weatherproofing belong to trained workers
Roofing combines steep or slippery surfaces, edges, skylights, openings, ladders, and falling materials. OSHA describes fall protection as critical for roof weatherproofing work. Keep people and pets away from the drop zone and ask the roofer whether a temporary cover is needed and how it will be secured; do not climb up to install one or use a random patch that can trap water or damage the roof.
Safety boundary
Stop conditions
- Do not walk on the roof, climb a ladder to reach shingles, step around skylights or openings, or attempt roof work without the appropriate professional fall-protection system and training.
- Do not pull off loose shingles, drive nails, spread roofing cement, or install an exterior tarp as a homeowner response to a visible gap; these actions can create fall, water-intrusion, or hidden-damage risks.
- Stop interior inspection for an unstable attic floor, sagging ceiling or roof deck, active major leak, wet insulation near wiring, smoke, or any electrical hazard; keep clear and arrange the appropriate emergency or professional service.
- Keep people and pets away from the roof edge and any area where shingles, branches, ice, or repair debris could fall.
Only after diagnosis
Potential parts
- roof tarp
Consider a temporary cover only if a qualified roofing professional determines that weather protection is needed while permanent repair is delayed; the visible gap alone does not make self-installation safe.
The cover, anchoring, drainage, wind exposure, roof slope, and attachment method must be selected and installed by the roofing professional without damaging the roof system. - replacement asphalt shingles
Consider replacement shingles only after the roofer confirms the existing roof type, extent of damage, and whether the underlayment, decking, flashing, and adjacent courses are sound.
Match the roof system, exposure, material, color, installation requirements, local code, and available warranty; appearance alone does not establish a suitable match. - roofing sealant
Consider sealant only when a qualified roofer identifies a specific flashing or penetration detail where the roof-system instructions permit it; do not use sealant to conceal an open shingle field or structural damage.
Confirm compatibility with the existing shingle, flashing, underlayment, temperature, moisture, and warranty requirements before professional application.
When checks do not resolve it
Need a professional?
Contact a qualified roofing professional for ground-confirmed gaps, missing or torn shingles, open seams, loose flashing, suspected storm damage, or any need for a temporary cover or roof access. Ask for coordinated electrical or structural help when water, sagging, or damaged components cross those boundaries.
Safety scope: Do not climb or work on the roof, use a ladder to reach the gap, enter an unsafe attic, touch wet electrical equipment, pull shingles, apply sealant, drive fasteners, or install a tarp. Keep the area below the roof edge clear until the professional arrives.
Have this ready
- Provide ground-based photos and a simple location sketch, number of missing or damaged shingles, roof plane and penetration location, storm date, fallen debris, ceiling or attic evidence, active-leak timing, roof age if known, prior repair history, and warranty documents.
Common questions
FAQ
Can I safely inspect missing shingles from the ground?
Yes. Use binoculars or a camera from a stable ground position and photograph the gap, nearby curled or cracked shingles, flashing, roof edges, and any debris below. Do not climb a ladder or walk on the roof to confirm what the ground view cannot show.
What should I check inside when a shingle is missing?
From rooms below and a safely reachable attic access point, look for new ceiling stains, dampness, dripping, daylight, wet insulation, dark spots, mold or mildew, and sagging sheathing. Stop for an unsafe attic, a sagging ceiling, or water near electrical equipment and arrange professional help.
Should I put a tarp over the visible roof gap?
Do not climb up to install one yourself. A roofer can decide whether temporary weather protection is needed and how to secure it without creating a fall hazard or trapping water. Move valuables from a safe interior position and call promptly if rain is coming.
Is one missing shingle an emergency?
It may be a localized repair, but the exposed gap can admit water and should be documented and assessed promptly. Treat active leaks, sagging, exposed decking, multiple missing areas, damaged flashing, or severe weather on the way as urgent professional situations.
Can I use roofing cement or sealant to close the gap?
Do not use generic sealant to hide an open shingle gap. The roofer may identify a specific compatible sealant for a flashing detail, but first needs to check the surrounding shingles, underlayment, decking, and drainage.
Read the exact guide
Official sources
- Fall Protection in Residential Construction - OSHA Guidance DocumentOccupational Safety and Health Administration · Federal construction-safety guidance used to keep repair, weatherproofing, ladders, scaffolds, anchors, and roof access within trained professional work rather than homeowner action.
- How to Identify Roof Damage and What to Look ForGAF · Roofing-manufacturer guidance used for identifying missing or damaged shingles, roof leaks, sheathing concerns, flashing and penetration defects, and ground-based inspection options.
- Missing Shingles on Your Roof? Here's What to DoGAF · Roofing-manufacturer homeowner guidance used for ground-based inspection, visible shingle changes, interior leak evidence, prompt repair, and asking a roofer about a temporary tarp.
- Fall Prevention Fact SheetOccupational Safety and Health Administration · Federal workplace-safety guidance used to support the user-observation-only boundary and to explain why roof access, ladders, openings, and weatherproofing require trained fall protection.
Community feedback
Share a repair observation
Share a plain-text repair observation. Accepted observations are published automatically; this page may take a moment to update.