
On this page
Start here
Quick answer
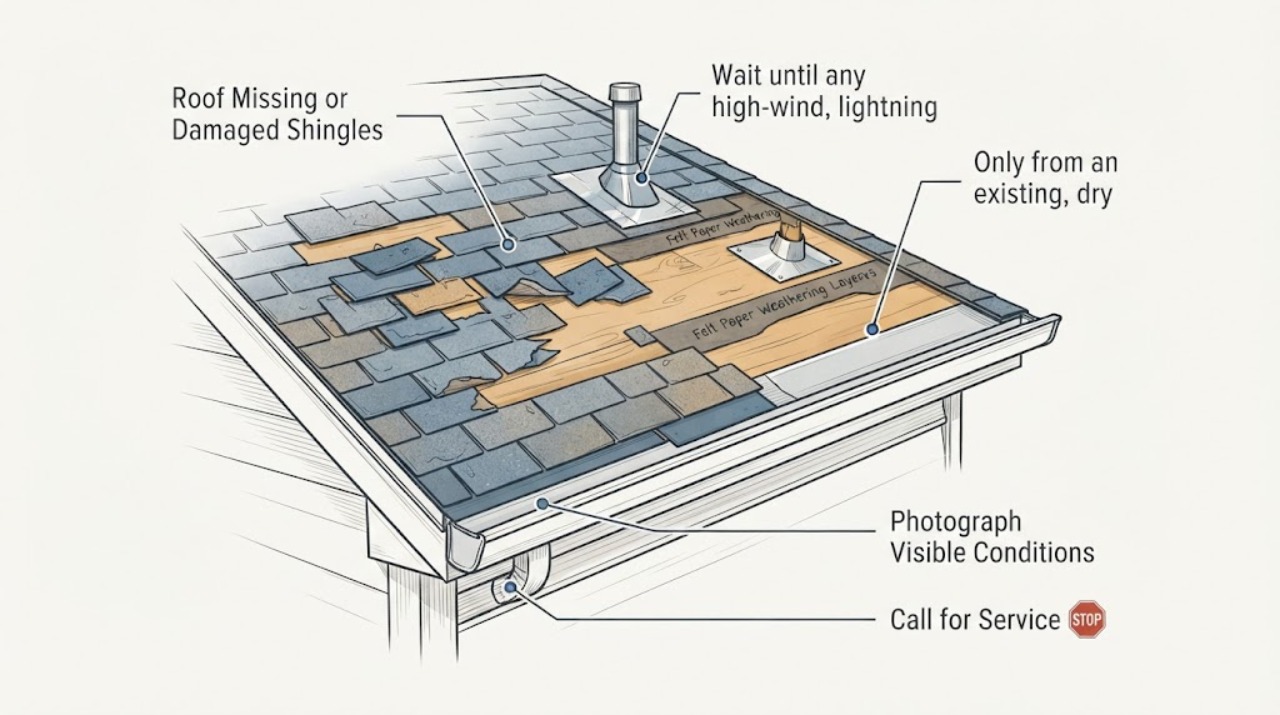
High winds can lift, crease, tear, or remove shingles, especially at roof edges, and can also disturb flashing, soffits, fascia, or penetrations. Wait until the storm and any warning have ended, then document the roof only from the ground and, if it is genuinely safe, look from an existing attic access point for daylight, wet insulation, water tracks, or a sagging ceiling. Do not climb, use a ladder, press a shingle down, nail, caulk, or attach a tarp. Arrange a qualified roofer promptly for a close inspection and professional temporary weather protection, especially if water is entering. A ground view cannot prove the cause or show concealed underlayment or deck damage.
Before you begin
Safety first
- This article is limited to storm-safe, ground-level documentation and an optional safe view from an existing attic access point. A qualified roofer must handle ladders, roof access, debris removal, tarping, shingle or flashing work, leak tracing, and roof-deck or structural assessment.
Work through in order
Diagnostic checks
Use only checks that match the exact appliance or system and its official guide.
-
Check 1
Wait until any high-wind, lightning, hail, or severe-thunderstorm warning has ended and screen the property from a protected location for downed lines, unstable trees, falling material, fire, or a visibly sagging ceiling; do not go outside to inspect during the event.
Expected result: The warning or storm is active, a line is down or sparking, a tree or roof section is unstable, the ceiling is sagging, or no immediate hazard is apparent.
Next step: Stay indoors and follow local emergency or utility guidance while the hazard remains. Once conditions are safe, continue with ground-level documentation; request urgent help for a sagging ceiling, fire, exposed wiring, or unstable structure.
Stop if: Stop immediately for downed or sparking lines, active fire, falling material, structural movement, or any need to enter an unsafe area.
Why this matters
Why: An active weather or structural hazard takes priority over roof diagnosis. A clear, calm site permits only limited safe observation, not roof access.
-
Check 2
Only from an existing, dry, safe attic access point with known footing, look without stepping into the attic for daylight, wet insulation, water tracks, staining, mold-like growth, or a sagging roof or ceiling; do not enter a damaged or electrically wet space.
Expected result: Daylight, wet insulation, a fresh water track, active dripping, widespread dampness, or sagging is visible, or the safe access point shows none of these clues.
Next step: Photograph the clue from the safe access point and arrange prompt roofing service; leave the area if the ceiling or framing is unstable. If the view is dry and safe, continue with ground-level observations rather than entering farther.
Stop if: Stop for unstable framing, exposed or wet electrical equipment, a sagging ceiling, unsafe footing, excessive heat, or any need to move insulation or probe materials.
Why this matters
Why: Interior clues support water entry or structural concern, but they do not identify where water entered because it can travel through roof layers. No visible clue does not rule out concealed damage.
-
Check 3
From the ground and other already safe viewpoints, photograph the affected slope and yard, and look for missing shingles, raised tabs, creases, tears, exposed layers, detached flashing, damaged soffit or fascia, roof fragments, and debris; do not use a ladder or climb to improve the view.
Expected result: Material is missing on the ground or roof, tabs are visibly raised or creased, flashing or edge trim is displaced, soffit or fascia is damaged, or no exterior clue is visible.
Next step: Keep people clear of loose pieces and give dated photos and the approximate roof side to a qualified roofer. Do not retrieve material from a roof, pull loose flashing, or press a lifted shingle flat.
Stop if: Stop for loose material overhead, an unstable gutter or fascia, a damaged tree, high wind, slippery ground, or any viewpoint that requires a ladder or roof entry.
Why this matters
Why: These patterns make wind-related roof-covering or perimeter damage more plausible, but a distant view cannot establish the full repair scope. No visible clue does not exclude damage hidden by the roof angle or covering.
-
Check 4
Compare the safe observations with the storm timing: note edge or corner lift, raised or creased tabs, tearing, blow-off, and debris direction, while separately noting random dents, depressions, granule loss, long-term curling, brittleness, or prior wear; do not declare a cause from appearance alone.
Expected result: Damage is concentrated at edges after a wind event, impact-like marks are random, the covering shows broad age-related wear, or the pattern is mixed or uncertain.
Next step: Report the pattern and event history, but let the roofer distinguish wind, impact, age, installation, flashing, and concealed-layer causes. Do not order a part or full replacement based only on a ground photo.
Stop if: Stop if identifying the pattern would require touching, scraping, lifting, walking on, or removing roofing material.
Why this matters
Why: Edge lift or blow-off after wind makes wind involvement more plausible. Random dents or depressions can point toward impact, while widespread curling or brittleness can reflect age or weathering. Mixed patterns may have more than one cause.
-
Check 5
From a dry, safe position, check ceilings and walls for new discoloration, wet spots, peeling paint, or dripping, and move belongings only if doing so does not bring you near water and electricity; do not puncture a ceiling or attempt a roof cover.
Expected result: Water is actively entering, a stain is enlarging or wet, finish is peeling or bubbling, or the mark is dry and unchanged.
Next step: Keep people away from the area, document the location and timing, and request prompt roofing service. If water is near electrical equipment, isolate the area and obtain qualified electrical or emergency help from a safe location; do not touch wet equipment.
Stop if: Stop for water near electricity, a sagging ceiling, falling finish, visible mold disturbance, or any need to open the ceiling or wall.
Why this matters
Why: Active or changing moisture raises the urgency of temporary weather protection and leak assessment. A dry mark may be old, but it does not prove the roof is sound.
-
Check 6
Record the storm date, the roof side and approximate affected area, safe photos before cleanup, roof covering type and age if known, prior repairs, and any interior or yard clues, then request a qualified roofing inspection; do not clean, nail, seal, or repair the roof first.
Expected result: The roofer can receive dated evidence and a clear symptom history, or important details are unknown because access is unsafe or the roof is obscured.
Next step: Ask the roofer to assess the covering, edges, flashing, underlayment, deck, and adjacent soffit or fascia, and to provide a safe temporary-protection plan if an opening is exposed. Follow any applicable insurance documentation process without altering the damage.
Stop if: Stop all user repair attempts; roof access, debris removal, tarping, shingle work, and concealed-layer assessment belong to qualified professionals.
Why this matters
Why: A complete history helps the professional separate wind blow-off from impact, age, flashing, underlayment, deck, or installation issues. Unknown details are a reason to preserve uncertainty, not to guess.
Use your observations
Decision map
Find the observation that best matches what you see, then follow the next safe action.
-
PATH 01Next step
What you see
Missing or lifted shingles are visible and there is daylight, a fresh stain, active dripping, or wet insulation.
Do this next
Keep clear of the affected area and request prompt professional inspection and temporary weather protection. Do not climb, patch, or attach a cover yourself.
Why this path and its safety boundary
Why it matters: An open weathering path with interior evidence is more concerning than an isolated cosmetic mark and may include concealed underlayment or deck damage.
-
PATH 02Next step
What you see
Raised or creased tabs or edge displacement are visible after wind, but no interior water is yet evident.
Do this next
Photograph from the ground and arrange a qualified roof inspection soon; do not press, glue, nail, or lift the shingle to test it.
Why this path and its safety boundary
Why it matters: Wind involvement is plausible and the roof may still be shedding water, but a delayed leak or hidden seal, flashing, or deck problem remains possible.
-
PATH 03Next step
What you see
The roof view is mostly intact, but water appears inside after the wind event.
Do this next
Document the interior location and timing and request leak tracing by a qualified roofer. Do not hose-test, open the ceiling, or remove roofing layers.
Why this path and its safety boundary
Why it matters: The entry point may be a concealed shingle defect, flashing or penetration failure, or water traveling away from the entry point; a clean ground view does not rule it out.
-
PATH 04Next step
What you see
The visible pattern is random dents or depressions, or broad curling and brittleness rather than a wind-aligned edge lift.
Do this next
Report all observed patterns and the storm history for a professional assessment of cause and scope. Do not choose replacement material by appearance alone.
Why this path and its safety boundary
Why it matters: Impact, age, weathering, or prior installation conditions may be involved instead of wind alone; cause cannot be confirmed from a distant view.
-
PATH 05Next step
What you see
A downed line, unstable tree or roof section, falling debris, active fire, wet electrical equipment, or sagging ceiling is present.
Do this next
Leave the hazard area, keep others away, and contact the appropriate emergency, utility, electrical, or structural professional from a safe location. Wait for clearance before any roof assessment.
Why this path and its safety boundary
Why it matters: This is an immediate safety or structural hazard, not a routine shingle check.
Helpful context
Understand the symptom
Wind damage is often concentrated at the perimeter
The roof edge, rake, corners, and areas around penetrations can see strong uplift. A shingle may look present from the ground but have a raised tab, crease, tear, or failed seal. Missing material, bent flashing, or damage to the soffit and fascia can expose the weather-shedding assembly. That is why a visible shingle symptom is a reason for inspection, not a reliable invitation to make a spot repair.
Separate storm safety from roof checking
Do not inspect outdoors while wind, lightning, hail, falling branches, or an official warning is active. Afterward, stay on the ground and keep clear of loose roof pieces, damaged trees, unstable gutters, and any power line. An attic view is optional and limited to an existing, dry, safe access point with known footing; a wet, dark, damaged, or electrically affected attic is a service boundary.
Temporary protection and permanent repair need roof access
A professional should determine whether the wind affected only the covering or also the flashing, underlayment, roof deck, or adjacent trim. GAF recommends professional help for inspection, temporary protection, and repair. Do not improvise a tarp or adhesive: a wet or sloped roof, hidden damage, and fasteners or sealants in the wrong location can add injury or water-entry risk. Preserve safe photos and the event timing for the roofer and, if relevant, your insurer's process.
Safety boundary
Stop conditions
- Do not climb, use a ladder, walk on the roof, lean over an edge, or inspect outdoors during high wind, lightning, hail, or an active warning.
- Do not press a lifted shingle down, pull flashing, apply adhesive or sealant, drive fasteners, attach a tarp, or remove roof materials as a user repair.
- Do not touch downed power lines, wet electrical equipment, unstable trees, loose roof material, damaged gutters, or structural debris.
- Stop an attic view for unsafe footing, wet or exposed wiring, unstable framing, excessive heat, mold or contamination, a sagging ceiling, or a need to move insulation.
- Keep people clear and request urgent professional help for active water entry, falling material, fire, structural movement, or any condition that cannot be safely observed.
Only after diagnosis
Potential parts
- matching replacement shingles
Consider only after a qualified roofer confirms that individual shingles are the correct scope and identifies the existing covering, exposure, color, age, and attachment requirements.
Confirm the exact roof system and local installation requirements; a similar-looking shingle is not proof of fit or weathering compatibility. - roof underlayment or leak-barrier material
Consider only if professional inspection finds that wind or water reached the underlayment or an exposed section needs system-compatible repair.
Underlayment selection and installation depend on the roof assembly, climate, slope, and local requirements; do not expose or install it as a user test. - roof-edge or flashing components
Consider only if inspection confirms displaced or damaged flashing, edge metal, soffit, fascia, or a penetration detail rather than shingle-only damage.
The correct profile and integration with shingles, wall, gutter, and drainage layers must be confirmed on site by the roofing professional.
When checks do not resolve it
Need a professional?
Arrange prompt qualified roofing service for any missing, lifted, creased, torn, or displaced shingle, exposed roof layer, damaged flashing or edge material, or interior moisture after wind. Request professional temporary weather protection when an opening or active leak is present. Treat a sagging ceiling, water near electricity, unstable structure, falling material, fire, downed lines, or ongoing severe weather as an urgent safety situation.
Safety scope: This article is limited to storm-safe, ground-level documentation and an optional safe view from an existing attic access point. A qualified roofer must handle ladders, roof access, debris removal, tarping, shingle or flashing work, leak tracing, and roof-deck or structural assessment.
Common questions
FAQ
Can wind damage shingles without removing them?
Yes. Raised tabs, creases, tears, and a failed seal can leave a shingle in place while weakening its weather protection. A ground view cannot confirm the seal or concealed layers, so have a roofer inspect it.
How can I tell wind damage from hail or age?
Edge or corner lift, raised tabs, and blow-off after a wind event make wind involvement more plausible. Random dents or depressions can suggest impact, while broad curling or brittleness can reflect age or weathering. Mixed causes are possible, and appearance alone is not conclusive.
Should I climb onto the roof to take a closer look?
No. Use safe ground-level views and photos. Roof access, ladders, loose material, and storm conditions create fall and debris hazards; a qualified roofer should perform the close inspection.
What if there is a ceiling stain but no missing shingle is visible?
Treat it as possible water entry. Water can travel through roof layers or enter at flashing or a penetration away from the visible stain. Photograph it from a safe, dry position and request leak tracing; do not open the ceiling or hose-test the roof.
Can I nail, glue, caulk, or tarp a loose shingle myself?
Do not improvise a roof repair or tarp. Pressing or fastening the material can worsen concealed damage and requires unsafe access. Ask a qualified roofer for professional temporary weather protection and repair.
When is wind-damaged roofing an emergency?
Leave the area and obtain urgent help for a downed or sparking line, fire, unstable tree or roof section, falling material, a sagging ceiling, water near electrical equipment, or active uncontrolled water entry. During an active warning, shelter indoors and wait for official clearance.
Read the exact guide
Official sources
- During a High Wind EventNational Weather Service, National Oceanic and Atmospheric Administration · General U.S. high-wind safety guidance; local warnings and emergency instructions control during a particular event.
- Windy Season? How to Identify and Fix Wind-Damaged ShinglesGAF · General residential asphalt-shingle guidance; the actual roof assembly, storm conditions, and local requirements control a particular inspection or repair.
- Storm Damage Roof Repairs: Resources GuideGAF · General residential post-storm guidance from a roofing manufacturer; safe access, the installed roof assembly, and local emergency instructions control.
Community feedback
Share a repair observation
Share a plain-text repair observation. Accepted observations are published automatically; this page may take a moment to update.