
On this page
Start here
Quick answer
A brown, yellow, gray, or black patch on one solar panel is not enough to prove a thermal hot spot: it may be surface soiling, laminate or encapsulant aging, storm damage, or an electrical defect. Treat a localized mark as a condition to document and investigate, not as permission to touch, clean aggressively, walk on, or remove the module. From the ground, photograph its location and any cracked glass, bubbles, delamination, moisture, frame damage, or junction-box change; review the inverter or monitoring record for a matching string or module performance change. A trained PV professional should confirm a suspected hot spot with infrared imaging and select further electrical or electroluminescence tests. If there is smoke, arcing, a burning smell, a visibly damaged module, water in the laminate or junction box, or a hot or damaged cable, keep people away, follow the installed emergency procedure if it is safe to do so, and arrange qualified solar service before repowering.
Before you begin
Safety first
- Do not walk on or lean on modules, open junction boxes, disconnect connectors, remove a module, probe DC wiring, bypass protection, or assume daylight has de-energized the array. For smoke, arcing, burning odor, exposed conductors, or an active fire, keep away and contact emergency services; follow the installed shutdown procedure only if it is safe and authorized.
Work through in order
Diagnostic checks
Use only checks that match the exact appliance or system and its official guide.
-
Check 1
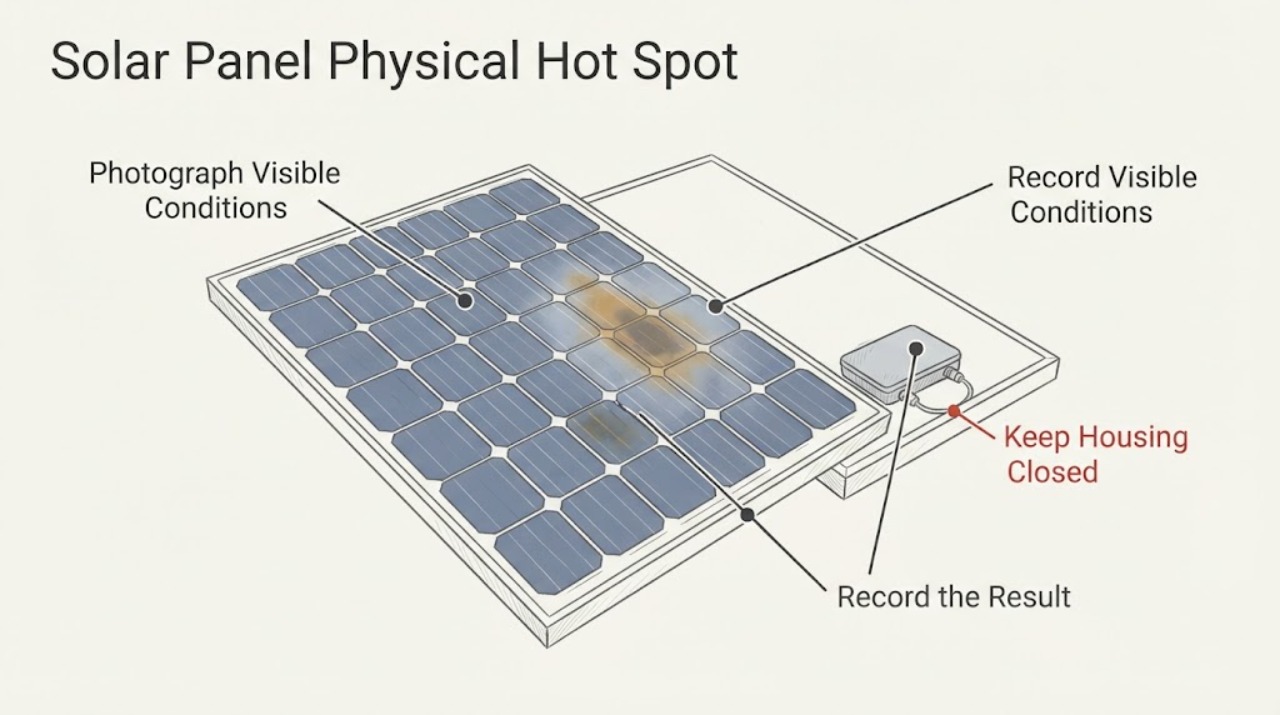
From the ground or another ordinary safe viewpoint, photograph the discolored area and record whether it is on the front glass, visible through the laminate, on the backsheet, near a frame or junction box, or on a cable or connector. Include the module position and its nameplate or serial information only if it can be read without approaching an unsafe location.
Expected result: The mark is a clean surface deposit, a diffuse yellow or brown laminate area, a sharply localized dark or burned-looking patch, a bubble or delamination, a crack, or a change near the junction box or wiring.
Next step: Save the photos with the date, weather, and module location. Do not scrape, press, wash forcefully, climb onto the array, or open any module or enclosure; continue with monitoring and service checks.
Stop if: Stop approaching if the roof or ground is wet or unstable, glass appears broken, a cable is loose or damaged, there is smoke, a burning smell, arcing, or a hot-looking junction-box or connector area.
Why this matters
Why: A visible deposit may be cosmetic or soiling, while a localized dark or burned-looking area, laminate bubble, crack, delamination, moisture, or junction-box change is a physical-damage clue. None of these appearances alone confirms or rules out a thermal hot spot.
-
Check 2
Without climbing, touching the module, or moving roof equipment, record nearby conditions that could explain a localized change: recent hail, wind, impact, snow, standing debris, persistent shade, bird deposits, or a new obstruction. Note whether the mark follows one cell or narrow strip, and whether it appeared suddenly or grew over time if prior photos exist.
Expected result: The discoloration appeared after a weather or impact event, aligns with a persistent obstruction or debris, is confined to one cell or strip, or has no known trigger and is slowly spreading.
Next step: Keep the module untouched and provide the timeline and photographs to the installer, module manufacturer, or qualified PV inspector. If there was visible storm damage, do not repower until the required visual and electrical inspection is complete.
Stop if: Stop for cracked glass, loose components, exposed conductors, water entry, an unstable roof, or any need to remove debris from a roof-mounted module.
Why this matters
Why: A storm or impact history raises the need to check for invisible cell or laminate damage; a mark confined to one cell or strip is more concerning than uniform aging but still needs thermal or electrical confirmation. A temporary obstruction may explain an appearance or performance change without proving module damage.
-
Check 3
From the normal user interface, review inverter or system-monitoring data for the affected module or string, if the system exposes that information. Record alerts, ground-fault or arc-fault indications, a sudden output change, and whether the affected area corresponds to one string or module; do not open the inverter or reset a protection device as a diagnostic test.
Expected result: Monitoring is normal and the discoloration is stable, or an alert or persistent output loss appears at the same time or on the same module or string.
Next step: Save the alert text and the time-series or daily record and arrange qualified PV diagnosis when performance changed, a protection alert appears, or the mark is worsening. Do not repeatedly reset a fault or replace a fuse without finding its cause.
Stop if: Stop using the system and arrange urgent qualified service for an arc-fault indication, smoke, burning odor, exposed or damaged wiring, water near electrical equipment, or repeated protective trips.
Why this matters
Why: Normal monitoring does not prove that a visible mark is harmless, but a matching output loss or electrical alert makes a module, connector, wiring, or protection problem more likely than a purely cosmetic change. A system-level alert cannot identify which component failed.
-
Check 4
Ask a qualified PV professional to perform a ground-level or appropriately planned visual assessment and, when conditions and equipment permit, infrared imaging of the modules, connectors, and junction-box areas. Provide the discoloration photos, module location, monitoring history, weather or impact timeline, and module documentation.
Expected result: The thermal image shows no repeatable abnormal temperature pattern, a localized hot area at the mark, a hot connector or junction box, or a pattern that requires electroluminescence or electrical testing to interpret.
Next step: Have the professional correlate the image with visual findings and, if justified, use electrical or electroluminescence testing to decide whether the module, connector, wiring, or another component should be repaired or replaced. Keep the system in the state recommended by the professional until the cause is addressed.
Stop if: Do not perform thermal, electroluminescence, I-V, connector, junction-box, or DC-wiring testing yourself unless you are trained and authorized for the equipment and site.
Why this matters
Why: DOE says IR imaging can identify module hot spots and many failure modes, but trained personnel are needed to interpret the images. A hot area confirms a condition requiring technical evaluation, not a safe homeowner repair or a specific replacement part.
-
Check 5
Before any service visit, compare the current condition with the module's installation records, warranty information, prior photos, and the system's maintenance log. Record the exact module position, visible defect, performance symptom, and any inspection result without assigning a failed part from the color alone.
Expected result: The mark is stable with no electrical or thermal anomaly, the mark is progressing, or inspection confirms a hot spot, crack, delamination, water intrusion, connector, or junction-box fault.
Next step: Give the complete record to the installer, manufacturer, insurer, or qualified PV service provider and follow their repair, isolation, or replacement recommendation. Keep all affected components and test results identified by location.
Stop if: Stop before repowering or further use when the system has visible physical damage, a confirmed hot spot, a protection alert, smoke, arcing, burning odor, or damaged electrical insulation.
Why this matters
Why: A stable isolated appearance may be monitored or evaluated for material aging, but progression or a confirmed thermal, physical, or electrical defect makes continued operation a professional decision. The remedy may be module-level, wiring-level, or system-level; replacing a panel solely because it is discolored can miss the root cause.
Use your observations
Decision map
Find the observation that best matches what you see, then follow the next safe action.
-
PATH 01Next step
What you see
The discoloration is visible from a safe viewpoint, but there is no cracked glass, delamination, moisture, cable or junction-box damage, monitoring alert, or confirmed thermal anomaly.
Do this next
Keep dated photos and normal monitoring records, avoid disturbing the module, and ask the installer or manufacturer whether a baseline inspection is appropriate if the mark persists or changes.
Why this path and its safety boundary
Why it matters: The color may be soiling or material aging, but visual stability does not prove the module is electrically healthy and does not rule out a developing defect.
-
PATH 02Next step
What you see
The mark appeared after hail, wind, impact, or another event, or the module now shows cracked glass, bubbles, delamination, moisture, loose framing, or other visible damage.
Do this next
Keep people away, follow the documented system shutdown procedure only when safe and authorized, and arrange visual and electrical inspection before repowering.
Why this path and its safety boundary
Why it matters: Weather or impact can leave damage that is not fully visible at ground level and can raise hot-spot or fire risk; a normal-looking output reading does not clear a visibly damaged module.
-
PATH 03Next step
What you see
The localized mark aligns with a persistent output loss, inverter or monitoring alert, or a mismatch affecting one module or string.
Do this next
Arrange qualified PV inspection with infrared and, if indicated, electrical or electroluminescence testing. Do not reset protection repeatedly or substitute a panel without identifying the fault path.
Why this path and its safety boundary
Why it matters: A module, connector, wiring, or protection problem is more likely than a purely cosmetic discoloration, but monitoring cannot identify the defective component by itself.
-
PATH 04Next step
What you see
A trained inspection finds a repeatable hot area at the discoloration, along a cell or interconnect, or at a connector or junction box.
Do this next
Keep the affected equipment in the professional's recommended safe state and obtain the written diagnosis and repair or replacement decision. Do not touch the module or attempt a bypass.
Why this path and its safety boundary
Why it matters: The mark is associated with a thermal condition that needs technical evaluation. It does not establish whether the module, bypass path, connector, wiring, or another component is the root cause.
-
PATH 05Next step
What you see
There is smoke, arcing, a burning smell, a visibly hot or damaged cable or junction box, exposed conductor, or repeated electrical protection trip.
Do this next
Keep people clear, contact emergency services for active smoke or fire, and use only the installed emergency shutdown process if it can be done without approaching the hazard. Arrange qualified PV service before any inspection or repowering.
Why this path and its safety boundary
Why it matters: This is an immediate electrical or fire-safety boundary, not a cosmetic inspection problem. PV components may remain energized in daylight.
Helpful context
Understand the symptom
Color is a warning sign, not a diagnosis
A localized brown or dark area can be on the glass, within the laminate, along a cell or bus area, or near the module's junction-box region. Color, shape, and a phone photograph can show where to investigate, but they cannot show the module temperature or identify a failed cell, interconnect, bypass path, or laminate. A real hot spot is established by a thermal or electrical inspection and interpreted with the module's construction and operating history.
Stay at ground level and keep the PV system's electrical boundary
PV modules can produce electricity whenever they are illuminated, and rooftop work adds fall and glass hazards. Use only ground-level or otherwise ordinary safe viewing. Do not walk, lean, press on, wash aggressively, open a junction box, disconnect connectors, remove a module, or probe DC wiring. If a storm left visible damage, the system should be inspected electrically before it is put back into service.
Only after diagnosis
Potential parts
- PV module
Consider a module replacement only after qualified visual, thermal, and electrical diagnosis confirms module-level damage or a failed module and the installer or manufacturer determines that replacement is the appropriate remedy.
Confirm the exact model, electrical characteristics, dimensions, mounting, connector, system design, and warranty requirements before selecting any replacement; appearance alone is not compatibility proof. - module junction-box or bypass-diode assembly
Consider this category only when a qualified technician identifies a junction-box, bypass-path, or connector fault and the module manufacturer permits that service; a visible spot does not establish this failure.
Use the module manufacturer's service instructions and exact electrical rating. Do not open, bypass, or substitute a junction-box or diode assembly as a homeowner repair.
When checks do not resolve it
Need a professional?
Stop approaching and arrange qualified solar service for a confirmed or suspected hot spot, visible crack, delamination, water intrusion, burned or unusually hot area, damaged cable or junction box, output loss, inverter or protection alert, or discoloration that is spreading or changing. Smoke, arcing, burning odor, or fire requires immediate distance and emergency response. Do not repower visibly damaged equipment until the required professional electrical inspection is complete.
Safety scope: Do not walk on or lean on modules, open junction boxes, disconnect connectors, remove a module, probe DC wiring, bypass protection, or assume daylight has de-energized the array. For smoke, arcing, burning odor, exposed conductors, or an active fire, keep away and contact emergency services; follow the installed shutdown procedure only if it is safe and authorized.
Common questions
FAQ
Can I confirm a solar-panel hot spot from a brown or black patch?
No. The patch is a useful location clue, but color alone cannot show the module temperature or identify a cell, interconnect, laminate, connector, or junction-box fault. A trained PV professional should correlate the appearance with monitoring and thermal or electrical testing.
Should I clean or touch the discolored area to see whether it goes away?
Do not scrape, press, wash aggressively, walk on, or open the module. Photograph it from a safe viewpoint and ask the installer or qualified PV professional to assess whether it is surface soiling, material aging, physical damage, or a thermal condition.
What inspection can confirm a suspected hot spot?
DOE describes infrared imaging as a way to identify module hot spots and notes that trained personnel are needed to interpret the images. Depending on the findings, the professional may correlate IR with visual, electrical, or electroluminescence testing.
Read the exact guide
Official sources
- Photovoltaic PerformanceNational Laboratory of the Rockies, U.S. Department of Energy · Professional characterization of solar PV module defects
- A Guide to Fire Safety with Solar SystemsU.S. Department of Energy · PV hot spots, electrical arcing, emergency safety, and shutdown boundaries
- Hail Damage Mitigation for PV SystemsU.S. Department of Energy, Federal Energy Management Program · Solar PV localized damage after hail or other weather events
- Solar Photovoltaic Performance and Efficiency BasicsU.S. Department of Energy · Solar cell temperature and physical material consequences
- Optimizing Solar Photovoltaic Performance for LongevityU.S. Department of Energy, Federal Energy Management Program · Solar PV hot spots, cell cracks, water intrusion, delamination, and performance monitoring
- PV System Owner’s Guide to Identifying, Assessing, and Addressing Weather Vulnerabilities, Risks, and ImpactsU.S. Department of Energy, Federal Energy Management Program · Solar PV module hot-spot inspection and physical-damage assessment
Community feedback
Share a repair observation
Share a plain-text repair observation. Accepted observations are published automatically; this page may take a moment to update.