
On this page
Start here
Quick answer
An active drip through a stained ceiling needs immediate containment and source control, not paint or a cosmetic patch. Keep people and contents out of the drip area, use a container only from stable dry footing, and take dated photos without touching a bulging or sagging surface. If water is near a light, outlet, fan, wiring, or standing water, do not handle the fixture or walk through water; have a qualified electrician isolate the affected circuit from a dry location. If the ceiling is sagging, cracking, popping, or shedding material, leave the room and treat it as a structural hazard. From a safe position, note whether the drip changes with rain, an upstairs fixture, an appliance, HVAC operation, or continued water use, then call the appropriate plumber, roofer, HVAC or water-damage professional. Do not open the ceiling, puncture a bulge, climb onto the roof, or assume the stain is directly below the source.
Before you begin
Safety first
- This article supports safe observation, documentation, and limited containment from stable dry footing only. Do not enter standing water, touch wet electrical equipment, puncture or open the ceiling, climb the roof or attic, or restore utilities after water damage without qualified inspection.
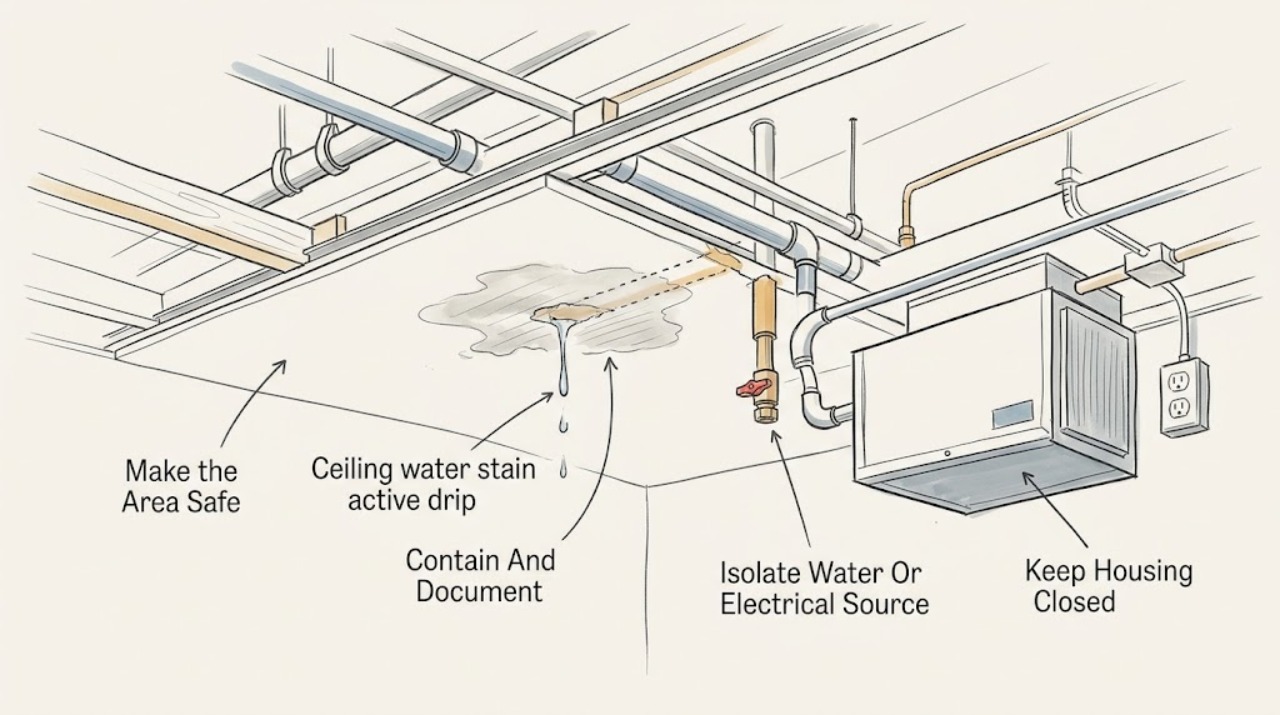
Work through in order
Diagnostic checks
Use only checks that match the exact appliance or system and its official guide.
-
Check 1
From the doorway or another stable dry position, look at the ceiling, floor, nearby fixtures, and room access before approaching the drip.
Expected result: Record whether there is standing water, water near a light or outlet, a bulge or sag, spreading cracks, peeling or falling material, popping or creaking sounds, a strong odor, or a blocked exit.
Next step: Keep occupants and pets out of the affected area. For structural warning signs, leave the room or building as appropriate and contact emergency services or a qualified building professional. For water near electrical equipment, keep clear and arrange electrician assessment from a dry location.
Stop if: Do not enter standing water, touch wet fixtures or wiring, stand beneath a bulge, use a ladder, or remain inside if the ceiling is moving, material is falling, the exit is threatened, or a gas odor or fire symptom is present.
Why this matters
Why: Water near electrical equipment creates a shock and fire concern; a bulge, sag, new crack, or structural noise means the wet ceiling may be unstable. A steady drip without those signs is still an active leak, but it does not justify standing under or touching the ceiling.
-
Check 2
If the floor is stable and dry and the ceiling is not bulging, place a container under the drip from the side, move contents away without contacting wet electrical equipment, and photograph the stain and drip path with the date and time.
Expected result: Note the drip rate or whether it is intermittent, the stain size and edge, any bubbling or discoloration, the water's apparent color or odor, and whether the container is filling faster after rain or fixture use.
Next step: Keep the photos and a short timeline for the plumber, roofer, HVAC technician, landlord or building manager, and remediation professional. Protect belongings only from safe flooring and do not make a ceiling opening to drain trapped water.
Stop if: Stop if the container cannot be placed without a ladder or pressure on the ceiling, if the floor becomes wet or slippery, if water reaches electrical equipment, or if the ceiling changes shape or sheds material.
Why this matters
Why: A changing drip rate supplies useful timing evidence, but the visible stain is not a reliable map of the breach. Brown, dirty, or foul-smelling water may indicate a different contamination and cleanup boundary than clean rain or supply water; do not taste or handle it unnecessarily.
-
Check 3
From a dry, accessible location, identify whether the room is below a bathroom, kitchen, laundry, water heater, HVAC equipment, roof or exterior wall; if a clearly labeled local water valve can be reached without entering water, stop using the suspected fixture and have the water supply isolated as appropriate.
Expected result: Observe whether the drip changes after an upstairs fixture is not used, after a safely accessible appliance is stopped, after HVAC operation changes, or after rain stops; do not run fixtures deliberately to provoke a leak.
Next step: Report the timing and location to the relevant qualified professional and keep suspected fixtures, appliances, or HVAC equipment off until they advise otherwise. If the house supply cannot be isolated safely, call the water utility or plumber rather than searching through wet areas.
Stop if: Do not enter standing water to reach a valve or breaker, handle a wet appliance, open an electrical box, shut off an unfamiliar gas valve, climb to inspect the roof, or remove ceiling material.
Why this matters
Why: A change tied to a particular fixture or appliance makes a plumbing or condensate source more likely; rain-linked changes make a roof or exterior source more likely. No change does not rule out a hidden pipe, roof path, or stored water in the ceiling. Water near wiring remains an electrical problem regardless of the likely plumbing source.
-
Check 4
From ordinary safe access only, compare the drip timing with weather and water use, and inspect visible adjacent walls, upper-floor fixtures, roof edges, gutters, attic access trim, and HVAC drain areas without entering the attic or roof.
Expected result: Record rain or snow at onset, a stain near an exterior wall or roof penetration, a drip below a bathroom or appliance, a condensate pan or drain symptom, musty odor, or water traveling along a wall or ceiling joint.
Next step: Send the location map, photos, weather and fixture timeline, and any safe observations to the professional who can inspect the roof, plumbing, HVAC drain, or building envelope. Keep the ceiling and roof untouched until inspected.
Stop if: Do not climb ladders, walk on a roof, crawl into an attic, move insulation, remove light trim, probe drywall, or use a powered tool near wet material.
Why this matters
Why: The pattern narrows the likely trade but cannot prove the entry point because water can travel before appearing. Musty odor or persistent dampness adds a mold and material-drying concern; an HVAC system suspected of contamination should not be run until checked.
-
Check 5
Arrange a qualified source inspection and ask for a repair-and-drying plan that addresses the leak source, wet ceiling assembly, nearby insulation and wiring, and any required mold or contaminated-water assessment.
Expected result: Have the report identify the confirmed or most likely source, the materials affected, whether electrical equipment was wet, whether the ceiling is structurally sound, and what must be removed, dried, tested, or replaced before cosmetic repair.
Next step: Follow the qualified professional's sequence: control the source, make the area safe, dry or remove affected materials, inspect electrical and structural elements, then repair and finish the ceiling only after the assembly is dry and sound.
Stop if: Do not paint, caulk, install new drywall, turn on a suspect HVAC system, or restore wet electrical equipment before the source and drying status are confirmed.
Why this matters
Why: A dry surface or stopped drip does not prove that the cavity is dry or that wiring and framing are safe. A repair plan that addresses only stain blocking can leave hidden moisture, mold, corrosion, or a recurring leak.
Use your observations
Decision map
Find the observation that best matches what you see, then follow the next safe action.
-
PATH 01Safety boundary
What you see
The ceiling is sagging or bulging, cracks or material are spreading or falling, popping or creaking is present, water is near a light or wiring, or the room has standing water.
Do this next
Leave the area, keep others out, and call emergency responders for fire, gas, collapse or immediate danger. Arrange a qualified electrician and building or structural assessment before reentry or restoration.
Why this path and its safety boundary
Why it matters: The immediate risk is structural failure or electric shock, not stain removal. Wet building materials can become heavy and unstable, and electrical equipment near water may remain hazardous.
Safety stop: Do not touch the ceiling or electrical fixtures, walk through water, use an appliance or powered tool, enter the attic, or attempt to drain the bulge yourself.
-
PATH 02Safety boundary
What you see
The drip starts or increases during rain or snow, appears near an exterior wall or roof penetration, or continues after the weather event while plumbing use is unchanged.
Do this next
Keep people off the roof and arrange qualified roof or building-envelope inspection. From the ground, provide weather timing and photographs; use a container only if the room remains structurally and electrically safe.
Why this path and its safety boundary
Why it matters: A roof, flashing, gutter, exterior-wall or ice-dam path is more likely, but water may have traveled along framing before reaching the stain.
Safety stop: Do not climb onto the roof, remove snow or debris from a roof edge, seal from inside, or close the stain with paint while the source is active.
-
PATH 03Safety boundary
What you see
The drip follows use of an upstairs bathroom, sink, toilet, laundry appliance, water heater, or a known pipe route, and is not linked to weather.
Do this next
Stop using the suspected fixture or appliance and have a qualified plumber or appliance technician isolate and repair the source. If a safely accessible labeled water shutoff is available from dry footing, use the appropriate shutoff; otherwise call the water utility or plumber.
Why this path and its safety boundary
Why it matters: A supply, drain, fixture seal, appliance connection, or concealed pipe is more likely than a roof-only leak; the ceiling stain may still be offset from the break.
Safety stop: Do not open the ceiling to find the pipe, operate a wet appliance, enter standing water to reach a valve, or assume tightening a visible fitting fixes the concealed leak.
-
PATH 04Safety boundary
What you see
The drip is not clearly tied to rain or fixture use, appears near an HVAC run or vent, or there is persistent dampness or a musty odor.
Do this next
Have an HVAC or water-damage professional inspect the condensate path and ceiling cavity as appropriate. If HVAC contamination is suspected, leave the system off until an experienced professional checks it; dry affected materials after the source is controlled.
Why this path and its safety boundary
Why it matters: Condensation, a condensate drain or pan issue, a hidden plumbing path, or retained moisture is possible. A stopped drip may reflect a changing operating condition rather than a repaired source.
Safety stop: Do not run a suspect HVAC system to test it, cut into the ceiling, disturb insulation, or paint over damp or moldy material.
-
PATH 05Safety boundary
What you see
The water is foul-smelling or visibly contaminated, the room has extensive wet materials or standing water, mold is widespread, or the leak involves sewage or floodwater.
Do this next
Keep occupants away as needed and arrange a water-damage or mold-remediation professional with experience in contaminated water. Follow public-health and utility instructions before cleanup or reentry.
Why this path and its safety boundary
Why it matters: The cleanup boundary includes contamination and indoor-air or health risks, not just a drywall repair. Porous ceiling and insulation materials may need controlled removal and disposal.
Safety stop: Do not handle contaminated water, remove moldy porous ceiling materials, run a possibly contaminated HVAC system, or mix cleaning chemicals without the correct professional plan.
Helpful context
Understand the symptom
A stain is a symptom, and the drip may not be directly above it
Water can travel along framing, roof sheathing, pipes, ducts, or the back of the ceiling before it appears at a stain. Timing is useful: rain-linked dripping raises the roof or exterior-envelope branch, while dripping after an upstairs shower, toilet, sink, appliance, or pipe use raises a plumbing branch. Condensation or an HVAC drain problem can also wet a ceiling without a storm. These are clues for a professional, not permission to open the ceiling or climb into an attic.
Contain water without loading the damaged ceiling
Place a bucket or shallow pan under the drip only if you can do so from stable, dry flooring and without standing beneath a bulge. Move furniture and electrical equipment away from the wet area from a safe position, and use battery lighting if the room is dark. Do not tape plastic to the ceiling, press on wet drywall, puncture a bulge, or place a ladder under the leak. A temporary container limits spread; it does not make the ceiling or the source safe.
Drying and mold work come after the leak is controlled
EPA recommends fixing the plumbing leak or other moisture source promptly and drying affected materials completely. Wet porous ceiling tiles, drywall, insulation, and similar materials may not be salvageable once moldy, and painting or caulking over mold does not solve the moisture problem. If water may be sewage or otherwise contaminated, or if the affected area is extensive or an HVAC system may be contaminated, use an experienced remediation professional rather than starting cleanup in the drip area.
Safety boundary
Stop conditions
- Do not stand beneath, press on, puncture, probe, or cut a bulging, sagging, cracked, or wet ceiling; leave the area if material is moving or falling.
- Do not enter standing water to reach a breaker or valve, touch wet light fixtures, outlets, wiring, appliances, or HVAC equipment, or restore power before qualified electrical inspection.
- Do not climb onto the roof or into an attic, move wet insulation, remove ceiling material, or use powered tools near the leak as a DIY source-tracing method.
- Do not paint, caulk, or install replacement drywall over an active or incompletely dried leak, and do not run a possibly mold-contaminated HVAC system.
- Call emergency responders for fire, gas odor, arcing, an imminent collapse, or an unsafe building; use qualified plumbing, roofing, HVAC, structural, electrical, or remediation service for the corresponding branch.
Only after diagnosis
Potential parts
- replacement ceiling drywall or ceiling tile
Consider replacement only after the leak is repaired and a qualified assessment confirms that the wet or moldy porous material cannot be dried and salvaged safely.
Match the existing ceiling system, fire or acoustic requirements, moisture exposure, framing support, and local code; do not cover wet material to hide a stain. - plumbing pipe, fitting, or fixture seal
Consider this category only when a qualified plumber identifies a leaking supply, drain, fixture connection, or concealed pipe as the source.
Confirm the exact pipe or fixture system, material, dimensions, access method, and applicable plumbing requirements; a visible ceiling drip does not identify the fitting. - roof flashing, membrane, or exterior seal component
Consider this category only when qualified roof or building-envelope inspection confirms that a roof penetration, flashing, membrane, gutter, or exterior joint is admitting water.
Match the installed roof system and weather details; do not apply an interior patch as a substitute for exterior source repair. - HVAC condensate pan or drain component
Consider this category only when an HVAC technician confirms a pan, drain, pump, or condensate connection is the source and identifies the failed component.
Confirm exact equipment model, drain routing, overflow protection, and installation requirements before ordering or fitting a component.
When checks do not resolve it
Need a professional?
Call emergency responders immediately for fire, gas odor, arcing, an imminent ceiling or roof collapse, or a building that appears unsafe. Arrange qualified electrical service when water is near wiring, fixtures, outlets, appliances, or standing water; arrange a plumber, roofer, HVAC technician, structural professional, or water-damage/mold remediator based on the observed pattern. Every active drip needs prompt source assessment even when the stain is small, because the visible point may be downstream from the leak.
Safety scope: This article supports safe observation, documentation, and limited containment from stable dry footing only. Do not enter standing water, touch wet electrical equipment, puncture or open the ceiling, climb the roof or attic, or restore utilities after water damage without qualified inspection.
Common questions
FAQ
What should I do first when water is actively dripping through a ceiling?
Keep people out of the area, check from a dry stable position for sagging, falling material, standing water, or water near electrical fixtures, and use a container only if it can be placed without a ladder or contact with the ceiling. Photograph the stain and timing, then arrange qualified source assessment.
Should I turn off the breaker when water is coming through the ceiling?
If water has reached electrical circuits or equipment, do not enter standing water or touch wet fixtures to reach a switch. A qualified electrician should isolate the affected circuit when you cannot reach the service panel from a dry location, and power should not be restored until the equipment is inspected.
Can I poke a hole in a bulging ceiling to drain it?
Do not puncture or probe an active bulge as a general DIY step. The ceiling may be heavy or unstable, and water may be near wiring or contaminated. Leave the area and have qualified building, water-damage, and electrical professionals decide how to make it safe.
How can I tell whether the drip is from the roof or plumbing?
Use timing as a clue without provoking the leak: rain or snow points more toward a roof or exterior path, while dripping after an upstairs fixture or appliance is used points more toward plumbing. A ceiling stain can be offset from the actual entry point, so a qualified professional must confirm the source.
Can I paint over a ceiling water stain after the drip stops?
Not yet. A stopped drip does not prove the cavity, framing, insulation, or wiring is dry and safe. Repair the source, assess and dry affected materials, address mold or contamination if present, and finish the ceiling only after the qualified professional confirms the assembly is dry and sound.
Read the exact guide
Official sources
- Mold Cleanup in Your HomeU.S. Environmental Protection Agency · EPA home mold-cleanup guidance; the size, contamination, materials, occupants, and building conditions determine whether professional remediation is needed.
- Snow and Roof DamageFairfax County, Virginia · Local government roof-distress guidance focused on snow loading; its warning signs and evacuation boundary are relevant to any ceiling leak accompanied by suspected structural distress, while structural professionals assess the actual building.
- Repairing Your Flooded HomeFederal Emergency Management Agency, hosted by Tennessee Department of Health · FEMA recovery guidance for flood-damaged homes; an isolated ceiling drip may require a smaller response, but the same cautions apply when the ceiling is sagging, water is near utilities, or the source is uncertain.
- Safety Guidelines: Reentering Your Flooded HomeCenters for Disease Control and Prevention · CDC guidance is written for flooded or storm-damaged homes; the electrical, reentry, drying, and HVAC precautions are relevant to serious interior water intrusion, while site-specific professionals determine the response.
- What to Do to Protect Yourself From Electrical HazardsCenters for Disease Control and Prevention · CDC disaster electrical-safety guidance; a qualified electrician and local utility determine safe isolation and restoration for a particular home.
Community feedback
Share a repair observation
Share a plain-text repair observation. Accepted observations are published automatically; this page may take a moment to update.