
On this page
Start here
Quick answer
If a door will not close because its lock or latch does not line up, do not force the handle or throw the deadbolt against resistance. First determine whether the panel reaches the frame and whether the lock works freely with the door open. If the lock works open but not closed, inspect the visible keeper or receiver and the door reveal for a shifted panel, hinge sag, debris, or weatherstrip pressure. Patio-door and window hardware use model-specific adjustment points; an Andersen guide, for example, distinguishes receiver adjustment on gliding doors from sash alignment on casement windows. Make only the small, documented adjustment for the exact product, testing the closure after each change. Stop and arrange qualified window-and-door service if the lock is loose or broken, the door is sagging, glass or frame is damaged, the panel must be removed, or the door cannot be secured without force.
Work through in order
Diagnostic checks
Use only checks that match the exact appliance or system and its official guide.
-
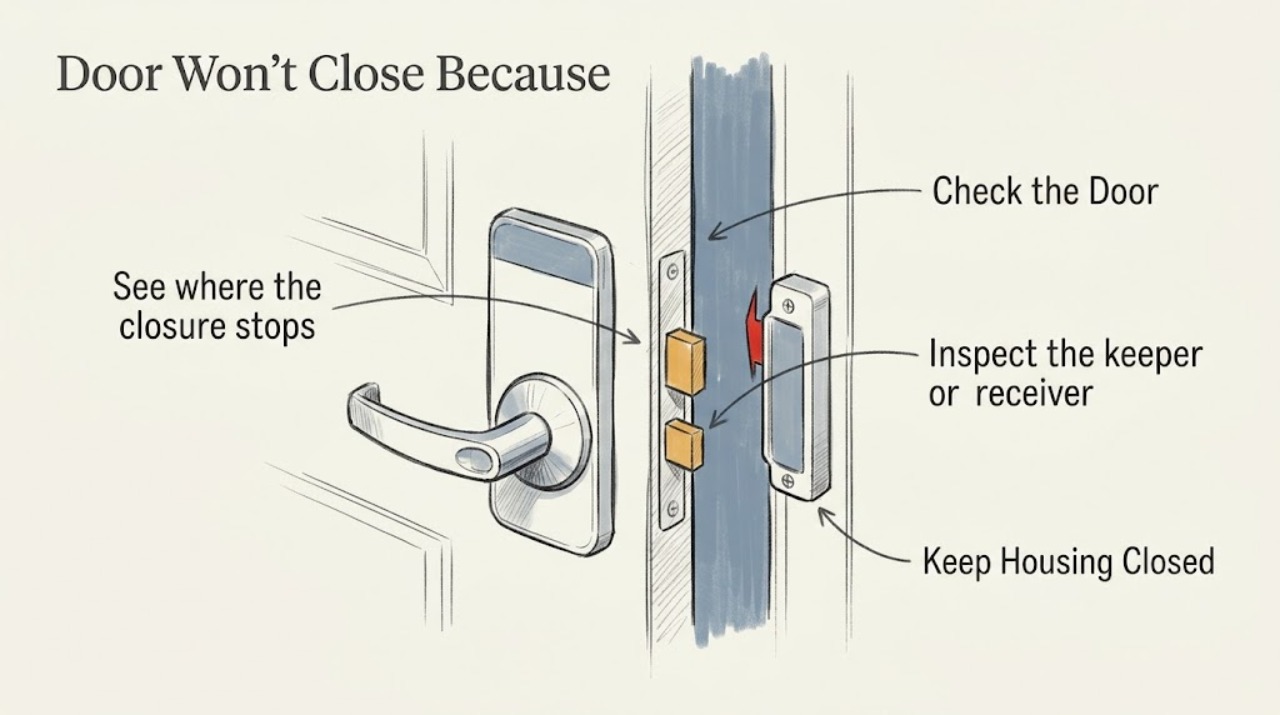
See where the closure stops
With people and pets clear of the opening, close the door slowly without turning the handle hard. Watch whether the panel reaches the frame, whether the latch or bolt contacts the keeper, or whether the panel rubs at the top, bottom, or latch side. Do not slam the door or force the lock.
Expected result: The panel stops before the frame, reaches the frame but the latch misses, the lock bolt is already extended, or the door closes and secures normally when handled gently.
Next step: Use the matching alignment or lock branch below. If the door closes and secures normally, do not make an adjustment; monitor only if the problem recurs.
Stop if: Stop if the door must be slammed, the lock must be forced, the glass or frame flexes, or the panel could fall or pinch someone.
Why this matters
Why: Stopping before the frame suggests a panel, hinge, roller, sill, seal, or obstruction issue. Reaching the frame while the latch misses points more directly to lock-to-keeper alignment. An extended bolt or a lock that binds without contact points toward the lock hardware itself.
-
Test the lock with the door open
Open the door enough to keep the lock and frame visible, then operate the handle or thumb turn gently as the product manual describes. Observe whether the latch or bolt retracts and extends smoothly with no key, handle, or thumb turn resistance. Do not test by holding the bolt against the frame or by removing the lock case.
Expected result: The lock operates freely while open, the latch remains extended or binds while open, or the handle is loose, damaged, or disconnected.
Next step: If it works open, continue with the visible keeper and alignment check. If it binds, remains extended, or the handle is damaged, leave the door unsecured only if safe and arrange qualified service.
Stop if: Do not spray an unknown lubricant into the lock, disassemble the lock case, or continue operating a loose handle that could leave the door unsecured.
Why this matters
Why: Free operation while open makes a strike, keeper, receiver, or panel-alignment problem more likely. Binding while open suggests a lock or handle fault. A loose or disconnected handle can prevent the lock from retracting and needs hardware service rather than an alignment adjustment.
-
Inspect the keeper or receiver for a mismatch
With the door open, inspect the visible keeper, strike, or receiver on the frame for a shifted position, loose visible screw, debris, or a bent opening. Close the door gently until the latch is near the receiver and compare the vertical and horizontal alignment. Do not remove the keeper or loosen screws unless the exact product guide identifies that adjustment.
Expected result: The latch or bolt is visibly above, below, or to the side of the opening; the receiver is loose or bent; debris blocks the opening; or the parts align but the lock still does not engage.
Next step: For a clear, minor mismatch, follow the exact model guide for receiver or keeper adjustment and test after each small change. Arrange service for bent hardware, stripped mounting points, or an alignment that cannot be corrected without moving the panel or frame.
Stop if: Do not enlarge the receiver opening, remove multiple fasteners, drill the frame, or force the bolt into a misaligned receiver.
Why this matters
Why: A consistent offset can prevent a normally working lock from entering its receiver. A bent or loose receiver can be a hardware or impact fault. A clear and aligned receiver shifts suspicion back to the lock mechanism, panel position, or frame condition.
-
Check the panel reveal and contact points
Look along the closed-side gap from top to bottom while the door is slightly open. For a gliding patio door, compare the reveal along the side jamb and look for a panel that is high, low, or not parallel. For a hinged or casement-style unit, look for rubbing at one corner, hinge-side sag, a compressed weatherstrip, or an obstruction at the sill.
Expected result: The gap is uneven, the panel rubs at one corner, the weatherstrip is folded or blocking closure, or the reveal is even and the panel does not rub.
Next step: Use only the product-specific roller, hinge, or sash adjustment instructions when the door type and adjustment point are confirmed. If the panel requires removal, the frame is warped, or the glass is stressed, stop and call service.
Stop if: Do not lift or remove a patio-door panel, bend a frame, adjust structural hinges blindly, or continue if glass is cracked or under visible stress.
Why this matters
Why: An uneven reveal or localized rubbing indicates panel or sash alignment can be preventing the lock from meeting its receiver. An even reveal with no rubbing makes an independent receiver or lock fault more likely.
-
Make one documented adjustment, then retest
After identifying the exact product and finding its manufacturer adjustment guide, mark the original keeper or receiver position. Make only the small adjustment the guide specifies, tighten the hardware as directed, and test the door from fully open to gently closed. Change one variable at a time so the result is traceable.
Expected result: The latch enters the receiver and the door secures without force, the closure improves but still misses, or the adjustment has no effect or makes rubbing worse.
Next step: Keep the successful setting and verify that the door remains aligned through several gentle cycles. If it still will not close, restore the marked position if safe and arrange qualified service.
Stop if: Do not keep moving the receiver, remove the lock case, or compensate for a sagging frame by forcing the door against the weatherstrip.
Why this matters
Why: A successful small adjustment supports a position or receiver mismatch. No improvement, worsening contact, or loose mounting points indicate a deeper panel, frame, or lock problem rather than a need for more random adjustment.
-
Decide when the lock needs professional service
After the safe external checks, record the door type, where contact occurs, whether the lock works open, the receiver position, and any damage. Inspect only from outside for cracked glass, a split frame, loose hinges, a broken handle, stripped screws, or a door that cannot remain secured.
Expected result: The lock remains inoperable with the door open, the handle or receiver is damaged, the frame or glass is damaged, the panel is sagging, or the door remains secure after the documented adjustment.
Next step: Arrange qualified window-and-door service for a failed lock, damaged frame or glass, loose mounting, sagging panel, or any repair requiring panel removal or lock-case access. If the door is secure and operates normally, monitor it and keep the model information for future service.
Stop if: Do not leave an exterior door unsecured, use a temporary object as a substitute lock, or perform lock-case, glass, frame, or panel-removal work without the exact service procedure and appropriate support.
Why this matters
Why: A lock that fails open or visibly damaged structure cannot be safely diagnosed by repeated alignment changes. A door that remains secure after a small documented adjustment can return to service, subject to the product manual.
Use your observations
Decision map
Find the observation that best matches what you see, then follow the next safe action.
-
PATH 01Next step
What you see
The door reaches the frame, the lock operates freely while open, and the latch or bolt misses the receiver.
Do this next
Inspect and, only when the exact guide allows it, make a small receiver or keeper adjustment and retest.
Why this path and its safety boundary
Why it matters: Lock-to-keeper alignment is the leading external branch.
-
PATH 02Next step
What you see
The panel stops before the frame or rubs at one corner, and the reveal is uneven.
Do this next
Follow the exact product guide for sash, hinge, or roller alignment. Stop if panel removal, frame movement, or structural adjustment is required.
Why this path and its safety boundary
Why it matters: Panel, sash, hinge, roller, frame, sill, or weatherstrip alignment may be preventing the lock from reaching its receiver.
-
PATH 03Next step
What you see
The latch or bolt binds, remains extended, or the handle is loose even with the door open.
Do this next
Do not force or disassemble it; keep the door in a safe position and arrange qualified hardware service.
Why this path and its safety boundary
Why it matters: The lock or handle mechanism itself may be faulty.
-
PATH 04Next step
What you see
The receiver is bent, its mounting points are stripped, or a small documented adjustment does not restore engagement.
Do this next
Restore the original marked position if safe and arrange qualified window-and-door service rather than enlarging the opening or adding improvised shims.
Why this path and its safety boundary
Why it matters: The hardware or surrounding frame needs a repair assessment.
-
PATH 05Next step
What you see
Glass is cracked, the frame is split or visibly warped, the panel may fall, or the door cannot be secured.
Do this next
Keep people clear, do not operate the door, secure the area without blocking an emergency exit, and obtain qualified service.
Why this path and its safety boundary
Why it matters: This is a safety and security stop, not a routine lock adjustment.
Helpful context
Understand the symptom
Separate a lock fault from a door-alignment fault
A door that will not close may stop before the latch reaches the frame, or it may reach the frame while the latch or deadbolt misses its keeper. Test the lock with the door open only from a safe position and without forcing it. If the lock moves normally open, the useful next check is alignment; if it binds or stays extended open, the lock or internal hardware needs attention. The exact hardware varies between hinged, gliding, storm, patio, and window-like door systems.
Adjust only the hardware named for the product
Manufacturer instructions do not use one universal lock adjustment. Andersen's gliding patio-door guide uses different receiver or lock adjustments by door age and series, while its hinged-door guidance describes receiver tabs that affect lock engagement and weatherstrip compression. A casement window uses sash alignment and an even reveal instead. Identify the product and use its manual before loosening screws or moving a keeper.
Safety boundary
Stop conditions
- Never force the handle, throw a deadbolt against resistance, slam the door, or pry the panel into the receiver.
- Stop for cracked glass, a split or unstable frame, a loose panel, exposed sharp hardware, or a door that cannot be secured.
- Do not remove a patio-door panel, open the lock case, drill the frame, enlarge a receiver, or perform structural or glass work as a troubleshooting step.
- Do not leave an exterior opening unsecured; arrange qualified window-and-door service when the lock fails with the door open or safe adjustments do not restore closure.
Only after diagnosis
Potential parts
- lock or latch assembly
Consider this category only when the lock binds or fails with the door open and a qualified diagnosis confirms an internal lock or latch fault.
Confirm the complete door or window manufacturer and model, handing, hardware series, and fit information before ordering; a door that will not close does not identify a lock assembly. - keeper, strike, or lock receiver
Consider this category only when the lock operates freely open but the receiver is bent, damaged, loose, or cannot be aligned using the exact product procedure.
Verify the exact door type, series, handing, and manufacturer fit information before ordering; receiver shapes and adjustment ranges are product-specific. - hinge, roller, or sash-alignment hardware
Consider this category only when the panel or sash has an uneven reveal, rubs the frame, or sags and a qualified diagnosis identifies alignment hardware as the cause of the lock mismatch.
Confirm the complete product model and the manufacturer's service procedure; some panel, hinge, and roller work requires supported removal and is not a lock-only repair.
When checks do not resolve it
Need a professional?
Call qualified window-and-door service when the lock binds or fails with the door open, the handle or receiver is damaged, the panel is sagging, the frame or glass is damaged, mounting points are stripped, the door cannot be secured, or the exact product procedure would require panel removal, lock-case access, structural adjustment, or glass work.
Common questions
FAQ
Why does my door close but the lock will not engage?
If the lock works with the door open but misses when the door reaches the frame, the keeper or receiver may be misaligned, or the panel may have shifted. Inspect the visible alignment and use only the exact product guide for a small adjustment.
Should I adjust the strike or keeper when a door will not close?
Only after confirming the door type and that the lock works freely while open. Mark the original position, follow the manufacturer procedure for that product, and make one small change at a time. Do not enlarge the opening or force the bolt.
What if the lock is stuck even with the door open?
A lock or handle fault is more likely than simple frame alignment. Do not disassemble the lock or keep forcing the handle; arrange qualified service and keep the door in a safe, secured position.
When should I stop trying to fix a door that will not close?
Stop for cracked glass, a split or unstable frame, a loose panel, a broken handle, a lock that fails open, or any repair requiring panel removal, lock-case access, structural adjustment, or glass work. Arrange qualified window-and-door service.
Read the exact guide
Official sources
- Adjust Sash on Andersen® A-Series Casement WindowAndersen Windows and Doors · Andersen A-Series casement windows where dragging, rubbing, failure to close, or failure to lock can indicate a crooked sash
- How to Install a Storm DoorPella · Pella storm doors; the official guide emphasizes smooth operation, consistent clearance, free closure, and product-specific hardware instructions
- Gliding Patio Door Hardware Adjustment and Replacement GuideAndersen Windows and Doors · Andersen gliding patio doors; the guide distinguishes uneven panel reveal, roller alignment, and receiver or lock adjustments by product series and age
- Adjust Tabs on Andersen® Hinged Inswing and Outswing Patio DoorsAndersen Windows and Doors · Andersen hinged inswing and outswing patio doors where receiver tabs affect lock engagement and weatherstrip compression
Community feedback
Share a repair observation
Share a plain-text repair observation. Accepted observations are published automatically; this page may take a moment to update.