
On this page
Start here
Quick answer
A leaking window frame needs a source check, not an immediate bead of caulk. Dry the area and identify the first wet point: water in the frame or sill may be following the window's drainage path, while water at the room-side trim can indicate a blocked drain, displaced seal, failed perimeter seal, or an installation and wall-interface problem. Clear only accessible dirt from drainage slots and the sill, check that the window closes and locks and that visible seals remain seated, and inspect the exterior perimeter only from a safe position. Do not block drainage openings or open the wall. Stop and arrange qualified window or building-envelope service for recurring water, soft or stained framing, movement, a loose pane, an inaccessible exterior, or water near electrical equipment.
Work through in order
Diagnostic checks
Use only checks that match the exact appliance or system and its official guide.
-
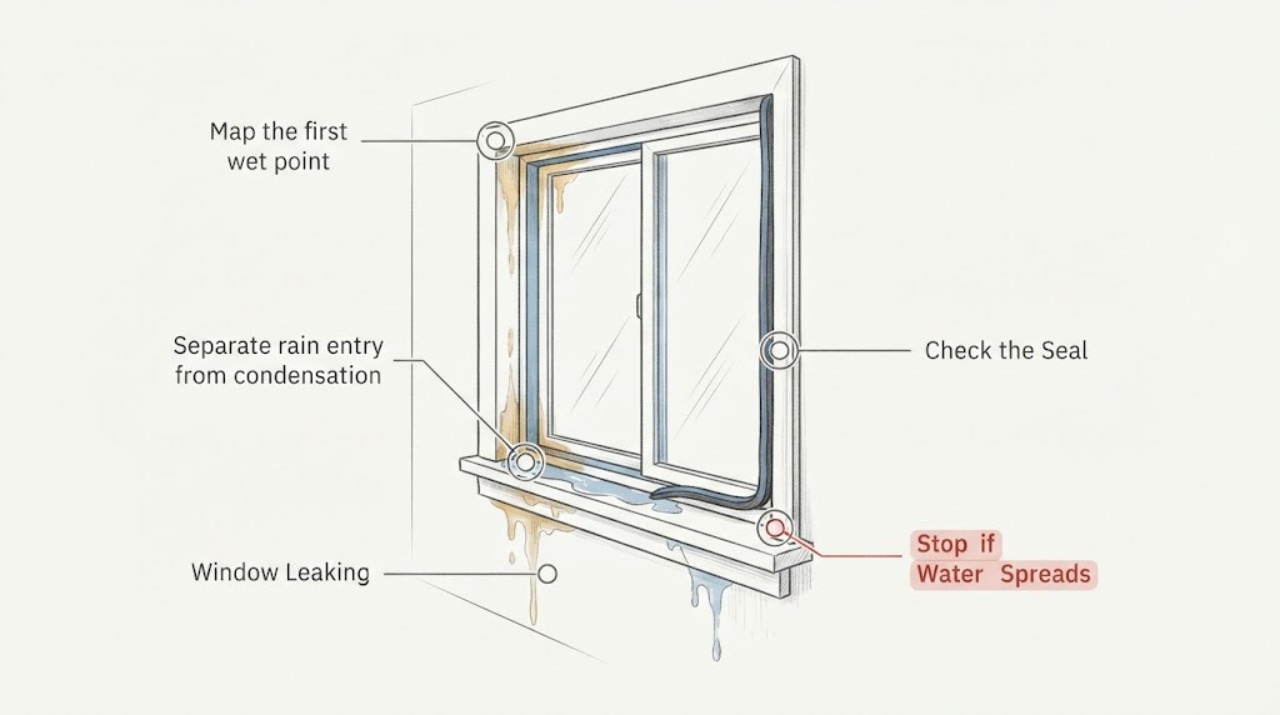
Map the first wet point
Dry the interior sill, frame faces, corners, and nearby trim. Mark or photograph the first place that becomes wet during the next safe rain observation, and note whether water appears only with wind-driven rain or also in dry weather. Do not open the window or lean outside to reproduce the leak.
Expected result: The frame channel or sill gets wet first, the inner trim or adjacent wall gets wet first, the leak follows wind and rain, or moisture appears without rain.
Next step: Use the matching branch below and keep a dated photo record. If the first wet point cannot be observed safely, stop at the accessible inspection boundary and arrange a professional assessment.
Stop if: Stop if water reaches electrical equipment, the wall or frame feels soft or moves, or observing the exterior would require unsafe access.
Why this matters
Why: A frame-first pattern can involve drainage or a displaced seal. A trim or wall-first pattern can involve the perimeter joint or surrounding construction. Dry-weather moisture makes condensation or a plumbing/roof path more plausible than a rain-only window leak.
-
Separate rain entry from condensation
Compare the timing and location of the moisture. Look for droplets spread across the room-side glass or frame during cold, humid conditions, versus a narrow wet path that begins after rain. Ventilate the room normally and avoid wiping away evidence before recording it; do not use a heater or flame to dry the window.
Expected result: Moisture is broad and surface-based during humid or cold conditions, or it begins at a frame corner or channel after rain and tracks toward the interior.
Next step: For condensation, reduce excess indoor moisture and monitor. For rain-timed entry, continue with the frame, drainage, and perimeter checks; persistent entry needs qualified service.
Stop if: Stop if moisture is pooling near an outlet, switch, wiring, or other electrical equipment, and isolate the area only if it can be done safely.
Why this matters
Why: Broad surface moisture is more consistent with condensation, while a rain-timed path at a joint or channel supports investigation of drainage, seals, or the perimeter. Both can occur together, so timing and the first wet point matter.
-
Check closure and visible frame seals
With the window at ground-level safe access, close and lock it using the normal handle or latch. From inside, inspect the visible seals around the frame for a section that is folded, pulled out, torn, compressed, or contaminated with dirt. Do not force a stiff handle or remove glazing, trim, or frame parts.
Expected result: The window does not close or lock evenly, a seal is displaced or damaged, dirt prevents a seal from contacting, or closure and visible seals look normal.
Next step: Remove loose surface dirt and lightly press a visibly displaced seal back only when the manufacturer's design allows it; do not cut or substitute a seal. Arrange qualified service for damage, poor closure, or a leak that continues with normal closure.
Stop if: Stop if the pane is loose or cracked, the frame is distorted, the handle requires force, or the window cannot be secured.
Why this matters
Why: A gap at the frame or a displaced seal can leave a path for infiltration. A normal-looking seal does not rule out a concealed drain or installation fault, especially when water enters only under wind-driven rain.
-
Clear only accessible frame drainage slots
After the window is dry and closed, inspect the bottom frame and sill channel from inside or another safe position for visible dirt, paint, or debris covering drainage slots or the gap between the frame and sill. Remove loose debris with a soft brush or vacuum at the accessible surface only; do not poke deeply, drill, or caulk the openings.
Expected result: A drainage opening or frame-to-sill gap is visibly blocked, the channel is clear but water still enters, or the drainage design is not identifiable.
Next step: Monitor after the accessible debris is removed. If water returns, document the exact frame location and arrange window service; follow the exact product instructions before any deeper maintenance.
Stop if: Do not seal, enlarge, drill, dismantle, or plug a drainage opening, and stop if the channel is damaged or the required access is outside the safe user area.
Why this matters
Why: A blocked accessible path can hold water in the frame. A clear path with continued entry points toward a displaced seal, failed perimeter interface, incorrect installation, or a concealed drainage problem; an unknown design should not be modified by guesswork.
-
Inspect the exterior perimeter from the ground
From ground level or another secure location, look at the visible joint where the window frame meets exterior trim, siding, or masonry. Note missing, shrunken, cracked, or separated sealant, open trim joints, staining above the frame, or a nearby roof or gutter path. Do not climb a ladder, remove siding or trim, or apply a new bead over a drainage opening without a qualified plan.
Expected result: The perimeter seal is visibly missing or damaged, water staining appears above or beside the window, the exterior looks normal, or the area cannot be seen safely.
Next step: Photograph the finding and arrange qualified window, roofing, or building-envelope service when the perimeter or adjacent wall is implicated. Do not use exterior caulk as a substitute for diagnosis.
Stop if: Stop before ladder work, roof access, trim removal, or any work near loose masonry, damaged siding, or a soft wall.
Why this matters
Why: A failed perimeter joint or water path above the window can make the frame appear to leak even when the window's internal channel is functioning. A normal ground-level view cannot prove that flashing or the wall interface is sound.
-
Look for movement or installation symptoms
With the window closed, observe whether the frame sits squarely, the sash meets the seals evenly, and the surrounding trim remains fixed. Record drafts, whistling, a recurring leak at one corner, gaps that change when the sash moves, or visible staining inside the wall. Do not loosen installation screws or attempt to re-square the frame.
Expected result: The frame or trim moves, closure is uneven, a recurring corner leak is paired with a draft, or the assembly appears stable and aligned.
Next step: Contact the installer or a qualified window professional for suspected alignment, installation, or concealed-interface faults. Supply the photos, rain direction, first wet point, and whether accessible drainage was clear.
Stop if: Stop if the frame is loose, the wall is soft or stained, the glass can move, or a repair would require opening the wall or removing the installed window.
Why this matters
Why: Movement, uneven closure, and recurring corner symptoms can indicate an alignment or installation issue rather than a replaceable surface seal. A stable assembly narrows the check toward the drainage and perimeter paths but does not confirm a hidden wall condition.
-
Prepare a precise service handoff
Record the window type if known, room and elevation, rain and wind direction, first wet point, photos before drying, condition of the frame channel and drainage openings, visible seal condition, closure and lock behavior, and any adjacent trim or wall staining. Keep the area dry and avoid further disassembly while the cause is unresolved.
Expected result: The leak stops after safe accessible debris removal, returns under rain despite a clear drain and normal closure, or is accompanied by structural, glass, electrical, or inaccessible-exterior symptoms.
Next step: Use the exact product maintenance guidance for routine care, or give the record to a qualified window, roofing, or building-envelope professional so the frame, perimeter, flashing, and wall interface can be assessed without guessing at a part.
Stop if: Stop all do-it-yourself work for water near electrical equipment, loose or cracked glass, frame movement, soft framing or wall materials, active interior flooding, or unsafe exterior access.
Why this matters
Why: A corrected accessible blockage supports a drainage-maintenance cause. Recurrence with normal closure or any structural, glass, electrical, or access hazard requires diagnosis beyond a homeowner seal check.
Use your observations
Decision map
Find the observation that best matches what you see, then follow the next safe action.
-
PATH 01Next step
What you see
Water is visible in the bottom frame but does not enter the room.
Do this next
Keep drainage slots and the frame-to-sill gap clear and monitor for actual entry into the property.
Why this path and its safety boundary
Why it matters: The frame may be holding water temporarily as part of its drainage design.
-
PATH 02Next step
What you see
Water enters the property and an accessible drainage slot or frame-to-sill gap is blocked.
Do this next
Remove loose accessible debris only, never plug the opening, and monitor; arrange service if water returns.
Why this path and its safety boundary
Why it matters: The blockage may be preventing collected water from leaving the frame.
-
PATH 03Next step
What you see
The seal is displaced or the window does not close and lock evenly.
Do this next
Clean loose surface dirt and follow the exact product guidance for a visibly displaced seal; use qualified service for damaged seals or poor closure.
Why this path and its safety boundary
Why it matters: The frame-to-sash contact may be incomplete and can allow infiltration.
-
PATH 04Next step
What you see
The interior trim or adjacent wall gets wet first, or staining appears above or beside the window.
Do this next
Document the path and arrange qualified window, roofing, or building-envelope inspection; do not cover the symptom with caulk.
Why this path and its safety boundary
Why it matters: The perimeter joint, flashing, roof or gutter path, or surrounding wall interface may be involved.
-
PATH 05Next step
What you see
Moisture appears in dry weather as broad surface droplets rather than a rain-timed path.
Do this next
Reduce excess indoor moisture through normal ventilation and monitor; seek service if a narrow rain-timed entry path also appears.
Why this path and its safety boundary
Why it matters: Condensation is more plausible than a frame leak, although the two conditions can coexist.
-
PATH 06Next step
What you see
The frame moves, the glass is loose or cracked, the wall is soft, or exterior access is unsafe.
Do this next
Stop work, protect people and property from the immediate hazard, and arrange qualified window or building-envelope service.
Why this path and its safety boundary
Why it matters: This is beyond a safe surface-maintenance check.
-
PATH 07Next step
What you see
Water reaches an outlet, switch, wiring, or other electrical equipment.
Do this next
Keep people away and use qualified electrical and window/building service; do not touch wet electrical components.
Why this path and its safety boundary
Why it matters: Treat the situation as an electrical safety boundary as well as a water leak.
Helpful context
Understand the symptom
Find the first wet point, not just the lowest drip
Water can travel along a sill, frame channel, trim, or wall before it appears indoors. Dry the visible area, take a photo, and watch during the next safe rain event or controlled observation from inside. A wet frame channel with a dry wall points toward drainage or seals; a wet corner, trim, or adjacent wall can point toward the perimeter or the surrounding construction. Keep the window closed if opening it could create a fall risk.
Do not seal over the drainage path
Many window systems use openings at the bottom of the frame to let collected water drain between the frame and sill. Clear visible debris only from user-accessible channels, and do not fill a slot, gap, or weep opening with caulk. If water still enters after the accessible check, the cause may be a seal, perimeter joint, flashing, installation, or concealed wall issue that needs a qualified inspection.
Safety boundary
Stop conditions
- Stop immediately for water near outlets, switches, wiring, or other electrical equipment; do not touch wet electrical components.
- Do not use a ladder or roof access, remove trim or siding, open the wall, or dismantle the installed window to chase a leak.
- Never plug or caulk over frame drainage slots, sill gaps, or other openings whose function has not been confirmed.
- Stop for loose or cracked glass, frame movement, soft or stained structural material, active flooding, or a window that cannot be secured.
- Do not use exterior sealant as a substitute for diagnosing a failed perimeter, flashing, installation, or wall-interface path.
Only after diagnosis
Potential parts
- window weather seal or gasket
Consider this category only when the exact window system and a qualified inspection confirm that a visible seal is damaged or no longer seats correctly.
Confirm the window manufacturer, series, dimensions, and seal profile before ordering; do not substitute a seal based only on appearance. - window frame or sill drainage component
Consider this category only when the exact frame design shows a damaged drainage component after the channel is safely inspected and the leak path is confirmed.
Confirm the exact window design and professional diagnosis; do not drill or enlarge a drainage opening or block an existing one. - perimeter seal or flashing interface
Consider this category only when a qualified window or building-envelope inspection identifies a failed perimeter or flashing interface rather than an internal frame blockage.
The correct repair depends on the wall construction and installation method; a surface sealant is not a universal substitute for the original water-management detail.
When checks do not resolve it
Need a professional?
Arrange qualified window service for a recurring leak after the accessible frame and seal checks, a damaged or displaced seal, poor closure, or a suspected drainage or installation fault. Use a qualified roofing or building-envelope professional when water appears above or beside the frame or the wall interface is implicated. Use qualified electrical service for water near electrical equipment, and do not perform exterior access or wall-opening work without the appropriate professional.
Common questions
FAQ
Is water inside a window frame always a leak?
Not necessarily. Some frames are designed to collect and drain water through bottom slots between the frame and sill. It becomes a leak into the property when water passes into the room, and the accessible slots, frame-to-sill gap, and seals should then be checked without blocking the drainage path.
Should I caulk around a leaking window frame?
Do not apply caulk before tracing the entry path, and never cover a drainage slot or sill gap. A failed perimeter joint may need a qualified repair, but surface sealant cannot correct every flashing, installation, or concealed-wall problem.
What should I check first when rain enters around a window?
Dry the area and identify the first wet point, then check the accessible frame drainage openings, frame-to-sill gap, closure, and visible seals. Inspect the exterior perimeter only from a safe position; recurring or concealed leaks need qualified service.
Can a window leak be caused by the wall around the frame?
Yes. Water appearing first at trim, an adjacent wall, or above the frame can involve a perimeter joint, flashing, roof or gutter path, installation interface, or concealed wall condition rather than the frame channel alone. Document the path and arrange building-envelope or window inspection.
When is a leaking window unsafe to inspect myself?
Stop for water near electrical equipment, loose or cracked glass, frame movement, soft or stained structural material, active flooding, an unsecured window, or any exterior check requiring a ladder or roof access. Keep people clear and use qualified service.
Read the exact guide
Official sources
- TroubleshootingAnglian Building Products · Household windows where water is visible in the frame or entering the property
- How to Reduce Window Air InfiltrationSimonton · Household windows where frame closure, seals, trim joints, or installation alignment may contribute to infiltration
Community feedback
Share a repair observation
Share a plain-text repair observation. Accepted observations are published automatically; this page may take a moment to update.