
On this page
Start here
Quick answer
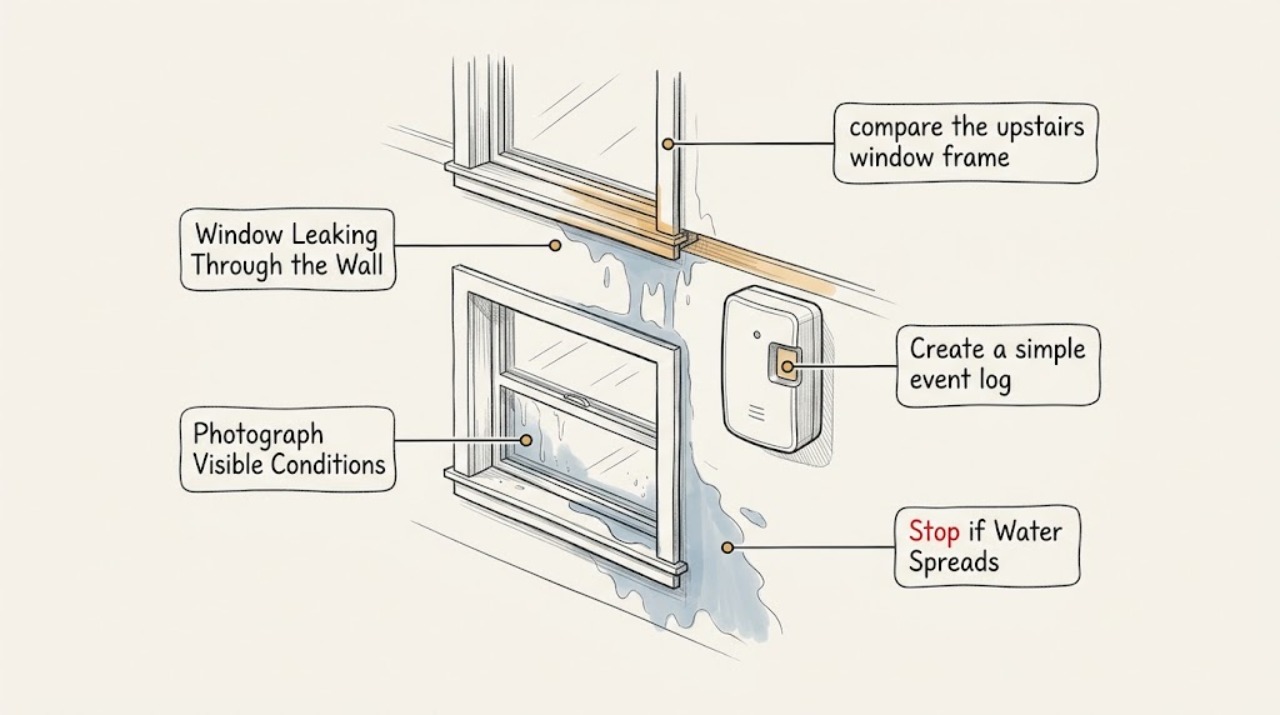
Water appearing around a downstairs window after rain at an upstairs window may be traveling through the wall cavity, but the visible stain is not proof that the lower frame is the entry point. First protect people and electrical equipment, record when and where the water appears, and compare the upstairs window, exterior wall, roof or flashing above, and nearby plumbing without climbing or opening the wall. Window head, jamb, sill, flashing, siding, roof-wall joints, and hidden wall paths can all redirect water downward. If the wall is soft or bulging, the leak is active or extensive, mold or rot is visible, water reaches electrical wiring, or a ceiling is swelling, stop investigating and call a qualified building-envelope or water-damage professional.
Before you begin
Safety first
- Do not climb, use a ladder or roof access, lean out of a window, remove trim or siding, drill or open the wall, disturb mold, block drainage openings, or seal a wet cavity as a test.
Work through in order
Diagnostic checks
Use only checks that match the exact appliance or system and its official guide.
-
Check 1
Move people and belongings away from the wet area, place a container or absorbent material to catch drips, and from a dry position keep water away from outlets, switches, wiring, and powered equipment; photograph the upstairs and downstairs interior surfaces without opening finishes.
Expected result: Water is actively flowing, the wall or ceiling is bulging or soft, water is near electrical equipment, or the area is damp but stable with no immediate electrical or structural warning.
Next step: For active water or a safety warning, keep clear and obtain emergency building, electrical, or water-damage help; if stable, continue documenting from inside without dismantling anything.
Stop if: Stop for live electrical concerns, a wet outlet or wiring, ceiling or wall bulging, rapid flow, falling material, or unsafe flooring.
Why this matters
Why: Active flow, water near electricity, or a weakened ceiling or wall changes this from a low-risk observation to an urgent safety and damage-control problem; a stable stain still indicates that moisture may be hidden in the wall.
-
Check 2
Create a simple event log for rain intensity and direction, wind, when the upstairs window or wall becomes wet, when the downstairs stain or drip appears, and whether the symptom continues after rain stops; mark the highest and lowest visible moisture points.
Expected result: The downstairs leak follows wind-driven rain, begins only after the upstairs area wets, appears during dry weather, or continues long after exterior rain has ended.
Next step: Give the log and photos to a building-envelope professional; do not create a hose test or wait for another storm if the wall is actively deteriorating.
Stop if: Stop if the log would require entering a storm, climbing, opening a wet wall, or delaying action while damage spreads.
Why this matters
Why: Timing can distinguish a rain-entry path from a plumbing, condensation, or stored-moisture problem, while a delay or downward spread is consistent with water moving inside a wall but does not identify the exact entry joint.
-
Check 3
From inside and without removing trim, compare the upstairs window frame, sill, corners, adjacent wall, and ceiling with the downstairs frame and wall; also note nearby bathroom, kitchen, radiator, HVAC, roof-space, or plumbing locations that could sit above or beside the wet path.
Expected result: The upper window shows staining or dampness, the lower area is the only visible wet point, or a separate plumbing or roof-space feature aligns with the vertical wall path.
Next step: Record each candidate source and ask a qualified professional to trace the path before resealing or replacing the lower frame; do not open the wall to confirm it yourself.
Stop if: Stop for sewage or contaminated water, a wet electrical chase, visible mold spreading, or any need to remove finishes or fixtures.
Why this matters
Why: A hidden wall cavity can carry water away from its entry point, so an apparently dry upstairs frame does not rule it out; an aligned plumbing, roof, or HVAC source prevents the lower window from being assumed responsible.
-
Check 4
From ground level or another secure location, inspect only what is plainly visible around the upper window: a missing or displaced drip edge, open trim joint, damaged siding, blocked sill drainage, failed-looking sealant, or a roof-wall intersection above it; do not use a ladder, climb, lean out, remove cladding, or disturb flashing.
Expected result: A visible exterior gap, damaged cladding, roof-wall defect, obstructed drainage path, or no accessible exterior defect is present.
Next step: Photograph the defect from a safe position and arrange qualified window or building-envelope service; do not fill every joint with sealant before the drainage path is understood.
Stop if: Stop for high or slippery access, loose siding, damaged glazing, roof work, unstable masonry, or any need to climb or reach beyond a secure stance.
Why this matters
Why: A visible defect is a useful lead, but concealed head, jamb, sill flashing, and wall drainage layers cannot be confirmed from the surface; no visible defect does not clear the upper window or wall cavity.
-
Check 5
Without cutting, drilling, or removing trim, check the accessible interior wall and ceiling for soft gypsum, peeling or bubbled paint, swollen trim, musty odor, staining that expands, or visible mold; if a moisture meter is already available and its instructions allow it, take comparative readings on dry-looking areas and the wet path.
Expected result: The finish is dry and hard, or moisture, swelling, musty odor, visible mold, or elevated comparative readings persist along the wall or ceiling.
Next step: Photograph and record the area, keep it ventilated only when that is safe, and arrange water-damage or building-envelope assessment; do not seal, paint, or replace finishes until the source and interior dryness are confirmed.
Stop if: Stop for extensive mold, soft or collapsing material, contaminated water, dust from disturbed finishes, or any need to probe or open the wall.
Why this matters
Why: Persistent or hidden moisture can support mold and damage framing, insulation, drywall, and finishes; a surface that feels dry does not prove the wall cavity is dry.
-
Check 6
Before applying caulk, paint, expanding foam, or a replacement trim piece, document the leak and have the water-management path evaluated; keep any temporary cover or absorbent measure removable and do not block visible drainage openings.
Expected result: The source has been diagnosed by a qualified professional, or the source remains uncertain and the visible stain is the only clue.
Next step: If the source is uncertain, leave structural and flashing repairs to a qualified professional and continue only safe documentation and drying; if diagnosed, follow the repair plan and verify the wall is dry before refinishing.
Stop if: Stop for concealed moisture, active leakage, rotten framing, or any request to seal a wall cavity that has not dried internally.
Why this matters
Why: A surface seal can hide water entering behind the frame or redirect it into the wall; DOE and EPA guidance emphasize connected flashing, drainage, and finding the root moisture source rather than treating only the visible symptom.
-
Check 7
Arrange qualified window or building-envelope service when water travels from an upstairs window to the downstairs wall, the source is uncertain, the upper assembly needs elevated inspection, or damage persists; provide the event log, photos, floor-to-floor location, window details, weather, and any plumbing or roof observations.
Expected result: The leak recurs, the wall cavity may be wet, the frame or flashing is concealed, or the issue involves roof, cladding, plumbing, structure, mold, or electrical safety.
Next step: Keep the affected area protected and do not open, seal, or refinish the wall until the source is repaired and the assembly is confirmed dry; use the appropriate specialist for each confirmed source.
Stop if: Stop all user investigation for active flow, structural softness, extensive mold, contaminated water, electrical moisture, high access, or concealed-wall work.
Why this matters
Why: Tracing a multi-level water path can require moisture mapping and selective professional access; replacing or sealing only the downstairs frame may leave the upstream entry and hidden damage untreated.
Use your observations
Decision map
Find the observation that best matches what you see, then follow the next safe action.
-
PATH 01Next step
What you see
Water is actively flowing, the wall or ceiling is bulging or soft, or finish material is falling.
Do this next
Arrange qualified service and follow the exact model guidance.
Why this path and its safety boundary
Why it matters: Keep people clear, protect the area only from a safe dry position, and obtain urgent water-damage or building assistance; do not open the wall or climb to the upper window.
-
PATH 02Next step
What you see
Water is near an outlet, switch, wiring, powered equipment, or an electrical chase.
Do this next
Arrange qualified service and follow the exact model guidance.
Why this path and its safety boundary
Why it matters: Do not touch wet electrical equipment or walk through water to operate a control; keep clear and obtain qualified electrical and building assessment before use.
-
PATH 03Next step
What you see
The downstairs stain follows rain and appears after the upstairs window or upper wall becomes wet.
Do this next
Arrange qualified service and follow the exact model guidance.
Why this path and its safety boundary
Why it matters: Treat the upper window, its flashing and wall drainage plane, roof-wall junction, and exterior cladding as candidate sources; arrange safe building-envelope inspection instead of sealing only the lower frame.
-
PATH 04Next step
What you see
Water appears in dry weather or does not track rain or wind.
Do this next
Arrange qualified service and follow the exact model guidance.
Why this path and its safety boundary
Why it matters: Prioritize nearby plumbing, HVAC condensate, roof-space moisture, and other concealed sources for professional assessment; do not assume a window-frame failure.
-
PATH 05Next step
What you see
A ground-level view shows damaged cladding, a displaced drip edge, open joint, roof-wall defect, or obstructed drainage near the upper window.
Do this next
Arrange qualified service and follow the exact model guidance.
Why this path and its safety boundary
Why it matters: Photograph the lead and arrange qualified inspection with safe access; do not climb, remove cladding, disturb flashing, or apply a blanket sealant patch.
-
PATH 06Next step
What you see
The wall or ceiling has persistent dampness, soft or swollen material, musty odor, visible mold, or elevated comparative moisture readings.
Do this next
Arrange qualified service and follow the exact model guidance.
Why this path and its safety boundary
Why it matters: Stop cosmetic repair and obtain water-damage or mold-experienced professional assessment; do not seal the cavity or disturb moldy material.
-
PATH 07Next step
What you see
The accessible frame and wall look intact but the lower stain recurs or its source cannot be traced safely.
Do this next
Arrange qualified service and follow the exact model guidance.
Why this path and its safety boundary
Why it matters: Keep the event log and arrange non-destructive moisture tracing by a qualified professional; a hidden flashing, wall, roof, or plumbing path remains possible.
-
PATH 08Next step
What you see
A qualified professional confirms the entry point and verifies that the wall assembly can dry.
Do this next
Arrange qualified service and follow the exact model guidance.
Why this path and its safety boundary
Why it matters: Follow the specified repair and drainage method, preserve weeps or drainage paths, and delay paint, caulk, or finish replacement until the materials are dry internally.
Helpful context
Understand the symptom
Why the downstairs window may only be the outlet
Water can enter at an upper window head, sill, side joint, exterior cladding, roof-wall intersection, or nearby penetration and travel down behind finishes before appearing at a lower frame. DOE describes the window flashing and wall rain plane as a connected drainage path, so sealing only the visible downstairs trim can hide rather than solve the entry route.
Keep the inspection low-risk
Use photos, timing, and accessible interior observations. Do not climb onto a roof, lean out of a window, use a ladder to inspect an upper exterior frame, remove siding or trim, drill the wall, or flood-test the assembly. A qualified professional can trace concealed moisture with appropriate equipment and access controls.
Safety boundary
Stop conditions
- Water is active or extensive, a ceiling is bulging, or a wall, trim, or floor is soft, unstable, or falling.
- Water reaches an outlet, switch, wiring, electrical equipment, or an area that cannot be approached from a dry position.
- Visible mold is extensive, the water is contaminated, or drying or cleanup would disturb hidden mold or damaged materials.
- Investigation would require a ladder, roof access, leaning out of a window, climbing exterior walls, removing cladding or trim, drilling, or opening the wall.
- The upper window, roof-wall junction, siding, flashing, masonry, or structure appears loose or damaged.
- A proposed repair would seal a wet wall cavity, block drainage openings, or conceal the source before it is diagnosed.
Only after diagnosis
Potential parts
- window frame or sill drainage component
Only consider a frame or sill component after a qualified diagnosis confirms that the window assembly, rather than the roof, siding, wall cavity, or plumbing, is the entry point.
Window geometry and drainage details vary; confirm the existing assembly and compatible repair method with the window professional. - window flashing or compatible sealant system
Only consider flashing or sealant materials after the drainage path and substrate are inspected; a surface bead alone may redirect water into the wall.
Use the professional's specified compatible system for the wall assembly, cladding, climate, and window installation; do not infer compatibility from the symptom.
When checks do not resolve it
Need a professional?
The downstairs leak recurs after rain or appears to follow wetting at an upstairs window., The source may be hidden in the wall, roof, cladding, flashing, plumbing, or HVAC system., The frame, sill, trim, wall, or ceiling is stained, soft, swollen, musty, moldy, or deteriorating., Safe access cannot show the upper exterior condition, or professional moisture mapping is needed., Water is near electrical equipment, the leak is active or extensive, or structural damage is suspected.
Safety scope: Do not climb, use a ladder or roof access, lean out of a window, remove trim or siding, drill or open the wall, disturb mold, block drainage openings, or seal a wet cavity as a test.
Common questions
FAQ
Can an upstairs window cause water to appear around a downstairs window?
Yes. Water can enter around an upper window, roof-wall joint, siding, or flashing and travel inside the wall before appearing below. The downstairs frame may be the outlet rather than the entry point, so compare timing and vertical alignment and obtain professional tracing before sealing it.
Should I caulk the downstairs window first?
Not as a test. A surface seal can hide the entry path or redirect water into the wall. Document the leak and have the flashing, drainage, cladding, roof, and possible plumbing paths evaluated before applying a repair material.
How can I check the upstairs exterior safely?
Only inspect what is plainly visible from ground level or another secure position. Do not use a ladder, climb onto the roof, lean out of a window, remove siding, or disturb flashing; use a qualified professional for elevated or concealed inspection.
What if the wall feels dry now?
A dry surface does not prove the wall cavity is dry. Hidden moisture can remain behind drywall or trim, so record the prior leak, look for swelling or musty odor, and use professional moisture assessment when the leak recurs or damage is suspected.
When is a window leak an emergency?
Treat active or extensive flow, a bulging or soft ceiling or wall, water near electrical equipment, falling materials, extensive mold, contaminated water, or unsafe access as stop conditions. Keep clear and obtain the appropriate qualified help before investigating further.
Read the exact guide
Official sources
- Mold Course Chapter 3:U.S. Environmental Protection Agency · Supports checking damp or hidden areas, recognizing that mold can be behind drywall, using moisture assessment, and avoiding disturbance of concealed mold; it does not diagnose the window entry point.
- Building Science Resource LibraryFederal Emergency Management Agency · Confirms FEMA's official recovery advisory on reducing water intrusion through and around windows and doors during wind-driven rain; detailed construction work remains professional and site-specific.
- Flood Cleanup to Protect Indoor Air and Your HealthU.S. Environmental Protection Agency · Although written for flood cleanup, supports the general caution to dry wet materials internally and not seal wet wall cavities or refinishing surfaces before they are dry; the exact cleanup scope depends on the water event.
- CPSC Urges Flood Victims to Take Steps to Prevent CO Poisoning, Electrocution, Explosion and FiresU.S. Consumer Product Safety Commission · Supports not touching wet plugged-in equipment and obtaining professional evaluation of water-affected electrical systems; apply the same stop boundary when window leakage reaches household electrical equipment.
- Addressing Indoor Environmental Concerns During RemodelingU.S. Environmental Protection Agency · Supports the consequences of water in building cavities, the need for moisture control, flashing and drainage, and consideration of roof, wall, and window paths; it does not identify this home's source.
- Retrofit Best PracticesU.S. Department of Energy · Supports the distinction between visible lower damage and an upstream window or wall entry path, including flashing integration, cavity damage, and root-source investigation; it is not a model-specific repair procedure.
Community feedback
Share a repair observation
Share a plain-text repair observation. Accepted observations are published automatically; this page may take a moment to update.