
On this page
Start here
Quick answer
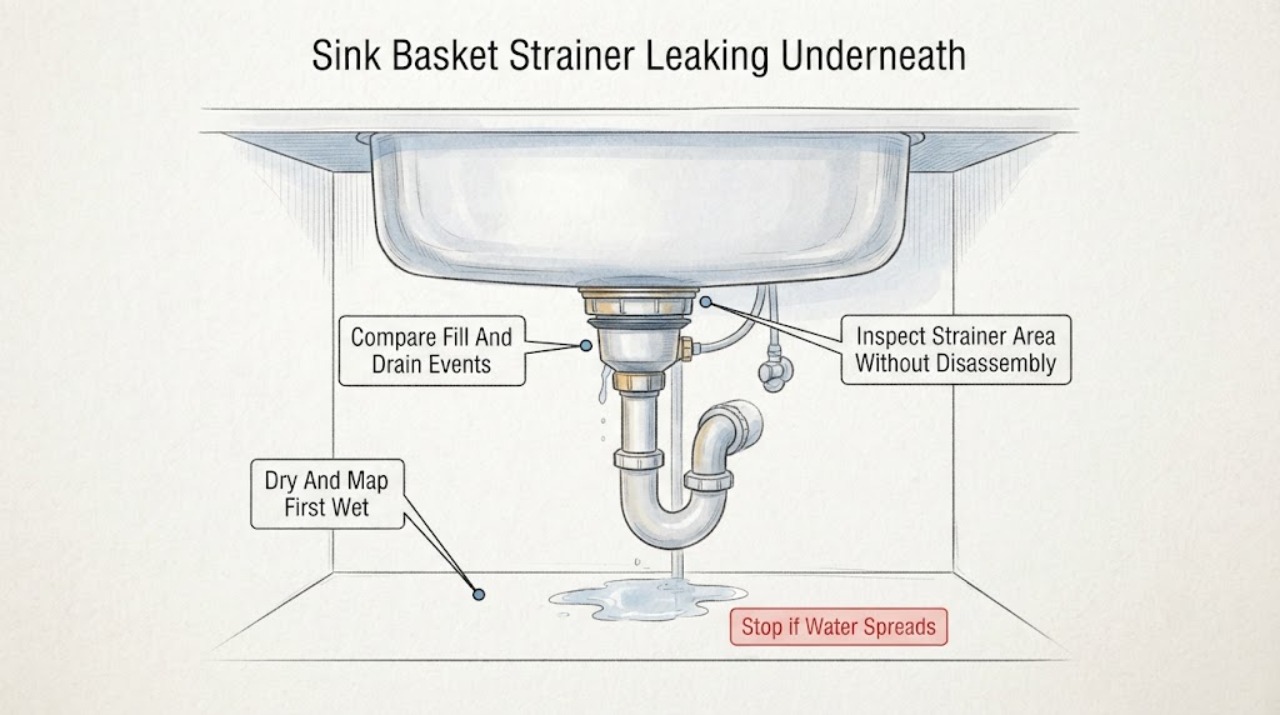
Water under an American Standard sink does not prove the basket strainer is the source. First dry the cabinet and identify the first wet point while observing the drain, then compare water entering the basin with water draining through it. A leak that begins around the strainer flange or the basket-to-sink joint keeps the flange seal, lower washer, locknut, or a damaged strainer in consideration; a leak only at a tailpiece, slip joint, disposal, or dishwasher connection is a different repair. American Standard sells more than one sink drain and strainer design, so confirm the exact sink and strainer model before selecting a replacement. Stop use for spreading water, cabinet damage, a corroded or moving fitting, or wet electrical disposal equipment, and arrange qualified plumbing service rather than tightening parts at random.
Before you begin
Safety first
- This article covers dry inspection, cautious water-path observation, model identification, and stopping or isolating use. A qualified plumber must handle strainer removal, sealing-stack replacement, corroded fittings, disposal connections, concealed leaks, and any water near electrical equipment.
Work through in order
Diagnostic checks
Use only checks that match the exact appliance or system and its official guide.
-
Check 1
Turn off the disposal and clear the cabinet. Dry the underside of the sink, basket strainer body, tailpiece, trap, supply area, and cabinet floor, then use a flashlight and a dry paper towel to watch for the first new wet spot.
Expected result: Water first appears directly below the strainer, at the tailpiece or slip joint, at a disposal or dishwasher connection, at a faucet supply connection, or from an unseen area.
Next step: Photograph the first wet point and continue only with a brief, safe water-path comparison. Stop use and arrange service if water is spreading, the cabinet is damaged, or wetness is near disposal wiring.
Stop if: Do not touch electrical connections, operate a disposal in a wet cabinet, or reach into an unstable or corroded drain assembly.
Why this matters
Why: The first wet point is more useful than the lowest drip. A strainer-area wet point keeps the flange seal, washer, locknut, or strainer body in consideration; a pipe or appliance connection points elsewhere and should not be treated as a basket-strainer failure.
-
Check 2
With the cabinet still dry and the disposal off, run a small amount of clean water into the sink, pause, and then let it drain while watching from below; do not fill the basin if the leak is already spreading or the cabinet cannot protect nearby equipment.
Expected result: Wetness begins while water is held in the basin, only as water drains, during both conditions, or not during this brief test.
Next step: Record the condition that produces the leak and use it to choose the service branch. Do not keep adding water to reproduce a leak that is reaching cabinetry or flooring.
Stop if: Stop the test for a rapid leak, overflow, sewage odor, water near electrical equipment, or any movement of the drain assembly.
Why this matters
Why: A leak while the basin holds water makes the strainer flange or sink-to-drain seal more likely. A leak only during drainage shifts attention toward the tailpiece, slip joint, trap, disposal, or connected drain path. No leak may mean the event was intermittent or the wrong area was observed.
-
Check 3
From above and below, inspect the visible strainer flange, basket body, lower washer area, locknut, and sink surface without loosening anything; look for a gap, corrosion, cracked metal, residue, or movement when the basket is observed from a stable position.
Expected result: The flange is visibly separated from the sink, the basket or nut moves, corrosion or a crack is present, the area stays dry while a downstream joint wets, or the sealing stack cannot be seen.
Next step: Keep the drain out of use if the strainer moves or water reaches the cabinet, and have a plumber verify the seal and assembly. Do not tighten a locknut without confirming the correct washer and seal arrangement.
Stop if: Do not put force on a corroded nut, pry the basket, scrape the sink surface aggressively, or disassemble the strainer with water still flowing.
Why this matters
Why: A gap, movement, corrosion, or crack makes a strainer assembly or seal problem more likely. A sound, dry strainer area with a wet downstream joint makes the basket less likely to be the starting point. An inaccessible stack cannot be diagnosed safely by guesswork.
-
Check 4
Dry the pipe below the strainer and observe the tailpiece connection, slip-joint nuts, trap, disposal inlet, and dishwasher drain connection during the same brief fill-and-drain comparison; leave the disposal off.
Expected result: Only a lower nut or tailpiece wets, the trap or disposal connection wets, the dishwasher hose connection wets, or all lower parts remain dry while the strainer area wets.
Next step: Mark or photograph the leaking joint and arrange the appropriate plumbing repair. Do not use tape, putty, or random tightening to mask a slip-joint leak, and do not reconnect or run an appliance while a drain connection leaks.
Stop if: Stop if wastewater escapes, a pipe is cracked, the disposal mount moves, or the leak reaches electrical components or the cabinet base.
Why this matters
Why: A lower joint or appliance connection indicates a downstream drain or hose seal issue rather than the basket-to-sink seal. A dry lower path with a wet flange area strengthens the strainer-area diagnosis.
-
Check 5
Record the American Standard sink model, visible drain or strainer markings, sink material, number of bowls, and whether a disposal or dishwasher hose is attached; use the manufacturer's product pages only to compare the assembly category, not to assume fit.
Expected result: The installed part matches a documented waste fitting or grid/adjustable strainer family, the sink model is known but the drain is not, or the sink and strainer identity is unknown.
Next step: Provide the model markings and photographs to a qualified plumber or manufacturer support. Retain removed parts if a professional disassembles the drain so the fit and seal stack can be checked.
Stop if: Do not measure or order a replacement by appearance alone, and do not remove the basket just to reveal a model marking.
Why this matters
Why: A matching product family helps a technician identify the correct seal and assembly. Different American Standard sink strainer designs and outlet descriptions mean that a visually similar replacement can still be wrong.
-
Check 6
After stopping the water test, dry the cabinet floor and inspect for swelling, staining, mold-like odor, soft material, or water tracking toward an outlet, disposal wiring, or adjacent cabinet; isolate the sink from use until the leak is assessed.
Expected result: The cabinet is dry and sound, moisture or damage is present, water reached electrical equipment, or the leak cannot be stopped by avoiding sink use.
Next step: Keep the sink unused, leave electrical equipment off if safe, and arrange qualified plumbing service. Seek urgent help when water is reaching wiring, flooring, or another occupied area.
Stop if: Do not energize or operate wet disposal wiring or appliances, and do not enter a flooded or electrically unsafe cabinet.
Why this matters
Why: Dry, sound cabinetry supports a prompt but contained plumbing repair. Swelling, persistent moisture, or wet electrical equipment raises the urgency and may require plumbing and building-damage assessment.
Use your observations
Decision map
Find the observation that best matches what you see, then follow the next safe action.
-
PATH 01Safety boundary
What you see
Water appears at the strainer flange or immediately below the sink opening while the basin holds water, while the lower tailpiece and trap stay dry.
Do this next
Keep the sink out of use and arrange a plumber to verify the basket, flange, washers, locknut, sink surface, and model-compatible replacement.
Why this path and its safety boundary
Why it matters: The strainer-to-sink sealing stack or strainer body is more likely than a downstream drain joint, but the correct gasket, washer, sealant, and assembly still depend on the exact sink and strainer.
Safety stop: Do not tighten the locknut blindly or continue filling the basin when water is reaching the cabinet.
-
PATH 02Safety boundary
What you see
The strainer area stays dry, but a tailpiece, slip joint, trap, disposal inlet, or dishwasher drain connection wets only while water drains.
Do this next
Mark the first wet joint, stop the sink or appliance use, and arrange plumbing service for the specific connection.
Why this path and its safety boundary
Why it matters: A downstream drain or hose seal issue is more likely than a basket-strainer flange leak; the lowest visible drip may not be the starting point.
Safety stop: Do not seal a moving or cracked joint with surface material or operate the disposal while water is near wiring.
-
PATH 03Safety boundary
What you see
The basket, flange, locknut, or surrounding sink surface moves, is corroded, cracked, visibly separated, or has been repeatedly retightened.
Do this next
Stop use and have a plumber inspect the complete strainer, sink surface, washers, and drain alignment before selecting a replacement.
Why this path and its safety boundary
Why it matters: The assembly or sink opening may no longer provide a reliable seal; additional force can damage the sink or distort the sealing surfaces.
Safety stop: Do not force corroded hardware or continue operating a drain that is shifting.
-
PATH 04Safety boundary
What you see
No wet point appears during a brief test, or water tracks from an inaccessible area and the source remains uncertain.
Do this next
Keep the area dry, photograph the cabinet and drain arrangement, and arrange qualified diagnosis rather than escalating the water test.
Why this path and its safety boundary
Why it matters: The leak may be intermittent, hidden behind the cabinet or sink, or related to a nearby supply or appliance connection; the basket strainer is not confirmed.
Safety stop: Stop for recurring moisture, odor, swelling, or any need to remove the sink or open the cabinet structure.
-
PATH 05Safety boundary
What you see
Water has reached disposal wiring, an outlet, flooring, swollen cabinetry, or another electrical or structural area.
Do this next
Avoid the wet area, keep the disposal and affected appliance off, isolate water only from a safe accessible control, and obtain urgent qualified help.
Why this path and its safety boundary
Why it matters: This is a water-damage and safety condition in addition to a plumbing leak; continued testing can worsen damage or create an electrical hazard.
Safety stop: Do not touch wet electrical equipment, enter a flooded cabinet, or restore power to equipment exposed to water.
Helpful context
Understand the symptom
A wet cabinet can have several different starting points
The basket strainer sits at the sink drain opening, but the water may be escaping at the flange-to-sink seal, the lower washer or locknut area, the tailpiece connection, a slip joint, a disposal connection, or a dishwasher drain connection. Water can also run along a pipe and make a nearby joint look guilty. Drying everything first and watching the first new wet point is more useful than tightening every visible nut.
Test filling and draining separately
A leak that appears while the basin holds water points toward the drain opening or its seal; a leak that appears only as water leaves the sink makes a lower connection or drain-path issue more likely. This is a symptom distinction, not a part verdict. Keep a disposal switched off while inspecting, and do not run electrical equipment when water is reaching its housing or wiring.
American Standard strainer fit is not universal
American Standard's product pages show different sink strainer and waste-fitting designs, including different construction and sink-outlet descriptions. Use the sink and drain markings, installation history, and parts documentation to establish the installed model. Do not order a replacement solely because the basket looks similar or because the opening seems close.
Safety boundary
Stop conditions
- Stop using the sink for a spreading leak, swollen or soft cabinetry, water reaching flooring or walls, or any wastewater escaping from a drain joint.
- Keep a disposal and affected appliances off when water reaches their housing, wiring, outlet, or controls; do not touch wet electrical equipment.
- Do not tighten a locknut, slip joint, hose, or disposal connection at random, and do not force corroded or moving drain hardware.
- Do not remove the basket strainer, disconnect the trap, or open a drain assembly unless the exact procedure and safe isolation are confirmed; use qualified service when uncertain.
- Do not order a replacement strainer by appearance alone; verify the exact American Standard sink and drain design before selecting a seal or assembly.
Only after diagnosis
Potential parts
- basket strainer assembly
Consider this category only when the leak is proven at the strainer flange or body and the exact sink and drain design has been identified by the manufacturer or a qualified plumber.
Confirm the sink outlet, strainer design, dimensions, material, and exact model fit; do not substitute a visually similar basket. - strainer flange seal and lower gasket set
Consider this category only when inspection confirms the strainer-to-sink sealing stack is damaged, displaced, or no longer sealing and the complete assembly remains suitable for reuse.
Confirm the manufacturer's sealing arrangement and exact model; do not add random sealant or stack incompatible washers. - tailpiece washer or slip-joint gasket
Consider this category only when the first wet point is a tailpiece or slip-joint connection below an otherwise dry strainer.
Confirm pipe size, joint type, washer profile, and drain alignment; do not use a gasket to compensate for cracked or misaligned pipe.
When checks do not resolve it
Need a professional?
Arrange qualified plumbing service when water first appears at the basket-strainer flange, the strainer moves or is corroded, the leak persists after a safe location check, the sink or drain model is unknown, or a repair requires disassembly. Seek urgent help when water reaches disposal wiring, an outlet, flooring, walls, or swollen cabinetry; keep the sink and affected appliance out of use until assessed.
Safety scope: This article covers dry inspection, cautious water-path observation, model identification, and stopping or isolating use. A qualified plumber must handle strainer removal, sealing-stack replacement, corroded fittings, disposal connections, concealed leaks, and any water near electrical equipment.
Common questions
FAQ
How can I tell whether the American Standard basket strainer is leaking?
Dry the drain area and cabinet, then watch the first wet point while a small amount of water is held in the basin and while it drains. Wetness at the flange or immediately below the sink points toward the strainer area; a lower joint or hose points to a different repair.
Does a leak underneath the sink always mean the basket strainer needs replacement?
No. The leak can be at the strainer seal or body, tailpiece, slip joint, trap, disposal, dishwasher hose, or another nearby connection. Confirm the source before selecting a basket or gasket.
Can I just tighten the nut under the basket strainer?
Do not tighten it blindly. A wrong washer stack, distorted seal, corroded hardware, or cracked strainer can worsen when forced. Identify the model and leak point, then have a plumber verify the assembly and sealing method.
Are all American Standard sink strainers the same size?
No. American Standard lists more than one sink drain and strainer design, with different product descriptions and sink-outlet details. Use the exact sink and drain identity rather than ordering by appearance.
When is an under-sink strainer leak urgent?
Keep the sink out of use and seek prompt help when water is spreading, cabinetry is swelling, a drain fitting moves or is cracked, wastewater escapes, or water reaches a disposal, outlet, or other electrical equipment.
Read the exact guide
Official sources
- Adjustable Sink Strainer DrainAmerican Standard · Official American Standard product page for an adjustable sink strainer drain; used to establish that sink drain products vary by design and that model identification matters before replacement.
- Grid Strainer Drain for SinksAmerican Standard · Official American Standard product page for a grid strainer drain; used to show that a different strainer family has its own outlet and connection description and should not be assumed interchangeable.
- Waste FittingAmerican Standard · Official American Standard product page for a sink waste fitting; used to establish the manufacturer's sink-drain-with-strainer product category and model-specific identity, not to claim that every sink uses this assembly.
Community feedback
Share a repair observation
Share a plain-text repair observation. Accepted observations are published automatically; this page may take a moment to update.