
On this page
Start here
Quick answer
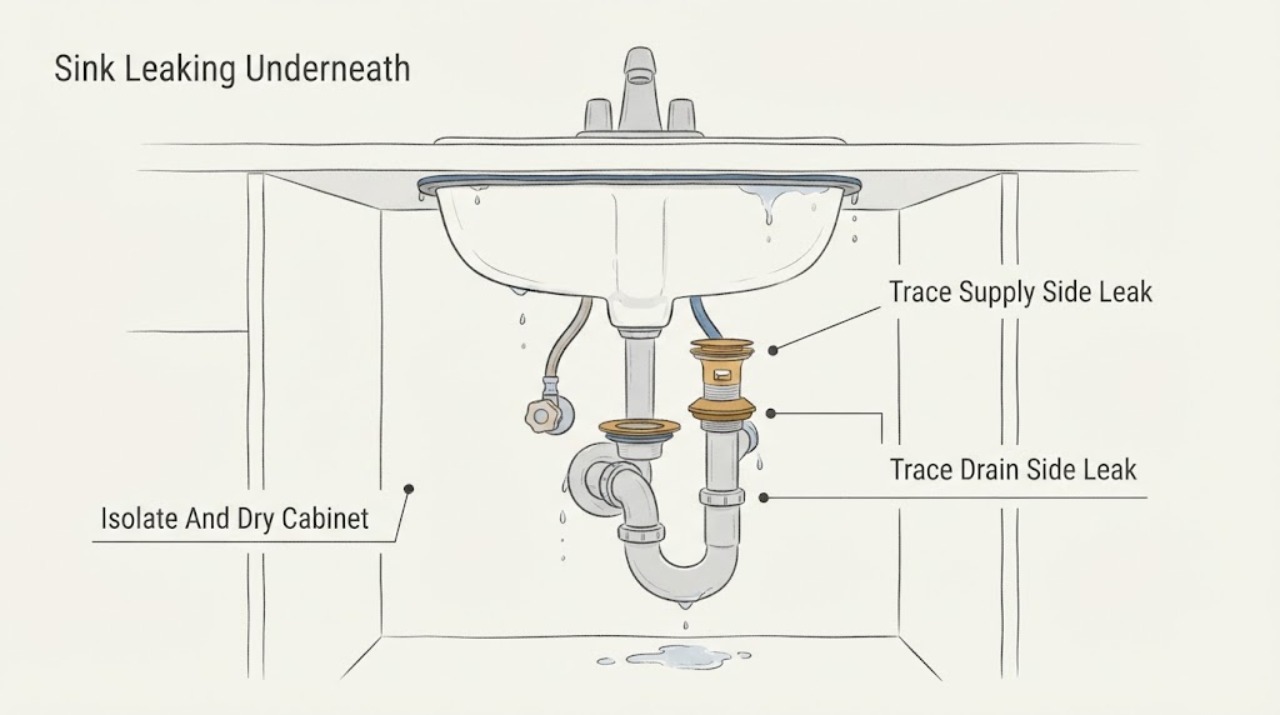
Water under an American Standard sink can come from a faucet supply connection, the faucet mounting area, the drain flange or gasket, the pop-up or strainer, the P-trap, or a hose or pipe farther back in the cabinet. First stop using the sink, empty and dry the cabinet, and place a dry paper towel beneath each visible joint. Briefly run cold water, then the drain, while watching from a safe position so you can identify whether the first wet spot appears during faucet use or only while the basin drains. American Standard's installation material shows that faucet and drain configurations vary and that seals, lock nuts, and supply connections are model-specific; EPA guidance likewise recommends checking for pooling under pipes and rust around joints and edges. Do not keep using a sink with an active leak, water near electrical equipment, a cracked fixture, contaminated water, or damage to the cabinet or wall. Tightening a plainly accessible connection may be reasonable only after the water supply is isolated and the exact fitting is understood; replacement of a seal, faucet, drain body, trap, or concealed pipe should follow the model instructions or be handled by a qualified plumber.
Work through in order
Diagnostic checks
Use only checks that match the exact appliance or system and its official guide.
-
Check 1
Stop using the American Standard sink, remove stored items, and dry the cabinet and visible pipes. If the leak is active, close the fixture shutoff valves; if a valve will not close or the source is a pressurized line, use the appropriate upstream shutoff and do not force a corroded valve. Keep towels and a container away from any electrical outlet or appliance.
Expected result: The cabinet stays dry after the water is isolated; water continues to appear; the shutoff valve drips or will not turn; or water is near an electrical connection or wall opening.
Next step: Leave the sink out of service and arrange qualified plumbing help when the leak cannot be isolated, the shutoff itself leaks, or water has reached electrical equipment or building materials.
Stop if: Stop immediately for uncontrolled water, a failed shutoff, water near electricity, a cracked pipe or fixture, sewage-colored water, or signs of cabinet, wall, or floor damage.
Why this matters
Why: A dry cabinet after isolation supports a pressurized supply or recently used fixture as the source. Continuing water, an unreliable shutoff, or water near electrical equipment makes the leak unsafe to investigate casually and may indicate a concealed or upstream problem.
-
Check 2
With the cabinet dry and the supply isolated until you are ready to observe, place separate dry tissues under the hot and cold supply connections, shutoff valves, faucet hoses, and the faucet mounting area. Briefly restore water only if it can be done safely, then run cold water without filling the basin and watch from the cabinet opening; do not put hands into a blind space or touch a wet electrical area.
Expected result: The first tissue wets at a supply nut or hose; at a shutoff valve stem or body; around the faucet mounting area; or nowhere during faucet use.
Next step: Keep the supply isolated and follow the exact American Standard model instructions for any plainly accessible connection. Have a plumber handle valve replacement, a faucet-body or mounting-seal repair, corroded fittings, or a connection that continues to leak.
Stop if: Stop before forcing a nut, replacing a valve, removing the faucet, or continuing around a wet electrical connection, corroded fitting, or concealed leak.
Why this matters
Why: A first wet point at a supply connection or valve points to the pressurized supply side. Moisture at the faucet base can indicate a mounting or body seal, but water from the deck may travel underneath before dripping. No leak during faucet use makes the drain side more likely, though a small intermittent supply leak is not ruled out.
-
Check 3
After the supply-side check is complete and the cabinet is dry, put a dry tissue under the drain flange or pop-up/strainer connection, then under the tailpiece and P-trap. Add only a small amount of clean water to the basin and release it while watching from the side. Do not loosen any trap or drain fitting during this test.
Expected result: Water appears at the basin-to-drain seal; at the pop-up or strainer connection; at a slip joint or P-trap; along the tailpiece; or only farther back in the wall or floor.
Next step: Stop using the sink and have the exact drain or trap configuration repaired when a seal, flange, trap, tailpiece, wall connection, or concealed pipe is implicated. Do not assume an American Standard drain part fits from appearance alone.
Stop if: Stop for a cracked drain, sewage backup, a full or corroded trap, a moving sink, a leak inside the wall or floor, or any need to disconnect plumbing you cannot safely isolate.
Why this matters
Why: A leak that starts when the basin drains points to the drain assembly or downstream path rather than a pressurized faucet supply. A wet trap joint may reflect a loose, damaged, or misaligned seal, while a leak farther back can be a concealed or shared drain issue. Water that appears under the basin without wetting the drain path may be traveling from the sink rim or faucet deck.
-
Check 4
If the leak begins only when the basin is filled or water splashes on the rim, run a very small amount of clean water while checking the sink rim, overflow opening if present, faucet deck, backsplash, and the underside of the basin. Keep the test below the point where water could spill into the cabinet and do not use chemical cleaners.
Expected result: Water appears only when the basin level rises; only when water splashes near the faucet or rim; at a visible crack or chip; or regardless of basin level and drain use.
Next step: Stop filling or splashing the sink. A cracked basin, failed sink-to-counter seal, or concealed overflow path needs model-appropriate repair or qualified plumbing service; do not try to seal a structural crack with a generic patch as a permanent fix.
Stop if: Stop for a visible crack, a sink that moves, water entering the wall or floor, damaged cabinetry, or a leak that cannot be contained with the supply isolated.
Why this matters
Why: A level- or splash-dependent leak makes the basin, overflow path, faucet deck, sink-to-counter seal, or a crack more likely than a P-trap. A leak independent of basin level shifts attention back to a pressurized supply, hidden pipe, or continuously wet connection.
-
Check 5
Record the American Standard model or product label, sink type and number of basins, faucet and drain style, exact first wet point, whether the leak occurs during faucet use, basin filling, draining, or at rest, shutoff behavior, recent installation or renovation, and any cabinet or wall damage. Photograph only the dry visible configuration and labels.
Expected result: The source remains uncertain; the leak returns after drying; a seal, faucet, drain, trap, valve, or wall connection is implicated; or moisture or mold odor persists in the cabinet or wall.
Next step: Keep the sink isolated, dry the area without disturbing damaged materials, and arrange qualified plumbing service. Provide the model, configuration, first wet point, test pattern, and any prior chemical or sealant use.
Stop if: Do not remove the faucet, drain flange, disposal, trap, or wall covering, and do not apply sealant over an active or unidentified leak as a substitute for diagnosis.
Why this matters
Why: The brand name alone does not identify the installed drain geometry or compatible seal. A recurring or hidden leak needs diagnosis before parts are selected, and persistent moisture can create secondary cabinet or wall damage.
Use your observations
Decision map
Find the observation that best matches what you see, then follow the next safe action.
-
PATH 01Next step
What you see
Do this next
Keep the valve closed, follow the exact American Standard instructions only for an accessible, understood connection, and use qualified plumbing service for a leaking valve, corroded fitting, faucet-body seal, or faucet removal.
Why this path and its safety boundary
Why it matters: A pressurized supply or faucet assembly is more likely than the P-trap. Moisture at the faucet base can travel along the underside, so the first wet point matters more than the lowest drip.
-
PATH 02Next step
What you see
Do this next
Stop using the sink and arrange repair using the model-specific installation information. Do not loosen a full, corroded, or pressurized trap as a first response.
Why this path and its safety boundary
Why it matters: A drain seal, misaligned or damaged connection, trap, or downstream restriction is more likely. The exact American Standard drain style determines which seal or assembly is present.
-
PATH 03Next step
What you see
Do this next
Keep water below the trigger level and have the sink or seal inspected. Do not mask a structural crack or moving sink with surface sealant.
Why this path and its safety boundary
Why it matters: A sink rim, overflow path, faucet-deck seal, sink-to-counter seal, or cracked basin is more likely than a pipe joint. This pattern can still damage the cabinet if repeated.
-
PATH 04Next step
What you see
Do this next
Keep the branch isolated, protect the area from further wetting, and arrange qualified plumbing and appropriate water-damage assessment. Do not open a wall or continue wet testing without a safe isolation point.
Why this path and its safety boundary
Why it matters: A concealed supply or drain line, another fixture, or already-established water damage may be involved. The visible drip may not be the original source.
Helpful context
Understand the symptom
Locate the first wet point, not just the lowest puddle
Water often travels along the underside of a sink, a cabinet floor, or a pipe before it drips, so the largest puddle may not be the source. Dry the area, use a separate dry tissue at each visible joint, and test one condition at a time: faucet running, drain open, or no water use. A leak that appears while the faucet runs points toward a supply hose, valve, faucet body, or mounting seal; a leak that appears only while the basin drains points more toward the drain flange, gasket, tailpiece, trap, or downstream connection. Do not reach into a dark or cramped cabinet around an energized outlet or appliance.
Use the American Standard model instructions for the actual fitting
American Standard sells multiple faucet and drain arrangements, including designs with separate valve bodies, supply hoses, pop-up drains, strainers, or disposal-related connections. A nut that looks loose may be a mounting nut, a compression connection, or part of a drain seal; tightening the wrong piece can worsen a leak or damage the fixture. Record the complete model and photograph the dry configuration before any approved adjustment. If the source is at the sink-to-counter or drain-to-basin seal, repair normally requires removing and resealing a component rather than simply tightening a nearby pipe.
Protect the cabinet and stop before concealed work
Keep the cabinet dry while the source is being identified and remove wet contents so the leak does not stay hidden. Persistent moisture under a sink can damage cabinets and nearby walls; EPA notes that leaking pipes can contribute to mold growth and may require a plumber or other qualified professional. Stop if the water is uncontrolled, the source is behind a wall or sealed cabinet, the piping is corroded or cracked, or a repair would require disconnecting a trap, faucet, disposal, or supply line you cannot isolate safely.
Safety boundary
Stop conditions
- Stop using the sink for uncontrolled water, a failed shutoff, water near electrical equipment, sewage-colored water, a cracked fixture, or water entering a wall, floor, or ceiling.
- Do not force a corroded supply valve or fitting, loosen a full or pressurized trap, or touch wet electrical equipment.
- Do not remove a faucet, drain flange, disposal, or wall covering without safe isolation and the exact model or installation instructions.
- Do not apply sealant over an active or unidentified leak, mix chemical cleaners, or use a generic replacement part based only on the American Standard name or appearance.
- Arrange qualified service when the leak recurs, affects building materials, remains hidden, or requires concealed pipe, trap, faucet, drain, or sink-to-counter work.
Only after diagnosis
Potential parts
- American Standard faucet supply hose, valve connection, or mounting seal
Consider this part class only when the first wet point is on the pressurized faucet side and the exact model instructions identify a damaged hose, connection seal, valve, or mounting seal.
Supply connection type, hose length, valve body, lock nut, washer, and faucet model vary; identify the complete American Standard model before selecting a replacement. - American Standard drain flange, pop-up, strainer, or gasket
Consider this part class only when a drain-side test confirms leakage at the basin drain, pop-up, strainer, or related seal rather than at the supply side.
Drain style, overflow arrangement, basin opening, finish, and seal geometry vary; use the exact product documentation and do not match by appearance alone. - Sink tailpiece, P-trap, or slip-joint seal
Consider this part class only when the first wet point is a cracked, obstructed, misaligned, or leaking trap or drain connection confirmed by safe inspection or a plumber.
Pipe size, material, trap arrangement, bowl count, disposal branch, and local requirements vary; confirm the installed configuration before ordering or fitting anything.
When checks do not resolve it
Need a professional?
Arrange service for a continuing or recurring leak, a leaking shutoff, corroded or cracked plumbing, a drain or faucet seal that requires removal, water behind a wall or floor, a moving or cracked sink, sewage-colored water, cabinet or wall damage, persistent dampness or mold odor, or any source that cannot be identified safely.
Have this ready
- Complete American Standard sink or faucet model and visible drain style
- Whether the leak starts during faucet use, basin filling, draining, splashing, or while the sink is idle
- The first wet point found at the supply, faucet base, drain, trap, wall, floor, or cabinet
- Shutoff behavior, recent installation or renovation, and any prior sealant or chemical cleaner use
- Photos of the dry visible configuration and any cabinet, wall, or floor moisture damage
Common questions
FAQ
Why is my American Standard sink leaking underneath but the faucet is dry on top?
Water may be traveling from a supply connection, faucet mounting seal, drain flange, pop-up or strainer, P-trap, or a pipe farther back before it drips. Dry the cabinet and use separate tissues to find the first wet point during faucet use and again while the basin drains. Keep the sink isolated if the source remains unclear.
How can I tell whether the leak is from the drain or the faucet supply?
With the area dry, observe a brief faucet run without filling the basin, then perform a separate small drain test. Wetness that begins at a supply hose, shutoff, or faucet mounting area during faucet use points to the pressurized side; wetness that starts at the drain, trap, or tailpiece only as water leaves the basin points to the drain side. Do not test near energized electrical equipment.
Should I tighten the pipe under my American Standard sink?
Only consider a small, model-appropriate adjustment when the exact fitting is plainly visible, the water is isolated, and you understand whether it is a supply connection, mounting nut, or drain joint. Do not force corroded fittings or tighten blindly; American Standard sink and drain arrangements vary, and a damaged seal may need replacement rather than tightening.
What if the leak only happens when the sink drains?
That pattern makes the drain flange, pop-up or strainer seal, tailpiece, P-trap, or downstream connection more likely than a pressurized faucet supply. Stop using the sink and arrange qualified plumbing service if the first wet point is at a seal, trap, wall connection, or concealed area. Do not loosen a full or corroded trap as a first step.
When should I call a plumber for an American Standard sink leak?
Call when the leak continues or returns, a shutoff or pipe is corroded or cracked, water is behind a wall or floor, the sink moves or is cracked, cabinet or wall materials are wet, sewage-colored water is present, or the repair requires removing a faucet, drain, trap, disposal, or sink seal. EPA recommends qualified help for leaking pipes and hidden moisture damage.
Read the exact guide
Official sources
- Fix a Leak WeekU.S. Environmental Protection Agency WaterSense · Official EPA household leak guidance used for checking faucet gaskets and fittings and isolating the water line before faucet work.
- Detect and Chase Down Leaks ChecklistU.S. Environmental Protection Agency WaterSense · Official EPA checklist used for safe visual leak-location observations under sinks and around pipe joints; it does not identify an American Standard part or authorize concealed plumbing work.
- Easy Installation: Saves TimeAmerican Standard · Official American Standard page used narrowly to establish that faucet and drain designs, seals, lock nuts, and connections vary by product; it is not a universal repair manual.
- Text Version of the Mold House TourU.S. Environmental Protection Agency · Official EPA moisture guidance used for the escalation boundary when an under-sink leak affects cabinets, walls, or concealed spaces.
Community feedback
Share a repair observation
Share a plain-text repair observation. Accepted observations are published automatically; this page may take a moment to update.