
On this page
Start here
Quick answer
If a Kohler sink is leaking underneath, dry the cabinet and identify the first wet point while the faucet is off, then while water drains. A leak that appears only while the faucet runs or the sink drains points toward a faucet supply, spray hose, drain, strainer, trap, or connection gasket; a continuous leak with no use can point toward a pressurized supply line or shutoff. Kohler's guidance says to turn off the water before faucet work, use a bucket or towels, check drain and supply connections, and inspect the exact product instructions. Close the accessible water supply if it moves normally, but do not force a corroded stop, dismantle a pressurized fitting, or overtighten a connection. If water is spraying, the cabinet is flooding, the sink or hose is cracked, or the leak cannot be isolated, use the main shutoff if safe and call a licensed plumber.
Before you begin
Safety first
- The homeowner scope is limited to drying and observing the leak, protecting the cabinet, closing a clearly identified stop that turns normally, relieving faucet pressure, and checking visible connections. Do not work on an uncontrolled pressurized line, force shutoffs or connectors, cut or glue unknown piping, use sealant to hide the source, or dismantle internal faucet parts without the exact model instructions.
Work through in order
Diagnostic checks
Use only checks that match the exact appliance or system and its official guide.
-
Check 1
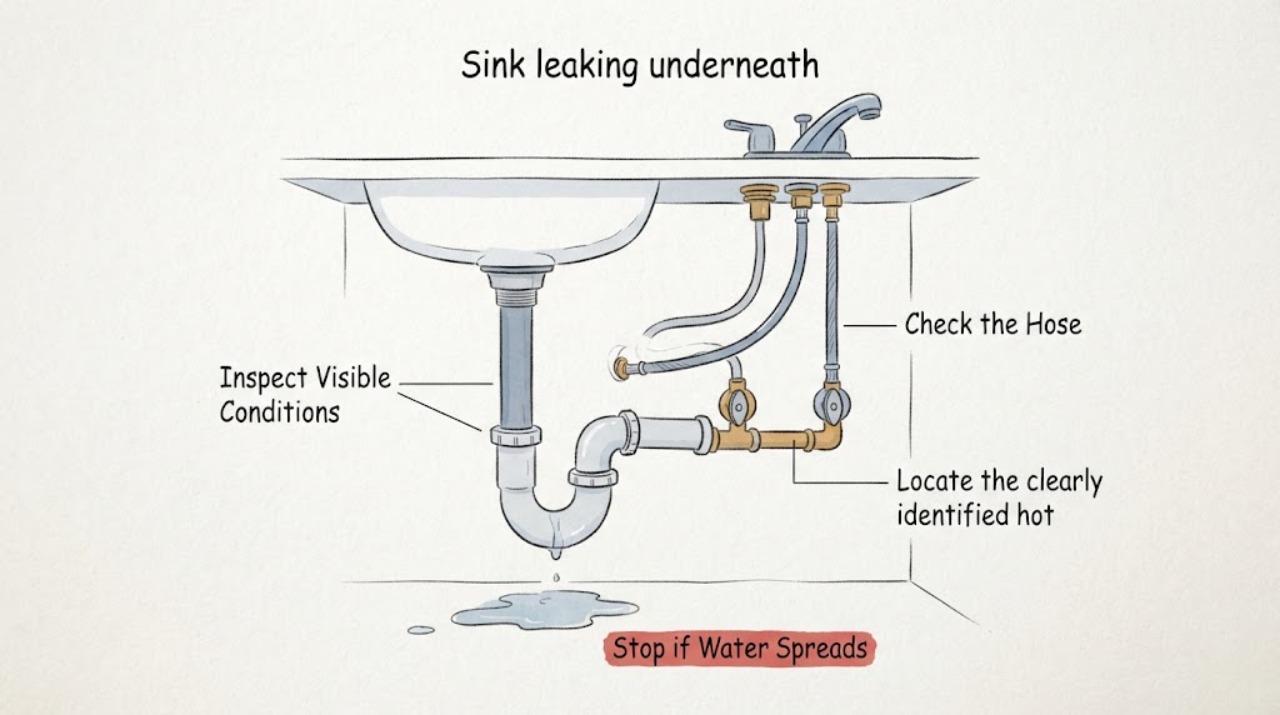
Empty the cabinet area, dry the underside of the sink, and place separate paper towels or a container below the faucet supply lines, spray hose, drain strainer, trap joints, and sink bottom. Observe first with the faucet off, then while it runs, and finally while the bowl drains.
Expected result: The first wet point is a pressurized supply or shutoff; a faucet or spray connection; the drain strainer or sink bottom; or the trap and drain piping, and it appears continuously or only during use.
Next step: Follow the matching branch and photograph the first wet point. Keep the cabinet dry and do not tighten a different connection just because it is nearby.
Stop if: Stop for spraying water, rapid flooding, a cracked sink or hose, water near electrical equipment, or a source that cannot be safely observed.
Why this matters
Why: Continuous wetness with no sink use favors a supply or shutoff path. Wetness only while the faucet operates favors a faucet hose or connection. Wetness during draining favors the drain, strainer, trap, or waste connection; water at the sink bottom or rim may indicate a body or seal issue.
-
Check 2
Locate the clearly identified hot and cold faucet supply stops below the sink. Close the affected stop, or both stops if necessary, only when each turns normally; then open the faucet briefly to relieve remaining pressure and leave a bucket under the area.
Expected result: The leak stops with one stop, stops only when both stops are closed, continues after the faucet stops are closed, or the stop itself leaks or will not move.
Next step: Keep the isolated supply closed and arrange licensed plumbing service when a stop leaks, is seized, or the main shutoff is needed. Do not remove a hose, valve, or drain component while the line is pressurized.
Stop if: Stop for a corroded or seized valve, active spray, flooding, water approaching electrical equipment, or any fitting that remains pressurized.
Why this matters
Why: A one-sided result narrows the hot or cold supply path. A leak that continues after local faucet stops are closed may be from the drain, faucet body, house-side line, or a failed stop. A seized stop increases the risk of flooding during any repair.
-
Check 3
With the water supply isolated, inspect visible faucet supply nuts, flexible hoses, pull-out or pull-down spray hose connections, and the faucet mounting area. Check for a loose-looking connection, split hose, displaced O-ring, or water tracking from above, without forcing a connector.
Expected result: A supply-hose connection is wet; a spray hose or sprayhead connection is wet only during use; a connector or O-ring is visibly damaged; or the faucet connections are dry while the drain area wets.
Next step: Use the exact Kohler model guide for a clearly identified connector or have a plumber replace the correct hose or seal. Do not substitute a connector by appearance or overtighten a plastic or quick-connect fitting.
Stop if: Stop for a split hose, damaged connector, faucet-body crack, fitting that spins, active leakage after a gentle correction, or any need to disassemble a pressurized connection.
Why this matters
Why: A wet supply or spray connection points toward a model-specific hose, seal, connector, or supply-stop repair. Kohler's troubleshooting examples distinguish these paths; dry faucet connections make a drain, trap, or separate sink leak more likely.
-
Check 4
If the area wets only while the sink drains, inspect the visible drain strainer, tailpiece, trap joints, and waste connections with a bucket underneath. If the bowl itself or sink-to-counter edge is wet, distinguish a rim or seal path from a pipe connection. Do not dismantle the trap unless the exact sink instructions and safe water isolation are clear.
Expected result: Water appears at a trap joint, drain connection, strainer, sink bottom, or countertop edge only during drainage; or the drain area stays dry while the faucet supply is wet.
Next step: Keep a bucket in place, stop using the sink if the leak is active, and arrange plumbing service for a failed gasket, trap, drain connection, or sink seal. Only make a normal, gentle correction when the exact manufacturer procedure identifies the connection and no damage is present.
Stop if: Stop for a cracked drain or sink, a joint that separates, sewage odor or backup, standing water, water damage, or any need to cut, glue, or force piping.
Why this matters
Why: A drain-cycle leak makes a trap, drain fitting, strainer gasket, or sink-body seal more likely than a pressurized faucet supply. A wet sink bottom or rim may require sink or sealing work rather than a pipe fitting. A dry drain during testing shifts attention back to the faucet or supply path.
-
Check 5
After an exact model-specific correction or professional repair, reopen the supply slowly and test the faucet, spray function, and drain separately while watching every previously dry paper towel and connection. Leave the cabinet accessible for a final delayed check.
Expected result: All connections stay dry; one connection wets immediately; the leak returns only while using the faucet or draining; or water appears at a different location after reassembly.
Next step: Close the supply again for any returning leak, document the timing and first wet point, and arrange licensed plumbing service instead of adding force, sealant, or an unverified part.
Stop if: Stop for spraying water, cabinet damage, a cracked body or pipe, sewage backup, or a shutoff that cannot isolate the leak.
Why this matters
Why: A dry, separate test supports that the repaired path is sealed. Immediate wetness suggests a connection or seal is not seated. A use- or drain-dependent recurrence identifies the relevant path; water migrating elsewhere means the first apparent source may have been downstream travel.
Use your observations
Decision map
Find the observation that best matches what you see, then follow the next safe action.
-
PATH 01Safety boundary
What you see
Water is present continuously around a faucet supply line or shutoff valve even when the sink and faucet are not being used.
Do this next
Close the affected stop if it turns normally, place a container under it, and arrange a plumber to assess the valve, supply line, or connection.
Why this path and its safety boundary
Safety stop: Do not force a corroded stop or dismantle a pressurized supply fitting.
-
PATH 02Safety boundary
What you see
The cabinet wets only while the faucet is running, and the first wet point is a faucet supply hose, spray hose, sprayhead connection, or quick-connect tee.
Do this next
Keep the supply isolated and use the exact Kohler model guide to identify the correct hose, connector, O-ring, or spray seal; arrange service if the connector is damaged or unclear.
Why this path and its safety boundary
Safety stop: Do not substitute a hose by appearance, force a quick connector, or continue operating a split line.
-
PATH 03Safety boundary
What you see
Water appears at the drain strainer, trap, or waste fitting only when the sink drains, while faucet supply connections remain dry.
Do this next
Stop using the sink until the connection is repaired, keep a bucket under the trap, and have a plumber assess the gasket, drain fitting, trap joint, or pipe damage.
Why this path and its safety boundary
Safety stop: Do not force a joint, cut or glue piping, or continue if wastewater backs up or a pipe separates.
-
PATH 04Safety boundary
What you see
The sink bottom, rim, or faucet mounting area is wet but the visible drain and supply connections are dry.
Do this next
Dry and retest with small amounts of water to confirm the path, then arrange plumbing or sink service for a body, mounting, or seal inspection.
Why this path and its safety boundary
Safety stop: Do not apply new sealant over an unknown leak, loosen mounting hardware under a loaded sink, or continue if the sink is cracked.
-
PATH 05Safety boundary
What you see
The leak returns after a connection was tightened or a model-specific part was installed, or the first wet point remains uncertain.
Do this next
Close the supply, leave the cabinet accessible, and arrange licensed plumbing diagnosis with photos, the sink and faucet models, and the use-versus-drain timing.
Why this path and its safety boundary
Safety stop: Do not keep tightening, add incompatible sealant, or replace multiple parts without identifying the leak path.
-
PATH 06Safety boundary
What you see
Water is spraying, the cabinet is flooding, a hose or sink is cracked, or no local shutoff can safely stop the leak.
Do this next
Use the main water shutoff if safe, protect the cabinet and nearby equipment, and obtain urgent licensed plumbing help.
Why this path and its safety boundary
Safety stop: Do not operate electrical equipment exposed to water or attempt a pressurized repair while the source is uncontrolled.
Helpful context
Understand the symptom
Locate the first wet point before tightening anything
Water can travel along the underside of a sink or cabinet and make a leak appear farther from its source. Dry the area, place paper towels at separate connections, and observe with the faucet off, while it runs, and while the bowl drains. A continuously wet supply line is a different path from a trap or drain that wets only during drainage, and both are different from a pull-out hose connection.
Separate pressurized supply leaks from drain leaks
Close the hot and cold faucet stops only if they are clearly identified and turn normally. If the water stops before the faucet is used, the supply path is more likely; if the cabinet stays dry until the faucet runs or the bowl drains, test the relevant hose, drain, strainer, trap, and connections. Do not remove a drain or supply fitting while water remains pressurized, and remember that water left in a trap can spill even after the supply is closed.
Kohler faucet connections can be model-specific
Kohler's under-deck troubleshooting for a pull-out kitchen faucet separates a supply-hose connection, a damaged supply stop, a spray hose, a sprayhead connection, and a sprayhead seal. Other Kohler faucets can use different hose routing and connectors. Use the exact model guide or parts diagram rather than treating every leak below a Kohler sink as the same repair.
Protect the cabinet and test slowly
Keep a bucket or towels under the suspected source and remove standing water so cabinet damage is visible. After a model-specific correction or professional repair, reopen the supply slowly and watch every connection, including the faucet hoses, drain, trap, and sink-to-counter area. If a connection immediately wets again, close the water and stop instead of adding more force or sealant.
Only after diagnosis
Potential parts
- Kohler model-specific faucet supply or spray hose
Consider this category only when the first wet point is a faucet supply or spray hose and the exact model documentation identifies the hose or connector.
Match the model, hose routing, connector type, length, and seal arrangement; Kohler faucet configurations vary and a generic hose may not seat correctly. - Kohler model-specific faucet seal, O-ring, or cartridge
Consider this category only when water originates above the sink deck or under the handle and the exact model guide or plumber identifies an internal seal or valve issue.
Confirm the exact model and valve or seal assembly before ordering; do not use a faucet cartridge as a substitute for a drain or supply leak. - sink drain, trap, or strainer gasket and connection hardware
Consider this category only when the leak appears during drainage at a drain, strainer, trap, or waste connection and the correct fitting or gasket is identified.
Match the drain or trap size, connection style, gasket profile, and sink installation; do not cut or glue unknown piping or overtighten plastic fittings.
When checks do not resolve it
Need a professional?
Escalate for continuous supply leaks, use-dependent hose leaks, drain or trap leaks, a wet sink bottom or rim, failed shutoffs, cracked parts, recurring leaks, flooding, or any repair requiring internal faucet, drain, or pressurized fitting work.
Safety scope: The homeowner scope is limited to drying and observing the leak, protecting the cabinet, closing a clearly identified stop that turns normally, relieving faucet pressure, and checking visible connections. Do not work on an uncontrolled pressurized line, force shutoffs or connectors, cut or glue unknown piping, use sealant to hide the source, or dismantle internal faucet parts without the exact model instructions.
Have this ready
- Provide the sink and faucet models if available, first wet point, whether the leak appears when the faucet runs or the bowl drains, whether it is continuous, photos of the cabinet connections, shutoff behavior, hose or pipe markings, and any recent installation or repair.
Common questions
FAQ
How do I find where my Kohler sink is leaking underneath?
Dry the cabinet and place separate paper towels under the supply lines, faucet hoses, drain strainer, and trap. Check once with the faucet off, once while it runs, and once while the bowl drains. The first wet point and timing distinguish a pressurized supply, faucet hose, drain, trap, or sink-body path.
Should I turn off the water before checking a leak under the sink?
Yes. Close clearly identified hot and cold supply stops if they turn normally, then open the faucet briefly to release remaining pressure. If a stop is seized, leaks, or cannot isolate the source, use the main shutoff if safe and call a plumber.
What can cause a Kohler faucet to leak below the deck?
Depending on the Kohler model, the wet point may be a supply-stop connection, supply hose, spray hose, sprayhead connection or seal, or another faucet fitting. Identify the model and use its troubleshooting flowchart; do not assume the leak is the cartridge.
What if the Kohler sink leaks only when it drains?
A leak that appears only while the bowl drains makes the drain strainer, gasket, trap, or waste connection more likely than a continuously pressurized faucet supply. Keep a bucket under the area, stop using the sink if the leak is active, and arrange plumbing service if the connection is damaged or unclear.
When should I call a plumber for a Kohler sink leak underneath?
Call when water sprays or floods, a supply stop will not close, a hose, sink, or pipe is cracked, wastewater backs up, the leak threatens electrical equipment or cabinetry, the source is uncertain, or the leak returns after the exact manufacturer procedure.
Read the exact guide
Official sources
- Widespread Faucet - Quick Connect Supply TeeKohler Assist · Kohler Assist guidance for widespread bathroom-faucet quick-connect tees; other products may use different connectors.
- How to Install a Kitchen Sink Faucet | Step by Step GuideKohler · Kohler installation guidance; installed product manuals and local plumbing requirements control a repair.
- How to Install a Kitchen Sink | Step-by-Step GuideKohler · Kohler kitchen-sink installation guidance; the installed sink and plumbing configuration controls exact repair details.
- Avatar Pull-Out Kitchen Sink Faucet: Faucet Is Leaking Below The DeckKohler · Kohler troubleshooting document for specified Avatar pull-out kitchen faucet models; other Kohler configurations require their own documentation.
- How to Fix a Leaky Sink FaucetKohler · Kohler general consumer guidance for leaky sink faucets; exact faucet model instructions control.
Community feedback
Share a repair observation
Share a plain-text repair observation. Accepted observations are published automatically; this page may take a moment to update.