
On this page
Start here
Quick answer
A Delta sink that leaks underneath must first be separated into a pressurized supply-side leak, a faucet body or mounting leak, a drain-side leak, or water arriving from the wall, countertop, or another appliance. Dry the area, place a paper towel under separate connections, and briefly run water while watching from a safe position; the first wet point matters more than where the puddle collects. Delta's own guidance covers supply and Quick-Snap connections, hose connections under the deck, mounting and seal checks, and model-specific leak parts. Shut off the correct water supplies before any connection work, do not overtighten or pull on a pressurized hose, and stop for a split line, seized valve, fast leak, cabinet or electrical damage, or a source that cannot be isolated. Call a plumber when the leak is inside the wall, at the sink body, persistent after a safe connection check, or requires faucet or drain disassembly.
Before you begin
Safety first
- Owner checks are limited to drying, safe external observation, normal operation of an accessible sink shutoff, model identification, and documentation. A qualified professional must handle failed shutoffs, pressurized repairs, faucet removal or internal parts, concealed plumbing, drain disassembly, wall access, and water-damage or electrical assessment.
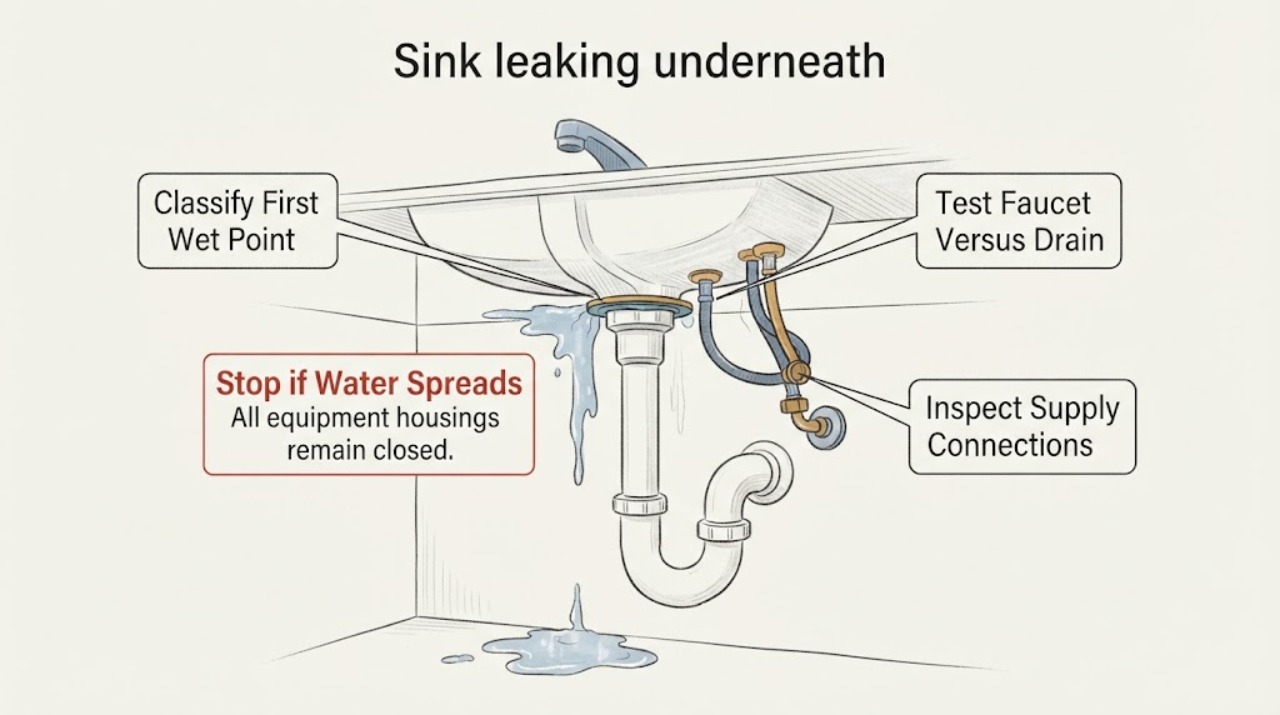
Work through in order
Diagnostic checks
Use only checks that match the exact appliance or system and its official guide.
-
Check 1
Remove stored items from under the sink, dry the visible cabinet floor and exposed connections, and place separate dry paper towels beneath each supply connection, faucet hose or mounting shank, drain flange, trap joint, and cabinet back. With no rapid leak or hazard, run a small amount of water and watch from outside the cabinet.
Expected result: Record the first towel that becomes wet: a hot or cold supply line, faucet hose or base, drain flange or trap, cabinet wall, or an unidentified location.
Next step: Stop the test as soon as a wet point appears, photograph it, and close the corresponding sink supply stops if they operate normally. If the source is rapid, hidden, or uncertain, shut off the broader water supply only if safe and call a plumber.
Stop if: Stop immediately for a spray, fast flow, damaged cabinet, water near electrical equipment, a seized shutoff, or any need to reach behind the wall or appliance.
Why this matters
Why: The first wet point separates pressurized faucet plumbing from drain plumbing and from water arriving elsewhere. A low puddle without a visible first point is not enough to identify a cartridge, hose, gasket, or drain fitting.
-
Check 2
After the area is dry and the supply is available, compare two brief observations without touching fittings: run the faucet into the basin, then stop the faucet and drain the basin. Do not continue if the leak grows quickly or water reaches an outlet, disposal wiring, or another electrical component.
Expected result: Record a leak only while the faucet runs, a leak while the basin drains, a drip even when the faucet is closed and basin empty, or no repeatable leak.
Next step: Close the sink supply stops for a pressurized leak, or avoid using the drain for a drain-side leak, and arrange the corresponding faucet or plumbing service. Do not tighten a connection while it is pressurized or use the wrong sealant.
Stop if: Stop for a continuous stream, water near electrical equipment, sewage-contaminated water, a cracked basin or drain, or a leak that cannot be isolated.
Why this matters
Why: Run-only moisture keeps the faucet body, hose, aerator or sprayer path, and supply connections in consideration. Drain-only moisture points toward the flange, tailpiece, trap, or drain connection. A drip with no water use suggests a pressurized supply or valve-side source.
-
Check 3
With the faucet supply stops closed and the faucet opened briefly to relieve residual pressure, inspect the visible hot and cold hose ends, adapters, shutoff outlets, and any Delta Quick-Snap or clip connection. Look for a hose that is not fully seated, a wet nut, a split or kinked hose, or a missing seal; do not pull hard or overtighten.
Expected result: Record dry and secure connections, moisture at one connection, a hose that moves or is not fully seated, a damaged hose or seal, or a supply stop that will not close.
Next step: If the exact Delta instructions clearly identify a loose accessible connection, reseat or snug it only as directed and recheck with the cabinet dry. Replace a damaged hose or seal only after model identification; call a plumber when the stop fails, the connection is corroded, or the leak persists.
Stop if: Stop for a failed shutoff, corroded or seized nut, split hose, pressurized spray, water near electricity, or any connection requiring force, heat, or wall access.
Why this matters
Why: Moisture at one supply or Quick-Snap connection keeps incorrect seating, a damaged seal, hose damage, or a fitting issue in consideration. A dry supply side shifts attention to the faucet body, mounting area, drain, or another source.
-
Check 4
With supply water isolated and the cabinet dry, inspect the underside of the Delta faucet body, mounting shank, gasket area, pull-down or pull-out hose, hose weight, clips, and sprayer connection without removing the faucet. Look for water tracking from above the counter, a wet mounting seal, hose rubbing, or a connection that leaks only during use.
Expected result: Record a dry base, water descending from the faucet body or deck opening, a wet hose or clip, a loose mounting area, or moisture that begins only when the sprayer or handle is used.
Next step: Keep the faucet isolated and identify the exact model before any part decision. Arrange faucet service for a body, mounting, hose, cartridge, or clip leak; do not disassemble the faucet or apply sealant as a substitute for the correct seal.
Stop if: Stop for a cracked faucet body, water entering the counter or cabinet, a hose that is close to failure, a loose mounting assembly, or any need to remove the faucet or access internal parts.
Why this matters
Why: A leak from the base or deck opening can involve mounting or body seals; use-only moisture can involve a hose or internal faucet path. Delta lists under-deck hose O-rings, cartridges, and other parts by product family, so the observation does not establish fitment.
-
Check 5
For a leak that appears while the basin drains, keep the faucet supply off if possible and inspect the visible drain flange, tailpiece, slip-joint connections, trap, dishwasher branch, and wall connection with dry towels. Do not loosen a slip nut, remove a trap containing unknown water, or pour chemicals into the drain as a leak test.
Expected result: Record moisture at the drain flange, one trap or slip-joint, a dishwasher or side branch, the wall connection, or no drain-side wet point.
Next step: Avoid using the sink if the drain leaks, protect the cabinet from a small cool drip without blocking the drain, and schedule plumbing service for a persistent, corroded, concealed, or sewage-contaminated leak.
Stop if: Stop for sewage odor or contamination, a cracked drain, a wall leak, active flooding, a trap that cannot be safely contained, or water near electrical equipment.
Why this matters
Why: A drain-only leak makes the flange, tailpiece, trap, branch, or wall connection more likely than the Delta faucet supply. A wall-side or concealed leak needs a plumber; a dry drain side shifts attention back to the faucet or supply path.
-
Check 6
Record the Delta model number from a safely visible tag, faucet body, original documentation, or the underside area only if no disassembly is needed. Add the first wet point, whether the leak occurs while running or draining, photos, supply-stop behavior, and any recent installation or service.
Expected result: Record a complete model and symptom record, a model that cannot be found, a leak that changed after a recent installation, or a source that remains unidentified.
Next step: Give the record to Delta support, a qualified faucet installer, or a plumber. Keep the affected supply or sink out of use until the leak is isolated; do not order a part from a generic image or continue operating to collect more evidence.
Stop if: Stop owner troubleshooting when the next step requires faucet removal, internal cartridge work, wall access, drain disassembly, a failed shutoff, or pressurized testing.
Why this matters
Why: Model identity narrows the correct hose, cartridge, seal, mounting, and connection family. A recent installation raises seating, clip, gasket, or connection routing as possibilities; an unidentified source requires plumbing tracing rather than a guessed Delta part.
Use your observations
Decision map
Find the observation that best matches what you see, then follow the next safe action.
-
PATH 01Next step
What you see
A towel wets at a hot or cold supply connection, hose, Quick-Snap fitting, or faucet-side connection while the faucet is closed or running.
Do this next
Close the affected sink supply stop if it works normally, avoid using that faucet, and arrange faucet or plumbing service. Follow Delta's exact model instructions for any accessible reseating; do not overtighten, pull on the hose, or work on a failed shutoff.
Why this path and its safety boundary
Why it matters: A pressurized supply, hose, connection seating, seal, or shutoff issue is more likely than a drain leak.
-
PATH 02Next step
What you see
Water begins only while the faucet or sprayer runs and tracks from the faucet body, deck opening, mounting shank, hose, clip, or under-deck assembly while the drain remains dry.
Do this next
Keep the faucet supply isolated, identify the exact Delta model, and arrange qualified faucet service. Do not remove the faucet, apply sealant, or choose a cartridge or O-ring from the brand name alone.
Why this path and its safety boundary
Why it matters: A faucet body, mounting gasket, hose, clip, or internal seal or cartridge path is more likely.
-
PATH 03Next step
What you see
The supply side stays dry, but water appears only while the basin drains at the flange, tailpiece, trap, branch, or wall connection.
Do this next
Avoid using the sink, contain only a small cool drip without blocking the drain, and schedule a plumber for a persistent, corroded, concealed, or sewage-contaminated leak. Do not use chemicals or loosen an unknown trap as a test.
Why this path and its safety boundary
Why it matters: The drain assembly or concealed plumbing is more likely than the Delta faucet.
-
PATH 04Next step
What you see
The Delta faucet and visible drain connections remain dry, the cabinet floor wets at the wall or side, or water appears after another fixture or appliance operates.
Do this next
Stop using the affected area, photograph the path, and call a plumber to trace and isolate the source. Do not blame the lowest wet point or open the wall as a homeowner test.
Why this path and its safety boundary
Why it matters: A wall supply, dishwasher branch, countertop seam, nearby appliance, or concealed plumbing source is more likely than a Delta faucet part.
-
PATH 05Next step
What you see
The leak is fast, the supply stop will not close, water reaches electrical equipment, the cabinet or sink is damaged, or the source cannot be safely observed.
Do this next
If safe, close the home's main water supply without reaching through water or operating damaged equipment, leave the area as appropriate, and call emergency plumbing or qualified service. Do not continue testing or remove fittings under pressure.
Why this path and its safety boundary
Why it matters: This exceeds a safe faucet observation and may cause water damage, shock, or structural problems.
Helpful context
Understand the symptom
Find the first wet point, not the lowest puddle
Water can travel along a supply line, faucet shank, cabinet floor, or drain pipe before it drips. Dry the visible parts and use separate dry towels around the hot and cold supply connections, faucet hoses, mounting shank, drain flange, trap joints, and cabinet back. Run a small amount of water only when no rapid leak or electrical hazard is present, then stop and isolate the water if the wet point appears.
Supply-side and drain-side leaks behave differently
A supply-side leak can occur even when the faucet is closed because the line remains pressurized. A drain-side leak usually appears when the basin drains, and a faucet-body leak often appears only while the handle or sprayer is running. Delta's resources list under-deck hose and connection components separately from faucet cartridges and other leak parts, so reproduce the symptom only long enough to distinguish those paths.
Do not assume every Delta faucet uses the same connection
Delta faucets can use different hose, supply, mounting, cartridge, and seal arrangements. Delta's support resources recommend identifying the product by model and show that some parts apply only to particular faucet families or connection types. Do not order a cartridge, O-ring, hose, or mounting nut from a photo or brand name alone.
The safe boundary is water isolation and observation
A homeowner can close an accessible, clearly identified sink supply stop, protect the cabinet from a small cool drip, and document the source. A failed shutoff, a hidden or wall leak, a damaged sink, a pull-down hose that needs replacement, or work that requires removing the faucet or trap is a plumbing-service boundary. Do not use sealant, tape, clamps, or overtightening to conceal a pressurized leak.
Safety boundary
Stop conditions
- Stop and isolate water for a fast leak, spray, failed shutoff, split hose, damaged sink or cabinet, water near electrical equipment, or a source that cannot be safely identified.
- Do not loosen, remove, or overtighten a pressurized supply, Quick-Snap fitting, hose, drain, trap, or wall connection; do not use tape, clamps, or sealant to conceal a failing line.
- Do not order a Delta cartridge, hose, O-ring, gasket, clip, or mounting part from a photo or brand name alone; verify the exact model and connection family first.
- Do not open a wall, remove the faucet, disassemble a cartridge, disconnect a trap containing unknown water, or use drain chemicals as a leak test.
- For sewage contamination, active flooding, structural damage, or water contacting electrical equipment, leave as appropriate and obtain urgent qualified plumbing or electrical help.
Only after diagnosis
Potential parts
- faucet supply hose or connection seal
Consider this only when the first wet point is a specific under-deck supply or Quick-Snap connection and inspection confirms a damaged, missing, or incorrectly seated hose or seal.
Confirm the exact Delta model, connection type, hose routing, seal, and installation instructions before ordering; do not substitute or overtighten a pressurized connection. - faucet mounting gasket or seal
Consider this only when water is traced to the faucet deck opening or mounting shank and the faucet body and supply connections are not the source.
Verify exact model, deck thickness, gasket shape, mounting arrangement, and approved installation procedure; faucet removal may require qualified service. - Delta faucet hose, clip, or O-ring
Consider this only when use-only moisture is traced to a specific sprayer hose, clip, or under-deck connection and the exact model parts diagram confirms the component.
Confirm exact Delta model and connection family before replacement; do not use a generic hose, clip, or O-ring based on appearance. - faucet cartridge or internal seal
Consider this only when qualified diagnosis traces a leak to the faucet body or internal cartridge or seal path after supply and mounting sources are excluded.
Confirm exact model, cartridge family, faucet technology, and service instructions; shut off water and use model-specific parts, not a universal substitute. - sink drain gasket, tailpiece, or trap component
Consider this only when the leak occurs during draining and the first wet point is the flange, tailpiece, trap, branch, or a specific drain joint.
Confirm sink and drain configuration, connection sizes, materials, and local requirements before replacement; concealed or contaminated drain work belongs with a plumber.
When checks do not resolve it
Need a professional?
Call a qualified plumber or faucet professional when the leak is persistent, pressurized, inside the wall, at the faucet body or mounting area, at a concealed drain, or requires replacing a hose, seal, cartridge, faucet, shutoff, drain, or trap. Call urgently for a fast leak, failed shutoff, water near electrical equipment, active flooding, sewage contamination, a cracked sink or cabinet, or structural damage.
Safety scope: Owner checks are limited to drying, safe external observation, normal operation of an accessible sink shutoff, model identification, and documentation. A qualified professional must handle failed shutoffs, pressurized repairs, faucet removal or internal parts, concealed plumbing, drain disassembly, wall access, and water-damage or electrical assessment.
Common questions
FAQ
Why is my Delta sink leaking underneath?
The source may be a pressurized supply or hose connection, faucet mounting or body seal, drain flange or trap, wall plumbing, or a nearby appliance. Dry the area and identify the first wet point before choosing a faucet part.
How can I tell whether the leak is from the Delta faucet or drain?
A faucet or supply leak usually appears while the faucet runs or can drip with the faucet closed; a drain leak appears when the basin empties. Use dry towels to separate the paths and stop as soon as a wet point appears.
Should I tighten the Delta connection under the sink?
Only follow the exact Delta instructions for a clearly identified accessible connection after shutting off water and relieving pressure. Do not overtighten, force corroded fittings, pull on hoses, or tighten a failed shutoff or pressurized spray.
What is a Delta Quick-Snap leak?
A Quick-Snap or clip connection that is not seated, has a damaged seal, or has a damaged hose can leak under the deck. Identify the exact faucet model and follow its connection instructions; do not substitute a generic connector or pull hard on the hose.
Can a Delta faucet cartridge cause water underneath the sink?
It can be involved when the faucet body or internal path is the first wet point, but a supply hose, mounting seal, or drain can look similar. Confirm the source and model before considering a cartridge; internal faucet work may require qualified service.
Why does the Delta sink leak only when I use the sprayer?
Use-only moisture keeps the sprayer hose, clip, under-deck connection, faucet body, and internal diverter or seal path in consideration. Keep the faucet off, isolate water if needed, and have the exact model and first wet point assessed.
Why does water appear under the sink when the faucet is off?
Supply lines remain pressurized when the faucet is off, so a supply hose, shutoff, or connection can drip. A drain or nearby source is also possible. Dry and isolate the first wet point rather than assuming the cartridge is responsible.
What if the Delta sink leak is from the drain?
Avoid using the sink and inspect only the visible flange, tailpiece, trap, branch, and wall connection with dry towels. Do not loosen a trap containing unknown water or use chemicals as a test; call a plumber for a persistent, concealed, corroded, or contaminated drain leak.
How do I find the Delta faucet model?
Look for a safely visible model label, tag, documentation, or marking on the faucet body or under-deck area without disassembly. Delta's parts resources use model identification because hoses, seals, cartridges, and mounting arrangements vary.
When is a Delta sink leak an emergency?
Treat a fast leak, failed shutoff, water near electrical equipment, active flooding, sewage contamination, a cracked sink or cabinet, structural damage, or a hidden wall leak as urgent. Isolate water only when safe and call qualified plumbing or emergency help.
Read the exact guide
Official sources
- Delta Faucet Support and Parts ResourcesDelta Faucet Company · Delta official support page used to establish sink-faucet support, leak-resource, parts, warranty, and installer-routing boundaries.
- Find Parts and Identify Your ProductDelta Faucet Company · Delta official parts-identification page used to distinguish leak-related cartridges, under-deck hose O-rings, spout seals, mounting or faucet parts, and model-specific fitment.
- 92627 HIGH-RISE PULL-DOWN TOUCH KITCHEN FAUCETSDelta Faucet Company · Delta installation guide used for general connection and leak-check boundaries; the pictured faucet is model-specific and must not be treated as a universal fit or procedure.
Community feedback
Share a repair observation
Share a plain-text repair observation. Accepted observations are published automatically; this page may take a moment to update.