
On this page
Start here
Quick answer
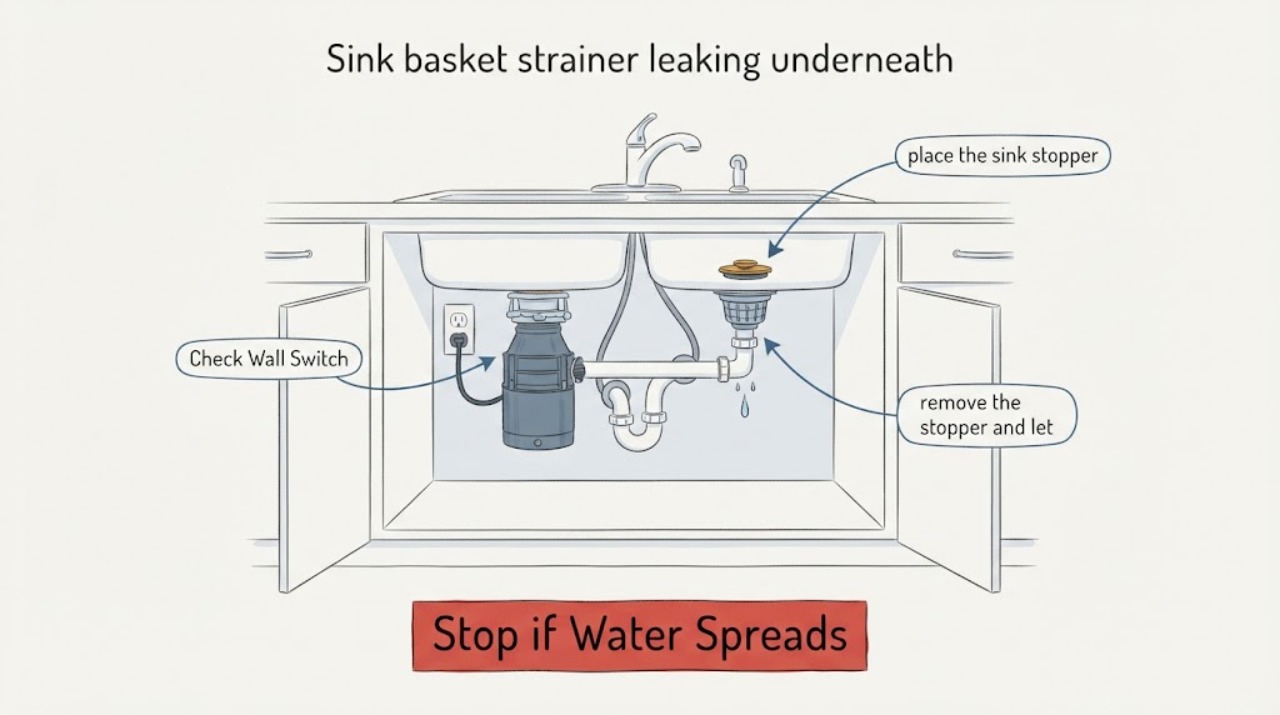
To troubleshoot a sink basket strainer leaking underneath, first empty and dry the cabinet and place a dry paper towel beneath the drain assembly. With the disposal off and no hands near moving equipment, use a brief, controlled test: hold water in the basin, then release it while watching the underside. A leak that starts while the basin is held full points more toward the strainer flange, gasket, or sink-to-strainer seal; a leak that appears only as water drains points more toward the tailpiece, slip joint, P-trap, or downstream connection. Water can travel along a pipe, so the first wet spot matters more than the lowest drip. Do not keep using the sink if water reaches electrical equipment, the cabinet floor is swelling, or the source is hidden. Do not overtighten the locknut or replace the P-trap just because the basket strainer is named; have the exact leak point confirmed before repair or parts selection.
Before you begin
Safety first
- The provider should separate a basket-strainer flange or body leak from a tailpiece, slip joint, P-trap, disposal, faucet, filter, dishwasher, or sink-seam leak. They should inspect the first wet point, use the product-specific installation method, avoid overtightening, and assess cabinet moisture or secondary damage.
Work through in order
Diagnostic checks
Use only checks that match the exact appliance or system and its official guide.
-
Check 1
Empty the cabinet beneath the sink, dry the visible drain assembly, and place a dry paper towel or sheet of newspaper under the strainer body, tailpiece, P-trap, and nearby supply or appliance connections. Keep the disposal switched off and do not put hands inside it.
Expected result: After a short wait, note whether the paper is already wet and identify the highest wet mark, not just the lowest drip. Record whether the moisture is centered under the basket strainer, at a threaded slip joint, on the P-trap, or on a separate hose or faucet line.
Next step: Photograph the first wet point and dry the area again before the controlled fill-and-drain test. If water is near electrical equipment or the cabinet is damaged, stop using the sink and arrange plumbing service.
Stop if: Stop immediately for a stream, exposed wiring, an energized or jammed disposal, sewage backup, contaminated water, a collapsing cabinet, or any need to reach into moving equipment.
Why this matters
Why: An already-wet paper towel means the leak may be continuous or residual, while a dry towel gives a clean baseline. Water can run along a pipe or cabinet surface, so a low puddle does not by itself identify a P-trap or basket-strainer failure.
-
Check 2
With the cabinet dry and the disposal off, place the sink stopper in the basin and add only enough water for a brief leak-location test. Watch the underside around the strainer flange and body while the basin is holding water; do not loosen or tighten anything during the test.
Expected result: Record whether the first moisture appears around the underside of the sink opening or strainer flange before the stopper is removed, whether the basket or body moves, and whether the tailpiece and trap remain dry during the hold.
Next step: Remove the stopper and proceed to the drain-only observation if the area is safe. Give the plumber the timing and exact first wet point; do not assume the P-trap is involved simply because the drip is underneath.
Stop if: Stop if the sink, drain body, cabinet floor, disposal, or electrical equipment shifts, leaks heavily, or becomes unsafe to approach.
Why this matters
Why: A leak during the basin-held stage makes the strainer-to-sink seal, gasket, flange, body, or sink opening more likely. A dry flange during the hold makes a strainer seal less likely, though a very slow leak or water path can still require professional confirmation.
-
Check 3
After drying the area again, remove the stopper and let the basin drain normally while watching the same paper markers. If the sink has two bowls, test the affected bowl separately and do not run the disposal.
Expected result: Note whether the first wet mark appears at the tailpiece connection, a slip nut, P-trap seam, dishwasher branch, disposal mounting area, or another drain fitting only while water is moving through the system.
Next step: Label the exact connection in a photo and stop repeated testing. A P-trap should be considered only when the leak is localized to that trap or its joints; do not buy or replace it based on the words leaking underneath alone.
Stop if: Stop if water backs up, drains slowly enough to overflow, sewage odor or contaminated water appears, the leak reaches electrical equipment, or the source cannot be seen without dismantling the assembly.
Why this matters
Why: A leak that starts only during draining shifts the inspection downstream from the basin-held strainer seal toward the tailpiece, slip joint, P-trap, branch connection, or drain line. If the wet mark begins at the strainer body even during this stage, the flange or body remains in scope.
-
Check 4
Inspect the accessible exterior of the strainer and sink opening without disassembly. Look for a visibly rotated or loose basket body, missing or displaced gasket, corrosion, cracking, movement at the sink flange, mineral tracks, and signs that water is coming from above the drain rather than the drain itself.
Expected result: Record the sink material, strainer brand or model if visible, whether the assembly was recently installed, whether the sink surface around the opening is rough or damaged, and whether a faucet, filter, dishwasher hose, or disposal sits above the wet path.
Next step: Provide these details to a plumber or the manufacturer before selecting a gasket, basket strainer, drain body, or P-trap. Keep the sink use to a minimum until the leak is repaired and the cabinet is dried.
Stop if: Stop if inspection requires removing the locknut, cutting a pipe, using force on seized fittings, lifting a disposal, applying chemical drain cleaner, or touching exposed wiring.
Why this matters
Why: Recent installation, a displaced seal, over-tightening damage, a rough or cracked drain opening, or a separate upper leak changes the likely repair. The visible basket, rubber gasket, drain nut, and tailpiece are distinct components; one cannot be inferred from another.
-
Check 5
Choose the repair scope from the test pattern: strainer flange or body, tailpiece or slip joint, P-trap or downstream drain, or a separate leak source. Give the provider the photos, first wet point, basin-held versus drain-only timing, sink and strainer identifiers, and any cabinet damage.
Expected result: Confirm whether the flange leaked while the basin was held, whether the leak began only as water drained, whether a P-trap joint was the first wet point, and whether any disposal, faucet, filter, or dishwasher connection was above the drip.
Next step: Arrange qualified plumbing service. Ask the provider to inspect the strainer flange and underside hardware, tailpiece and slip joints, P-trap, nearby appliance connections, sink material, and cabinet moisture. Follow the exact product instructions for any confirmed replacement and avoid overtightening.
Stop if: Stop all DIY work if the leak is continuous, the cabinet or sink is damaged, fittings are seized, water is near electricity, sewage is backing up, or the repair requires disassembly beyond a safe and clearly identified connection.
Why this matters
Why: A flange-stage leak supports a strainer seal or assembly assessment; a drain-stage leak supports a downstream connection assessment; a separate upper wet point means the basket strainer may be incidental. A persistent or hidden leak needs a scoped plumbing repair rather than trial-and-error parts replacement.
Use your observations
Decision map
Find the observation that best matches what you see, then follow the next safe action.
-
PATH 01Next step
What you see
The first wet point appears around the strainer flange or body while the basin is held full, before the stopper is removed.
Do this next
Stop repeated tests, document the assembly and sink material, and arrange a strainer-focused repair. Do not rotate the body or overtighten the underside nut while it is still installed.
-
PATH 02Next step
What you see
The flange stays dry during the hold, but the first wet mark appears at a tailpiece slip joint, P-trap seam, or downstream connection as the sink drains.
Do this next
Arrange plumbing service for that connection and avoid replacing the basket strainer or P-trap until the joint is confirmed. Stop use if the leak is worsening or reaches the cabinet floor.
-
PATH 03Next step
What you see
The first wet point is on a faucet base, supply line, filter, dishwasher hose, disposal mounting area, or sink/countertop seam above or beside the strainer.
Do this next
Keep the affected water source off if safely possible, document it, and request the appropriate plumbing or appliance service. Do not dismantle the disposal or pressurize the area to reproduce the leak.
-
PATH 04Next step
What you see
The source cannot be seen, water is continuous or contaminated, the cabinet is swollen, or the leak is near an energized disposal or outlet.
Do this next
Stop using the sink, keep people away from the hazard without reaching into it, and obtain prompt qualified plumbing service. Use emergency assistance for an active electrical or flooding hazard.
Helpful context
Understand the symptom
Find the first wet point before naming the part
The basket strainer sits at the sink opening; below it are the strainer body and gasket or nut, then the tailpiece and usually a P-trap. A drop at the bottom of the trap may have run down from a higher flange or slip joint. A controlled fill-and-drain observation, with a dry paper towel or newspaper beneath each connection, is more useful than assuming the lowest visible drip is the failed component.
What the timing of the leak changes
If water appears around the drain flange while the basin is held full, the strainer-to-sink seal or sink opening deserves attention. If the flange stays dry but water appears only as the basin drains, inspect the tailpiece, slip nuts, P-trap, and downstream connection instead. If the leak is continuous with no water in the basin, also consider a supply line, faucet base, filter, dishwasher hose, or disposal connection dripping from above. These patterns narrow the scope; they do not prove a part has failed.
Protect the cabinet and keep the boundary safe
Stop the test if water approaches an electrical disposal or outlet, the cabinet or countertop is unstable, or the leak becomes a stream. Do not reach into a disposal, use it while investigating, or remove the large locknut and trap just to see what happens. Manufacturer guidance warns against overtightening drain fittings and notes that product-specific gaskets, putty, and components must be matched to the assembly. A plumber should handle persistent leaks, hidden moisture, damaged sink material, seized fittings, or any repair that requires disassembly in a cramped cabinet.
Safety boundary
Stop conditions
- A stream, flooding, sewage backup, contaminated water, or water entering the building or cabinet structure.
- Water near an energized disposal, outlet, exposed wiring, or another electrical hazard; do not reach into the area.
- Any need to run or reach into a disposal, use chemical drain cleaner, cut pipe, lift equipment, or apply force to seized fittings.
- Any need to remove the strainer locknut or P-trap before the leak point is identified and the system-specific method is known.
- A swollen or collapsing cabinet, cracked sink, unstable countertop, or other condition that makes access unsafe.
Only after diagnosis
Potential parts
Only when the flange-stage test and inspection confirm a failed or damaged strainer assembly; match the sink opening, product design, material, and manufacturer instructions.
Only after the exact strainer design and sink material are identified. Product instructions differ on gasket, putty, or sealant, and some materials can be stained or damaged by an unsuitable product.
Only when the drain-only test localizes the first wet point to that downstream joint or trap; do not infer P-trap failure from a leak described generally as underneath.
When checks do not resolve it
Need a professional?
Arrange qualified plumbing service when the leak persists or recurs, the first wet point is hidden or disputed, the strainer or trap is seized, the cabinet or sink is damaged, a disposal or electrical connection is nearby, or a repair requires disassembly.
Safety scope: The provider should separate a basket-strainer flange or body leak from a tailpiece, slip joint, P-trap, disposal, faucet, filter, dishwasher, or sink-seam leak. They should inspect the first wet point, use the product-specific installation method, avoid overtightening, and assess cabinet moisture or secondary damage.
Have this ready
- Exact symptom: sink basket strainer leaking underneath
- Whether the first wet point appeared while the basin was held full or only as it drained
- Photos of the strainer flange, underside body, tailpiece, P-trap, and nearby hoses
- Sink and strainer brand, model, material, and approximate installation date if available
- Whether the sink has a disposal, dishwasher branch, filter, or two bowls
- Cabinet swelling, standing water, odor, sewage backup, or electrical-access concerns
Common questions
FAQ
How do I tell whether the basket strainer or P-trap is leaking?
Dry the cabinet and place paper under each connection. Hold water in the basin and watch the strainer area, then release it and watch the tailpiece and P-trap. A flange-stage leak points more toward the strainer seal or body; a drain-only leak at the trap or its joints puts the P-trap in scope. Water tracking means the first wet mark, not the lowest drip, is decisive.
Can I fix a leaking basket strainer by tightening the large nut underneath?
Do not tighten it blindly. Product instructions use different gasket and sealing arrangements, and overtightening can stress or damage the drain area. First identify whether the flange is actually the first wet point and follow the exact product instructions or use a plumber.
Why does the leak appear only when the sink drains?
Water moving through the tailpiece, slip joint, P-trap, branch connection, disposal, or downstream drain can expose a leak that does not appear while the basin is merely holding water. Watch the first wet point during the drain stage before replacing the basket strainer.
Do I need to replace the whole sink if the basket strainer leaks underneath?
Not necessarily. The strainer assembly, gasket or sealing surface, tailpiece, or trap may be the problem. A cracked or damaged sink opening is a different finding that needs professional assessment; do not assume the sink is ruined from the symptom alone.
Is it safe to keep using the sink while it leaks?
Only for a brief controlled observation if the area is stable and no electrical, flooding, sewage, or cabinet-damage hazard is present. Stop normal use when water is reaching the cabinet floor, stored items, disposal, outlet, or building materials, and arrange plumbing service.
Read the exact guide
Official sources
- Why doesn't my pop-up sink stopper stop the water from draining?Delta Faucet · Delta's page concerns a pop-up drain rather than a kitchen basket strainer; it supports the general flange-versus-drain-body distinction and warns that sealing materials must suit the sink and components.
- Garbage Disposal Leaking from the Mounting AssemblyInSinkErator · The page is disposal-specific, but its paper-test and basin-fill/drain observation method helps distinguish a mounting-area leak from other under-sink sources; it does not diagnose a standalone basket strainer.
- Kraus Kitchen Sink Strainer ST-4 Installation InstructionsKraus USA · ST-4-specific instructions support the distinction between the strainer body, washer, seal, and waste-plumbing connection; other models may use different parts or torque limits.
- Kitchen Strainer Installation Guide ST-1 / ST-2 / ST-3 / BST-1 / BST-2Kraus USA · Kraus product instructions support the described component relationships and product-specific installation boundary; they are not universal instructions for every sink strainer.
- Granite Sink Installation Instructions FRK-Gran-INST-AFranke · Franke installation guidance supports the basin-held versus drain-stage observation and overtightening boundary; exact requirements depend on the sink and drain assembly.
Community feedback
Share a repair observation
Share a plain-text repair observation. Accepted observations are published automatically; this page may take a moment to update.