
On this page
Start here
Quick answer
A dripping discharge pipe on an A. O. Smith water heater usually means the temperature-and-pressure relief valve is opening because of pressure or temperature, not that the pipe itself should be capped. First keep people away from hot water, identify whether the drip is from the pipe end, the relief-valve threads, or the tank connection, and safely shut off gas or electricity and the cold-water supply using the exact model instructions. Intermittent drips during recovery can point to thermal expansion or supply pressure; a large or continuous hot discharge can signal overheating; a leak at the welded tank fitting or a valve that continues to drip after proper diagnosis needs qualified plumbing service. Never plug, cap, block, remove, or bypass the relief valve or discharge pipe.
Before you begin
Safety first
- Do not cap the discharge path, remove or test the relief valve, drain a hot or pressurized tank, adjust pressure or gas controls, work on energized wiring, or restore operation before the tank is full and the relief system is confirmed safe.
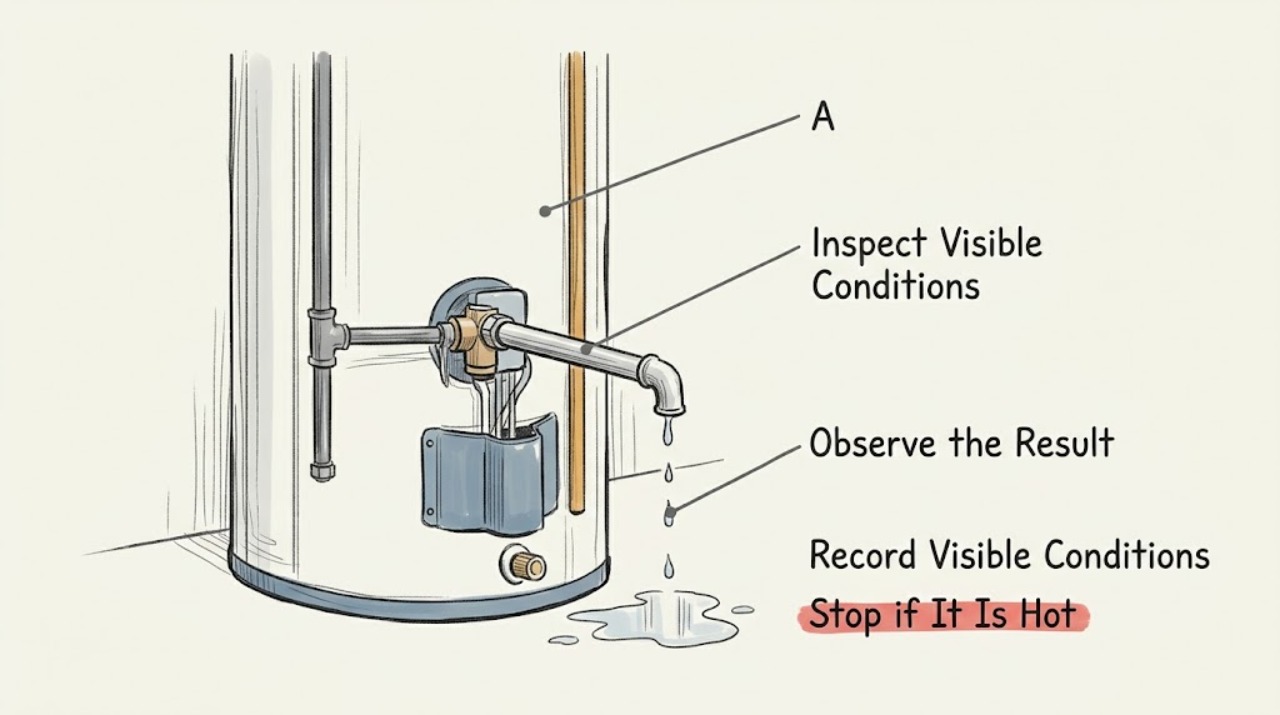
Work through in order
Diagnostic checks
Use only checks that match the exact appliance or system and its official guide.
-
Check 1
Make the area safe before inspecting the discharge pipe. Keep hands and people away from any water, identify whether the heater is gas or electric, and use the exact manual to turn off gas or electrical energy and the cold-water supply only when you can do so safely. If you smell gas, see flame or damaged wiring, hear unusual venting, or cannot reach a shutoff safely, leave the area and contact the appropriate emergency or qualified service provider.
Expected result: The heater and water supply are safely isolated, or hot water, gas, electrical, venting, or access conditions prevent safe isolation.
Next step: Do not touch the valve or discharge pipe when safe isolation is not possible. Protect people and flooring and arrange qualified plumbing or water-heater service.
Why this matters
Why: Isolation limits scalding, gas, electrical, pressure, and water-damage risk. An unsafe or inaccessible shutoff is a stop condition, not a reason to improvise around the relief device.
-
Check 2
From a safe position, identify the first wet point without touching hot surfaces. Dry only accessible surrounding surfaces with a cloth and observe whether water comes from the discharge-pipe end, the relief-valve threads, the valve-to-tank fitting, the drain pan, or another nearby connection. Do not remove insulation, operate the relief lever, or disconnect the pipe.
Expected result: Water exits the pipe end, appears around the relief-valve threads, wets the tank-side fitting, collects at the base, or starts at another pipe or connection.
Next step: Photograph the wet point and keep energy and water isolated. Follow the matching branch below without loosening, capping, plugging, or replacing the relief assembly based on location alone.
Why this matters
Why: A pipe-end drip indicates relief-valve discharge; moisture at the threads suggests a connection leak; a wet tank fitting can be a non-repairable welded fitting; water at the base or another pipe may be a different leak or condensation source.
-
Check 3
Record the timing and amount of a discharge-pipe drip without trying to force a test. Note whether it occurs only while the heater is recovering after hot-water use, at other times with no water use, continuously, or as a large release of hot water. Keep the pipe end unobstructed while observing from a safe distance.
Expected result: The drip is intermittent during recovery, intermittent while fixtures are closed, constant, or a large amount of hot water is discharged.
Next step: Do not cap the pipe or adjust the thermostat as a substitute for diagnosis. Keep the heater isolated and arrange qualified service for constant, large, hot, or unexplained discharge.
Why this matters
Why: Intermittent recovery drips make thermal expansion or supply pressure more likely; a constant drip can mean a relief valve that is not seating or an unresolved pressure condition; a large hot discharge raises concern about excessive temperature or thermostat malfunction.
-
Check 4
Inspect the discharge pipe and termination for obvious external blockage, a cap, a valve, crushing, or a change from the installation described in the exact manual. Check that water has a safe path away from people and electrical equipment, but do not alter the pipe, remove the relief valve, or insert anything into it.
Expected result: The pipe is open and intact, the pipe is capped or blocked, the end is damaged or obstructed, or the discharge path is inaccessible or altered.
Next step: Do not operate the heater with a blocked, capped, damaged, or incorrectly altered discharge pipe. Keep the heater isolated and arrange qualified plumbing service to restore the safety path and diagnose the valve activation.
Why this matters
Why: A blocked or altered discharge path removes the intended relief route and is an immediate safety defect. An intact open pipe does not explain why the valve is discharging; the pressure or temperature cause still needs diagnosis.
-
Check 5
Check for signs of a pressure or thermal-expansion pattern without measuring or adjusting the system yourself: note whether the drip follows a heating cycle while all fixtures are closed, whether the home has a backflow or check-valve condition, and whether a previously installed expansion-control component is present according to the installation records. Do not connect a gauge to the drain valve or alter a pressure-reducing or expansion device as a first check.
Expected result: The drip occurs during recovery in a closed plumbing system, supply pressure is suspected to be high, an expansion component is absent or uncertain, or the drip occurs independently of recovery.
Next step: Have a qualified plumber evaluate system pressure, thermal expansion, and the relief valve together. Do not rely on the relief valve to manage expansion and do not replace it before the underlying condition is assessed.
Why this matters
Why: A. O. Smith associates intermittent relief discharge with thermal expansion and pressure conditions, but a symptom pattern cannot establish the required pressure setting or select an expansion component. Drips independent of heating make a seating, valve, temperature, or other plumbing fault more likely.
-
Check 6
Check the surrounding heater for a separate source before attributing every puddle to the discharge pipe. Inspect only cool, accessible inlet and outlet connections, the drain valve, the tank base, and the pan; also note temporary condensation after a cold refill or startup. Do not remove covers, loosen fittings, or treat a wet tank base as a relief-valve problem.
Expected result: A nearby connection or drain valve is wet, condensation disappears as the heater warms, the tank base remains wet, or only the discharge-pipe end becomes wet.
Next step: Keep energy and water off and arrange the appropriate qualified service for any recurring leak or wet base. Do not replace the relief valve to address water that starts elsewhere.
Why this matters
Why: Runoff, condensation, a drain-valve leak, or an internal tank leak can resemble relief-pipe discharge. A wet base with dry external fittings is a serious tank clue; an isolated wet pipe end keeps relief-valve activation in scope.
-
Check 7
After a qualified repair, verify from the exact manual that the discharge path remains open, all fittings are secure, and the tank is full before normal operation is restored. Observe one normal recovery from a safe position and record whether discharge returns; do not reset, lift, or repeatedly cycle the relief valve to reproduce a drip.
Expected result: The pipe stays dry, intermittent discharge returns, a large hot discharge occurs, the discharge path is blocked, or the tank cannot be confirmed full.
Next step: Keep the heater isolated and call the qualified plumber back for any returning discharge, hot release, blocked pipe, or uncertain tank fill. Never restore operation by capping the pipe or bypassing the relief device.
Why this matters
Why: A dry recovery supports a corrected condition, but returning discharge means the relief, pressure, temperature, expansion, or installation issue remains unresolved. A blocked path or incompletely filled tank creates an immediate safety or equipment risk.
Use your observations
Decision map
Find the observation that best matches what you see, then follow the next safe action.
-
PATH 01Next step
What you see
A few drops emerge from the discharge pipe only during recovery, while the pipe is open and no water is coming from the threads or tank fitting.
Do this next
Have a qualified plumber evaluate pressure, expansion control, and the relief valve together. Do not depend on or block the relief valve to manage expansion.
Why this path and its safety boundary
Why it matters: Thermal expansion or elevated supply pressure is more likely than a pipe defect, but the relief valve may also be reacting to an unresolved pressure condition.
-
PATH 02Next step
What you see
The discharge pipe drips continuously or intermittently even when no recovery is occurring, and the system pressure and expansion condition are unknown.
Do this next
Keep the heater isolated and arrange qualified service. Do not lift the lever, remove the valve, adjust pressure, or replace it without the model-specific diagnosis.
Why this path and its safety boundary
Why it matters: A relief valve that is not seating, debris at the seat, persistent pressure, or another valve condition is possible.
-
PATH 03Next step
What you see
A large amount of very hot water is discharged from the pipe, or the heater is unusually hot or the thermostat is suspected of malfunctioning.
Do this next
Stay clear of the discharge, leave the pipe unobstructed, shut down gas or power only as safely directed by the manual, and arrange urgent qualified water-heater service.
Why this path and its safety boundary
Why it matters: Excessive temperature or a thermostat-related fault is more likely and can create a scalding and pressure hazard.
-
PATH 04Next step
What you see
Water is present around the relief-valve threads or the tank-side fitting rather than at the discharge-pipe end.
Do this next
Do not tighten, remove, or reseal the valve on a hot or pressurized tank. Keep the heater isolated and arrange qualified plumbing service; a welded tank fitting may require replacement of the heater.
Why this path and its safety boundary
Why it matters: A threaded connection leak or a leak at the tank fitting is more likely than relief activation through the pipe.
-
PATH 05Next step
What you see
The discharge pipe is capped, blocked, damaged, has an intervening valve, or cannot drain to a safe termination.
Do this next
Do not operate the heater or attempt to conceal the drip. Arrange qualified service to restore the model- and code-appropriate discharge path and diagnose the relief activation.
Why this path and its safety boundary
Why it matters: The safety relief path is defective regardless of why the valve is dripping, and operation could allow dangerous pressure or temperature to build.
-
PATH 06Next step
What you see
The tank base or pan is wet while the discharge pipe, relief threads, and accessible connections remain dry.
Do this next
Close the water supply, shut down gas or power as safely directed, protect the area, and arrange qualified diagnosis. Do not replace the relief valve to repair a leaking tank.
Why this path and its safety boundary
Why it matters: An internal tank leak or another concealed source is more likely than discharge-pipe dripping; a confirmed tank leak can require replacement.
-
PATH 07Next step
What you see
There is gas odor, a carbon-monoxide alarm, abnormal venting, exposed electrical wiring, uncontrolled water, or uncertainty about safely shutting down the heater.
Do this next
Leave the area and use appropriate emergency guidance for gas or carbon monoxide. Otherwise keep people clear, isolate the heater only when safe, and arrange qualified service; never cap or bypass the relief system.
Why this path and its safety boundary
Why it matters: The condition exceeds a homeowner observation and may involve gas, carbon monoxide, scalding, electrical, pressure, or flooding risk.
Helpful context
Understand the symptom
The discharge pipe must remain open
The pipe attached to the temperature-and-pressure relief valve is not an ordinary drain that can be plugged to stop a drip. It provides a path for water when the heater experiences excessive pressure or temperature. A missing, blocked, capped, bent, or incorrectly altered discharge path creates a serious hazard. Treat the drip as a symptom to diagnose, not as a nuisance to contain.
A safe visual distinction is enough for a homeowner
You can record where and when water appears without operating the relief lever, removing the valve, measuring pressure, or opening a gas or electrical compartment. The useful distinctions are a few drops during a heating recovery, a constant drip, a large hot discharge, moisture around the threaded valve connection, or water at the welded tank fitting. Use the exact A. O. Smith manual for the model and have a qualified plumber handle pressure, temperature, relief-valve, and expansion-system diagnosis.
Safety boundary
Stop conditions
- Never cap, plug, block, bend, remove, or place a valve in the temperature-and-pressure relief discharge path. Do not operate a water heater with a defective or obstructed relief system.
- Do not drain a hot or pressurized tank, lift or remove the relief valve, measure pressure at the drain valve, adjust a thermostat or expansion device, or work on gas or electrical parts as a routine homeowner check.
- Stop immediately for a large hot discharge, gas odor, carbon-monoxide alarm, abnormal venting, exposed wiring, a wet tank base, uncontrolled water, or uncertainty about safe isolation. Arrange qualified plumbing or water-heater service and do not restore operation until the tank and relief path are confirmed safe and the tank is full.
Only after diagnosis
Potential parts
- A. O. Smith temperature-and-pressure relief valve
Consider only when qualified diagnosis confirms the valve itself is leaking or not seating after pressure, temperature, thermal expansion, discharge-path, and tank-fitting causes are addressed.
Relief valves are safety components and must match the exact water-heater model and certified ratings. Never select one from a drip pattern alone. - A. O. Smith thermal expansion tank
Consider only when a qualified pressure and plumbing assessment confirms thermal expansion in a closed system and determines that an expansion tank is required.
Sizing, location, charge, and installation depend on the water system and local requirements. A plumber should confirm the selection and installation. - A. O. Smith pressure-reducing valve
Consider only when qualified measurement confirms excessive supply pressure contributing to relief discharge and a pressure-reducing valve is appropriate for the system.
Pressure controls must suit the home's plumbing arrangement and local requirements. Do not adjust or install one from discharge symptoms without diagnosis. - A. O. Smith relief-valve discharge pipe or fitting
Consider only when qualified service finds the discharge pipe or termination damaged, obstructed, incorrectly altered, or unable to provide the required safe path.
Pipe material, routing, termination, and clearances are model- and code-sensitive. Never substitute a cap, plug, or valve.
When checks do not resolve it
Need a professional?
Arrange qualified plumbing or water-heater service for any continuous or recurring discharge-pipe drip, a large hot release, water at the relief-valve threads or tank fitting, a blocked or altered discharge pipe, suspected pressure or thermal expansion, a wet tank base, a hot or pressurized heater, gas or carbon-monoxide concern, or any leak that returns after inspection. Provide the exact A. O. Smith model and serial information, fuel type, drip timing and amount, first wet point, discharge-path condition, shutoff status, and photos.
Safety scope: Do not cap the discharge path, remove or test the relief valve, drain a hot or pressurized tank, adjust pressure or gas controls, work on energized wiring, or restore operation before the tank is full and the relief system is confirmed safe.
Common questions
FAQ
Why is my A. O. Smith water heater relief valve discharge pipe dripping?
A few drops during a heating recovery can point to thermal expansion or high supply pressure, while a continuous drip can indicate a relief valve that is not seating. A large hot discharge can indicate excessive temperature. Keep the pipe open, do not cap it, and arrange qualified plumbing diagnosis rather than replacing the valve from the symptom alone.
Can I cap or plug the dripping relief-valve discharge pipe?
No. A. O. Smith's manual says the discharge path must not be plugged or blocked because it is the safety route for excessive temperature or pressure. Keep people away from hot discharge, shut down the heater only as safely directed, and arrange qualified service.
Should I replace the relief valve because it is dripping?
Not before the cause is diagnosed. A. O. Smith links relief discharge with pressure, thermal expansion, temperature, threaded connections, and tank-fitting conditions. A qualified plumber should identify the wet point and evaluate the underlying pressure or temperature condition before selecting a correctly rated valve.
Is a large amount of hot water from the discharge pipe an emergency?
Treat a large or very hot discharge as urgent. Stay clear, never block the pipe, and shut down gas or power only when the manual and conditions make that safe. Arrange qualified water-heater service, especially if the heater is unusually hot, a thermostat fault is suspected, or there is a gas, venting, electrical, or carbon-monoxide concern.
Read the exact guide
Official sources
- Water Heater Maintenance Guide | A. O. SmithA. O. Smith · Official A. O. Smith maintenance guidance for residential water heaters; use the relief-valve label and exact model manual for any permitted inspection.
- 320386-002 Smith HW.inddA. O. Smith · Official A. O. Smith instruction manual for the referenced gas water-heater family; exact model documentation controls configuration and startup details.
- Technical Bulletins - Bulletin #52 Leaking Temperature and Pressure Relief ValveA. O. Smith · Official A. O. Smith technical bulletin for temperature-and-pressure relief valve leakage; exact model manual and qualified service control repair work.
- Why Is My Water Heater Leaking? | A.O. SmithA. O. Smith · Official A. O. Smith water-heater leak guide; exact model manual and fuel configuration control inspection and restart procedures.
- Technical Bulletins - Bulletin #45 Thermal ExpansionA. O. Smith · Official A. O. Smith technical bulletin on thermal expansion; pressure measurement and expansion-system work belong to qualified plumbing service.
Community feedback
Share a repair observation
Share a plain-text repair observation. Accepted observations are published automatically; this page may take a moment to update.