
On this page
Start here
Quick answer
Water dripping from a Bradford White water heater's temperature-and-pressure relief (T&P) valve discharge pipe is not a pipe to cap or plug. A brief drip during heating can be related to thermal expansion in a closed water system, while a continuous discharge, very hot water, a valve that will not stop, or a leaking tank can indicate excessive pressure, overheating, a contaminated or failed relief valve, or a more serious water-heater fault. From a safe distance, confirm that the water really exits the relief-valve discharge pipe, note whether it is a brief drip or steady flow, and check only for visible damage, blockage, or water near electrical parts. Do not lift the relief lever repeatedly, remove the valve, loosen fittings, or work around hot, pressurized, gas, or live electrical components. If the discharge continues, the water is scalding, the tank or connections leak, the pipe is blocked, or you cannot safely identify the source, keep clear and arrange qualified plumbing service; use the model's instructions for any fuel or electrical isolation.
Before you begin
Safety first
- This article supports cool, external visual observations only. Relief-valve operation, pressure measurement, thermal-expansion diagnosis, gas controls, electrical compartments, hot-water connections, and valve or tank replacement require qualified service.
Work through in order
Diagnostic checks
Use only checks that match the exact appliance or system and its official guide.
-
Check 1
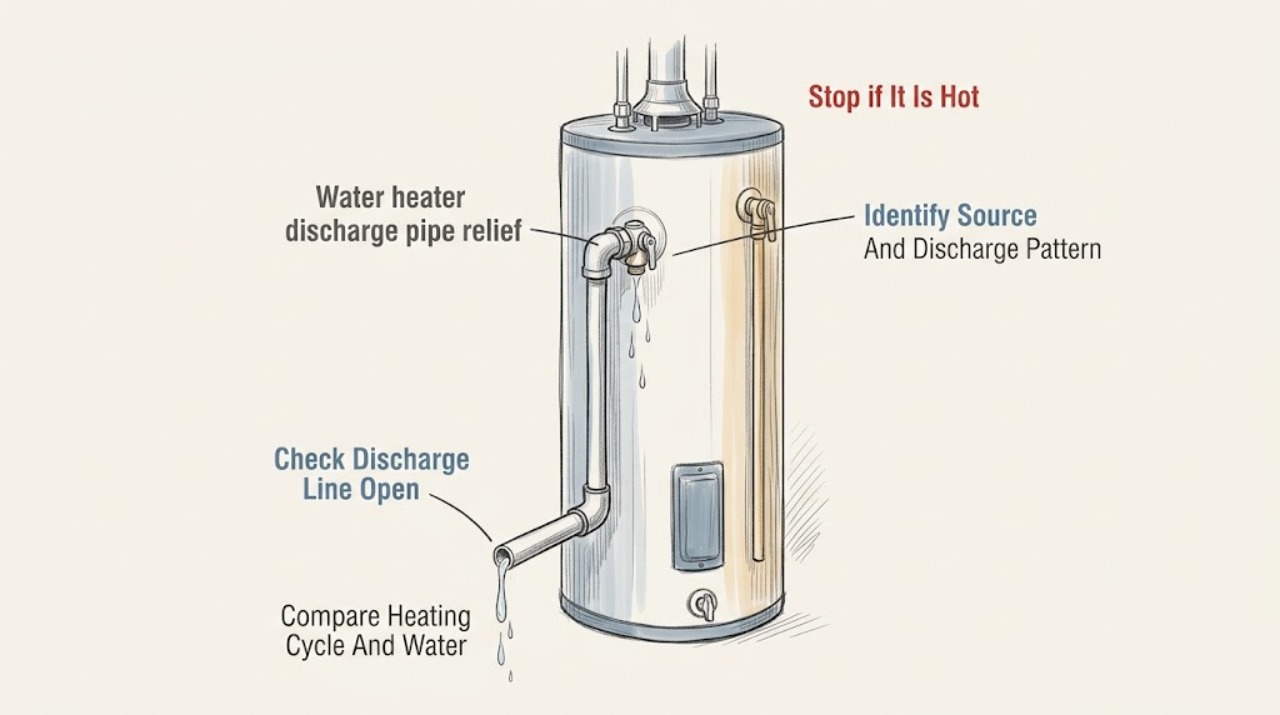
From a cool, dry position, observe the exact first wet point without touching the pipe: the relief-valve outlet, a discharge-pipe joint, another water connection, the drain valve, or the tank itself. Note the water's apparent temperature only by safe visual cues such as steam or rapid evaporation, never by touch.
Expected result: Record whether water exits the open discharge pipe, forms at a threaded joint, appears below the tank, or is near an electrical compartment; record brief drops, intermittent release, or a continuous stream.
Next step: Keep clear, minimize hot-water use, photograph the safe visible pattern if useful, and continue only with the matching visual checks; arrange urgent service for a stream, steam, tank leak, or water near electricity.
Stop if: Do not touch the discharge water or valve, place a hand under the pipe, move the pipe, or remove insulation or covers to find the source.
Why this matters
Why: Water exiting the relief outlet indicates the safety valve is responding or leaking at its seat. A dry relief outlet with a wet joint points toward a plumbing connection. Water at the tank or electrical area can indicate a separate leak or shock hazard and should not be treated as a valve adjustment.
-
Check 2
Visually inspect the accessible discharge line from the relief valve to its termination, looking for a cap, plug, shutoff valve, crushed section, ice, debris, upward trap, or termination that could prevent free drainage; do not attempt to clear an obstruction while the heater is hot or pressurized.
Expected result: Record whether the line is continuously downward and open to a safe drain, or whether its opening is blocked, frozen, submerged, kinked, or directed toward people, electrical parts, or damageable materials.
Next step: Do not cap or modify the line; keep people away from the outlet and have a qualified plumber correct an obstruction, termination, or frozen section and assess why the valve discharged.
Stop if: Do not insert tools, flush the line, add a valve, plug the outlet, or disconnect the discharge pipe.
Why this matters
Why: An obstructed or unsafe discharge path is an installation and safety defect because the valve cannot relieve or drain as intended. A clear open line does not explain away ongoing discharge; the cause may be expansion, excessive pressure, temperature, or valve failure.
-
Check 3
Without changing the thermostat or opening the system, note whether the drip appears during or just after the water heater reheats, after a long period of hot-water use, or at unrelated times; note whether the home has a pressure-reducing valve, backflow preventer, or other closed-system device if that information is safely known.
Expected result: Record a brief recurring drip tied to heating, a steady or increasing release, a drip that continues when the heater is not reheating, or no reliable pattern; record only known plumbing features and do not guess supply pressure.
Next step: Have a qualified plumber measure system pressure and inspect the expansion and pressure-control arrangement; do not adjust the relief valve or thermostat to suppress the symptom.
Stop if: Do not raise or lower the thermostat as a test, bypass backflow protection, disconnect an expansion tank, or use an unverified pressure reading to select a part.
Why this matters
Why: A recurring heating-linked drip in a closed system is consistent with thermal expansion, which Bradford White says may require a properly sized expansion tank or a pressure-reducing arrangement. A continuous or patternless release makes overpressure, overheating, debris, or a relief-valve fault more concerning.
-
Check 4
Read the rating plate from a safe visible position to identify the Bradford White model and whether the unit is gas, electric, or another design; look for scorch marks, corrosion, bulging, damaged insulation, unusual venting, a gas odor, or water contacting wiring without opening any panel.
Expected result: Record the model and serial information if safely visible, fuel type, hot or unusual surfaces, corrosion, tank seepage, gas odor, smoke, or water near electrical parts.
Next step: Keep clear and arrange qualified service; if there is gas odor, smoke, fire risk, or water contacting electricity, follow the appropriate local emergency or utility procedure and isolate only from a safe location.
Stop if: Do not remove access panels, relight a pilot, touch wiring, operate a gas control, or stand in front of the discharge outlet while investigating a hazard.
Why this matters
Why: Fuel type and model determine the safe isolation procedure and the correct relief-valve specification. Corrosion, tank seepage, overheating signs, gas odor, smoke, or water near wiring moves the issue beyond a simple discharge-line inspection.
-
Check 5
Protect the surrounding floor and people from the discharge without restricting the outlet: keep children and pets away, move vulnerable items only if it can be done without touching the hot heater, and record the drip rate and visible source for the plumber.
Expected result: Record whether the water is a few cool drops, hot intermittent discharge, a continuous flow, or accompanied by steam, pressure noise, tank leakage, a burning or gas odor, a repeated electrical trip, or loss of hot water.
Next step: Arrange qualified plumbing service promptly; use the exact Bradford White manual's safe fuel or power shutoff guidance if directed and accessible, and do not restore operation after an unsafe shutdown until the cause is assessed.
Stop if: Do not cap, plug, clamp, tape, wire shut, remove, or manually force the relief valve or discharge pipe to stop water.
Why this matters
Why: A continuous or hot discharge, pressure noise, tank leak, odor, electrical symptom, or worsening flow indicates an active safety or equipment fault. A small intermittent drip still needs evaluation because a relief valve should not be used as the routine control for thermal expansion.
Use your observations
Decision map
Find the observation that best matches what you see, then follow the next safe action.
-
PATH 01Safety boundary
What you see
The open discharge pipe releases a small amount only during or just after reheating, the tank is otherwise dry, and the home has a backflow preventer or pressure-reducing device.
Do this next
Have a qualified plumber verify pressure and the expansion-control setup, while leaving the relief outlet open and untouched.
Why this path and its safety boundary
Why it matters: Thermal expansion in a closed water system is a plausible cause; Bradford White describes this pattern and points to a properly sized expansion tank or suitable pressure-control arrangement.
Safety stop: Do not treat this as permission to cap the pipe, adjust the relief valve, or select an expansion tank from a guess.
-
PATH 02Safety boundary
What you see
Water flows continuously or is very hot, the valve does not stop, the drip occurs outside heating cycles, or the discharge is increasing.
Do this next
Keep clear of the outlet and arrange qualified service promptly; isolate fuel or power only by the model's safe procedure from a dry accessible location.
Why this path and its safety boundary
Why it matters: Excessive pressure or temperature, debris at the valve seat, or a failing relief valve is more concerning than ordinary thermal expansion.
Safety stop: Do not lift the lever repeatedly, replace the valve while hot or pressurized, or block the discharge path.
-
PATH 03Safety boundary
What you see
The discharge line is capped, plugged, frozen, kinked, submerged, or terminates where hot water could contact people, wiring, or property.
Do this next
Keep people away and have a qualified plumber correct the line and inspect the relief system; do not make a temporary plug or valve adjustment.
Why this path and its safety boundary
Why it matters: The relief path has an installation or drainage defect. Restricting it can defeat the pressure-protection function even if the valve itself is not the original cause of the drip.
Safety stop: Do not remove an obstruction with a tool, disconnect the line, or cap the outlet to prevent water damage.
-
PATH 04Safety boundary
What you see
The relief outlet is dry, but water starts at a pipe joint, drain valve, tank seam, or below the heater.
Do this next
Keep the area clear, document the first wet point, and arrange qualified plumbing assessment; protect flooring only without contacting hot parts or restricting the relief line.
Why this path and its safety boundary
Why it matters: This is more consistent with a plumbing connection, drain-valve, or tank leak than a T&P discharge. A tank leak can progress to property damage and is not fixed by changing the relief valve.
Safety stop: Do not tighten hot fittings, remove tank insulation, open panels, or assume the tank is safe because the relief pipe is dry.
-
PATH 05Safety boundary
What you see
There is steam, a gas or burning odor, smoke, scorching, a bulging or corroded tank, water near electrical parts, repeated power trips, or an uncontrolled flow.
Do this next
Move people away, follow local emergency or utility guidance for gas or fire signs, and isolate the heater only from a safe dry position if the model procedure permits; arrange qualified service.
Why this path and its safety boundary
Why it matters: The condition has crossed the ordinary visual-check boundary and may involve scalding, fire, gas, electrical, or pressure hazards.
Safety stop: Do not approach the outlet, touch water near wiring, relight or adjust gas controls, or continue operating the heater to observe what happens.
Helpful context
Understand the symptom
A relief-valve drip is a safety signal, not a nuisance leak
The T&P valve exists to discharge water if tank temperature or pressure becomes excessive. A discharge pipe can therefore carry hot water even when the tank looks normal from outside. Bradford White also describes thermal expansion in a closed system as a cause of periodic discharge. That possibility does not make a continuous drip safe: the pattern, temperature, and exact source determine how quickly to involve a plumber.
Separate the valve outlet from nearby plumbing
The small pipe below or beside the relief valve is the discharge path, but water can also come from a threaded connection, drain valve, hot or cold line, tank seam, or a nearby condensate path on some models. Use a dry visual inspection from a safe position and trace the first visible wet point without touching hot metal or moving the pipe. A wet pipe connection with a dry valve outlet is a different repair decision from water exiting the relief opening.
Never defeat the pressure-protection path
Bradford White installation guidance requires the discharge line to remain open, drain completely, and avoid blockage or freezing; it also says not to place a valve between the relief valve and the tank. Do not cap, plug, pinch, extend into a submerged drain, or otherwise restrict the outlet to stop the drip. Do not test the valve by repeatedly pulling its lever, because hot pressurized water may discharge and a valve that does not reseat needs professional attention.
Safety boundary
Stop conditions
- Never cap, plug, clamp, tape, wire shut, remove, or place a shutoff valve in the relief-valve discharge path.
- Do not touch or manually test a hot pressurized discharge, repeatedly lift the relief lever, loosen fittings, or replace the relief valve while the system is hot or pressurized.
- Stop for continuous or scalding discharge, steam, pressure noise, tank seepage or bulging, gas or burning odor, smoke, scorching, repeated electrical trips, or water near wiring.
- Do not open gas controls, electrical covers, thermostat or heating-element compartments, or sealed tank components as an ordinary-user check.
- Arrange qualified plumbing service when the source is unclear, the valve continues to drip, the discharge line is obstructed or unsafe, or the next step requires pressure, temperature, fuel, electrical, or valve diagnosis.
Only after diagnosis
Potential parts
- Bradford White temperature-and-pressure relief valve
Consider this category only after qualified diagnosis finds a contaminated, damaged, incorrectly rated, or non-reseating relief valve rather than an upstream pressure or temperature cause.
Confirm the exact model, working-pressure rating, temperature rating, discharge capacity, and applicable code requirements; do not substitute a visually similar valve. - Thermal expansion tank or pressure-control component
Consider this category only when a qualified plumber confirms a closed water system and pressure changes consistent with thermal expansion, and sizes the solution for the installation.
Confirm system pressure, water-supply configuration, local requirements, and exact sizing with a qualified plumber; an expansion tank does not replace a relief valve. - Water heater relief-valve discharge pipe or fitting
Consider this category only when diagnosis finds corrosion, damage, blockage, freezing, or an incorrect termination in the discharge path.
Confirm the model manual, local plumbing requirements, heat rating, drainage, and clear open termination; never use a pipe modification to suppress relief discharge.
When checks do not resolve it
Need a professional?
Arrange qualified plumbing service for any continuous or hot discharge, a valve that will not stop, a blocked or unsafe discharge pipe, a suspected thermal-expansion problem, a leak from the tank or fittings, or any symptom involving gas, electricity, steam, severe corrosion, or pressure. The relief valve is a safety device and should not be defeated while waiting for service.
Safety scope: This article supports cool, external visual observations only. Relief-valve operation, pressure measurement, thermal-expansion diagnosis, gas controls, electrical compartments, hot-water connections, and valve or tank replacement require qualified service.
Common questions
FAQ
Why is my Bradford White relief valve discharge pipe dripping?
A brief drip linked to reheating can be consistent with thermal expansion in a closed water system. A continuous, hot, or worsening discharge can indicate excessive pressure or temperature, debris or damage at the valve seat, or another fault. Leave the outlet open and arrange qualified plumbing assessment rather than blocking it.
Can I cap or plug the relief-valve discharge pipe to stop the leak?
No. Bradford White installation guidance requires the discharge path to remain open and drainable and prohibits capping, plugging, or placing a valve between the relief valve and tank. Restricting it can defeat a safety function and create a dangerous pressure condition.
Should I pull the relief-valve lever to clear a drip?
Do not repeatedly operate the lever as a DIY drip fix. The outlet may release hot water under pressure, and a valve that does not reseat or continues releasing water needs qualified service. Follow the exact model manual and keep clear of the outlet.
What does a drip that happens only while the water heater heats mean?
In a closed water system, heating can expand the water and raise pressure enough to make the relief valve discharge intermittently. A plumber should verify system pressure and the expansion-control arrangement; the relief valve remains a safety device and should not be used as routine pressure control.
When is a Bradford White relief-valve drip an emergency?
Treat continuous or scalding discharge, steam, pressure noise, a tank leak or bulge, water near electricity, gas or burning odor, smoke, or an uncontrolled flow as an immediate stop condition. Keep people away, follow local emergency or utility guidance where applicable, and arrange qualified service.
Read the exact guide
Official sources
- 238-55700-00_CurrentBradford White Water Heaters · Bradford White installation and operation manual for the identified model family; exact model manual and local code control the installation.
- Discharging Temperature and Pressure Relief ValvesBradford White For The Pro · Bradford White residential and commercial water-heater guidance; installation and local requirements vary.
- Where can I find the technical documentation for my water heater?Bradford White Water Heaters · Bradford White product-support documentation lookup; availability depends on the model and serial record.
- Beat the Heat and Boost Efficiency: Your Summer Water Heater Maintenance GuideBradford White Water Heaters · Bradford White general maintenance guidance; model-specific manuals and qualified service determine procedures.
Community feedback
Share a repair observation
Share a plain-text repair observation. Accepted observations are published automatically; this page may take a moment to update.