
On this page
Start here
Quick answer
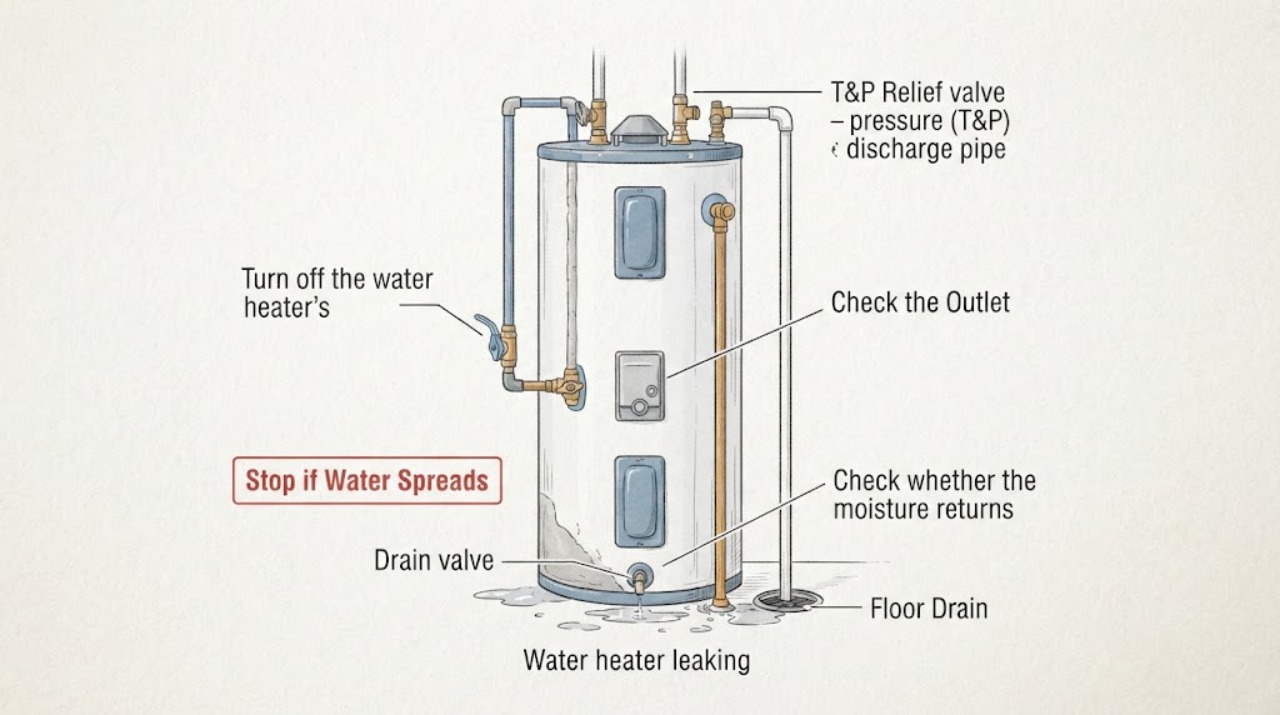
If an A. O. Smith water heater is leaking, turn off its heating source and the cold-water supply to the heater, then keep clear of hot, energized, or gas-fired components. Dry the area and trace the first wet point: water at the top usually points to a pipe or fitting; water at the side or from the temperature-and-pressure (T&P) discharge can involve pressure, temperature, or the relief valve; water at the drain valve can come from a valve that is not fully closed; and water from the tank shell or base often indicates corrosion or an internal tank failure. A. O. Smith also warns that condensation can look like a leak, especially during startup or when cold water enters a gas heater. A short, carefully contained visual inspection is reasonable, but do not cap the T&P discharge, open a hot valve, drain a hot tank, remove covers, relight gas, or work on electrical terminals. A leak that continues after the supply is closed, a large volume of hot water, gas odor, water from the tank body or base, rust, a failed relief valve, or water reaching flooring requires prompt qualified water-heater service; a corroded tank is not a patch repair.
Before you begin
Safety first
- Homeowner checks should remain limited to safely shutting off the heating source and cold-water supply, drying and tracing visible moisture, distinguishing a possible temporary condensation pattern, and documenting visible fittings and damage. A qualified professional should handle T&P, gas, electrical, pressure, drain, tank, vent, and replacement work.
Work through in order
Diagnostic checks
Use only checks that match the exact appliance or system and its official guide.
-
Check 1
Turn off the water heater's heating source and close the cold-water supply valve to the heater from a safe position; for gas odor, smoke, sparks, or water near electrical equipment, leave the area and follow emergency guidance rather than approaching the unit.
Expected result: The flow stops, the supply valve will not close, hot water continues to discharge, gas odor is present, or water is spreading to the floor, wall, ceiling below, or electrical area.
Next step: Keep the heater isolated and arrange urgent qualified service. Use emergency help for fire, gas danger, severe flooding, or immediate electrical danger; do not relight, reset, or repeatedly reopen the supply.
Why this matters
Why: A contained drip is different from an uncontrolled hot-water, gas, electrical, or structural hazard. Closing the water supply does not make the tank or discharge safe to touch.
-
Check 2
Dry the accessible top, sides, drain area, and floor, then place dry paper towels below the inlet, outlet, relief-valve discharge, drain valve, and any visible connection without removing the jacket or insulation.
Expected result: The first wet towel is at a top fitting, relief discharge, drain valve, condensate or flue area, tank seam or jacket, or no new water appears after drying.
Next step: Keep the heating source and supply off while documenting the location. Do not tighten hot fittings or remove panels; arrange service for any tank, relief, drain, or hidden-jacket leak.
Why this matters
Why: The first wet point is more informative than the puddle's final location. Water at a connection may be repairable; water from the tank shell or insulation keeps corrosion or an internal failure in consideration.
-
Check 3
Check whether the moisture returns only during startup or after cold water enters, and whether the heater remains dry after it has safely cooled and the area has been wiped; do not restart the heater just to reproduce a leak.
Expected result: Water appears briefly with startup or burner operation and stops after warming, or water remains or returns while the heater is off and the area is dry.
Next step: If the source remains uncertain, leave the heater off and supply isolated and arrange a professional inspection. Do not use a condensation explanation to dismiss recurring water or a wet tank base.
Why this matters
Why: Temporary condensation is more likely in the first pattern. Continued moisture indicates a true leak, a fitting or valve path, drain or flue condensate, or another nearby water source.
-
Check 4
From a safe distance, inspect the T&P relief-valve discharge pipe and the area around its tank connection for dripping, hot-water spray, corrosion, or a loose-looking threaded connection; do not cap the pipe or operate the relief lever as a test.
Expected result: The discharge is dripping intermittently, a large volume of hot water has discharged, the threaded connection is wet, or the relief path is dry.
Next step: Keep the heater off and arrange qualified service for any relief-valve moisture. Never plug, cap, hold open, or replace the valve with an unverified rating; treat discharge water as scalding.
Why this matters
Why: Dribbling can relate to pressure or thermal expansion, while a large hot discharge can signal excess temperature or a thermostat problem; a wet connection can be a valve or tank-fitting issue. A dry relief path shifts attention elsewhere.
-
Check 5
Visually inspect the drain valve and nearby bottom connections without opening the valve, then compare the wet point with the tank shell, drain fitting, and floor; do not drain a hot tank or attempt to remove a valve.
Expected result: Water is localized at the drain valve or its tank fitting, appears through the jacket or base, or the bottom area is dry after the heater is isolated.
Next step: Leave the supply and heating source off. Arrange service for a drain-valve or tank-fitting diagnosis, and treat water from the tank body or base as a likely replacement-level problem rather than a patch.
Why this matters
Why: A slightly open or faulty drain valve and a leaking tank fitting are different from a tank-shell leak. Water through the base or jacket can indicate internal corrosion or a hidden connection.
-
Check 6
Check only visible top pipe connections, inlet and outlet joints, recirculation or probe connections if present, and the floor for water from another source; do not use force on hot or corroded fittings or disturb gas, electrical, or pressure components.
Expected result: A connection is the first wet point, rust or corrosion is visible, water may be coming from another line, or all accessible connections are dry while the jacket or base is wet.
Next step: Photograph the area and keep the heater isolated. Have a qualified plumber or water-heater technician repair fittings and verify the tank, pressure, relief, and drain conditions before returning it to operation.
Why this matters
Why: A loose external connection may be serviceable, while corrosion, a tank fitting, or water from another source changes the diagnosis. Dry visible fittings do not rule out a hidden tank leak.
-
Check 7
Record the A. O. Smith model, serial and fuel type, first-wet point, whether the supply and heat source were shut off, condensation timing, relief or drain behavior, rust, sounds, water temperature, floor damage, and recent installation or maintenance.
Expected result: Water returns, the tank body or base is wet, a relief valve discharges, a fitting is corroded, the leak cannot be isolated, or the heater is not safe to restart.
Next step: Give the record and safe-distance photos to a qualified water-heater professional and request inspection of supply connections, T&P operation, drain valve, tank shell, pressure/expansion conditions, controls, and water-damage exposure.
Why this matters
Why: The record helps a professional distinguish condensation, pipe or drain connection, relief-valve, pressure, tank, corrosion, or installation causes without guessing at a replacement part.
Use your observations
Decision map
Find the observation that best matches what you see, then follow the next safe action.
-
PATH 01Next step
What you see
Moisture appears only briefly after cold water enters or the burner starts, then stops after the heater safely warms and remains dry.
Do this next
Monitor only after the area is dry and no hazard is present. Arrange service if water returns, remains under the heater, or the source cannot be separated from a fitting or flue path.
Why this path and its safety boundary
Why it matters: Condensation is more likely than a persistent tank leak, but recurrence, a wet base, or water at a fitting still requires further investigation.
-
PATH 02Next step
What you see
Water begins at a top inlet, outlet, or other visible pipe connection while the tank shell and base remain dry.
Do this next
Keep the heat source and water supply off until a qualified person assesses the connection. Do not tighten a hot, corroded, or moving fitting by force or use sealant as a substitute for diagnosis.
Why this path and its safety boundary
Why it matters: An external connection leak is more likely than an internal tank failure, although corrosion can make a fitting unsafe to disturb.
-
PATH 03Next step
What you see
Water drips from the T&P discharge, sprays hot water, or appears around the relief-valve tank connection, especially while the heater operates.
Do this next
Keep the heater isolated and arrange qualified service to determine why the safety valve opened. Never cap the discharge, hold the lever open, or install an unverified valve.
Why this path and its safety boundary
Why it matters: Relief-valve condition, thermal expansion, high pressure, high temperature, or thermostat trouble is more likely than a simple drain-valve leak.
-
PATH 04Next step
What you see
Water is localized at the bottom drain valve or connection, while the tank shell is dry and no hot discharge or gas/electrical hazard is present.
Do this next
Do not open the valve or drain hot water. Keep the heater off and have the drain valve and tank fitting repaired or replaced by a qualified professional.
Why this path and its safety boundary
Why it matters: A drain valve that is slightly open, faulty, or leaking at its tank fitting is more likely than a corroded tank shell.
-
PATH 05Next step
What you see
Water comes through the tank body, jacket, insulation, or base; rust and corrosion are present; the leak continues with the supply closed; or flooring, a wall, or a ceiling below is wet.
Do this next
Keep the heat source and supply off, protect the area from water, and arrange prompt qualified water-heater service and replacement assessment. Use emergency help for gas, fire, severe flooding, or electrical danger.
Why this path and its safety boundary
Why it matters: An internal tank failure, hidden corrosion, uncontrolled stored water, or property-damage condition is more likely than a minor fitting issue.
Helpful context
Understand the symptom
Shut down safely before tracing water
Water heaters combine hot water with gas combustion or high-voltage electrical components. A. O. Smith's leak guidance says to turn off the heating source and cold-water supply before inspection. For a gas unit, avoid ignition sources if gas is suspected; for an electric unit, use the dedicated disconnect or breaker only if it is safe to do so. Closing the supply does not cool the tank, so treat every outlet, relief discharge, and drain as potentially scalding.
Find the highest first-wet point
Water often travels down the jacket or piping before it forms a puddle. Dry the accessible exterior and use separate dry paper towels at the top fittings, relief-valve discharge, side connections, drain valve, and base. A top fitting, side relief path, bottom drain, condensation trail, or tank shell has a different next step. Do not remove the jacket or insulation to chase a hidden leak.
Condensation can mimic a leak
A. O. Smith's condensation bulletin explains that cold incoming water and burner operation can create temporary condensation, especially on gas heaters. If the water disappears after the heater is safely shut down and the area is dried, condensation becomes more likely. If water returns or remains under the heater, continue looking for a loose fitting, valve, tank, or other source; do not assume every puddle is harmless.
Relief-valve water is a safety signal
The T&P relief valve exists to limit dangerous temperature and pressure. A. O. Smith describes intermittent dribbling, threaded-connection seepage, and large hot discharges as different symptoms that can relate to thermal expansion, pressure, valve condition, or thermostat trouble. Never cap or plug the discharge pipe, hold the lever open, or substitute an unverified valve. Have a qualified professional determine why it opened before any replacement.
A tank-shell leak is not a fitting adjustment
If water comes through the tank body, welded seam, insulation, or base even after external fittings are dry, corrosion or an internal tank failure is more likely. A. O. Smith states that a leaking tank cannot be repaired as a fitting leak; replacement planning and water-damage control are the appropriate next steps. The exact conclusion depends on the heater type and model, so preserve the rating-plate information for the technician.
Safety boundary
Stop conditions
- Turn off the heating source and cold-water supply and arrange prompt qualified service for water from the tank body, jacket, insulation, or base; a large hot discharge; a leaking T&P valve; gas odor; smoke; sparks; repeated electrical trips; or water reaching flooring, walls, ceilings, or electrical equipment.
- Do not cap or plug the T&P discharge, hold its lever open, install an unverified relief valve, open a hot drain, remove insulation or panels, relight gas, touch energized terminals, or drain the tank without model-specific safety procedures.
- Do not restart the heater while it is leaking, patch a corroded tank, tighten hot or corroded fittings by force, or assume condensation explains recurring water, rust, or a wet base.
- Arrange service when the leak continues with the supply closed, the first-wet point cannot be isolated, water returns after drying, or safe external checks do not distinguish a connection, valve, condensation, tank, or pressure problem.
Only after diagnosis
Potential parts
- A. O. Smith water-heater drain valve
Consider only when a professional confirms the drain valve or its tank connection is the first wet point and the tank itself is sound.
Match the exact A. O. Smith model, valve connection, drain routing, temperature exposure, and approved replacement method; do not remove a hot or pressurized valve. - A. O. Smith temperature-and-pressure relief valve
Consider only after a qualified technician identifies a defective relief valve and investigates the temperature, pressure, and thermal-expansion reason for discharge.
Match the exact heater model and certified valve ratings; never cap the discharge or install a valve with an incorrect rating. - A. O. Smith water-heater pipe or fitting seal
Relevant only when tracing confirms an external threaded or pipe connection is leaking and the tank fitting is structurally sound.
Confirm the exact connection, materials, temperature and pressure requirements, and model instructions; hot-water plumbing repairs may require a qualified professional. - A. O. Smith storage water-heater replacement tank
Consider only when a qualified inspection confirms tank-shell corrosion, a welded fitting failure, or an internal leak that cannot be repaired as an external connection.
Match the exact model requirements, fuel or electrical service, venting, plumbing, safety controls, capacity, and local installation rules; replacement is professional work.
When checks do not resolve it
Need a professional?
Safety scope: Homeowner checks should remain limited to safely shutting off the heating source and cold-water supply, drying and tracing visible moisture, distinguishing a possible temporary condensation pattern, and documenting visible fittings and damage. A qualified professional should handle T&P, gas, electrical, pressure, drain, tank, vent, and replacement work.
Common questions
FAQ
What should I do first if my A. O. Smith water heater is leaking?
Turn off the heating source and close the cold-water supply to the heater from a safe position. Keep away from hot discharge, gas, and electrical hazards, then dry and trace the first wet point. Do not restart a leaking heater.
Can condensation look like an A. O. Smith water-heater leak?
Yes. A. O. Smith explains that cold incoming water and burner operation can create temporary condensation, especially on gas heaters. If water returns or remains under the heater after the area is dry and the heater is safely off, treat it as a leak that needs further inspection.
What does water from the temperature-and-pressure relief valve mean?
Dripping or hot discharge can relate to pressure, thermal expansion, a relief-valve defect, high temperature, or thermostat trouble. Keep the heater isolated and have a qualified professional investigate. Never cap the discharge or install an unverified valve.
Can a leaking water heater tank be repaired?
If water is coming through the tank body, welded seam, insulation, or base, corrosion or internal tank failure is likely and replacement assessment is usually needed. An external fitting or drain valve may be a separate repair, but a wet tank shell should not be patched or ignored.
Read the exact guide
Official sources
- Why Is My Water Heater Leaking?A. O. Smith · A. O. Smith's general leak guide covers tank and tankless context; exact shutoffs, controls, and service procedures remain model-specific.
- LEAKAGE CHECKPOINTSA. O. Smith · This A. O. Smith manual page lists checkpoints for a particular water-heater family; it is used for source-location reasoning with model-specific caution.
- Water Heater Maintenance ChecklistA. O. Smith · A. O. Smith's maintenance checklist provides general warning-sign and service guidance across water-heater types; model instructions govern exact work.
- TECHNICAL BULLETIN: CONDENSATIONA. O. Smith · The bulletin describes condensation behavior and an isolation check for applicable water heaters; it does not rule out every other water source or model condition.
- TECHNICAL BULLETIN: LEAKING TEMPERATURE AND PRESSURE RELIEF VALVEA. O. Smith · A. O. Smith's technical bulletin explains relief-valve symptoms and causes; the article preserves a professional boundary for hot discharge and valve work.
Community feedback
Share a repair observation
Share a plain-text repair observation. Accepted observations are published automatically; this page may take a moment to update.