
On this page
Start here
Quick answer
A leak that truly emerges from the tank shell, a welded seam, or a welded tank fitting is a structural tank leak, not an ordinary adjustment. A. O. Smith's technical guidance says a confirmed tank leak should be handled by replacing the water heater, and its relief-valve bulletin says a leak at a welded tank spud is not repairable. First keep clear of hot water, gas burners, wiring, and the temperature-and-pressure relief discharge, then use only a dry visual check to distinguish water traveling from a top fitting, drain valve, relief-valve outlet, element gasket, or condensation from water returning directly at the seam. If a dry seam or base becomes wet again, stop using the heater and arrange qualified water-heater service for isolation, removal, and replacement assessment. Do not weld, seal, patch, drill, drain, or open the tank yourself.
Before you begin
Safety first
- This article supports dry, non-contact visual observation only. Do not operate gas, electrical, relief, water-supply, or drain controls to test a seam; do not open panels, drain, move, patch, weld, or repair the heater.
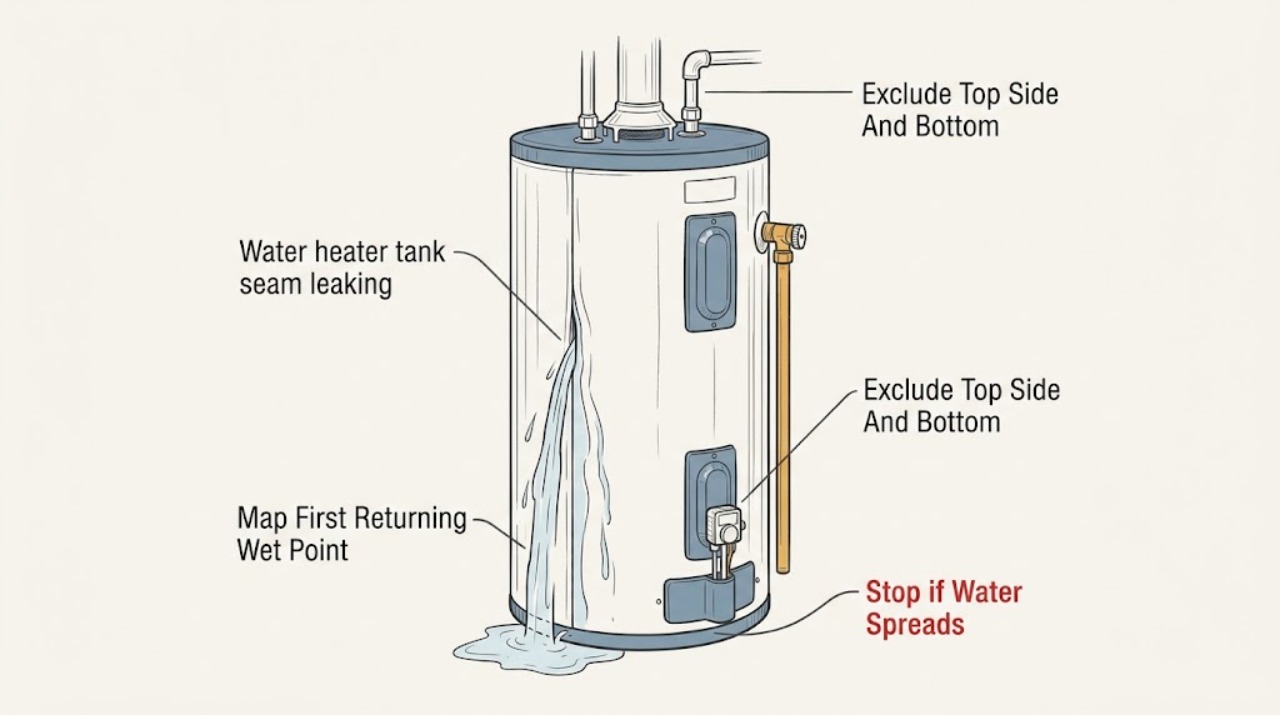
Work through in order
Diagnostic checks
Use only checks that match the exact appliance or system and its official guide.
-
Check 1
From a cool, dry, accessible position, note the water already present and visually trace the highest visible wet point downward without touching the tank, burner, wiring, relief-valve discharge, or fittings.
Expected result: Classify the first visible wet area as a top connection, side relief-valve area, drain-valve area, electric-element cover area, tank wall or seam, base, drain pan, or an unknown path; record whether water is hot, actively flowing, or only damp.
Next step: Photograph the wet point and rating plate, keep people away from hot water, and continue only with the non-contact timing check if there is no gas odor, steam, spray, or electrical-area moisture.
Stop if: Stop immediately for scalding-hot water, active spray, steam, gas odor, hissing, a carbon-monoxide alarm, water near wiring, or a damaged tank or connection.
Why this matters
Why: A wet point above the seam can send water down the shell and imitate a seam leak. Moisture beginning at the tank wall, welded seam, welded spud, or base after nearby points are dry makes a structural tank leak more likely. An unknown path needs professional isolation rather than more disassembly.
-
Check 2
After the visible water is removed only from the floor or pan, observe from a safe distance whether moisture returns only during or shortly after a normal heating or hot-water-use period; do not change the gas control, thermostat, breaker, or water supply to run a test.
Expected result: Record whether the moisture stops after the heater's normal cycle, returns while the tank is idle, or reappears at the same seam or base location regardless of heating.
Next step: If moisture persists or returns at the seam or base, stop using the heater and arrange qualified service; if it disappears and only appears under a repeatable heating pattern, ask a technician to confirm condensation before resuming normal use.
Stop if: Do not manipulate gas controls, open the burner compartment, remove covers, drain the tank, or touch hot surfaces to distinguish condensation from a leak.
Why this matters
Why: Transient moisture associated with heating can be condensation, especially when the cold tank or piping is warmed. Moisture that returns while idle or repeatedly begins at one seam is less consistent with condensation and more consistent with a leak. Timing alone cannot certify a seam or rule out a hidden fitting leak.
-
Check 3
Using only a flashlight and a dry visual check, inspect the outside of the accessible inlet and outlet connections, relief-valve area, drain-valve area, and electric-element cover area if present; do not tighten, remove, or test any valve.
Expected result: Note whether a fitting, relief-valve discharge path, drain valve, element-cover edge, or nearby pipe is the first wet point while the tank seam remains dry.
Next step: Keep the appliance out of service for an active leak and provide the exact location to a technician; do not substitute a fitting repair for a confirmed shell or welded-spud leak.
Stop if: Stop for any discharge from the relief-valve pipe, a hot or pressurized fitting, a gas-valve connection, an element-cover leak, or any need to remove a panel or valve.
Why this matters
Why: A first wet point at a connection or component makes that component more likely than a tank seam, although pressure, temperature, and sealing faults still need qualified diagnosis. If all accessible components remain dry and the seam or base wets again, a structural tank leak becomes more likely.
-
Check 4
If the suspected seam is cool enough to view safely and no water is spraying, compare the seam, welded tank fitting or spud, and the surrounding shell after the area is dry; do not probe, sand, scrape, seal, or pierce the surface.
Expected result: Record whether beads or a wet track originate directly from the seam or welded fitting, whether the wet area recurs when the tank is idle, or whether the seam stays dry while water arrives from above or a valve.
Next step: For a recurring seam or welded-fitting wet point, stop using the heater and arrange replacement assessment; for another source, leave the component untouched and give its location and timing to qualified service.
Stop if: Do not weld, solder, epoxy, caulk, drill, grind, or remove insulation or tank panels, and do not continue operation if water reaches the floor, burner, or electrical area.
Why this matters
Why: A repeatable wet track from the tank shell or welded fitting supports a structural tank leak. A dry seam with water from above makes a connection, relief-valve, drain, element-gasket, or condensation source more likely. Visual evidence does not justify a weld, epoxy, sealant, or pressure repair.
-
Check 5
Read the rating plate from a dry, safe position and record the model, serial number, fuel type, installation location, leak location, and whether the tank is in a pan or near finished surfaces; do not use the plate as permission to order or install a replacement yourself.
Expected result: Note whether the unit is gas, electric, or another configuration, whether the serial number is legible, and whether water is threatening flooring, walls, stored items, wiring, or the burner area.
Next step: Send the model and serial information, photographs, leak timing, and suspected seam location to A. O. Smith support or a qualified water-heater professional; keep the unit out of service until the leak is assessed.
Stop if: Stop for gas odor, a carbon-monoxide alarm, exposed wiring, hot spray, flooding, or any need to enter a confined or wet equipment area.
Why this matters
Why: The model and serial information lets A. O. Smith or a qualified installer identify the correct product and parts path. Fuel type and the water-damage pattern change the isolation and installation requirements. A missing plate or unsafe access increases the service boundary rather than supporting a generic repair.
Use your observations
Decision map
Find the observation that best matches what you see, then follow the next safe action.
-
PATH 01Safety boundary
What you see
The accessible upper fittings and valve areas are dry, but water repeatedly begins at the tank shell seam, tank base, or a welded tank fitting.
Do this next
Stop using the heater and arrange qualified water-heater replacement assessment; provide the model, serial number, fuel type, photographs, and leak timing.
Why this path and its safety boundary
Why it matters: The pattern is consistent with a structural tank leak. A. O. Smith's guidance treats a confirmed tank leak or welded spud leak as not repairable at the tank and directs replacement rather than patching.
Safety stop: Do not weld, patch, epoxy, drain, move, or continue operating the tank while waiting for service.
-
PATH 02Safety boundary
What you see
Water begins at a top pipe connection, relief-valve connection or discharge path, drain valve, or nearby fitting while the seam remains dry.
Do this next
Keep clear of hot discharge and arrange qualified diagnosis; do not loosen the relief valve, cap its pipe, or tighten a hot or pressurized connection.
Why this path and its safety boundary
Why it matters: A component or connection leak is more likely than a shell seam leak, but relief-valve discharge can signal a temperature or pressure condition and should not be treated as a simple loose fitting.
Safety stop: Stop for a large discharge, steam, scalding water, gas odor, or water near electrical components.
-
PATH 03Safety boundary
What you see
Moisture appears only during or shortly after a heating or heavy hot-water-use period, then disappears without a recurring seam or fitting wet point.
Do this next
Ask a qualified technician to confirm the source before relying on the heater; protect the floor and monitor for any return while the unit is idle.
Why this path and its safety boundary
Why it matters: Condensation is possible, but a visual timing pattern does not rule out a concealed leak. The heater should not be modified to reproduce the symptom.
Safety stop: Stop for persistent moisture, a wet seam, a puddle that grows, hot spray, abnormal gas or combustion signs, or any water near wiring.
-
PATH 04Safety boundary
What you see
Moisture starts at an electric-element cover or drain-valve area while the tank shell and seam remain dry.
Do this next
Stop using the heater and arrange qualified service for the component; preserve the visible location and do not remove the cover, element, drain valve, or insulation.
Why this path and its safety boundary
Why it matters: A gasket or drain-valve issue is more likely than tank-shell failure, but both hot water and energized equipment can be present and the component may be pressurized.
Safety stop: Stop immediately for water near wiring, hot discharge, a damaged valve, or an active stream.
-
PATH 05Safety boundary
What you see
The source cannot be isolated, water is spreading, gas odor or hissing is present, a carbon-monoxide alarm sounds, or the leak is near the burner, wiring, or finished building surfaces.
Do this next
Leave the area if gas or combustion danger is suspected, follow local emergency or utility guidance, and arrange qualified service; do not re-enter a hazardous area to collect more evidence.
Why this path and its safety boundary
Why it matters: The situation exceeds ordinary visual troubleshooting and may involve fuel, combustion, electrical, pressure, scalding, or water-damage hazards.
Safety stop: Do not touch controls, valves, wiring, relief devices, or the tank in a gas, steam, flooding, or electrical hazard.
Helpful context
Understand the symptom
A seam leak is different from a fitting leak
Water can run down the outside of a tank and make a sound fitting look like a shell leak. The top connections, relief-valve discharge, drain valve, element gasket on an electric model, and nearby piping need to be separated from moisture that begins at the tank wall or a welded fitting. A dry wipe followed by observation from a safe distance can locate the first returning wet point; it cannot make a structural leak safe to repair.
Condensation can mimic a leak, but a returning seam wet spot changes the boundary
A. O. Smith explains that condensation can appear around a heater during or after heating, especially when cold water enters or a gas burner operates after inactivity. If moisture disappears after the heater's normal cycle and no fitting or seam becomes wet again, condensation remains possible. If water returns at the seam, tank base, or welded spud, treat it as a tank failure and arrange service instead of repeating a heating test.
Gas, electric, pressure, and scalding hazards are service boundaries
Tank water can be very hot, and a gas model adds flame and combustion hazards while an electric model adds energized wiring. The temperature-and-pressure relief valve is a safety device, not a seam repair point. Do not remove its discharge pipe, test or force its lever, open the burner or electrical compartment, or loosen a pressurized fitting while looking for the leak. A technician can isolate the fuel, power, and water supplies and determine whether replacement is required.
Safety boundary
Stop conditions
- Do not weld, solder, epoxy, caulk, patch, drill, grind, or pierce a tank seam, shell, or welded fitting.
- Do not drain the tank, remove the relief valve, cap its discharge, open burner or electrical panels, or loosen hot or pressurized fittings as a troubleshooting step.
- Stop for gas odor, hissing, a carbon-monoxide alarm, steam, scalding water, active spray, flooding, or water near wiring or the burner.
- Stop using the heater when water returns from the tank shell, seam, base, or welded fitting; a confirmed tank leak needs replacement assessment.
- Keep people away from water-damaged floors and equipment, and arrange qualified service when the leak source is concealed or the unit cannot be observed from a dry, safe position.
Only after diagnosis
Potential parts
- replacement A. O. Smith tank water heater
Consider a replacement heater only when a qualified diagnosis confirms leakage from the tank shell, seam, base, or welded fitting, or determines that the tank is otherwise beyond repair.
Use the exact model, fuel type, capacity, venting, connections, installation requirements, and local code review; A. O. Smith requests serial-number information for appropriate parts guidance. - temperature-and-pressure relief valve
Consider this category only if a qualified diagnosis finds the relief valve or its threaded connection is the leak source and the tank shell and welded seam are intact.
Confirm the exact heater model and valve ratings with the manufacturer or qualified professional; never cap, bypass, or substitute the safety device by appearance. - water heater drain valve
Consider this category only if the leak is isolated to the drain valve and a qualified professional confirms that the tank and drain connection are sound.
Confirm the exact tank connection and service procedure; draining or replacing a valve involves hot water and pressurized equipment. - electric-element gasket
Consider this category only for an electric model when a qualified diagnosis confirms leakage at the element gasket and the tank shell and seam are intact.
Confirm the exact heater model and element assembly; electrical isolation, draining, and resealing should be handled by a qualified professional.
When checks do not resolve it
Need a professional?
Arrange qualified water-heater service immediately for a recurring seam, shell, base, or welded-fitting leak; any water near the burner, wiring, relief discharge, or finished building surfaces; gas odor, hissing, steam, scalding water, flooding, or a carbon-monoxide alarm; or any source that cannot be isolated by safe visual observation. A tank-body or welded-spud leak is a replacement boundary, not a user patch or weld repair.
Safety scope: This article supports dry, non-contact visual observation only. Do not operate gas, electrical, relief, water-supply, or drain controls to test a seam; do not open panels, drain, move, patch, weld, or repair the heater.
Common questions
FAQ
Can an A. O. Smith water-heater tank seam be repaired?
A. O. Smith guidance treats a confirmed tank leak as a replacement condition, and says a welded tank spud is not repairable. Do not weld, patch, epoxy, or drill the seam; arrange qualified replacement assessment.
How can I tell a tank seam leak from a loose fitting?
From a dry, safe position, trace the first returning wet point without touching the equipment. Water beginning at a top connection, valve, or drain path can run down the shell; water that repeatedly begins at the seam, shell, base, or welded fitting after nearby areas are dry is more consistent with a structural tank leak.
Can condensation look like a water-heater leak?
Yes. A. O. Smith explains that condensation can occur around heating events and may be mistaken for a leak. Do not change gas, power, or thermostat controls to reproduce the symptom; have a qualified technician confirm the source if moisture returns or the seam is wet.
Should I turn off the gas or breaker when the tank seam is leaking?
A leak involving hot water, gas, or electricity is a service boundary. Keep clear of the equipment and follow the installed model's safety instructions or local emergency guidance; do not manipulate controls, valves, wiring, or relief devices if the area is wet, hot, or hazardous. Arrange qualified service.
What information should I give the technician?
Provide the A. O. Smith model and serial number if readable from a dry position, fuel type, photographs of the first wet point and seam, leak timing, water temperature concerns, and any gas odor, hissing, steam, electrical-area moisture, flooding, or floor damage.
Read the exact guide
Official sources
- TECHNICAL BULLETIN: CONDENSATION, BULLETIN 15A. O. Smith · Official A. O. Smith technical bulletin explaining how condensation can resemble a water-heater leak; gas-control operation is left to qualified service in this article.
- Replacement PartsA. O. Smith · Official A. O. Smith replacement-parts page; it does not establish fit for a heater without the exact serial and model information.
- TECHNICAL BULLETIN: PUDDLE ON FLOOR, BULLETIN 51A. O. Smith · Official A. O. Smith technical bulletin for diagnosing water on the floor or in a drain pan around a water heater.
- Why Is My Water Heater Leaking?A. O. Smith · Official A. O. Smith consumer guidance for diagnosing leaks in water heaters; the installed model's manual and qualified service requirements control.
- TECHNICAL BULLETIN: LEAKING TEMPERATURE AND PRESSURE RELIEF VALVE, BULLETIN 52A. O. Smith · Official A. O. Smith technical bulletin for temperature-and-pressure relief-valve leakage and welded tank-spud conditions.
Community feedback
Share a repair observation
Share a plain-text repair observation. Accepted observations are published automatically; this page may take a moment to update.