
On this page
Start here
Quick answer
First find the highest wet point rather than assuming the tank has failed. Water at a threaded connection, drain valve, or fitting can have a different remedy from water emerging through the tank shell; water at the temperature and pressure relief discharge can indicate a relief or pressure condition, and water on a condensing model may be condensate or a blocked drain. Keep clear of hot water and steam, do not operate or cap the relief-valve discharge, and do not open electrical or burner compartments. If water is near electrical parts, the leak is active or spreading, the tank shell is wet, or gas odor is present, stop using the heater and arrange qualified help; leave immediately for gas odor and contact the gas utility or emergency services from outside. If it is safe and dry to reach, close the water heater cold-water shutoff to limit damage, protect the floor, and have a plumber identify the source.
Before you begin
Safety first
- Keep the heater off and the area clear for hot water, steam, forceful discharge, gas odor, smoke, burning odor, arcing, water near electrical parts, or an active spreading leak. Do not remove panels, operate the relief valve, alter the discharge, relight, or perform pressure or energized tests.
Work through in order
Diagnostic checks
Use only checks that match the exact appliance or system and its official guide.
-
Check 1
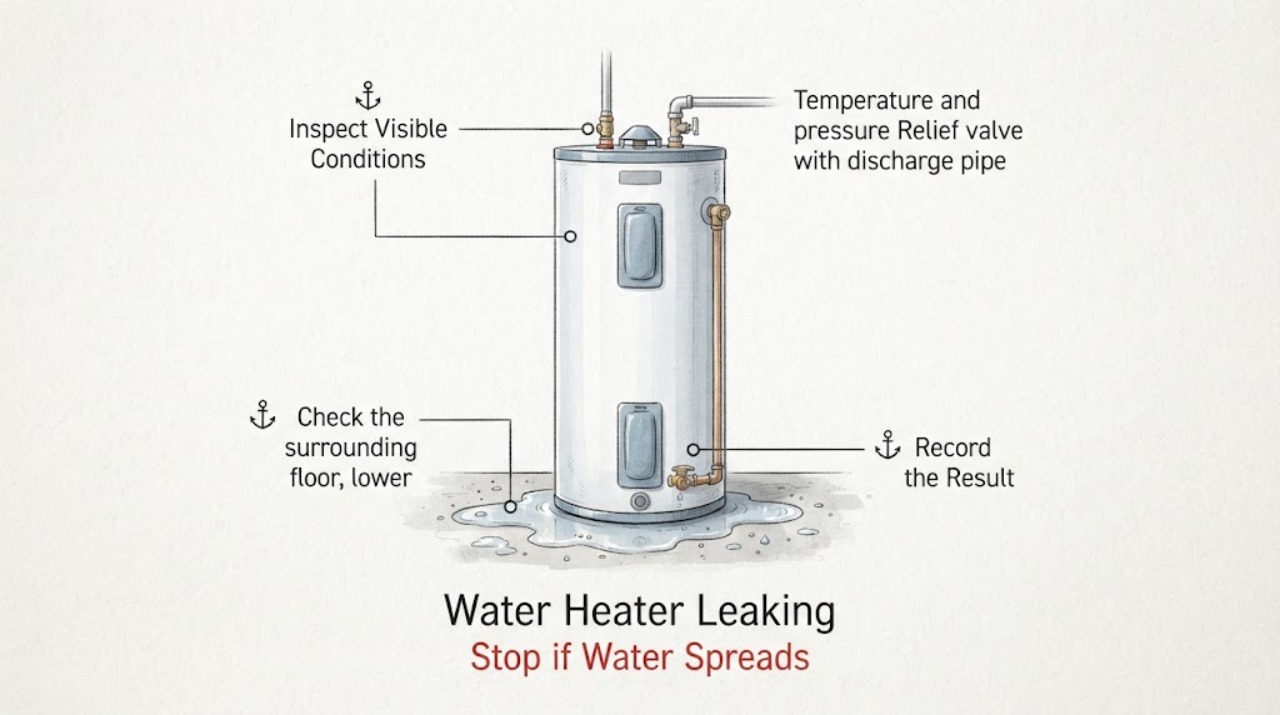
From a dry, stable position, look for the highest fresh wet point and trace only visible water without touching the tank, insulation, relief-valve handle, discharge line, burner area, or electrical cover. Note whether the water starts at a top connection, side seam, bottom valve, relief discharge, condensate drain, pan, or nearby plumbing.
Expected result: Water emerges from the tank shell or seam, appears at a connection or valve, exits the relief discharge, comes from a condensate line, or enters from plumbing above.
Next step: Photograph the location and stop for an active stream, hot spray, steam, or water near electrical parts. Arrange a plumber for the identified path; a wet tank shell generally requires service and replacement assessment rather than a patch.
Why this matters
Why: The location separates a possible connection, drain, relief, condensate, or plumbing leak from a tank-shell leak; water may travel before it drips.
-
Check 2
Check the surrounding floor, lower ceiling, pan, and nearby plumbing for spreading water while keeping feet, hands, and tools out of pooled water. If the heater's cold-water shutoff is clearly labeled, dry to reach, and does not require leaning over hot discharge, close it from the safe side; otherwise leave it alone.
Expected result: The flow slows after the cold-water inlet is closed, continues at the same rate, the pan or floor drain is overflowing, or water is reaching a lower floor or electrical equipment.
Next step: Keep the area clear, contain water only without touching hot or energized equipment, and request prompt plumbing help. If water is near electrical equipment, do not enter the wet area or operate a switch there; use qualified electrical help.
Why this matters
Why: A slower flow suggests the heater's incoming supply is contributing, while continued flow can be stored tank water, a relief or drain path, condensate, or another plumbing source. Spreading water is a property-damage emergency even if the component is uncertain.
-
Check 3
Look at the relief-valve discharge outlet from a safe distance without lifting its handle, removing the valve, capping the pipe, or placing a valve in the discharge path. Note whether water is hot, whether it drips only during heating, and whether the discharge route is visibly blocked, frozen, or directed toward an electrical part.
Expected result: Water is coming from the discharge, the discharge is hot or forceful, it repeats during heating, or the pipe is blocked or improperly terminated.
Next step: Do not test or alter the relief valve or discharge line. Keep people away from the outlet and arrange qualified water-heater service promptly; treat hot spray, steam, or a forceful discharge as an immediate safety issue.
Why this matters
Why: The relief system may be responding to a pressure or temperature condition, or the valve or discharge installation may be faulty. A blocked or capped discharge removes a safety path.
-
Check 4
If the unit is a condensing model, inspect only the visible condensate outlet, trap, and drain path for a loose joint, standing water, kink, or a blocked route. Do not disconnect tubing, pour chemicals into it, or change the drain slope while the heater is operating or leaking.
Expected result: Water is localized at the condensate fitting or drain, the route is visibly blocked, or the tank, relief outlet, and water connections are the first wet points instead.
Next step: Keep the heater off if water is reaching electrical or control parts and have a qualified technician inspect the model-specific condensate route. Do not generalize this check to a non-condensing model.
Why this matters
Why: A condensate drainage problem can mimic a heater leak on applicable models; a tank or relief path points to a different service diagnosis.
-
Check 5
With the heater left closed and undisturbed, inspect the visible cold-water and hot-water connections, drain-valve outlet, and pan edge for fresh droplets or corrosion. Do not tighten, remove, or reseal a connection while it is hot, pressurized, wet near electrics, or difficult to reach.
Expected result: A connection or drain valve is the first wet point, water appears from the tank shell, or no fitting is wet but the pan continues to fill.
Next step: Leave repairs to a qualified plumber, especially for a tank-shell leak or inaccessible connection. Provide the model, fuel type, installation type, photos, and whether closing the cold-water inlet changed the flow.
Why this matters
Why: A visible fitting or drain-valve leak may be isolated by a professional; water from the shell or an unexplained filling pan can indicate internal tank failure or hidden travel.
-
Check 6
Check for a gas odor, smoke, burning smell, arcing, a hot electrical enclosure, or water around wiring and controls without approaching the source. Do not operate electrical switches or controls in a wet area and do not relight or service a burner when gas odor is present.
Expected result: Gas odor, smoke, burning odor, arcing, damaged wiring, or water reaches electrical or burner controls.
Next step: Leave the area immediately for gas odor, avoid flames and switches, and contact the gas utility or emergency services from outside. For electrical wetness or smoke without gas odor, keep clear and obtain emergency or qualified electrical and plumbing help; do not restart the heater.
Why this matters
Why: The leak is now an immediate fire, explosion, shock, or equipment hazard, not a fitting-identification exercise.
Use your observations
Decision map
Find the observation that best matches what you see, then follow the next safe action.
-
PATH 01Next step
What you see
Water starts at the tank shell, side seam, or bottom of the tank rather than at a replaceable external fitting.
Do this next
Limit water damage if it is safe, leave the heater off, and arrange prompt qualified assessment for replacement and installation conditions. Protect the floor and any lower level from continued leakage.
Why this path and its safety boundary
Why it matters: An internal tank leak is more likely than a loose connection, and a patch or sealant is not a safe repair path.
-
PATH 02Next step
What you see
Water begins at a top water connection or drain-valve outlet, while the tank shell remains dry and the flow is not hot or forceful.
Do this next
Close the cold-water inlet only from a safe, dry position if accessible, keep the heater undisturbed, and have a plumber identify the fitting and model-specific repair. Do not tighten a hot or pressurized joint yourself.
Why this path and its safety boundary
Why it matters: An external connection or drain-valve path is more likely, although water can still run along the heater before appearing below.
-
PATH 03Next step
What you see
Water comes from the temperature and pressure relief discharge, is hot, or appears repeatedly during heating.
Do this next
Keep clear of the outlet and do not lift, cap, plug, or remove the valve. Arrange qualified service promptly, with emergency caution for steam or forceful hot discharge.
Why this path and its safety boundary
Why it matters: A relief-valve, temperature, or pressure condition is possible; the discharge path is a safety system and must not be blocked.
-
PATH 04Next step
What you see
A condensing model is wet only around its condensate drain or trap, with no wet tank shell, relief discharge, or water connection.
Do this next
Keep water away from controls, do not disconnect or modify the drain, and arrange a qualified technician to inspect the condensate path and operation.
Why this path and its safety boundary
Why it matters: A condensate drainage problem is more likely than a storage-tank leak, but the model-specific route needs confirmation.
-
PATH 05Next step
What you see
The first wet point cannot be found, water continues after the cold-water inlet is closed, or water is spreading to a pan, floor, wall, or lower level.
Do this next
Keep people away from hot or pooled water, contain it only from a safe dry position, and request prompt plumbing service. Use qualified electrical help if water is near energized equipment.
Why this path and its safety boundary
Why it matters: Stored tank water, a relief or drain path, condensate, or another plumbing leak may be involved, and property damage is increasing.
-
PATH 06Next step
What you see
Gas odor, smoke, burning odor, arcing, or water reaches wiring, controls, or a burner compartment.
Do this next
Leave immediately for gas odor and call the gas utility or emergency services from outside. Otherwise keep clear and call qualified emergency help; do not operate switches, relight, or restart the heater.
Why this path and its safety boundary
Why it matters: The condition presents an immediate fire, explosion, shock, or burn risk.
Helpful context
Understand the symptom
A water heater leak is a location diagnosis
Dry the floor only from a safe position and watch where fresh water first appears. Water can travel down insulation, pipes, a pan, or the floor before it drips. Record whether the first wet point is a top connection, a side seam or tank shell, the relief-valve discharge pipe, the bottom drain valve, a condensate fitting, or plumbing above the heater. Take a photo from outside the hazard area and note whether the flow changes while the heater is heating or when hot-water fixtures are used. Bradford White says leakage from the tank, water-line connections, or relief valve must not damage the area around the unit or lower floors, so protect the space below while arranging diagnosis.
Do not treat a relief discharge as an ordinary fitting leak
The temperature and pressure relief valve and its discharge line are safety components. The discharge must remain unobstructed and must not be capped or blocked. Water from that line may be hot, and repeated discharge can be associated with a relief-valve or pressure condition that needs qualified diagnosis. Do not lift the valve handle, remove the valve, add a shutoff, or plug the pipe as a leak fix. Tell the plumber whether water came from the discharge opening and whether it occurs during heating.
Condensing models have another water path
Some Bradford White installations include a condensate drain near the lower part of the unit. A wet condensate fitting or drain line is not the same diagnosis as a tank-shell leak. Do not disconnect the drain or alter its trap while water is flowing. Give the exact model and installation type to the service provider so the condensate route, relief discharge, pan, and tank can be distinguished safely.
Safety boundary
Stop conditions
- Stop immediately for gas odor, smoke, burning odor, arcing, damaged wiring, water near electrical parts, or a hot electrical enclosure. Leave for gas odor and contact the gas utility or emergency services from outside; do not use switches or restart the heater.
- Keep clear of hot water, steam, forceful discharge, or a relief-valve outlet. Do not lift, remove, plug, cap, or obstruct the temperature and pressure relief valve or its discharge line.
- Do not open burner, electrical, or control compartments; do not relight a burner with gas odor; do not make energized checks; and do not tighten or remove a hot or pressurized fitting.
- Stop and request prompt plumbing help for a wet tank shell, active or spreading flow, a pan or lower-floor leak, an unexplained condensate path, or any leak that cannot be traced safely.
Only after diagnosis
Potential parts
- temperature and pressure relief valve
Consider this only after qualified diagnosis confirms that the relief valve or its installation is the source of discharge and the replacement matches the heater requirements.
Relief-valve ratings, openings, discharge requirements, and local code depend on the exact Bradford White model and installation. Do not substitute a valve by appearance or use a cap or shutoff. - water connection gasket or fitting
Consider this only when a plumber confirms a top water connection or fitting is leaking while the tank shell is sound.
Connection materials, seals, dielectric details, and access vary by model and installation. Confirm the exact model and diagnosis before selecting a component. - water heater drain valve
Consider this only when qualified inspection identifies the bottom drain valve as the first wet point and confirms replacement is appropriate.
Drain-valve fit and service method are model- and installation-dependent; the valve must not be opened while hot or pressurized. - condensate drain or trap component
Consider this only for a condensing model after qualified inspection confirms a condensate fitting, trap, or route is leaking or blocked.
Condensate arrangements differ by Bradford White model and installation. Confirm the exact manual and drainage requirements before selecting a component.
When checks do not resolve it
Need a professional?
Request service when the source is not certain, the tank shell is wet, water returns after the inlet is closed, a relief discharge repeats, a connection or drain valve leaks, a condensate path is blocked, or water has reached electrical or burner controls.
Safety scope: Keep the heater off and the area clear for hot water, steam, forceful discharge, gas odor, smoke, burning odor, arcing, water near electrical parts, or an active spreading leak. Do not remove panels, operate the relief valve, alter the discharge, relight, or perform pressure or energized tests.
Common questions
FAQ
Is a leaking Bradford White water heater always a failed tank?
No. Water may originate at a water connection, drain valve, relief discharge, condensate route on applicable models, plumbing above the heater, or the tank shell. Find the highest fresh wet point from a safe position. A wet shell needs prompt qualified assessment and often a replacement decision; do not patch it as a first fix.
Can I close the water supply to a leaking Bradford White heater?
If the cold-water shutoff is clearly identified and dry and safe to reach, closing it can limit incoming flow. Do not lean over hot discharge, enter pooled water, or operate a valve near energized equipment. If the valve is inaccessible or the leak is spreading, keep clear and request prompt plumbing help.
What if water is coming from the relief-valve pipe?
Treat it as a safety-system issue, not an ordinary fitting leak. The water may be hot and repeated discharge can indicate a temperature, pressure, or valve problem. Do not lift the handle, remove the valve, cap the pipe, or add a shutoff. Keep people away and arrange qualified service.
Could condensate look like a water-heater leak?
Yes, on a condensing model. Water localized at the condensate outlet, trap, or drain can have a different cause from water at the tank shell or relief discharge. Do not disconnect or modify the drain; give the exact model and installation details to the technician.
Should I turn a leaking water heater back on to test it?
Do not restart it when water is near wiring or controls, the tank shell is wet, hot water or steam is present, the relief discharge is forceful, or gas or burning odor is present. Keep clear and arrange qualified help. A single safe visual observation is more useful than repeated operation of a leaking heater.
Read the exact guide
Official sources
- 49-50300-2_HiRes.pdfBradford White · Official owner manual for a Bradford White heat-pump water-heater family; exact controls and installation details vary by model.
- Draining a Water HeaterBradford White · Bradford White For The Pro bulletin; it recommends professional help and contains procedures not suitable for an unqualified leak response.
- 238-48384-00_PBradford White · Official Bradford White installation and operation manual; relief and condensate details are model-specific.
- FAQs - Bradford White For The Pro®Bradford White · Bradford White official FAQ; installation requirements remain model- and code-dependent.
Community feedback
Share a repair observation
Share a plain-text repair observation. Accepted observations are published automatically; this page may take a moment to update.